
Billing settings
One page that shapes every invoice, receipt, and pay page – a card-by-card tour.
- Where to find it
- Business profile – your logo and contact block
- Payment methods and the ACH Payment Terms
- Late fees
- Payment reminders and monthly statements
- Automatic card updates (Account Updater)
- Receipts: your copy and the reply-to address
- Invoice numbering & footer
- Coupons
- Payment methods
- Split into payments
- Custom payment fields
- Dual pricing & surcharge
- Failed subscription payments (dunning)
- Test Mode Transactions
Where to find it
Accept Payments → Settings is the one page that shapes every invoice, receipt, pay page, and the virtual terminal. Set a card once and every tool follows. Each card saves on its own and shows Saved when the change is stored; there is no page-level save button.
The page is four groups, in this order. Payments: Business profile, Payment methods with the ACH Payment Terms, Dual pricing, and Payment options. Invoices & estimates: Invoice numbering & footer, Late fees, Split into payments, Coupons, and Custom payment fields. Reminders & delivery: Payment reminders (with monthly statements), Invoice delivery, and Receipts. Developer & testing: the Embedded Virtual Terminal keys and Test Mode Transactions.
Most cards can be changed by the owner and by team members with billing access. Two things are owner-only: accepting the ACH Payment Terms and requesting bank payments.
If a switch will not move or a card shows Locked, that feature is not enabled on your account yet. The text under the switch says what is needed, for example accepting the ACH terms, linking a merchant account, or contacting your rep.
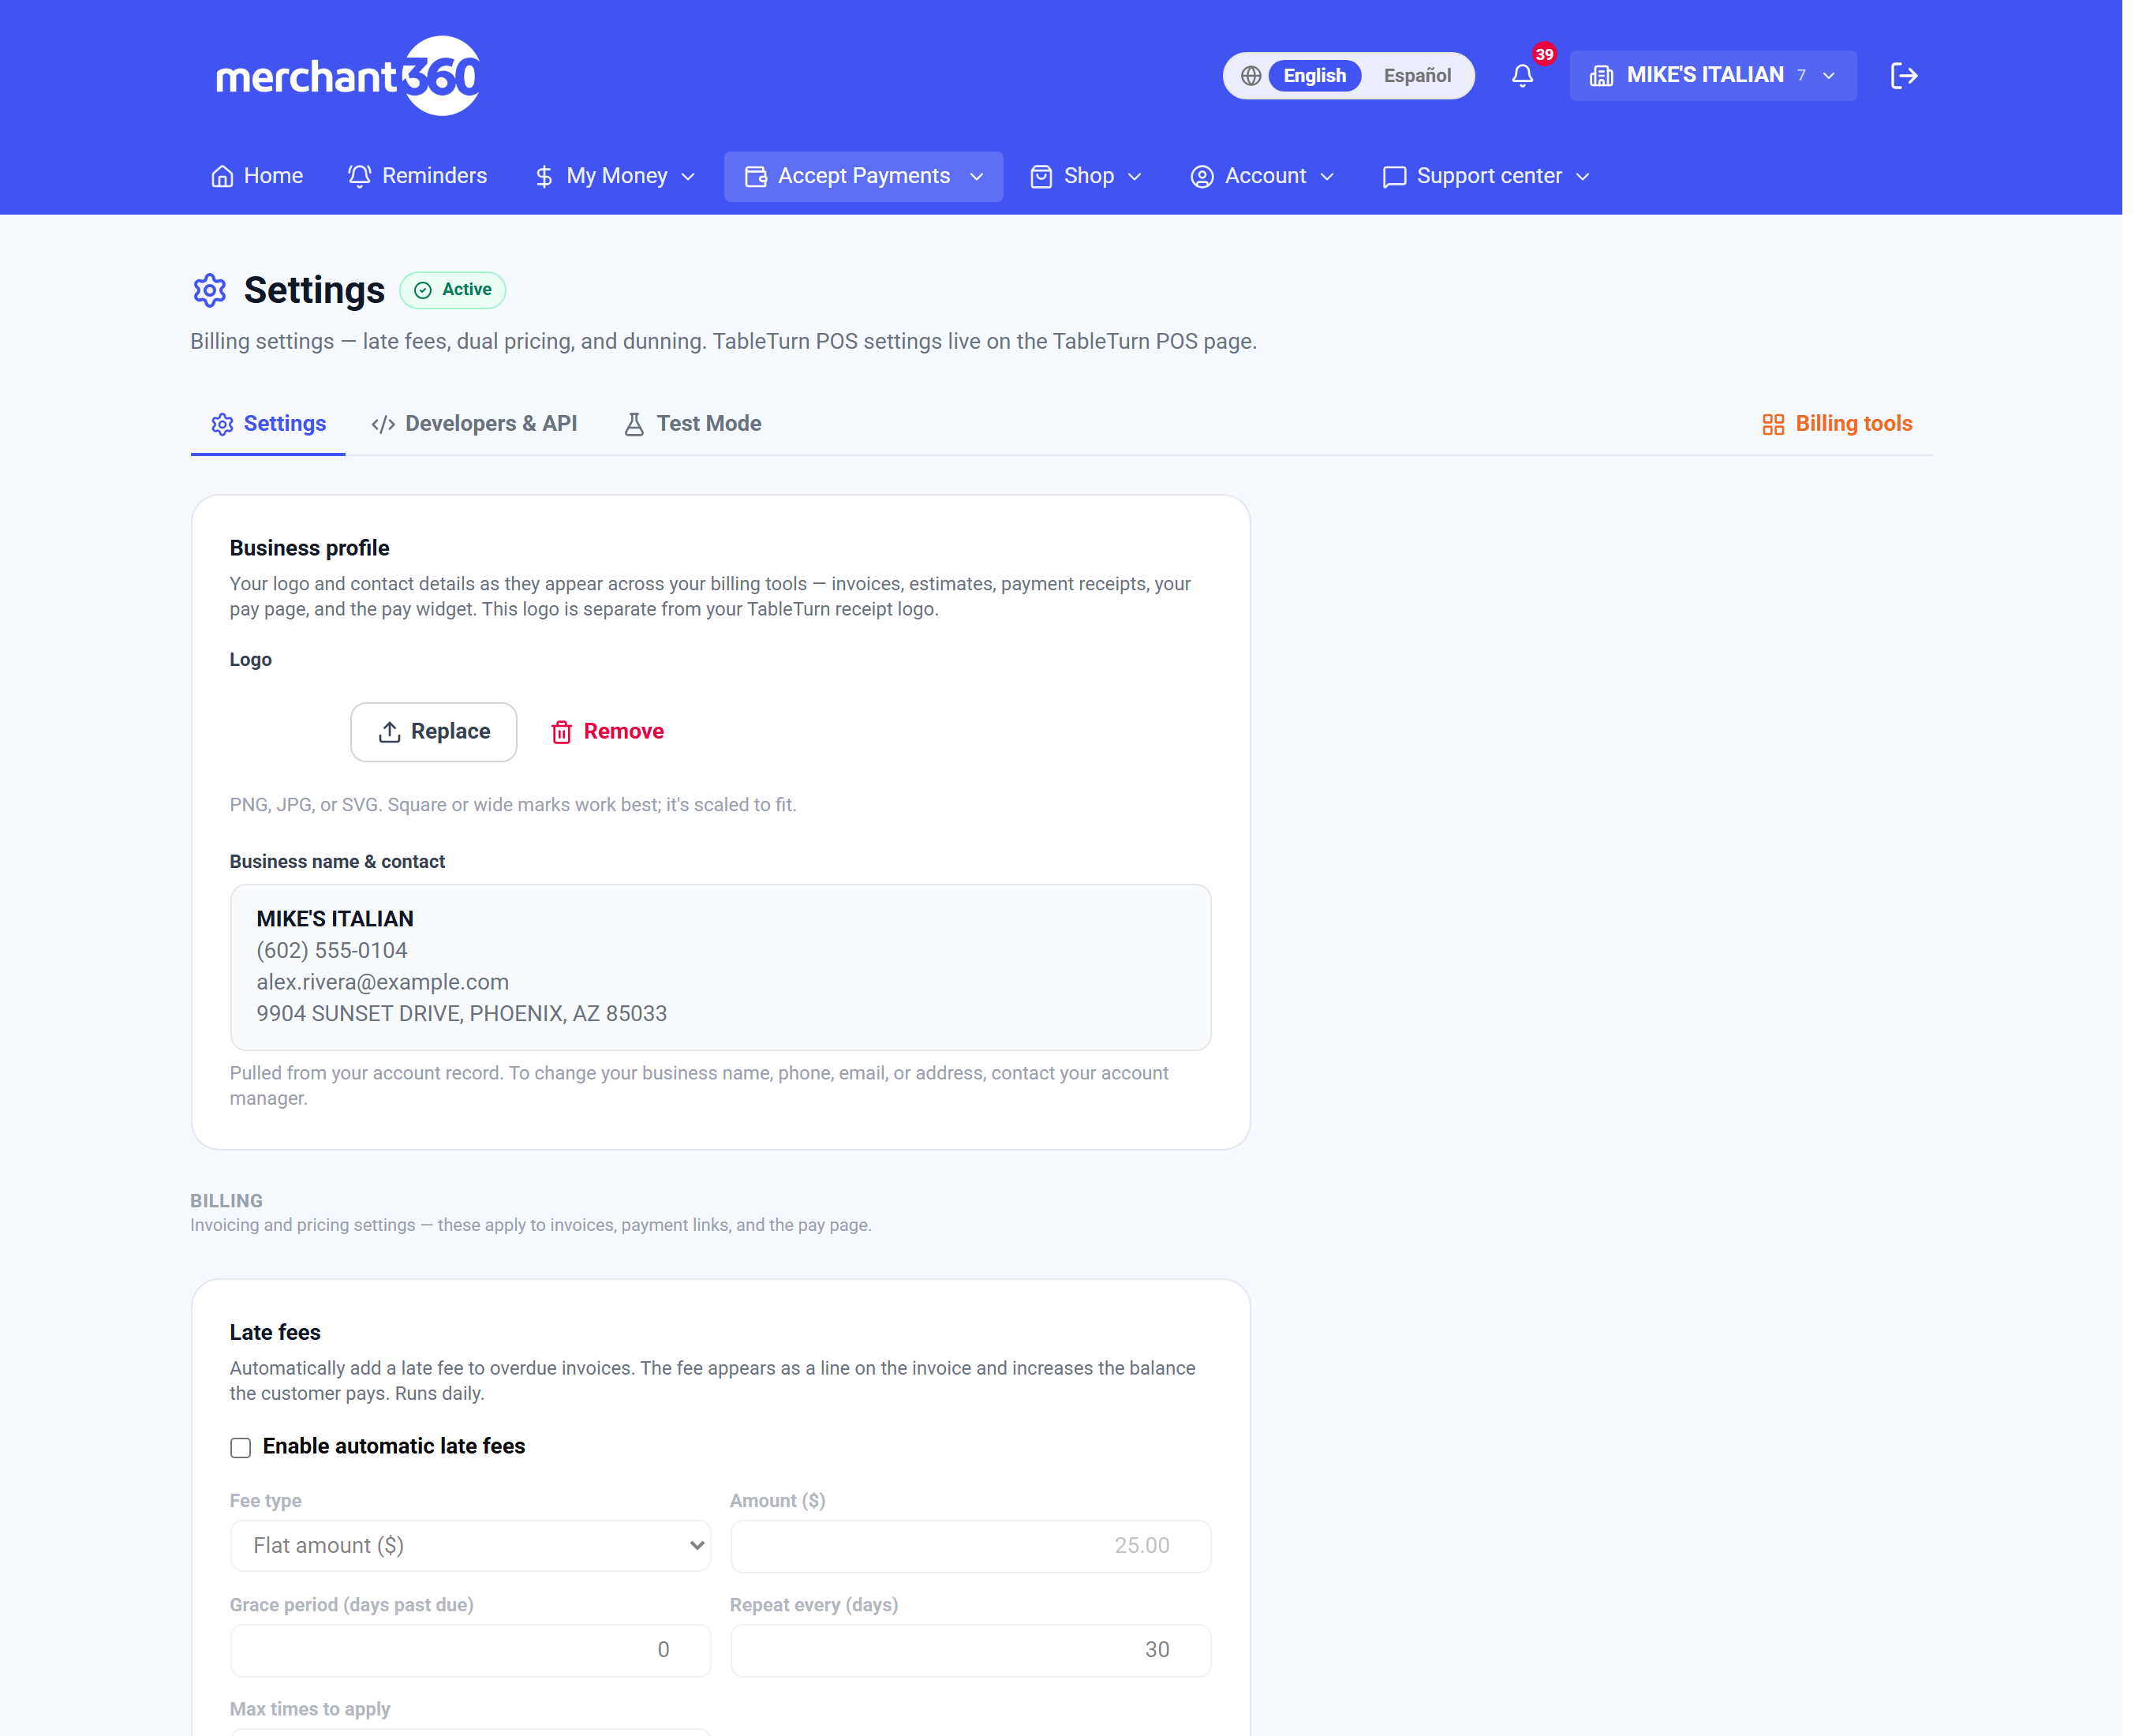
| On this screen | What it does |
|---|---|
| Business profile | Your logo and the name and contact block printed on every document. See the next section. |
| Payment methods | Card, Bank (ACH / eCheck), and Cash/Check switches that decide which ways to pay appear on invoices and pay pages. |
| ACH Payment Terms | Where the owner accepts the terms that unlock bank payments. |
| Dual pricing | Card price and cash price settings. Covered in the Surcharge & dual pricing chapter. |
| Payment options: Allow partial approvals | On, a gift or prepaid card that approves less than the amount keeps the partial amount and you collect the rest another way. Off, a partial approval is reversed in full and the charge shows as declined. |
| Payment options: Offer autopay enrollment on invoices | Adds a checkbox on invoice pay pages that lets customers save their card and pay future invoices automatically on the due date. |
| Payment options: Automatic card updates (Account Updater) | Keeps stored cards current with the card networks. See Automatic card updates below. |
| Payment options: Re-present a returned bank payment | Tries a bank debit again two business days after a return for insufficient or uncollected funds, up to two more times, and emails the customer. On by default. See the Bank payments chapter. |
| Payment options: Check the balance before a bank debit | For bank accounts the customer connected through their bank sign-in, holds back a debit the account cannot cover instead of sending it to be returned. On by default. See the Bank payments chapter. |
| Invoice numbering & footer | Prefixes for invoices and estimates and the footer that prints on every invoice. |
| Late fees | Automatic fees on overdue invoices. |
| Split into payments | Lets customers pay a qualifying invoice in equal card installments. |
| Coupons | Promo codes customers enter on the pay page. |
| Custom payment fields | Extra fields captured with every payment and where they print. |
| Payment reminders | Automatic payment reminders and Automatic monthly statements. |
| Invoice delivery: Attach the invoice PDF | Sends the invoice as a PDF attachment with the pay link. Off sends the link alone. |
| Invoice delivery: Text2Pay | Invoices with a mobile number also go out by text with the pay link, on send and on each reminder. |
| Receipts: Email customers a payment receipt | Receipts after every card payment, and for bank payments both when the debit starts and when it completes. |
| Receipts: Email me when a payment comes in | A payment alert to your notification recipients for every paid invoice or link. Bank payments alert at initiation and again at settlement. |
| Receipts: Receipt footer message | Text shown at the bottom of every emailed receipt, such as a thank-you note or return policy. |
| Embedded Virtual Terminal | Generate embed key issues a key that lets another software product host your virtual terminal in a frame, limited to the website domains you list. Revoke stops it. The key is shown once. |
| Test Mode Transactions | View test transactions opens your sandbox ledger. See Test Mode Transactions below. |
Business profile – your logo and contact block
The Business profile card is your identity on every document: your logo plus the business name, phone, email, and address customers see on invoices, estimates, emailed and PDF receipts, statements, your hosted pay page, and the pay widget.
Upload the logo once. PNG, JPG, or SVG work; a square or wide mark on a white or transparent background looks best because it is scaled to fit. This logo is separate from your TableTurn receipt logo, which is set on the TableTurn POS page.
The name and contact block is pulled from your account record and is read-only here. You are done when the card shows Logo saved; the next invoice, receipt, or pay page you open carries it.
If the upload fails, try a PNG or JPG under a few megabytes. If the business name, phone, email, or address is wrong, contact your account manager; those details are changed on your account, not on this page.
- 1Click Upload under Logo and choose the file.
- 2Check the preview. Click Replace to try another file or Remove to clear it.
- 3Review the Business name & contact block. If anything is out of date, contact your account manager.
| On this screen | What it does |
|---|---|
| Logo | Preview of the current logo used on invoices, estimates, receipts, statements, and pay pages. |
| Upload / Replace | Chooses the logo file (PNG, JPG, or SVG). Saved immediately. |
| Remove | Clears the logo. Documents then show your business name alone. |
| Business name & contact | Read-only name, phone, email, and address pulled from your account record. |
A square-ish logo on a white or transparent background looks best across email and PDF.
Payment methods and the ACH Payment Terms
The Payment methods card decides what customers can use to pay on invoices, payment links, checkout, and the pay widget: Card, Bank (ACH / eCheck), and Cash/Check. Only the methods you switch on appear. Card shows the card price; Bank and Cash/Check show the cash price when dual pricing is on.
Save my card, on the same card, decides whether customers are offered a box to save their card for next time on payment links, invoices, checkout, booking and ordering pages. It is on unless you switch it off. A customer who already saved a card can still pay with it. The box is not offered while a surcharge program is on.
Bank is available once your account is approved for bank payments. If it is not, the switch is greyed out with a note and a Request bank payments (ACH) button that opens the request page; the Bank payments chapter walks through it. Once approved, the switch stays Locked until the ACH Payment Terms are accepted.
The ACH Payment Terms card sits right under Payment methods. The business owner or an authorized signer reads the terms, types their full name and title, ticks the attestation, and clicks Accept the ACH Payment Terms. The card then shows the version accepted, by whom, and on what date, and the Bank switch unlocks. Accepting is a one-time step; it stays recorded on your account.
If the terms are updated later, the card says so and asks you to accept the current version. Businesses already offering bank payments must accept the terms by November 15, 2026 to keep bank payments on; a banner on ACH Transactions reminds you until it is done.
If you do not see the Accept button, you are signed in as a team member. Only the account owner can accept. Sign in as the owner, or ask the owner to accept from this card.
- 1Under Payment methods, switch on Card. Switch on Cash/Check if you record those payments on invoices.
- 2If Bank is greyed out, click Request bank payments (ACH) and submit the request. Come back once you get the approval email.
- 3On the ACH Payment Terms card, click Open the full terms in a new tab and read them.
- 4Type your Full name and Title, tick I am authorized to bind the business and I accept these terms, and click Accept the ACH Payment Terms.
- 5The card shows the accepted version and date. Switch on Bank (ACH / eCheck). Pay by bank now appears on your invoices and pay pages.
| On this screen | What it does |
|---|---|
| Save my card | Offers customers the save-my-card box on your pay pages. Off hides it everywhere. |
| Card | Visa, Mastercard, Discover, and American Express on every pay page. Not enabled means a merchant account has not been linked yet. |
| Bank (ACH / eCheck) | Pay by bank on invoices, links, checkout, and the widget. Its note tells you the state: Not enabled for your account, Locked until the terms are accepted, or live. |
| Request bank payments (ACH) | Opens the request page where you tell us what you expect to run. Shown only while bank payments are not enabled. |
| Cash/Check | Shows the cash or check price on invoices so you can record those payments against them. |
| Accepted version X by Name on Date | The record of the acceptance on file. The terms were updated means a newer version needs acceptance. |
| Open the full terms in a new tab | The complete ACH Payment Terms document. |
| Full name / Title | Who is accepting, recorded with the acceptance. |
| I am authorized to bind the business and I accept these terms | The attestation. Required before Accept is enabled. |
| Accept the ACH Payment Terms | Records the acceptance and unlocks the Bank switch. Owner only. |
| Accept the ACH Payment Terms by November 15, 2026 | The banner shown to businesses already on bank payments until the terms are accepted. |
Only the account owner can accept the terms. A team member with a manager or accountant role sees the terms but not the Accept button.
Late fees
Late fees add a charge to invoices that go unpaid past their due date, without you touching each invoice. The fee is booked onto the invoice as its own line, so the customer sees exactly what was added and why, and the balance they pay goes up by that amount.
You choose a flat dollar amount or a percentage of the balance, the grace period (days past due before the first fee), how many days between repeat fees, and the maximum number of fees per invoice. The policy runs once a day and applies to every open invoice that crosses a boundary.
You are done when the card shows Saved and the summary line reads back your policy, for example $25.00 5 days after the due date, repeating every 30 days, up to 3 times. Turn the switch off and the card says late fees are off; existing fees stay on their invoices.
If a fee landed on an invoice that should not have one, open the invoice and issue a credit memo for the fee amount. Late fees never apply to paid invoices or to invoices you mark as not subject to fees.
- 1Tick Enable automatic late fees.
- 2Pick the Fee type: Flat amount ($) or Percent of balance (%), and enter the Amount or Percent.
- 3Set the Grace period (days past due), Repeat every (days), and Max times to apply.
- 4Click Save policy. The summary line confirms the policy.
| On this screen | What it does |
|---|---|
| Enable automatic late fees | Turns the policy on or off. Off, invoices never accrue extra charges. |
| Fee type | Flat amount ($) adds a fixed fee. Percent of balance (%) adds a share of what is still owed. |
| Amount ($) / Percent (%) | The size of each fee. |
| Grace period (days past due) | How many days after the due date the first fee applies. |
| Repeat every (days) | Days between repeat fees while the invoice stays unpaid. |
| Max times to apply | Cap on the number of fees one invoice can receive. |
| Save policy | Stores the policy. The summary line under the form reads it back. |
Payment reminders and monthly statements
One card, two switches. Automatic payment reminders email the customer as an invoice approaches and passes its due date: a week before, on the due date, then 7, 30, and 60 days past due. Each email shows the balance with a pay-now link, one email per boundary, and paid invoices are never chased.
Automatic monthly statements email every customer with an open balance on the 1st of each month: their open invoices, aging, and one link to pay everything at once. One statement per customer per month; customers with a zero balance get nothing.
Both switches save the moment you flip them. You are done when the card shows Saved. Reminders and statements go out from your business name to the email on the customer record, and you can send a one-off reminder any time from an invoice's page.
If a customer says they did not get a reminder, check that the invoice is still open, that the customer has an email address, and that a boundary has actually passed. Text2Pay on the Invoice delivery card also sends each reminder by text when the customer has a mobile number.
The autopay offer, partial approvals, Pay with Points, and automatic card updates are on the Payment options card under Payments. Text2Pay and the PDF attachment are on the Invoice delivery card.
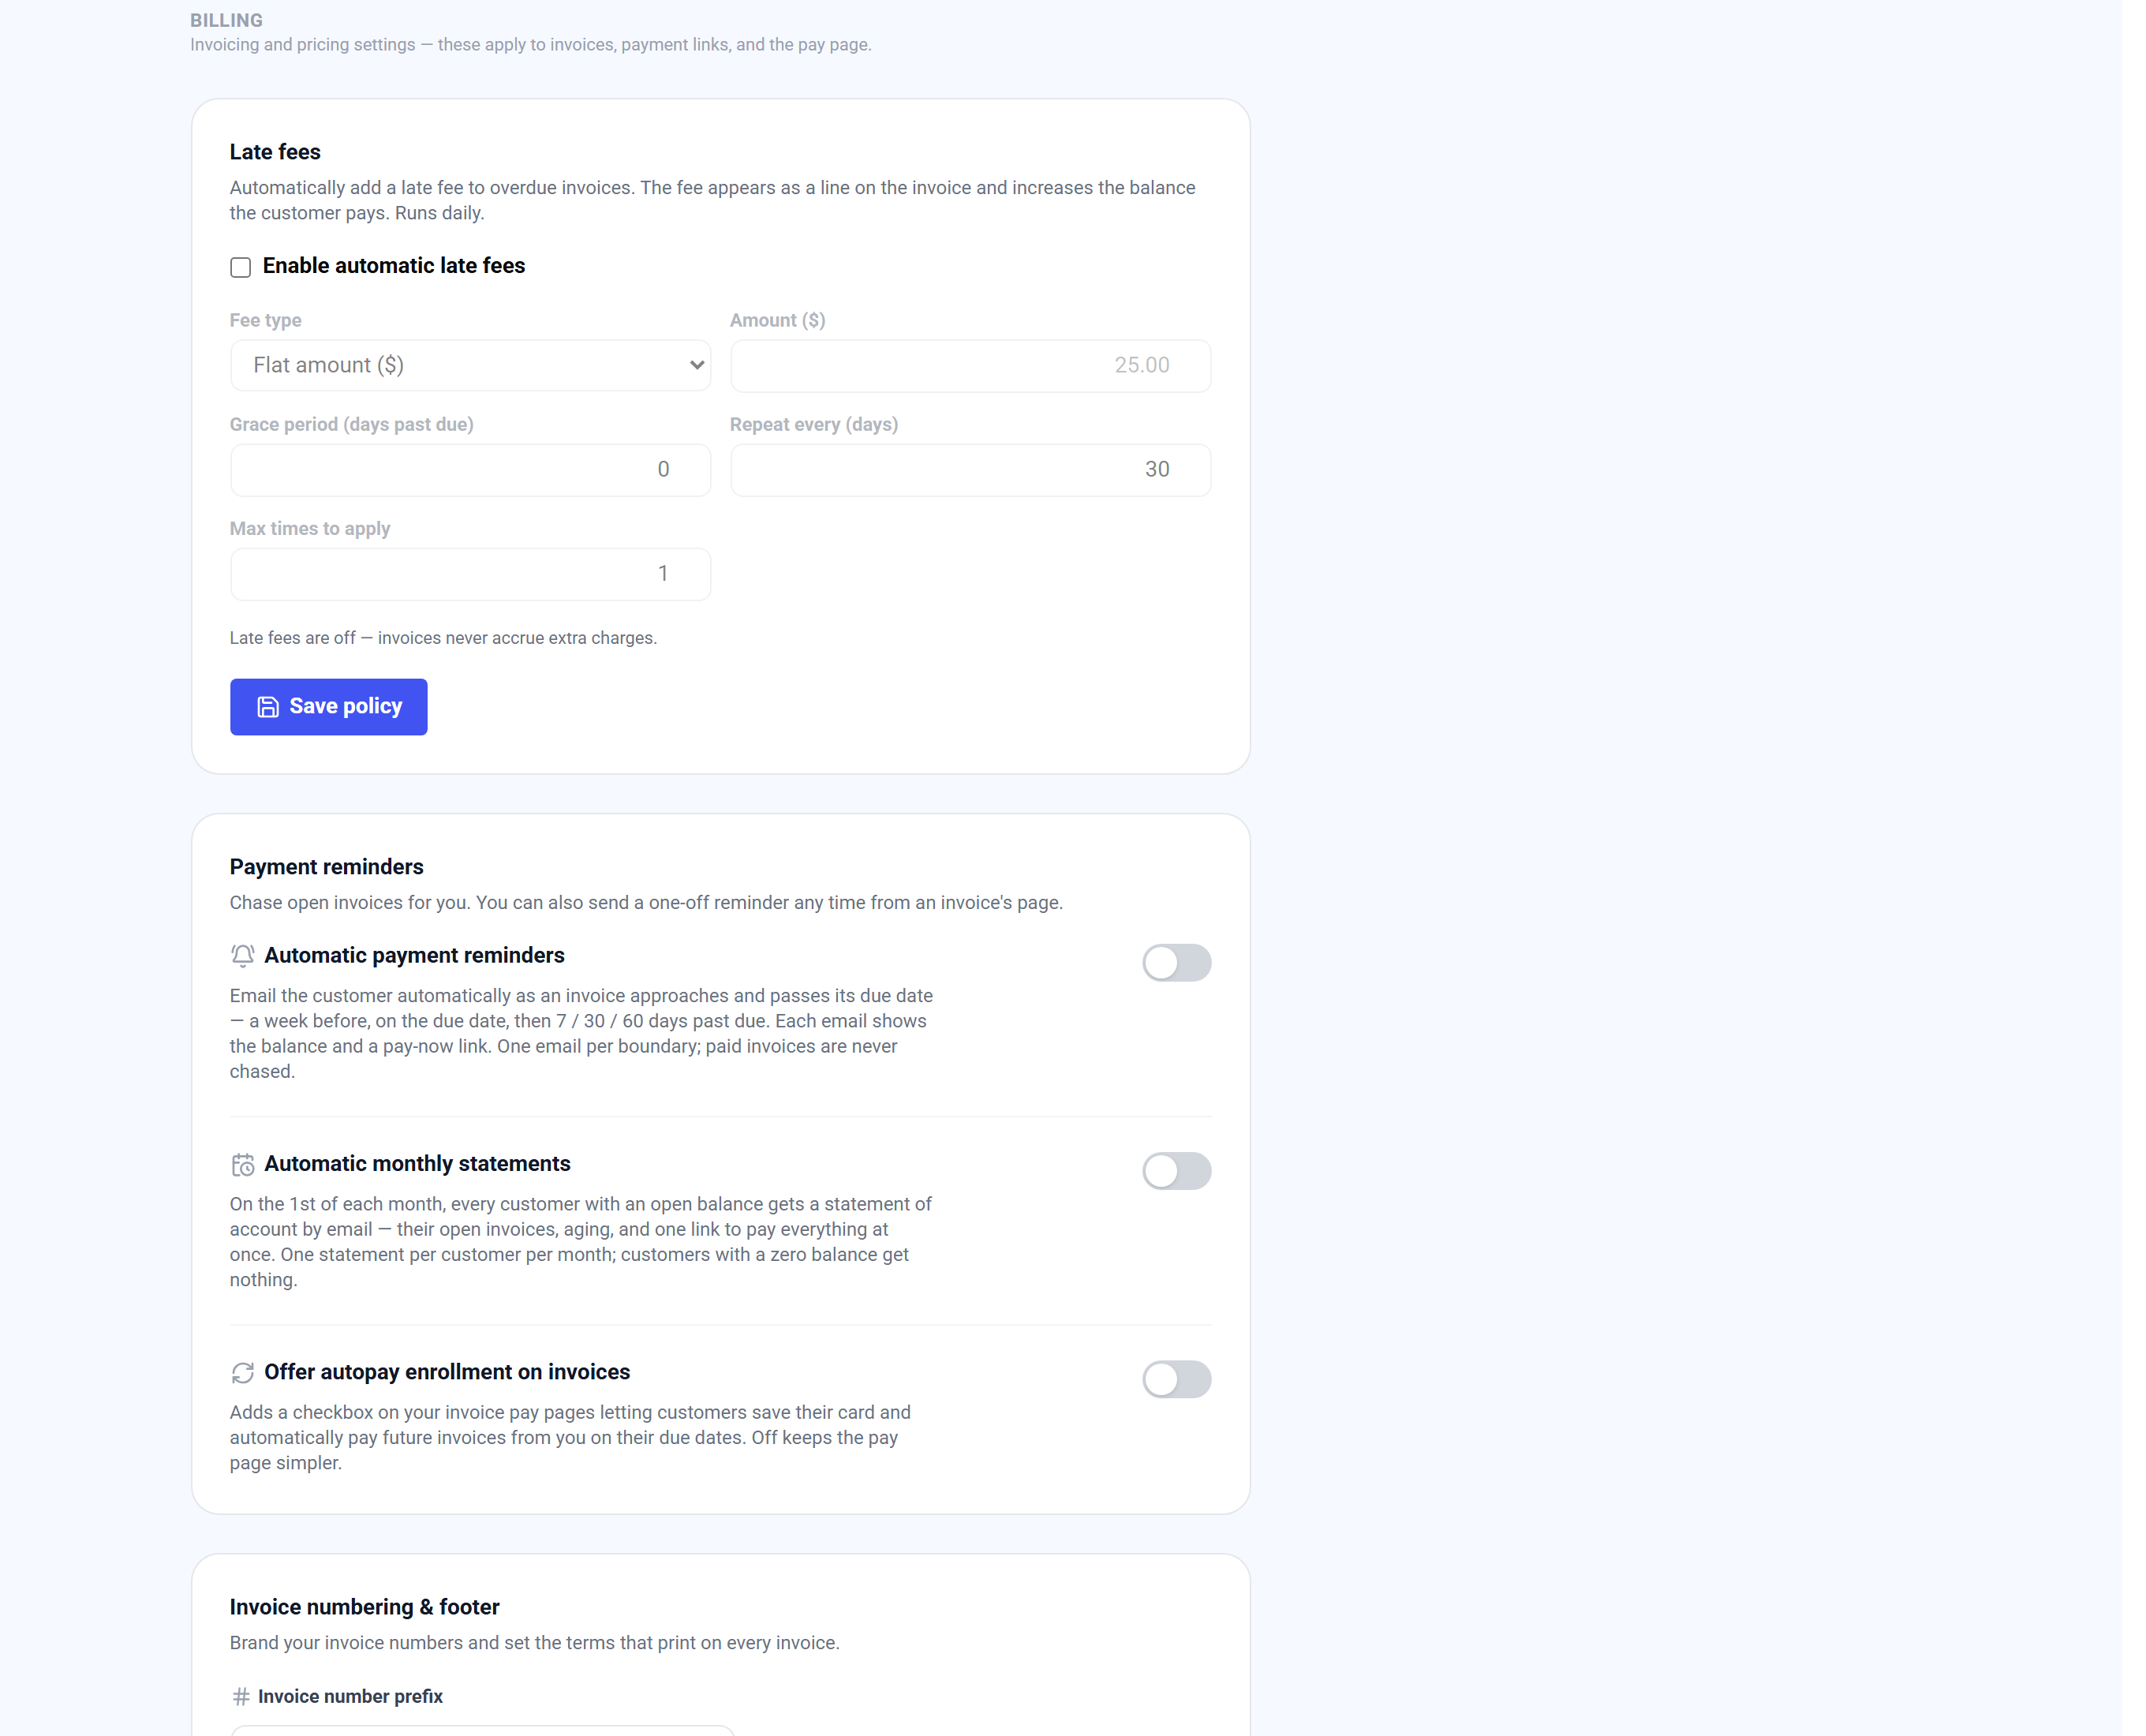
| On this screen | What it does |
|---|---|
| Automatic payment reminders | Emails at a week before, the due date, and 7 / 30 / 60 days past due, each with the balance and a pay-now link. |
| Automatic monthly statements | A statement of account on the 1st of the month to every customer with an open balance. |
| Saved | Confirms the switch change was stored. |
Automatic card updates (Account Updater)
Cards get reissued, renewed, and closed all the time, and every one of those breaks a recurring charge. With Automatic card updates on, every card you keep on file (subscriptions, recurring plans, autopay, or a plain saved card) is checked with Visa, Mastercard, or Discover on a schedule. When the issuer has a newer card number or expiry date it is saved to your vault automatically, and every plan on that card keeps billing without the customer doing anything.
Cards expiring soon and cards that just declined are checked first; everything else at least every six months. A closed account is flagged and the customer gets a secure link to enter a new card. Each check and its result is logged in the Account Updater panel on Saved Cards.
You are done when the switch is on and shows Saved. There is nothing else to configure. From then on, watch the Result column on the Saved Cards page: New card number saved and New expiry saved mean a plan was rescued.
If the switch says automatic card updates are not available on this account yet, the program has not been enabled for you; contact your rep. If a card still declines after a check, the issuer had no update, so send the customer the update link from the Expiring cards panel.
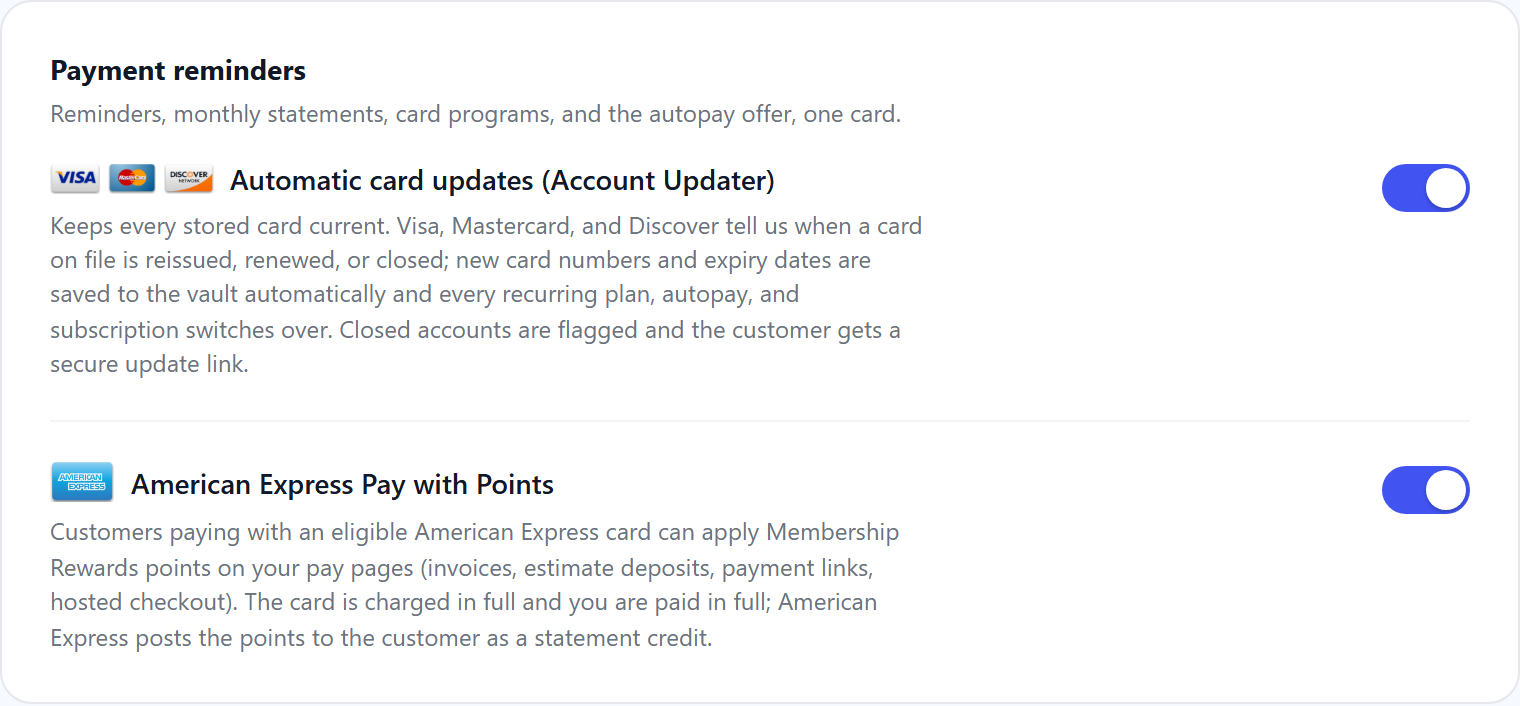
| On this screen | What it does |
|---|---|
| Automatic card updates (Account Updater) | The switch on the Payment options card. On, stored cards are checked with the networks on a schedule and updated automatically. |
| Check expiring cards now | On Saved Cards: runs a network check on every card expiring soon without waiting for the schedule. |
| Check now | On one card's row: asks the network about that card only. |
| Result | What the network said: Current, No update, Issuer not participating, New card number saved, New expiry saved, Account closed, Contact cardholder, Cardholder opted out, Rejected, or Check failed. |
Receipts: your copy and the reply-to address
The Receipts card under Accept Payments → Settings → Reminders & delivery decides what your customers are emailed after they pay and what you get yourself. Every field on it saves on its own: the switches when you flip them, the text fields when you click away.
Email customers a payment receipt sends a receipt after a card payment, and for a bank (ACH) payment both when the debit starts and when it completes. Email me when a payment comes in sends a payment alert to your notification recipients for every paid invoice or link. Payments you run yourself on the virtual terminal do not alert; the BCC copy covers those.
BCC address gets a copy of every customer receipt, from every channel: invoices, payment links, the virtual terminal, saved-card charges, your payment page, the card reader, recurring billing and the point of sale. It is the simplest way to give your bookkeeper or a shared inbox a record of each payment, including the ones that do not alert.
Reply-to address is where a customer's reply goes. Receipts are sent by Merchant360 under your business name, so the sender cannot be your own address, but a customer who hits Reply reaches the address you put here. Leave it blank to use your business email.
Receipt footer message prints at the bottom of every emailed receipt: a thank-you, a return policy, a tax note. The What is emailed, and when box on the card lists each message and who receives it.
If you set a From or BCC address on the Pay Widget page before this card existed, those still apply whenever the fields here are blank. An address that is not a valid email is refused and not saved.
| On this screen | What it does |
|---|---|
| Email customers a payment receipt | Customer receipts on or off. |
| Email me when a payment comes in | Payment alerts to your notification recipients. |
| BCC address | One address that is copied on every customer receipt. |
| Reply-to address | Where customer replies to a receipt are delivered. Blank uses your business email. |
| Receipt footer message | Text at the bottom of every receipt, up to 500 characters. |
| What is emailed, and when | A reference list of each receipt and alert. |
Use a shared mailbox for the BCC address rather than one person's, so receipts keep arriving when someone is out.
Coupons
Coupons are promo codes your customers type on the invoice pay page. A coupon takes a dollar amount or a percentage off the balance, can expire on a date, and can be limited to a number of uses. Use them for a seasonal promotion, a referral thank-you, or a make-good on a late delivery.
When a customer enters a valid code, the discount is applied to the payment and booked automatically as a credit memo against the invoice, so your receivables and reports stay accurate without a manual adjustment.
You are done when the new coupon appears in the list with its code, discount, and used count. Deactivate a coupon to stop it without deleting it; Activate turns it back on.
If a customer says a code did not work, check the list: the coupon must be active, not past its expiry, and under its Max uses. Codes are entered on the invoice pay page, not on payment links or the widget.
- 1Click New coupon.
- 2Enter the Code the customer will type and pick the Type: % off or $ off. Enter the Percent or the Amount ($).
- 3Optionally set Max uses and Expires.
- 4Click Create coupon. The coupon is live immediately.
| On this screen | What it does |
|---|---|
| New coupon | Opens the form to add a code. |
| Code | What the customer types. Codes are not case-sensitive on the pay page. |
| Type | % off takes a percentage of the balance. $ off takes a fixed amount. |
| Percent / Amount ($) | The size of the discount. |
| Max uses (optional) | How many times the code can be redeemed in total. The list shows how many were used. |
| Expires (optional) | The last day the code works. |
| Create coupon / Cancel | Saves the coupon or closes the form. |
| Deactivate / Activate | Turns a coupon off or back on without deleting it. |
Payment methods
The Payment methods card decides which ways to pay appear on your invoices, payment links, checkout pages, and the pay widget. Card is always available once your merchant account is linked. Bank (ACH / eCheck) appears when your account is enabled for bank payments and the ACH Payment Terms are accepted. Cash/Check shows the cash price so you can record those payments on an invoice.
Switches take effect immediately. You are done when the card shows Saved; the next pay page a customer opens offers exactly the methods you switched on.
If Bank is greyed out, follow Request bank payments (ACH) on the card. If it shows Locked, accept the ACH Payment Terms on the card below. Both are explained in the section above.
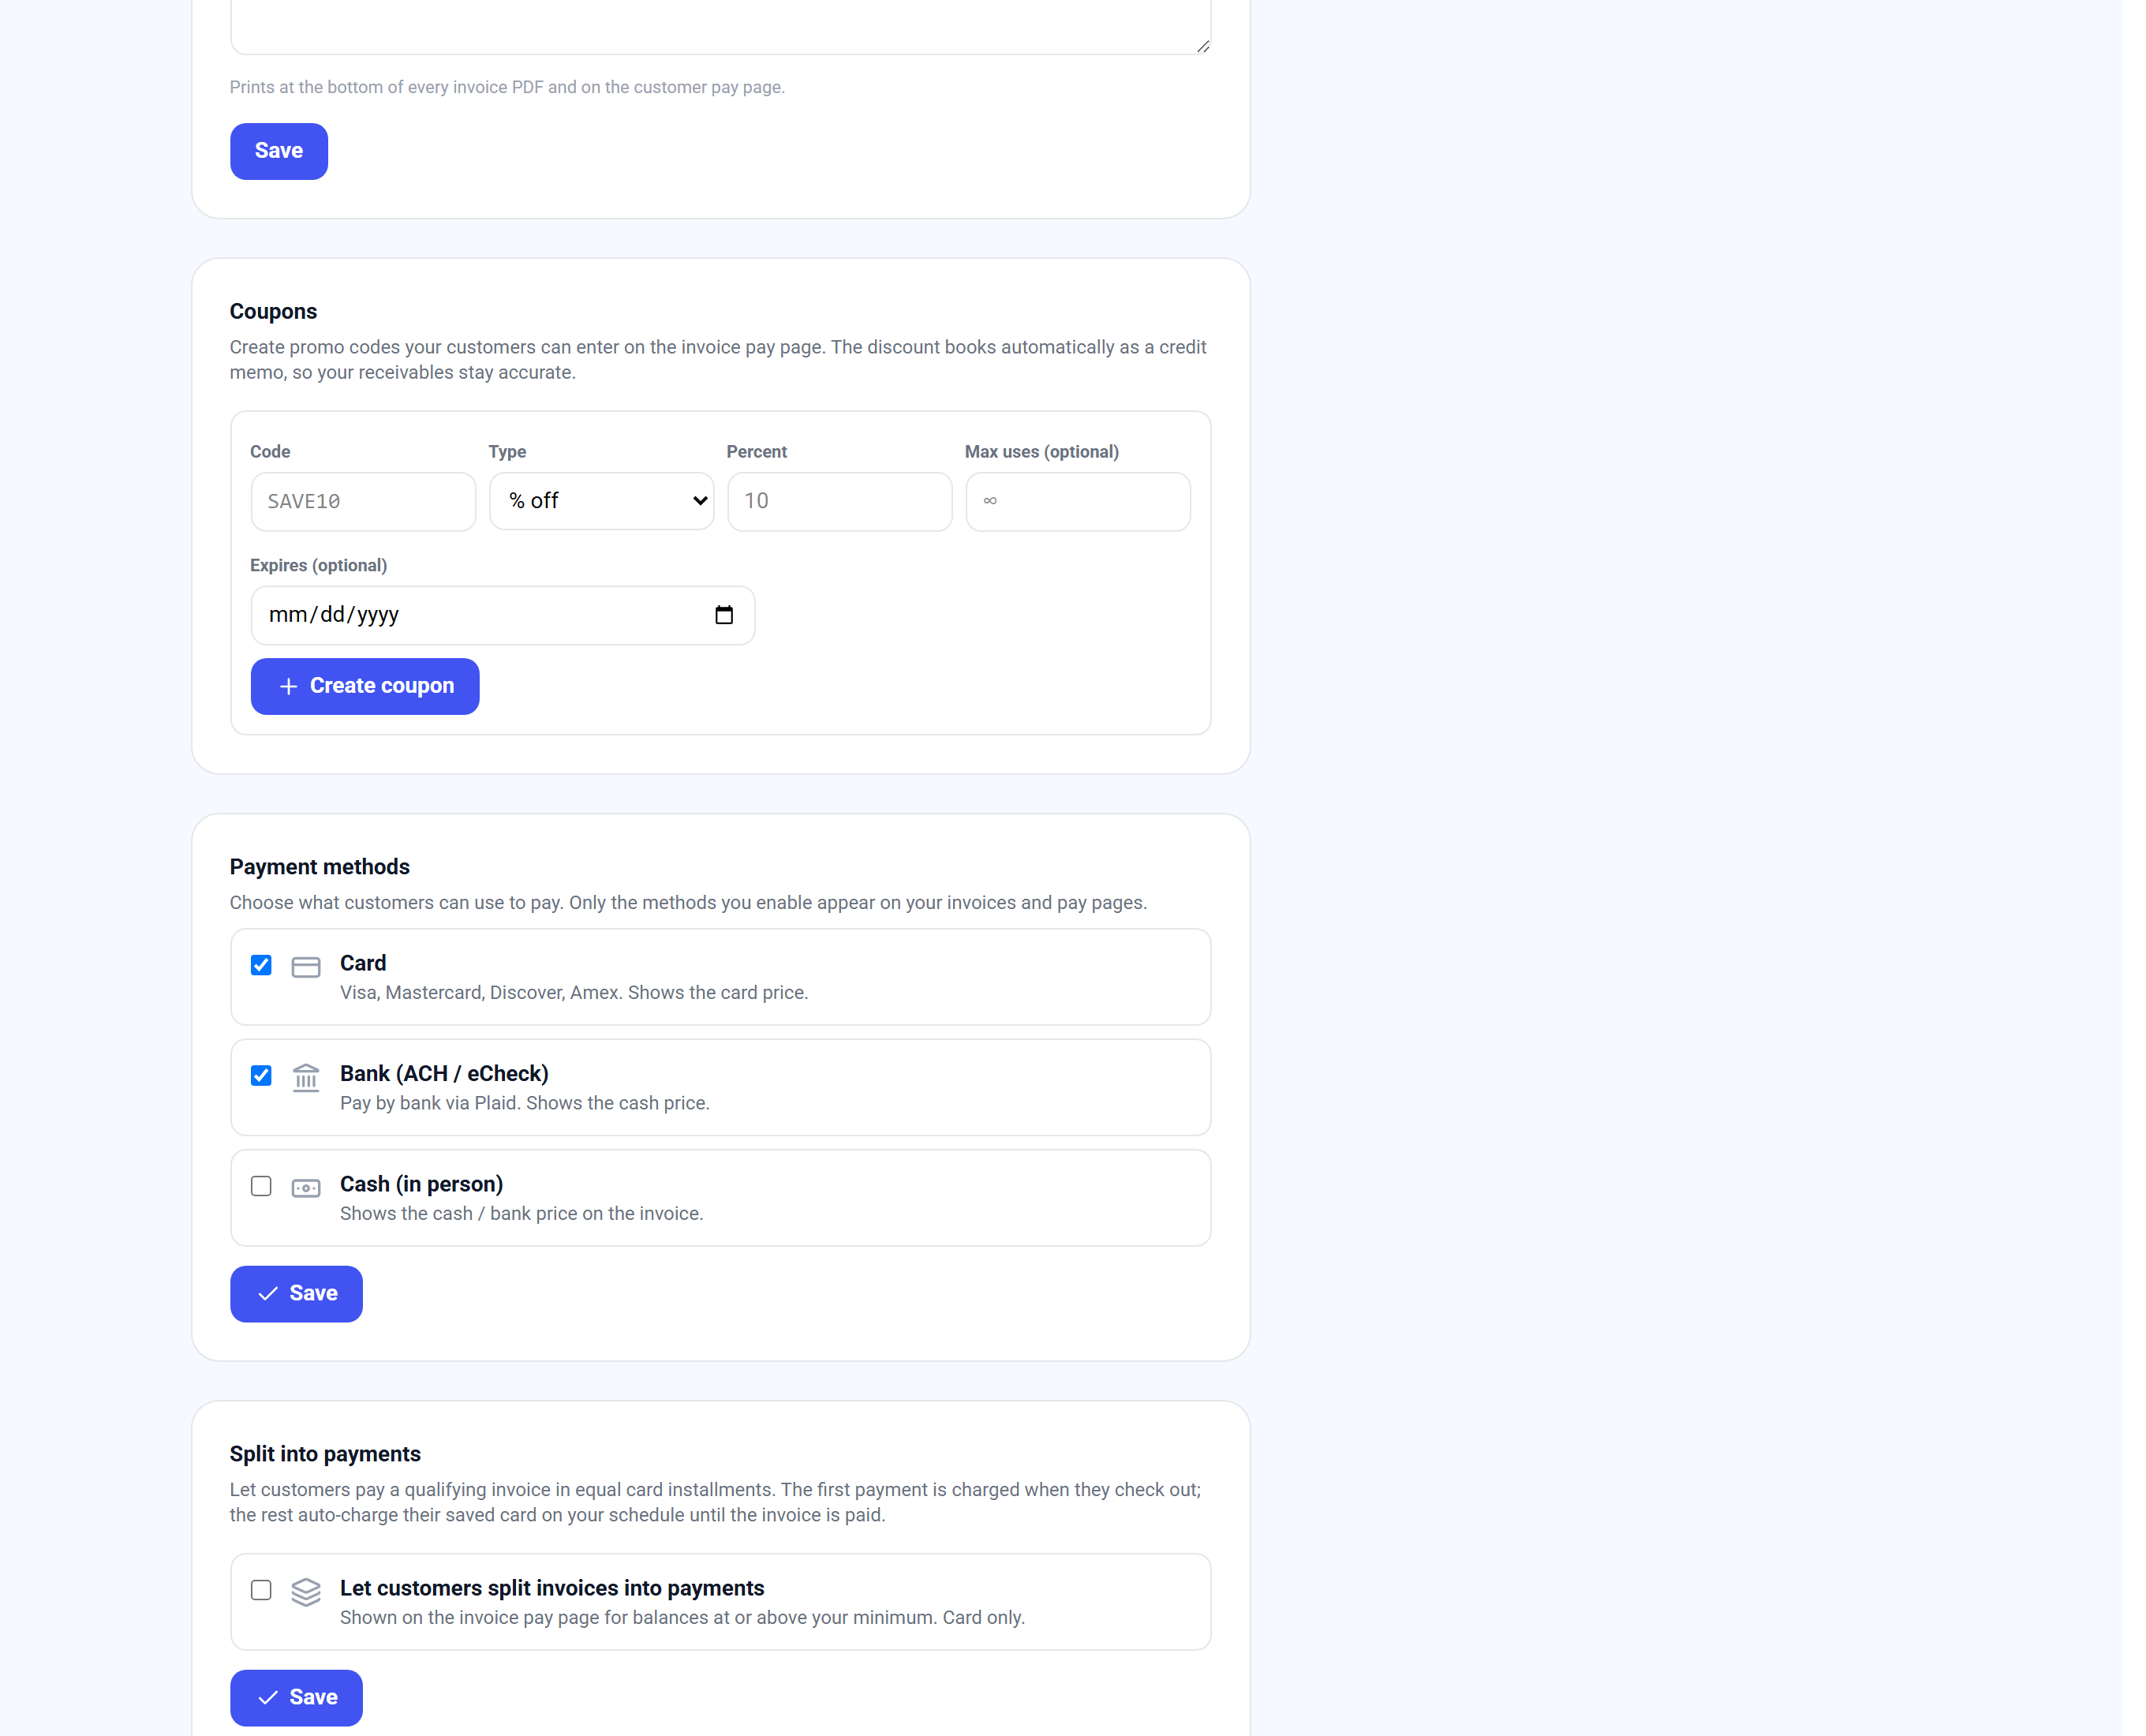
| On this screen | What it does |
|---|---|
| Card | Visa, Mastercard, Discover, and American Express on every pay page. Shows the card price under dual pricing. |
| Bank (ACH / eCheck) | Pay by bank on every pay page. Shows the cash price under dual pricing. |
| Cash/Check | Shows the cash or check price on invoices for payments you record by hand. |
| Request bank payments (ACH) | Opens the request page while bank payments are not enabled. |
| Locked | Bank is approved but the ACH Payment Terms have not been accepted yet. |
Split into payments
Split into payments lets a customer pay a larger invoice in equal card installments, automatically. The first payment is charged when they check out; the remaining charges run against their saved card on the schedule you set until the invoice is paid. Use it for big-ticket invoices where a payment plan closes the sale.
You set the minimum invoice balance that qualifies, the maximum number of payments (2, 3, 4, 6, or 12), and the cadence (weekly, every 2 weeks, or monthly). The customer picks the plan on the invoice pay page; you do not create anything per invoice.
You are done when the switch is on and the card shows Saved. Every invoice at or above the minimum then offers the option. The remaining charges appear on the invoice and on Money → Transactions as they run.
If the option does not show on a pay page, the balance is under your minimum or the customer chose to pay by bank; installments are card only. A failed installment is retried and the customer is emailed to update their card.
| On this screen | What it does |
|---|---|
| Let customers split invoices into payments | The master switch. Shown on the invoice pay page for balances at or above your minimum. Card only. |
| Minimum invoice | The smallest balance that offers a plan. |
| Max payments | The most installments a customer can choose: 2, 3, 4, 6, or 12. |
| Charge every | Weekly, Every 2 weeks, or Monthly between installments. |
Custom payment fields
Custom payment fields capture the details your business needs with every payment: a Client Number, a Matter #, a PO number, a job name, or a category such as Payment for. Define a field once and it appears wherever you enable it. The value the payer or your staff enters is saved on the transaction and shows on its detail page.
A field is asked for however the customer pays, not only by card. On a payment link and an e-invoice the fields sit above the choice of payment method, and on hosted checkout they appear with each method, so they apply to a card, a bank (ACH) payment, Pay with Vault, Apple Pay, Affirm and Klarna alike, and a required field must be filled before any of them goes through. On the virtual terminal they appear on the Card tab, the Bank (ACH) tab and when you charge a saved card. A subscription started on your payment page keeps what the subscriber entered and carries it onto every billing cycle. For a card payment the values show on the transaction; for a bank payment they show on the payment's detail under ACH Transactions.
Two more places are off until you tick them, because they are staff surfaces where an extra question slows a sale down: Card reader and Mobile terminal. With Mobile terminal on, the phone app shows a Details chip beside Discount, Tax and Tip; tap it to fill the fields, and a required one is checked before you take the card or the cash. When you create an invoice, the same fields appear under the notes, so if you are charging a card on file yourself you can type them and they go on the payment; on an invoice you send, what you type is kept and the customer can still complete it on the pay page. Bank payments are listed in Money → Transactions in the Report view with their custom fields in the same columns as card payments.
Each field is free text or a dropdown of options you define, and can be optional or required. Two rows of checkboxes control it. Show on decides where the field is asked: payment links, e-invoices, estimates, checkout, the pay widget, and the virtual terminal. Print on receipts decides where the value appears afterward: Customer receipt prints it on the email and PDF the customer gets; Merchant copy prints it on the receipt PDF you download. A field like an internal client number can be captured at the terminal and printed on your copy while never appearing on the customer's receipt.
Categorize your income with a dropdown. An organization that takes annual dues and several events into one bank account adds a required dropdown such as Payment for with one option per program. Every payment then carries its category: filter and group Money → Transactions by it, tick Show custom fields on the Report view to add the values as a second line under each payment (in the CSV and PDF exports too), and tick Post as a class in QuickBooks and Xero so each option becomes a class on your synced invoices and deposits.
You are done when the field shows Active with chips for the surfaces you chose. It appears on those surfaces immediately.
If a field does not show on a pay page, open it with Edit and check that surface under Show on. If Add custom field is disabled, you have reached the limit of 10 active fields; delete or turn off one you no longer use. Deleting a field never erases values already captured on past payments.
- 1Click Add custom field and give it a Field label. The label is what payers see.
- 2Pick Text or Dropdown. Dropdowns need at least two Options, comma-separated.
- 3Tick Required if the payment must not go through without it.
- 4Tick where the field should be asked under Show on.
- 5Tick where the value should print under Print on receipts. Leave Customer receipt off for internal-only fields.
- 6For a dropdown that categorizes income, tick Post as a class in QuickBooks and Xero. One field can be the class.
- 7Click Save changes. The field is live on the surfaces you chose.
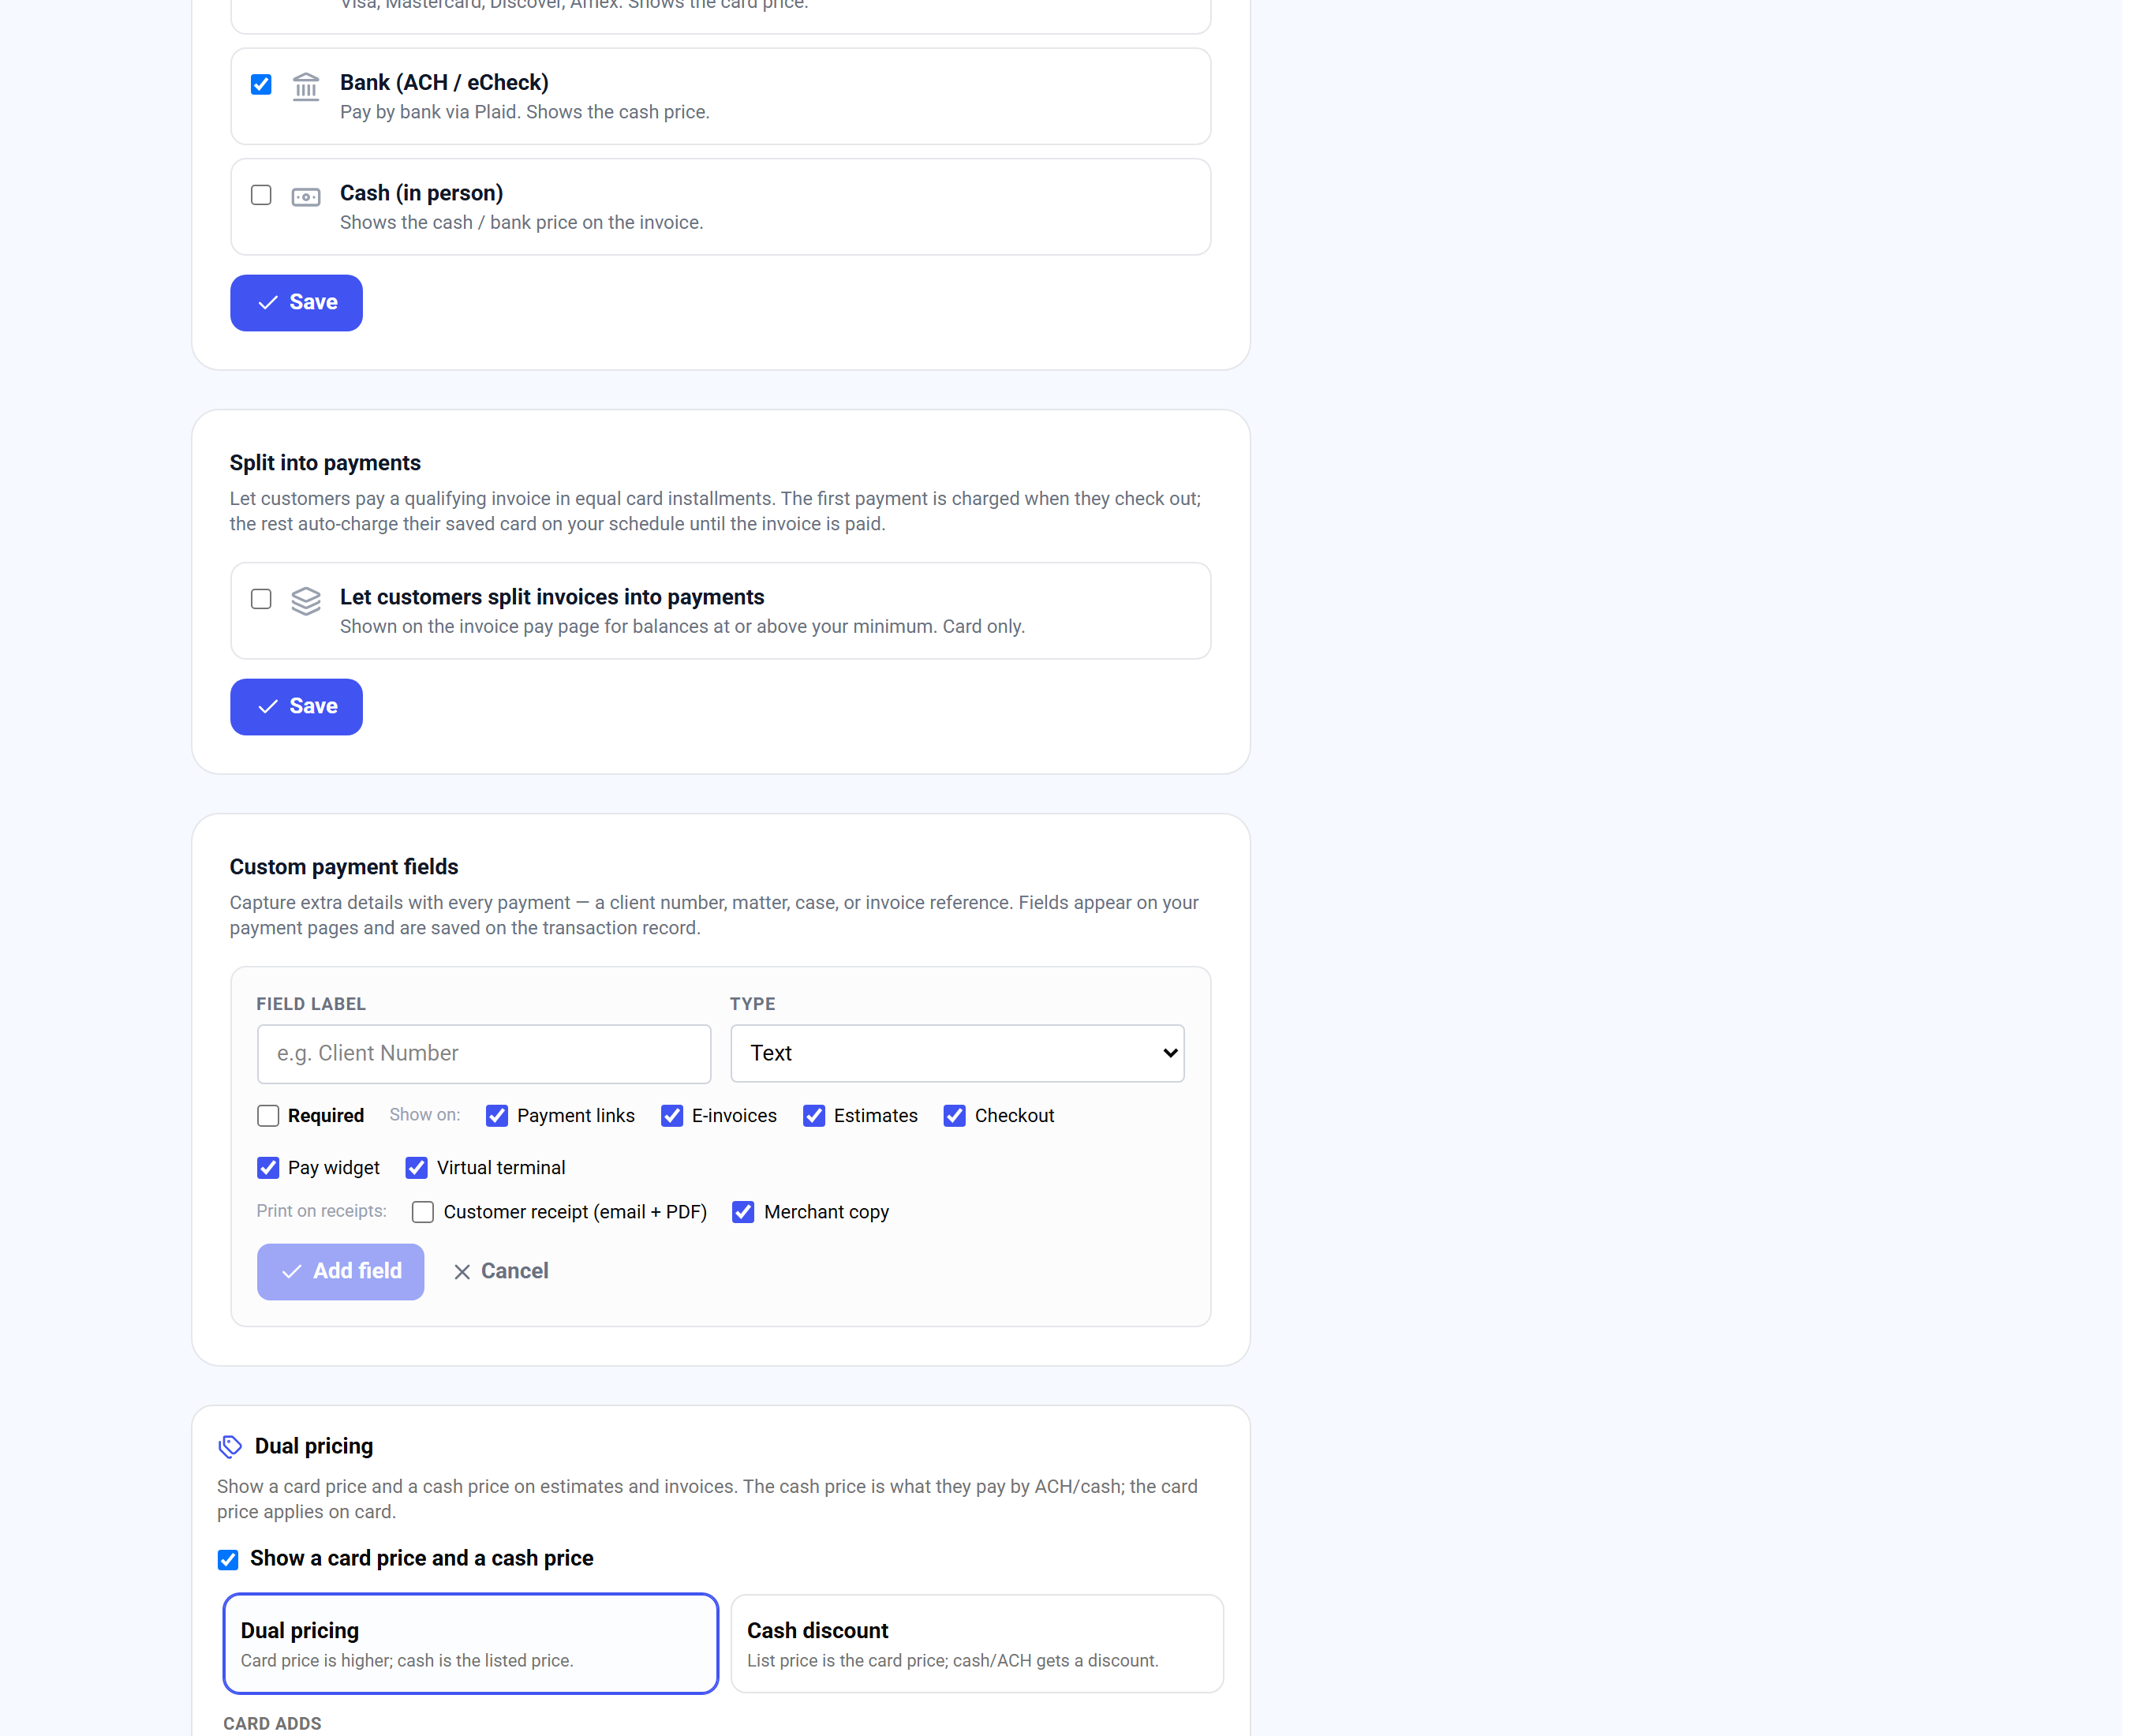
| On this screen | What it does |
|---|---|
| Add custom field / Add field | Opens the form for a new field. Up to 10 active fields. |
| Field label | The prompt payers see, for example Client Number. |
| Type | Text for free entry, Dropdown for a fixed list. |
| Options (comma-separated) | The dropdown choices, for example Retainer, Consultation, Filing fee. |
| Required | The payment cannot be submitted without a value. |
| Show on | Where the field is asked: Payment links, E-invoices, Estimates, Checkout, Pay widget, Virtual terminal. |
| Print on receipts | Where the value prints: Customer receipt (email + PDF) and Merchant copy. |
| Post as a class in QuickBooks and Xero | Each dropdown option becomes a QuickBooks class and a Xero tracking option on synced invoices and deposits. Only one field can be the class. |
| Save changes | Stores the field and applies it immediately. |
| Active / Off | Whether the field is currently asked. The chips (Links, Invoices, Estimates, Checkout, Widget, Terminal, Customer receipt, Merchant copy, Accounting class) show where it is on. |
| Edit / Delete | Changes or removes the field. Values already captured on past payments are kept. |
| Show custom fields (Transactions Report view) | Adds each payment's custom field values as a second line on the report, the CSV, and the PDF. |
You can have up to 10 active fields. Deleting a field never erases values already captured on past payments; they stay on those transactions.
Dual pricing & surcharge
The Dual pricing card controls the card price and cash price your tools present. Set it here once and the virtual terminal, invoices, estimates, payment links, checkout, the pay widget, and the mobile app all follow. The full topic, including compliance and signage, has its own chapter.
Two modes. Dual pricing: the cash price is the listed price and the card price is higher by the Card adds percentage. Cash discount: the listed price is the card price and cash, bank, and debit get the Cash discount percentage off. The example row under the mode shows both prices for a sample item so you can see the effect before you save.
Treat debit cards like ACH / cash gives debit and prepaid cards the lower price so only credit cards pay the card price. Also apply to TableTurn POS extends the same pricing to your register. Changes save as you make them; you are done when the card shows Saved.
If a surcharge program is active on your account, the card says so and dual pricing is paused: your pages use the surcharge instead. The settings still save and take effect once the surcharge is turned off.
| On this screen | What it does |
|---|---|
| Show a card price and a cash price | The master switch for dual pricing on every surface. |
| Dual pricing | Mode where the card price is higher and cash is the listed price. |
| Cash discount | Mode where the listed price is the card price and cash, bank, and debit get a discount. |
| Card adds / Cash discount | The percentage between the two prices. |
| On a $X item | The example row showing the Card and Cash (or Credit and Debit / ACH / Cash) prices for a sample amount. |
| Treat debit cards like ACH / cash | Only credit cards pay the card price. Debit and prepaid cards are recognized from the card number and pay the cash price. |
| Also apply to TableTurn POS | Shows card and cash prices on your TableTurn register too. |
| A surcharge program is active | Notice that dual pricing is paused while your surcharge program runs. |
Failed subscription payments (dunning)
When a subscription charge fails, Merchant360 retries it and emails the customer to update their card. The Failed payments setting decides what happens when the retries are used up.
Pause the subscription, the default, keeps the plan and the card on file so it can be reactivated once the card is updated. Cancel the subscription ends it; reviving it means starting a new one. Pick the option that matches how you want to treat a customer whose card has gone bad.
You are done when the card shows Saved. The choice applies to every subscription and recurring plan on your account from then on.
If a paused subscription needs to resume, have the customer update the card through the update link on Saved Cards, then resume the plan from the Recurring page. Failed charges also surface on the pay widget's Subscribers list with a one-click Retry now.
| On this screen | What it does |
|---|---|
| Pause the subscription | Keeps the plan and card on file so it can be reactivated once the card is updated. The default. |
| Cancel the subscription | Ends the subscription after retries are exhausted. Reviving it means starting a new one. |
| Saved | Confirms the choice was stored. |
Test Mode Transactions
Test Mode Transactions is your sandbox ledger. Every payment attempt made with a Test API key or from an integration running in test mode lands here, approvals and declines alike, and never touches real money or your live Transactions list. Use it to prove a new website, plugin, or checkout integration end to end before switching it to a Live key.
The amber card at the bottom of Settings opens it. The page carries a TEST MODE banner and lists each attempt with when it happened, its source, the card used, the amount, the outcome, and the address verification result.
You are done testing when the outcomes match what your integration expects. Then create a Live key on the Developers page and swap it in; live payments appear on Money → Transactions instead.
If a test payment is missing, the request was made with a Live key, which means it was a real charge; find it on Transactions and void it. If the list is empty, run a payment with a Test key or a test checkout session and it appears here.
| On this screen | What it does |
|---|---|
| View test transactions | Opens the sandbox ledger from the Settings page. |
| TEST MODE banner | Reminder that everything on this page is simulated and not funded. |
| When | Date and time of the attempt. |
| Source | Where it came from: API payment, API authorization, API invoice payment, or Hosted checkout. |
| Card | Brand and last four of the test card. |
| Amount | The simulated amount. |
| Outcome | Approved, or Declined with the decline code your integration received. |
| AVS | The address verification result returned for the attempt. |