
Integrations
Connect Merchant360 to the other tools you run your business with – accounting, your online store, and automated sales tax.
BNPL (Buy Now Pay Later)
Accounting
Your website & online store
Sales tax
CRM & marketing
How integrations work
Account → Integrations is one page of cards, grouped by category: Accounting, Automation & tools, BNPL (Buy Now Pay Later), Business platforms, eCommerce, Email marketing, Field service, Payments, and Sales tax. Each card is something you connect once; after that Merchant360 keeps it in sync for you.
Only the account OWNER and MANAGER roles can manage integrations. Other roles see the page with a warning and no Connect buttons.
A card shows one of a few states. Not connected means it is ready to Connect. Connected shows when it last synced, or never synced yet. Early access means your rep has to enable it. Not configured means the integration is not turned on for the platform yet. Once connected you can Sync now, and Disconnect after a confirmation.
Accounting integrations use OAuth: you sign in on QuickBooks or Xero, not here. Disconnecting revokes Merchant360's access on the provider's side, not just here. Accounting syncs run automatically every 4 hours, and Sync now forces an immediate run. A sync only ever pushes new activity since the last run, and each item (deposit, chargeback, invoice, payment) syncs exactly once, so re-running never double-posts.
Each card also links to its section of this guide (Setup guide or Install guide) so the instructions are one click away.
If Sync now reports Sync failed, click Connect again to refresh the authorization and run it once more. If a card that was Connected now reads Not connected, the provider revoked or expired the authorization; reconnect and the sync resumes where it left off. We keep adding integrations; if the tool you need is not here yet, tell your sales rep.
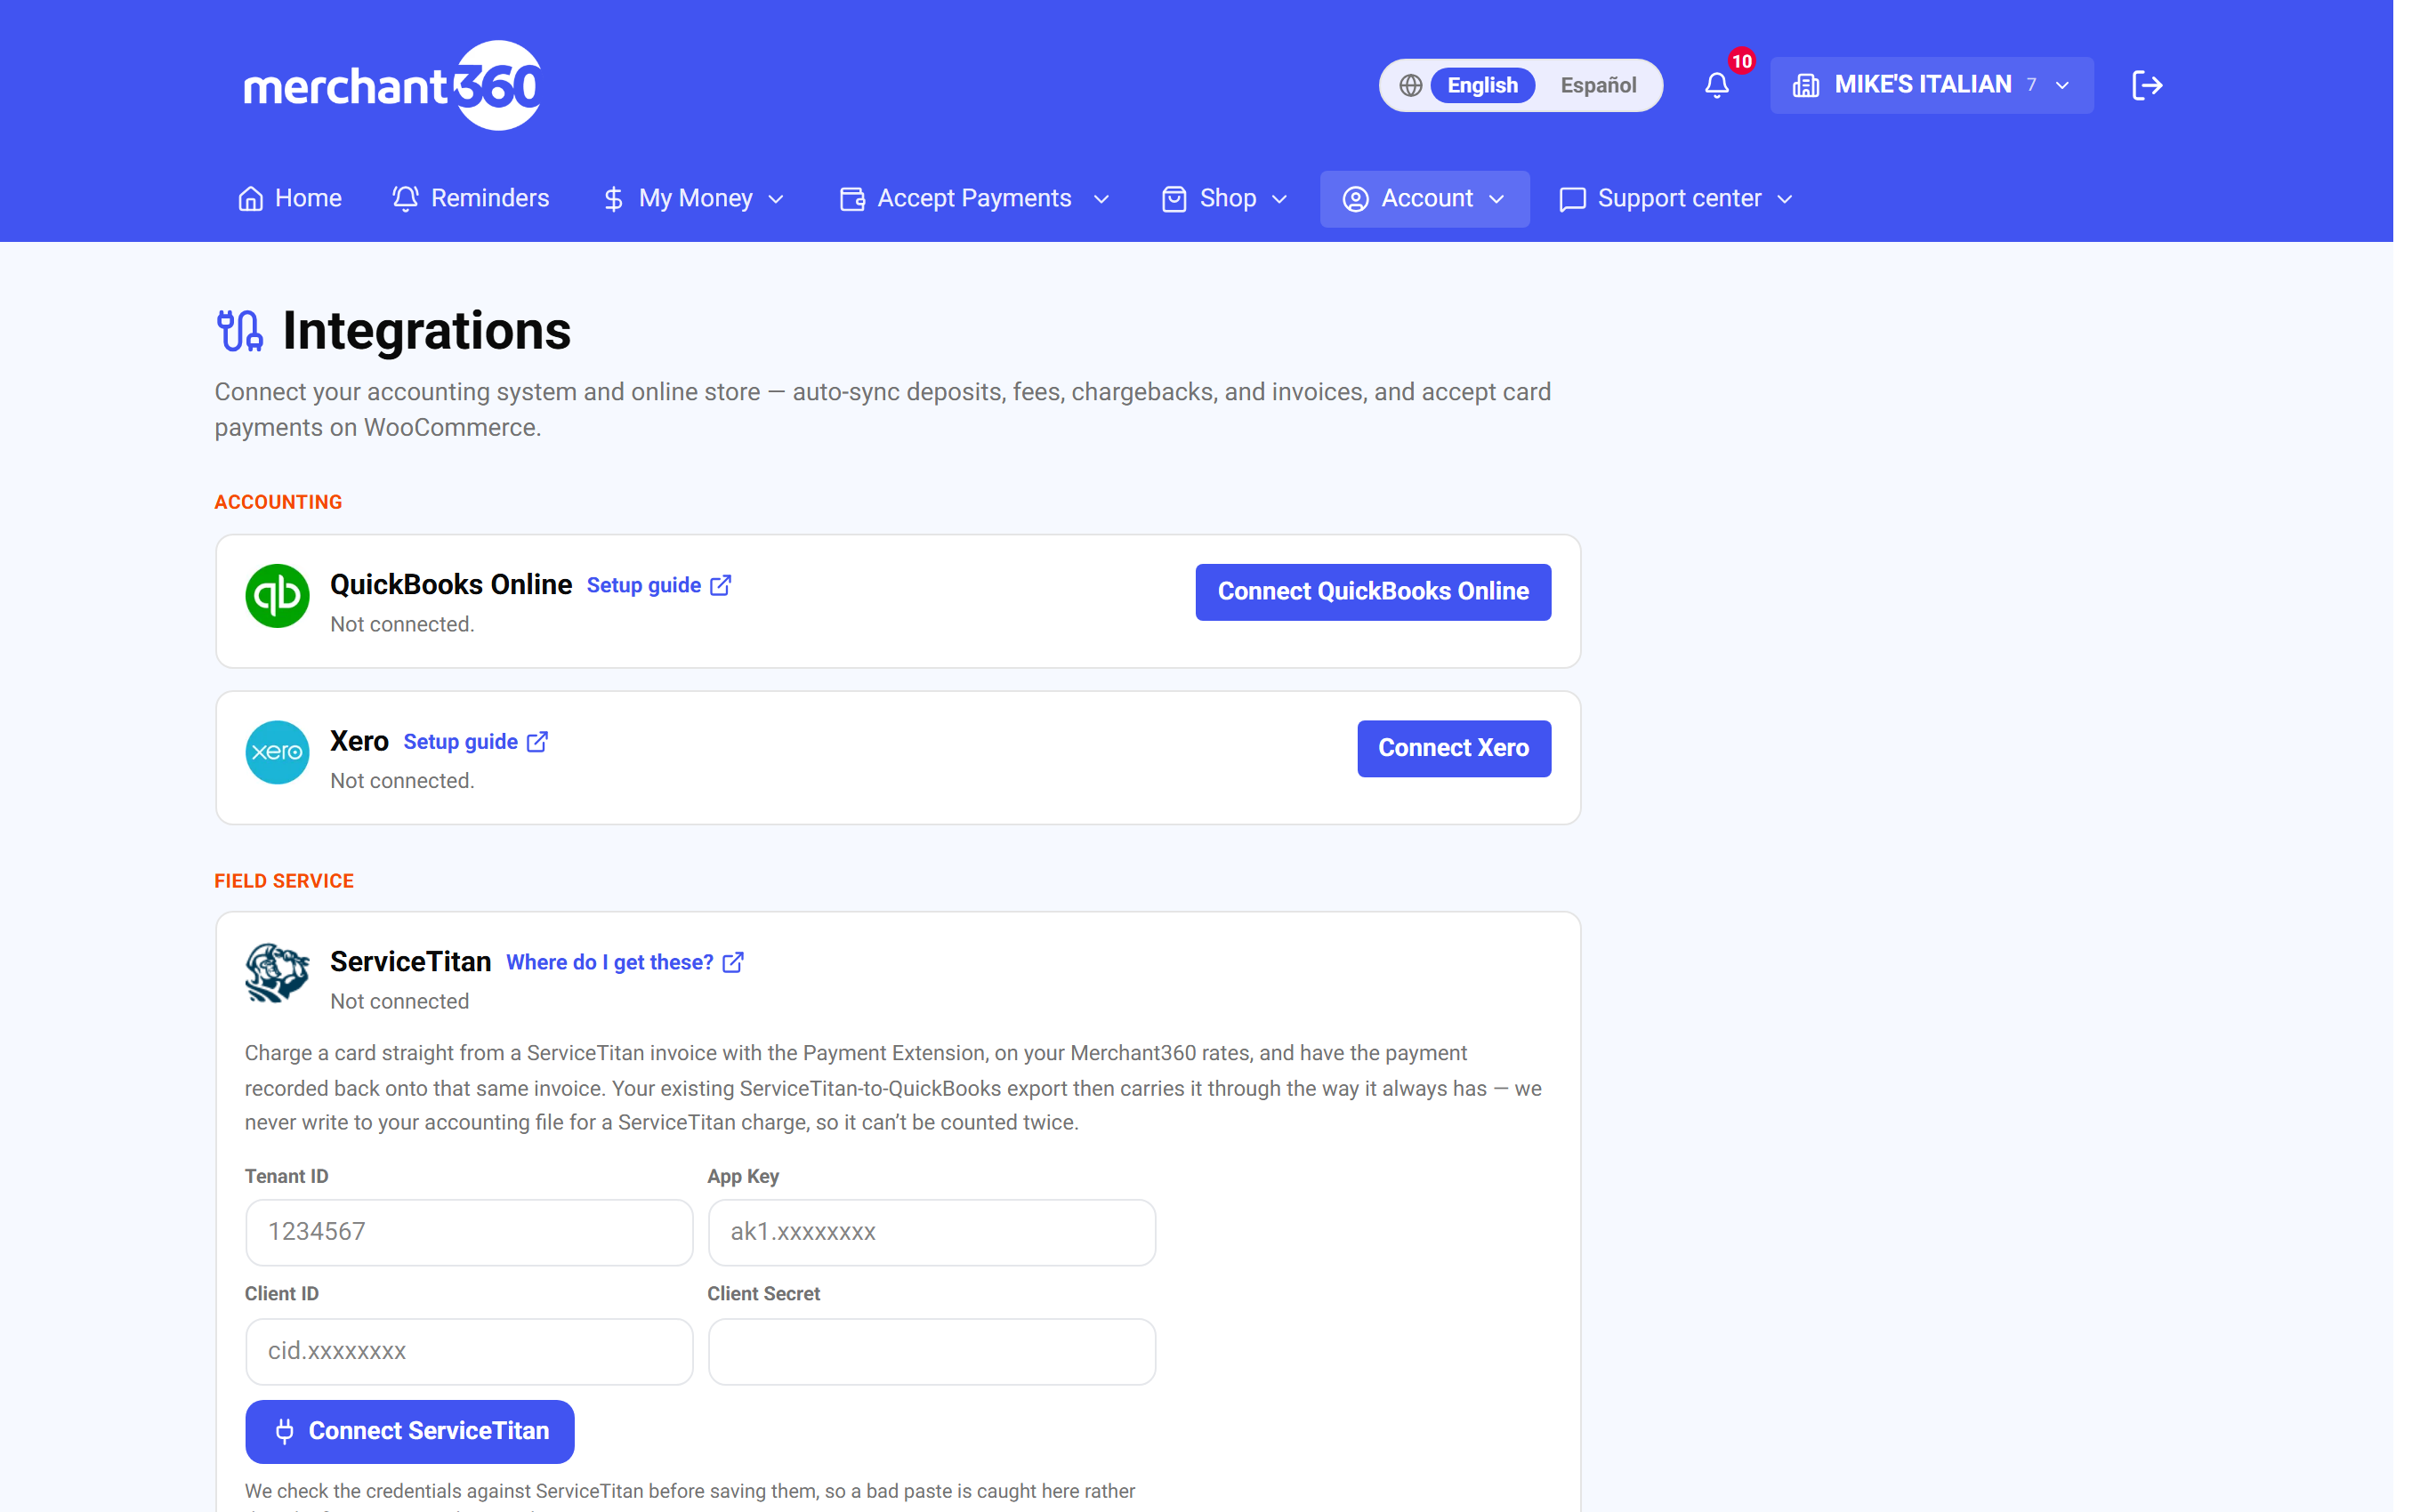
| On this screen | What it does |
|---|---|
| Connect | Starts the connection. For QuickBooks Online and Xero you sign in at the provider and authorize; other cards ask for a key or credentials first. |
| Connected · last synced / never synced yet | Status line on a connected card with the time of the last sync. |
| Not connected | Status of a card that is ready to connect. |
| Early access – ask your rep | Badge on cards your rep has to enable before you can connect. |
| Not configured | The integration is not enabled on the platform yet. |
| Sync now | Runs a sync immediately. The result reads Synced N items (N failed), or Sync failed. |
| Disconnect | Asks Disconnect this integration? Sync will stop until you reconnect, then removes the connection and revokes access at the provider. |
| Setup guide / Install guide / How it works | Links from the card to its instructions. |
| Only OWNER and MANAGER roles can manage integrations | Warning shown to other roles; ask your account owner for access. |
 Zapier
Zapier is a service that connects apps to each other with no code. A Zap is a simple rule: when something happens in one app, do something in another. Merchant360 plugs into that world, so getting paid can automatically update the rest of your business.
Real examples: when a payment succeeds, add a row to a Google Sheet your bookkeeper watches. When an invoice is paid, post a message in your team's Slack. When someone fills out your Typeform or JotForm, create and email them a Merchant360 invoice automatically. When a new customer is added, subscribe them to your Mailchimp list.
The Zapier card sits under Automation & tools with a Get the Zapier app button. The app is in early access, so your representative sends the invite link. Zapier connects with an API key, which you create under Developers & API; use a test key first so every Zap runs against simulated data, then swap in your live key.
You are done when the Zap is on and a test payment produced the action you expected. If a Zap does not fire, check that it is turned on in Zapier, that the key you pasted is the live key, and that the trigger you chose matches the event (a paid invoice is Invoice Paid, not New Successful Payment).
- 1Get the Merchant360 app for Zapier (early access; your representative sends you an invite link, and one click adds it to your Zapier account).
- 2In Zapier, create a Zap and choose Merchant360 as the trigger (New Successful Payment, Invoice Paid, Checkout Completed) or as the action (Create Invoice, Create Payment Link, Create Customer).
- 3When Zapier asks you to connect your account, paste an API key from Developers & API. Use a test key first, then swap in your live key.
- 4Turn the Zap on. The Zap runs when a customer pays.
| On this screen | What it does |
|---|---|
| Get the Zapier app | Opens the Merchant360 app on Zapier so you can add it to your Zapier account. |
| Early access – ask your rep | Badge on the card until your representative sends the invite. |
| Developers & API → Issue key | Creates the API key you paste into Zapier. Test keys run against simulated data; live keys move real money. |
Start with one Zap: New Successful Payment, then add a row in Google Sheets. It takes five minutes, and you will immediately see how every payment can drive the rest of your tools.
 Mailchimp
Connect Mailchimp and your Merchant360 customer list keeps your Mailchimp audience current with no CSV exports. Customers who checked "keep me posted" on a class booking arrive subscribed and tagged class-opt-in, ready for a campaign; the rest of your directory arrives unsubscribed, so nobody is emailed without permission you grant inside Mailchimp.
Campaigns, unsubscribes, and compliance all live on Mailchimp's side. Merchant360 only keeps the audience fresh, automatically every night, plus a Sync now button.
The card is under Email marketing. Connecting takes a Mailchimp API key (created in Mailchimp under Account → Extras → API keys), then choosing which audience to sync into.
When it is connected, the card reads Connected with the audience name and a count of contacts synced. If Verify key fails, the key was copied incompletely or created for a different Mailchimp account; create a new one and paste it again. If the audience list is empty after verifying, create an audience in Mailchimp first.
- 1In Mailchimp, go to Account → Extras → API keys and create a key.
- 2In Merchant360 open Account → Integrations → Email marketing, paste the key into the Mailchimp card, and click Verify key.
- 3Pick the audience to sync into and click Connect & sync. The first sync runs immediately.
- 4New customers and opt-ins flow in nightly from then on. Click Sync now any time you want them sooner.
| On this screen | What it does |
|---|---|
| Mailchimp API key | Field for the key from Mailchimp (Account → Extras → API keys). |
| Verify key | Checks the key with Mailchimp and loads your audiences into the picker. |
| Pick your audience… | Dropdown of your Mailchimp audiences. The one you choose receives your customers. |
| Connect & sync | Saves the connection and runs the first sync right away. |
| Connected · audience / contacts synced | Status line showing the linked audience and how many contacts have been synced. |
| Sync now | Pushes new customers and opt-ins immediately instead of waiting for the nightly run. |
| Disconnect | Stops the sync. Contacts already in Mailchimp stay there. |
Constant Contact support is built on the same engine and arrives once the developer-app registration completes; ask your rep if you use Constant Contact instead.
BNPL (Buy Now Pay Later)
Let customers split larger invoices into installments while you are paid in full up front. The BNPL provider settles directly to your bank and carries all repayment risk. These payments book on the invoice as that provider's tender, outside your card processing, and are listed with a Refund button under Billing Tools → BNPL Payments.
 Affirm (Buy Now Pay Later)
Affirm lets your customers split a larger invoice into monthly payments. You are paid the full amount up front, Affirm settles directly to your bank, and the repayment risk is entirely Affirm's. On invoices of $50 or more, a "Pay over time with Affirm" button appears on the pay page; the customer taps it, gets an instant decision in Affirm's window, and your invoice is marked paid the moment they confirm.
Two important mechanics: Affirm money settles from Affirm, not through your card processing, so these payments book on the invoice as an Affirm tender with the Affirm transaction ID. And every merchant starts in try-it-out mode: the button runs on Affirm's sandbox, where the whole flow works but no real money moves, until you connect your own keys.
The Affirm card under BNPL takes a Public API key and a Private API key from your Affirm dashboard, with a Sandbox or Live choice. Start with sandbox keys; check Live keys once Affirm approves your account.
When it is live, the card reads Connected with the last characters of the key and Live, and the invoice button uses your own Affirm account. If the button still says it is in try-it-out mode after connecting, you saved sandbox keys; click Change keys and enter the live pair. If a customer is declined by Affirm, that decision is Affirm's and the invoice stays open for another payment method.
- 1Try it first: the Affirm button already appears on your invoice pay pages in sandbox mode. Run a fake payment end to end to see what your customers will see.
- 2Ready for real payments? Sign up at affirm.com/business. Once approved, your Affirm dashboard has an API Keys page with a public and private key.
- 3In Merchant360 open Account → Integrations → BNPL, paste both keys, check Live keys, and click Save & connect.
- 4From then on, Affirm payments are real: the customer pays Affirm monthly, and Affirm deposits your money directly to your bank on their settlement schedule.
| On this screen | What it does |
|---|---|
| Try-it-out mode is ON | Notice that your invoices already show the Affirm button on a shared sandbox with no real money moving. |
| Public API key / Private API key | Fields for the pair from the Affirm dashboard's API Keys page. |
| Sandbox / Live keys | Tells Merchant360 which Affirm environment the keys belong to. Keep Sandbox until Affirm approves your account. |
| Save & connect | Verifies the keys and switches the invoice button to your Affirm account. |
| Connected · key | Status line showing the connected key and whether it is Sandbox or Live. |
| Change keys | Reopens the key fields so you can replace sandbox keys with live ones. |
| BNPL Payments → Refund | Refunds an Affirm payment through Affirm; the invoice reopens for the refunded amount. |
Refund Affirm payments right in Merchant360: Billing Tools → BNPL Payments lists every Affirm payment with a Refund button. The money goes back through Affirm and the invoice reopens for the refunded amount. Settlement reports and disputes live in the Affirm dashboard, linked from that page.
 Klarna
Klarna brings Pay in 4 and monthly financing to your invoice pay pages. On invoices of $35 or more, a "Pay with Klarna" option appears; the customer picks their plan in Klarna's own window, and your invoice is marked paid the moment Klarna approves. You are paid in full up front, Klarna settles to your bank, and the customer owes Klarna, not you.
Like Affirm, every merchant starts in try-it-out mode on Klarna's Playground (their sandbox): the whole flow works and no real money moves until you connect your own credentials.
The Klarna card under BNPL takes an API username (UID) and API password from the Klarna merchant portal, with a Playground or Live choice. Playground credentials first; check Live once Klarna approves your store.
When it is live, the card reads Connected with the API user and Live. If the Klarna option does not appear on an invoice, the invoice is under $35. If Save & connect fails, the credentials belong to the other environment; match Playground or Live to where they were created.
- 1Try it first: the Klarna option already appears on your invoice pay pages in Playground mode. Run a fake payment end to end.
- 2Ready for real payments? Sign up at klarna.com/us/business. Once approved, the Klarna merchant portal has an API credentials page with a username and password.
- 3In Merchant360 open Account → Integrations → BNPL, paste both into the Klarna card, check Live credentials, and click Save & connect.
- 4From then on Klarna payments are real: the customer pays Klarna on their plan, and Klarna deposits your money on their settlement schedule.
| On this screen | What it does |
|---|---|
| Try-it-out mode is ON | Notice that your invoices already show the Klarna button on Klarna's Playground with no real money moving. |
| API username (UID) / API password | Fields for the credentials from the Klarna merchant portal (Settings → Klarna API credentials). |
| Playground / Live credentials | Which Klarna environment the credentials belong to. |
| Save & connect | Verifies the credentials and switches the invoice option to your Klarna account. |
| Connected · API user | Status line showing the connected user and environment. |
| Change credentials | Reopens the fields to replace Playground credentials with live ones. |
| BNPL Payments → Refund | Refunds a Klarna payment through Klarna. The page also lists recent Klarna payouts for reconciliation. |
Refund Klarna payments right in Merchant360 too (Billing Tools → BNPL Payments), and that page also shows your recent Klarna payouts for reconciliation. Disputes are handled in the Klarna merchant portal; BNPL disputes never touch your card chargeback ratio.
Testing with test cards
Every integration can be exercised end to end in test mode before real money moves: connect with a test key (or tick test mode during connect) and pay with the platform's test cards. Test payments never charge anything, are never funded, and never appear in your live Transactions. They show up under Billing Tools → Settings → Test Mode Transactions instead, declines included.
Use test mode when you set up a new store, plugin, extension, or Zap, and again whenever you change a checkout setting. Use any future expiry and any CVV with the numbers below.
You are done when the approved and declined rehearsals both appear on Test Mode Transactions with the outcome you expected. If a test payment shows up in your live Transactions instead, the connection is live rather than test; disconnect and reconnect in test mode (or paste a test key) before continuing. If a card number other than these approves, that is expected: any valid-looking number approves in test mode.
- 14242 4242 4242 4242: approved (address and ZIP match).
- 24000 0000 0000 0002: declined, do not honor.
- 34000 0000 0000 9995: declined, insufficient funds.
- 44000 0000 0000 0069: declined, expired card.
- 54000 0000 0000 0127: declined, incorrect security code.
- 64000 0000 0000 0010: approved, address matches but ZIP does not.
- 74000 0000 0000 0028: approved, ZIP matches but address does not.
- 84000 0000 0000 0036: approved, no address or ZIP match.
| On this screen | What it does |
|---|---|
| Test Mode Transactions | The list of every test-mode payment and decline, kept separate from live Transactions. |
| Connect in test mode (sandbox – no real charges) | Checkbox on the WooCommerce and Payment Extension connect screens that makes the connection a test one. |
| Test/sandbox key | Option when generating a WooCommerce key: the key only ever creates test payments. |
| Sandbox / Playground | The test environment choice on the Affirm, Klarna, TaxJar, and Avalara cards. |
Any other valid-looking card number approves in test mode, so your existing test flows keep working; the numbers above are for rehearsing specific outcomes. Developers can find the same table with response codes in the API docs.
Accounting
Keep the books posted without typing anything twice. Connect QuickBooks Online or Xero and your processing activity, invoices, and payments flow into your accounting file automatically. Both cards sit under Accounting on the Integrations page, connect with a sign-in at the provider, and sync every 4 hours with a Sync now button in between.
 QuickBooks Online
Connecting QuickBooks Online keeps your books current automatically: Merchant360 posts your processing activity into QuickBooks as journal entries, and you keep categorizing and reconciling the way you already do.
What syncs: each funded batch posts a journal entry (debit EPI Processing Clearing, credit Merchant Processing Sales); processing fees are already netted into the deposit, so they are not posted separately; chargebacks post to a Chargebacks & Adjustments expense account against the clearing account; refunds reduce the batch deposit they are part of; and invoices, customers, and payments you take in Merchant360 appear in QuickBooks as invoices and payments, with customers created automatically by name. On the first sync, Merchant360 creates the accounts it posts to if they do not exist.
Bank feed rule: when your processing deposit appears in the QuickBooks bank feed, categorize it to EPI Processing Clearing (or click Match when QuickBooks suggests it). Never Add it as new income, or the deposit is counted twice.
Access scope: Merchant360 creates and reads journal entries, invoices, customers, and items. It never touches payroll or banking credentials. The card also has a Mark the invoice paid automatically switch, which records Merchant360 payments against the matching QuickBooks invoice; invoices that already show a zero balance are skipped.
If the card shows Not connected after it worked before, the authorization expired or was revoked; press Connect and sign in again, and sync resumes from where it left off. If entries are missing, press Sync now and check the Synced N items result. Duplicates cannot come from re-running: each batch, fee, chargeback, and refund syncs exactly once. Wrong accounts: journal entries post to the accounts named on their lines; your bookkeeper can reclassify in QuickBooks, or contact support to change the default mapping.
- 1Go to Account → Integrations and click Connect on the QuickBooks Online card.
- 2Sign in at Intuit, choose the QuickBooks company, and authorize the Merchant360 app.
- 3You return to Integrations showing Connected. The first sync runs automatically; after that it runs every 4 hours.
- 4Need it now? Click Sync now to force an immediate sync.
| On this screen | What it does |
|---|---|
| Connect | Sends you to Intuit to sign in and authorize. You come back to the card showing Connected. |
| Connected · last synced | Status line with the time of the last sync, or never synced yet. |
| Sync now | Pushes all activity since the last run immediately. Shows Synced N items (N failed) when done. |
| Mark the invoice paid automatically | Toggle. When on, payments taken in Merchant360 are recorded against the matching QuickBooks invoice. Zero-balance invoices are skipped. |
| Disconnect | Confirms, then revokes Merchant360's access in Intuit and stops the sync. |
| How sync works | Panel on the page describing the journal entries for deposits and chargebacks and the 4-hour schedule. |
Duplicate or wrong entries? Each batch, fee, chargeback, and refund syncs exactly once, so re-running never re-posts. Journal entries land in the accounts named on their lines; your bookkeeper can reclassify in QuickBooks, or contact support to change the default mapping.
 Xero
Xero
Xero connects the same way as QuickBooks Online and posts your Merchant360 activity into Xero automatically. Each funded batch and each chargeback or adjustment posts as a balanced manual journal that runs through an EPI Processing Clearing account, so your real bank-feed deposit reconciles against the clearing account and nothing double-counts.
Invoices and payments too: the invoices you send from Merchant360 sync into Xero as sales (ACCREC) invoices, the customer is created as a Xero contact automatically, and as those invoices get paid the payments post against them, applied to the clearing account. Each invoice and payment syncs exactly once.
Settled card batches from your billing tools post as manual journals as well. When a dropdown custom field is set to post as a class, Xero gets it as a tracking category named after the field, with one tracking option per dropdown value, so your Xero reports break income down by program the way QuickBooks classes do. Xero allows two active tracking categories per organization; if both are already in use, entries post without tracking and the sync log says so.
Access scope: Merchant360 works with your chart of accounts, contacts, tracking categories, manual journals, invoices, and payments in your Xero organization. It never touches payroll, files, or bank credentials.
If you connected the wrong Xero organization, click Disconnect, then Connect again and choose the right one. If tracking is missing on new entries, free up one of Xero's two tracking category slots and run Sync now.
- 1Go to Account → Integrations and click Connect on the Xero card.
- 2Sign in at Xero, choose the organization to connect, and authorize Merchant360.
- 3You return to Integrations showing Connected; the first sync runs automatically, then every 4 hours. Use Sync now for an immediate update.
| On this screen | What it does |
|---|---|
| Connect | Sends you to Xero to sign in, pick the organization, and authorize. |
| Connected · last synced | Status line with the time of the last sync. |
| Sync now | Runs the sync immediately and reports Synced N items (N failed). |
| Mark the invoice paid automatically | Toggle that records Merchant360 payments against the matching Xero invoice; zero-balance invoices are skipped. |
| Disconnect | Confirms, then revokes access at Xero and stops the sync. |
Your website & online store
Take payments where your customers already are. WooCommerce covers a full online store; the WordPress Pay Widget covers everything else: donations, one-time payments, subscriptions, and letting customers look up and pay an invoice right on your site. Both connect from this page, and both have their own step-by-step chapter.
 WooCommerce
Run your online store on WordPress with WooCommerce? Merchant360 has a full plugin that takes credit and debit cards on your store through your Merchant360 account, and, if your account has gift cards, sells and accepts them too. The card is entered on Merchant360's secure window, so card data never touches your site.
The WooCommerce card under eCommerce shows the store's connection state: Connected with one click when you used the Connect with Merchant360 button in the plugin, or Connected with a key when you pasted a key. It also has Get the plugin on WordPress.org, the Setup guide link, and Generate a key for the manual setup, with a Test/sandbox key option for practice orders.
The setup is its own step-by-step guide with screenshots: installing the plugin, connecting it, choosing how customers pay, and turning on gift cards.
If the card shows Not connected but the plugin says connected, the store connected to a different Merchant360 account; sign in to the right account and connect again from the plugin.
| On this screen | What it does |
|---|---|
| Get the plugin on WordPress.org | Opens the plugin's page in the WordPress plugin directory. |
| Setup guide | Opens the WooCommerce chapter of this guide. |
| Generate a key | Creates an API key for the manual setup. It is shown once; copy it into the plugin's API key field. |
| Test/sandbox key | Option when generating: the key creates test payments only, so practice orders never charge a card. |
| Connected with one click / Connected with a key | Status showing how the store was connected. |
| Authorize & connect | The approval screen you see in Merchant360 when the plugin's Connect with Merchant360 button sends you here. Connect in test mode makes it a sandbox connection. |
 WordPress
Have a WordPress site but no online store? You can still take card payments on it with Merchant360, for donations, one-time payments, and subscriptions, by pasting a small snippet onto a page or linking a secure pay page. No WooCommerce is required, and the card is entered on Merchant360's secure form, so card data never touches your site.
Everything is set up under Take Payments → Pay Widget: turn the widget on, choose the payment types, set the amount range and branding, then copy the embed snippet or the pay-page URL. This is its own step-by-step guide with graphics.
If the widget refuses payments on your page, check the Master switch on the Pay Widget page is On and that the payment type your page uses is ticked under Payment types.
| On this screen | What it does |
|---|---|
| Pay Widget → Master switch | Turns the hosted page and the embed on or off together. |
| Payment types | Which flows the widget accepts: Fixed amount, Donations, Save card on file, Pay external invoice, Pay Merchant360 invoice, Subscriptions. |
| Embed snippet → Copy | Copies the code you paste into a WordPress page. |
| Copy URL / Preview | Copies the hosted pay-page link, or opens it so you can see what customers see. |
In your browser
Some software you work in every day will never have a payments button. The Chrome extension puts one in your browser instead: payments from a side panel, in any web-based software, without leaving the page. It connects from the Payments category on the Integrations page.
Merchant360 Chrome Extension - Add Payments to your Chrome Browser
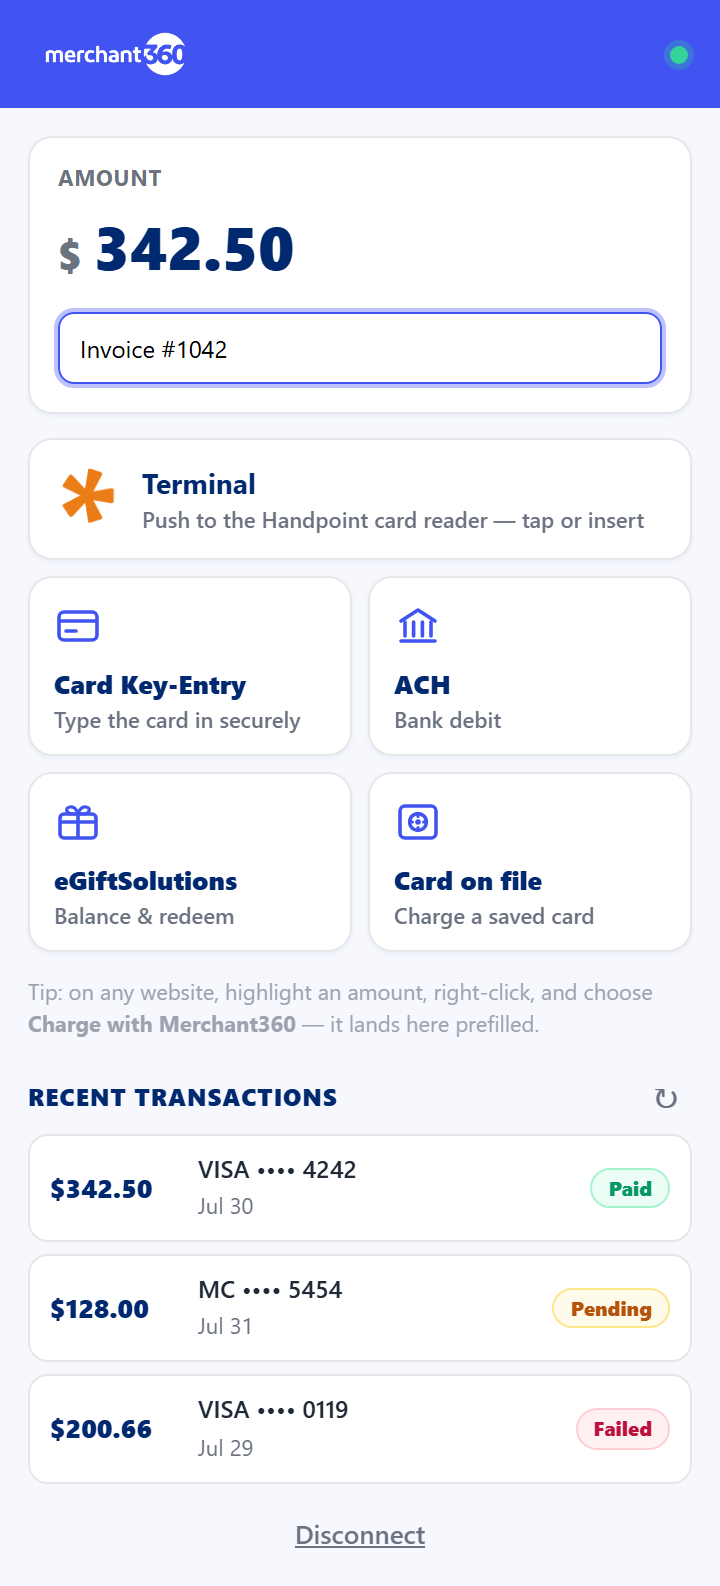
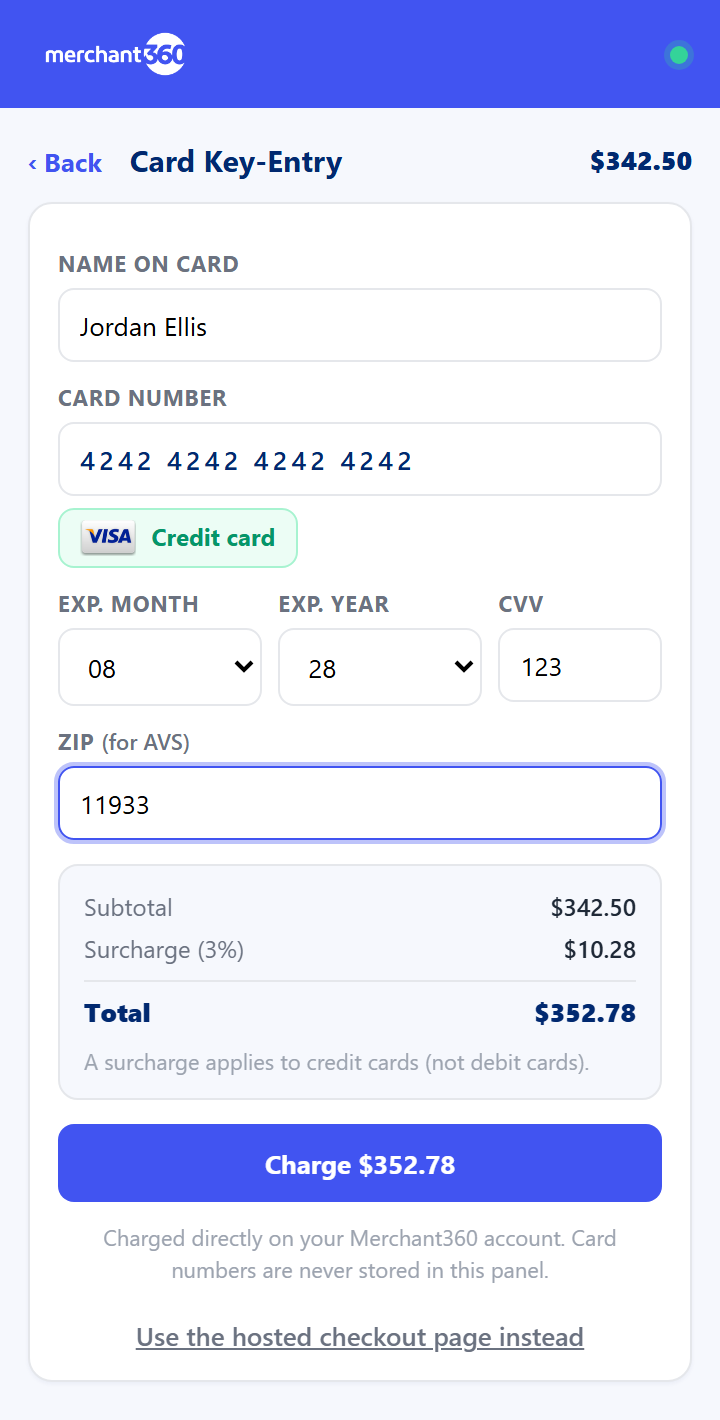
The Merchant360 Payment Extension is a Chrome and Edge browser extension that puts your card processing inside any web-based software: your shop system, your EMR, your ERP, even when that software's payments are locked to its own processor. Highlight an amount on the page, right-click, and choose Charge with Merchant360. Our secure hosted checkout opens at that amount, the customer's card is taken there and never in your software, and the extension hands back the transaction ID to record in the software's payment note.
In supported apps like QuickBooks Online it goes further: the extension detects the invoice's balance due on its own and shows a Pay with Merchant360 button, with no highlighting needed.
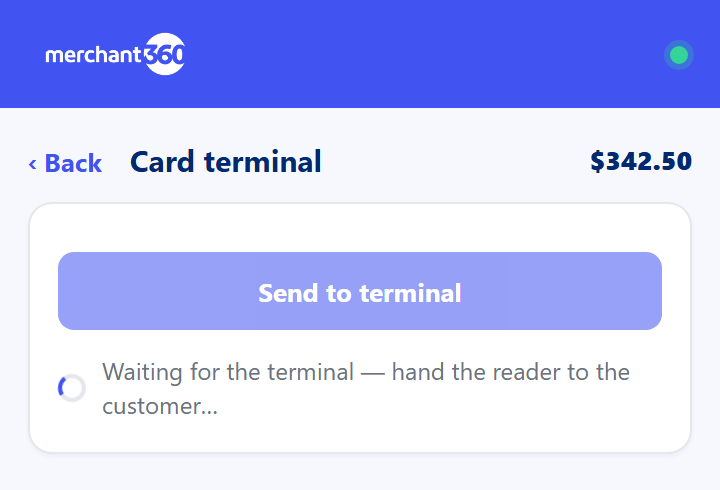
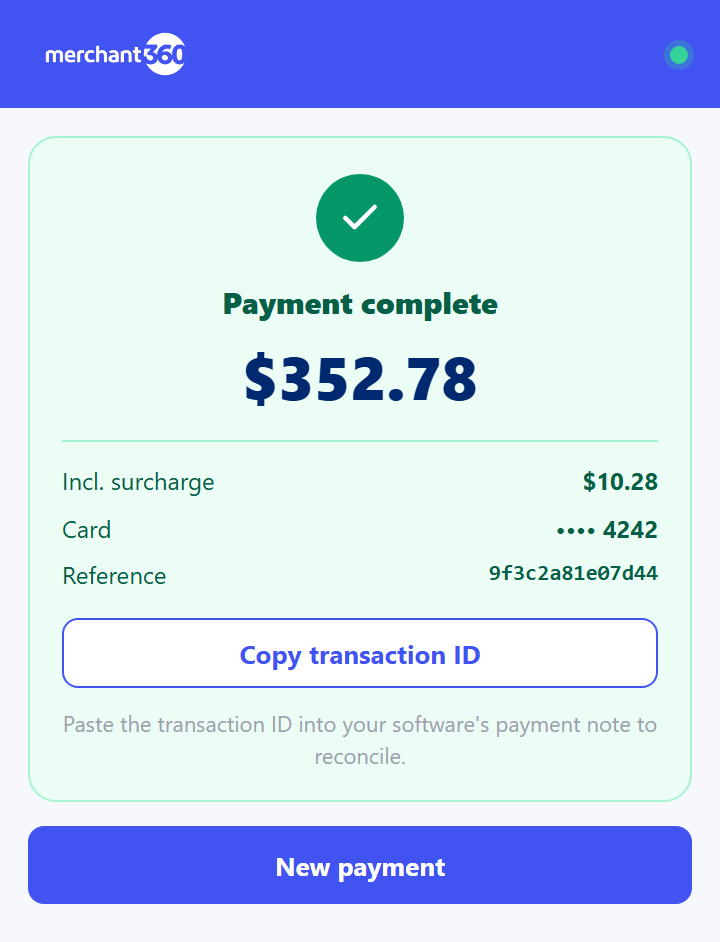
Retail counter? If your account has a Handpoint card-present reader paired, the extension also shows Send to card terminal. The amount goes to the physical reader, the customer taps or inserts, and the result (card, amount, transaction ID) comes back to the extension. No keying, and card-present rates apply.
Repeat customer? Charge a card on file skips entry entirely: search the customer by name or email, pick their saved card (shown as brand and last four only, since the card itself lives in the secure vault), and the amount charges in one click.
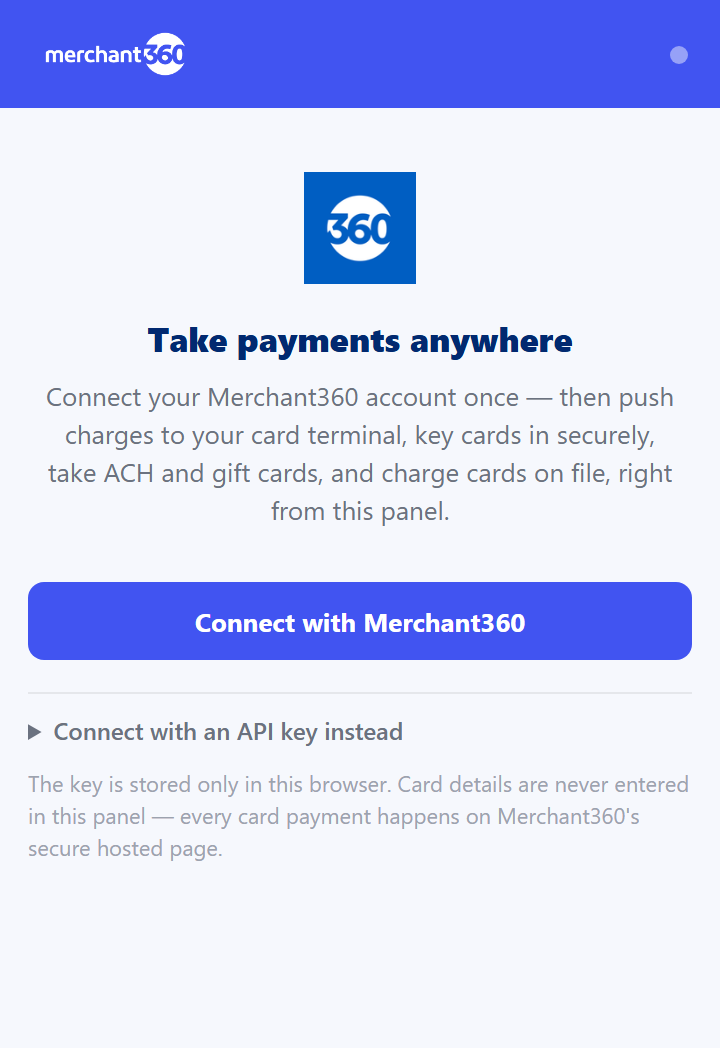
Setup is two steps: install the extension from the Get the extension button on the Integrations page, then click Connect with Merchant360 in the extension. You sign in, see what the extension will be allowed to do, and click Authorize & connect. The extension configures itself with a checkout-only key; there is nothing to copy. Connect in test mode lets you try it with no real charges.
Payments settle, report, and refund from your Merchant360 dashboard like every other sale, and your surcharge or dual-pricing program applies automatically. If the connect tab does not hand the key back, the page shows a manual hint; if a charge does not appear in Transactions, check whether the extension was connected in test mode, in which case it is under Test Mode Transactions.
| On this screen | What it does |
|---|---|
| Get the extension | Button on the Integrations page that opens the extension download page. |
| Connect with Merchant360 | In the extension: sends you to Merchant360 to sign in and approve. |
| Connect the Payment Extension → Authorize & connect | The approval screen in Merchant360. It lists what the extension may do: open hosted checkouts at amounts you choose, read the result (transaction ID, amount, card last four), and nothing else. Connect in test mode makes it a sandbox connection. |
| Connected | Shown when the key has been handed to the extension. You can close the tab and start taking payments. |
| Charge with Merchant360 | Right-click menu item on a highlighted amount. Opens the hosted checkout at that amount. |
| Pay with Merchant360 | Button the extension shows on a supported app's invoice with the balance due already filled in. |
| Send to card terminal | Pushes the amount to your paired Handpoint reader for a tap or insert. |
| Charge a card on file | Search a customer and charge one of their saved cards in one click. |
| Transaction ID | Returned after each payment so you can paste it into your software's payment note. |
Every payment happens on Merchant360's hosted checkout. The full software directory lives at merchant360.net/extension.
Sales tax
Stop maintaining tax rates by hand. Connect TaxJar or Avalara and every invoice calculates the exact rate from your customer's full address and your tax nexus, county and city taxes included. If both are connected, Avalara is used first, then TaxJar, then your own Tax rates, so an invoice never fails to calculate.
 TaxJar
TaxJar is an automated sales-tax service. Once you connect it, Merchant360 asks TaxJar for the exact sales-tax rate on each invoice, based on your customer's full address and the places you have tax nexus, instead of the flat per-state rate you would otherwise set by hand. It is the most accurate option, especially if you sell into many states or into places with county or city taxes.
You control this from Account → Integrations, in the Sales tax section. Connecting is just pasting your TaxJar API token; nothing else changes about how you make invoices.
When TaxJar is connected, it takes over the rate on your invoices automatically. Your Taxable settings on items still apply (a non-taxable item is never taxed), and if TaxJar cannot answer for some reason, Merchant360 quietly falls back to your own Tax rates so an invoice never fails to calculate. Disconnect any time and you are back to your manual rates.
If an invoice shows your manual rate instead of TaxJar's, the customer has no full Bill To address; add the street, city, state, and ZIP and the rate recalculates. If Test connection fails, the token was revoked in TaxJar; create a new one and reconnect.
- 1In TaxJar, go to Account → API Access and copy your API token.
- 2In Merchant360 go to Account → Integrations, find the Sales tax section, paste the token into the TaxJar card, and click Connect TaxJar. Tick Sandbox first if you are testing with a TaxJar sandbox token.
- 3It verifies the token and shows Connected. Use Test connection any time to confirm it is still working.
- 4Make invoices as normal; tax is now calculated by TaxJar from the customer's Bill To address. Disconnect on the same card to go back to your manual rates.
| On this screen | What it does |
|---|---|
| API token | Field for the token from TaxJar (Account → API Access). Stored encrypted and never shown again. |
| Sandbox | Tick when the token is a TaxJar sandbox token so calls go to the sandbox. |
| Connect TaxJar | Verifies the token and switches invoice tax to TaxJar. |
| Connected | Status once the token has been verified. |
| Test connection | Runs a live check against TaxJar and reports success or the exact error. |
| Disconnect | Removes the token; invoices go back to your manual Tax rates. |
Your token is stored encrypted and never shown again. TaxJar uses your business address as the origin for the calculation. Both Merchant360 (for your own invoices) and ISO360 (for offices billing on behalf) have their own TaxJar connection.
 Avalara AvaTax
Avalara AvaTax is the second automated sales-tax option, in the same Sales tax section. Like TaxJar, once connected it calculates the exact rate for each invoice from your customer's full address and your tax nexus. Avalara is the enterprise-grade choice, common with accountants and larger operations, and the one to pick if your bookkeeper already files through Avalara.
Rate quotes only: Merchant360 asks Avalara for the tax amount but does not record transactions into your Avalara ledger, so nothing here double-reports against what your accountant files. Your Taxable settings on items still apply, and if Avalara cannot answer, Merchant360 falls back to TaxJar (if connected) and then to your own Tax rates; an invoice never fails to calculate.
If you connect both Avalara and TaxJar, Avalara is used first.
If Connect Avalara fails, check that the Account ID and License key come from the same Avalara account and that Sandbox matches where they were created. If your Avalara account has several company profiles and the wrong one is answering, enter the Company code and reconnect.
- 1In Avalara, go to Settings → License and API keys and note your Account ID and License key.
- 2In Merchant360 go to Account → Integrations → Sales tax, enter both into the Avalara AvaTax card (plus an optional Company code if your Avalara account has more than one company profile), and click Connect Avalara. Tick Sandbox first if you are testing against an Avalara sandbox account.
- 3It verifies the credentials and shows Connected. Use Test connection any time.
- 4Make invoices as normal; tax now comes from Avalara. Disconnect on the same card to go back to TaxJar or your manual rates.
| On this screen | What it does |
|---|---|
| Account ID / License key | Fields for the credentials from Avalara (Settings → License and API keys). The license key is stored encrypted and never shown again. |
| Company code (optional) | Selects which company profile answers when your Avalara account has more than one. |
| Sandbox | Tick when testing against an Avalara sandbox account. |
| Connect Avalara | Verifies the credentials and switches invoice tax to Avalara. |
| Connected | Status once the credentials have been verified. |
| Test connection | Runs a live check against Avalara and reports the result. |
| Disconnect | Removes the credentials; invoices fall back to TaxJar or your manual rates. |
The license key is stored encrypted and never shown again. Like TaxJar, both Merchant360 and ISO360 (offices billing on behalf) have their own Avalara connection.
CRM & marketing
Connect the platforms you sell and market through, so payments and leads flow without copy-paste. LeadConnector connects from the Business platforms category on the Integrations page.
 LeadConnector
Merchant360 connects to LeadConnector in two ways: as your payment processor, and as a lead source for offices that recruit through LeadConnector. You only need the part that applies to you; most merchants use payments, and sales offices use lead sync.
Payments: once connected, Merchant360 becomes a payment provider inside your LeadConnector sub-account, so your invoices, order forms, payment links, and subscriptions charge cards through your Merchant360 account. The buyer enters their card on Merchant360's secure checkout window and the money settles to you, the same as every other Merchant360 payment. You keep the receipts, refunds, and reporting you already use.
Leads, for sales offices: if your office works leads in LeadConnector, connecting it makes the sync two-way. LeadConnector contacts and opportunities flow into your lead list, and leads you create or edit there mirror back into LeadConnector. This is set up by the office from its own Integrations page rather than here.
Subscriptions bill through your account too: when a LeadConnector subscription is created against a saved card, the first cycle charges immediately and renewals run automatically on schedule. After three failed renewal attempts the subscription is marked past due so you can follow up.
Bank payments and pricing in the LeadConnector checkout: when Bank (ACH) is on under Payment methods, the checkout window offers Card and Bank side by side with the price of each. Bank pays the invoice amount and has no fee; the customer connects their bank or enters the account, and the payment settles in one to three business days. The LeadConnector invoice shows paid when the money settles, not when the customer submits, so a returned payment never leaves a paid invoice behind. With dual pricing on, the card price shows next to the bank price; card pays the card price, bank pays the cash price, and the LeadConnector invoice stays at the invoice amount with the card price recorded on the Merchant360 transaction and the receipt. Dual pricing shows in the checkout only when Bank is on. A surcharge program shows as a fee on credit cards, with bank and debit at no fee. Refunds requested from LeadConnector are scaled to what the card was charged, and subscriptions on a saved card bill at the card price the customer accepted. Bank payments are refunded from ACH Transactions in Merchant360.
Which account gets linked: each LeadConnector sub-account links to exactly one Merchant360 account, and that account receives its live payments. Installing the app while signed in to Merchant360 in the same browser links the sub-account to that account. Installing while signed out saves the connection with no account, and signing in later does not claim it; sign in to the account that should receive the payments, click Connect on the LeadConnector Payments card, and choose the sub-account. To move a sub-account to a different Merchant360 account, sign in to that account, click Connect, and choose the same sub-account; the link moves and the previous account stops receiving its payments. Disconnect ends the link on the Merchant360 side only: the app stays installed, test mode keeps working, and live charges are declined until a sub-account is linked again. An agency-level install links every sub-account to the account you were signed in to (or to none), and each can still be moved on its own with Connect.
The card shows Linked with a Finish setup button when the sub-account is connected but the payment provider is not active yet, and Connected once Merchant360 is your LeadConnector payment provider. If a live charge in LeadConnector is declined with no card error, no sub-account is linked to this Merchant360 account; click Connect and choose it. If the provider stopped working after you reinstalled the app, click Re-run setup and set Merchant360 as the default provider again in LeadConnector.
- 1Connect payments: go to Account → Integrations and click Connect on the LeadConnector Payments card. Sign in at LeadConnector and choose the sub-account to connect. Installing from the LeadConnector marketplace works too; the confirmation page links to a short getting-started guide at merchant360.net/crm-guide.
- 2Approve access. Merchant360 registers itself as a payment provider on that sub-account automatically; there is nothing to paste. If the card reads Linked, click Finish setup.The installation will be more seamless if you are logged in to your Merchant360 account at the same time you are performing the install per these instructions in LeadConnector.
- 3In LeadConnector, open Payments → Integrations and set Merchant360 as the default payment provider. This is a one-time click; repeat it if you ever uninstall and reinstall the app.
- 4Take payments: your invoices, order forms, payment links, and subscriptions now charge on Merchant360's secure card window, with your logo and business details on it, and the funds settle to your account.
- 5Connect leads (offices): from your office's Dashboard → My Office → Integrations, click Connect on LeadConnector and choose the sub-account. New contacts and opportunities start appearing in your leads automatically, and your lead edits flow back.
| On this screen | What it does |
|---|---|
| Connect | Sends you to LeadConnector to sign in and choose the sub-account. Choosing a sub-account already linked elsewhere moves it to this account. |
| Linked – click Finish setup | The sub-account is connected but the payment provider is not active yet. |
| Finish setup | Activates Merchant360 as the payment provider on the sub-account. |
| Connected – Merchant360 is your LeadConnector payment provider | Status once payments are flowing through your account. |
| Re-run setup | Registers the payment provider again, for example after the app was reinstalled. |
| Disconnect | Ends the link on the Merchant360 side. The app stays installed, test mode keeps working, and live charges decline until a sub-account is linked again. |
| Saved Cards → LeadConnector wallet | Cards buyers saved in the LeadConnector checkout window, listed with your other saved cards. |
| Transactions → Source: LeadConnector | Every LeadConnector payment shows its source, and you refund it here like any other sale. |
Card entry: the card is captured on Merchant360's window. Test mode: switch the provider to test mode in LeadConnector (or before payments are activated on your account) and every charge simulates; card 4242 4242 4242 4242 approves with no real money moving. Saved cards: buyers can save a card in the checkout window, and those cards also appear under the LeadConnector wallet section of your Saved Cards page. Refunds: refund a LeadConnector payment right from your Merchant360 transactions; the transaction's source reads LeadConnector so you always know where it came from. Leads and payments are independent; connecting one does not require the other.