
Virtual terminal
Key in a card from any browser – no hardware needed.
Take a card payment
The virtual terminal turns any browser into a card terminal. Use it whenever a customer reads you a card number: phone orders, deposits, the balance on an open order, or a card that will not tap on your countertop reader.
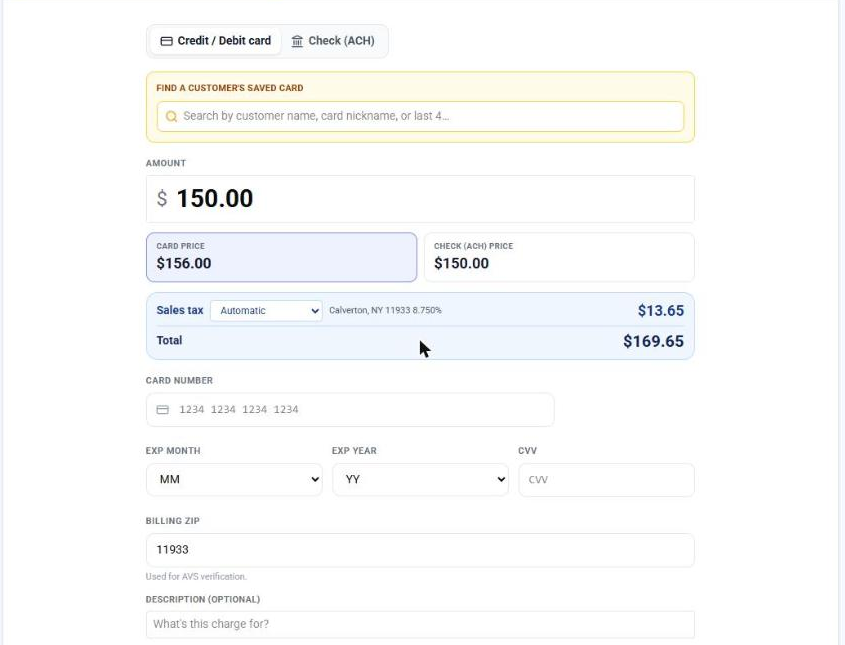
It is live once your card processing is active. Nothing needs to be installed. The page opens on the Card/Check mode with the Credit / Debit card rail selected, and the form reads top to bottom in the order you work: a search for a card the customer already saved, the amount, the prices that amount produces, then the card itself.
A payment is done when the result panel shows Approved with a transaction number and an authorization code. The sale is on Money → Transactions right away, and the receipt goes to the buyer email you entered.
If the charge declines, the reason shows under the form. Confirm the card number, expiration, security code, and billing ZIP with the customer and try once more. A second decline usually means the card issuer is refusing the charge, so ask for a different card instead of keying the same one again.
- 1Go to Accept Payments → Virtual Terminal.
- 2Charging a card you already have on file? Use Find a customer's saved card at the top and pick it by name, email, nickname or last four. The card fields disappear and the sale charges the card on file.
- 3Enter the amount. It fills the full width of the form.
- 4With dual pricing on, the Card price and Check (ACH) price boxes appear under the amount so the two prices are always in view.
- 5Read the price panel under them: Sales tax with its amount (only when you switched tax on for card sales; it reads $0.00 until you choose Automatic), the Surcharge when your program applies one to this card, the Tip when you entered one, and the Total.
- 6Type the card number. The brand chip appears from the first digits, and when you move to the next field the middle digits are masked so nobody looking at your screen sees a full card. Click back into the field to edit it.
- 7Pick the expiration month and year from the dropdowns and type the security code (three digits, four on American Express).
- 8Enter the billing ZIP. It is checked against the card's billing address, helps the charge approve, and is the ZIP automatic tax uses.
- 9Add a description or an invoice or reference number if you want it on the receipt and in your reports, and a buyer email and name to send the receipt automatically.
- 10Click Charge card. The approval or the decline reason appears in a second or two.
| On this screen | What it does |
|---|---|
| Card/Check, Gift Card, Loyalty | The mode bar at the top of the terminal. Card/Check is the default. The other two modes appear only when your account has gift cards or loyalty enabled. |
| Credit / Debit card and Check (ACH) | The rail choice under the mode bar. Credit / Debit card keys a card. Check (ACH) opens the bank payment form and appears only when bank payments are enabled on your account. |
| Find a customer's saved card | Search box at the top of the form. Pick a stored card by customer name, email, nickname or last four; the card fields disappear and the charge goes to the card on file. |
| Amount | The sale amount before tax, surcharge or tip. Full width; the prices and the panel under it update as you type. |
| Card price / Check (ACH) price | Shown under the amount when your account runs dual pricing. The card rail charges the Card price; the bank rail charges the Check price. |
| Sales tax | In the price panel, only when Sales tax on card sales is switched on under Accept Payments → Tax rates. $0.00 No sales tax is the default on every sale; Automatic looks the rate up and shows where it came from. See Sales tax in the terminal. |
| Surcharge | In the price panel, only on credit cards when your account runs a surcharge program. Calculated on the taxed amount. Debit cards show the reason no surcharge applies. |
| Tip | In the price panel when you entered a tip on an eligible sale. |
| Total | What the card will be charged: amount plus tax, surcharge and tip. |
| Card number | Detects the brand as you type and masks the middle digits when you leave the field. An invalid number is flagged before you can charge. |
| Exp month and Exp year | Dropdowns for the expiration date. An expired date is refused before the charge is sent. |
| CVV | The security code from the back of the card (four digits on the front for American Express). It is never stored. |
| Billing ZIP | The ZIP code of the card's billing address, used for address verification and for automatic sales tax. A mismatch shows in the transaction's AVS result. |
| Description | Free text that prints on the receipt and shows on the transaction. Use it for what the payment was for. |
| Invoice / reference number | An optional reference that is saved on the transaction and printed on the receipt, for example INV-2026-001. |
| Buyer email and Buyer name | Sends the receipt to this address the moment the charge approves. Leave it blank to skip the emailed receipt; you can still send one from the transaction later. |
| Custom payment fields | Any custom field you enabled for the virtual terminal under Settings → Custom payment fields appears here and its value is saved with the payment. |
| Save this card to vault | Tokenizes the card on approval so you can charge it again without re-keying. See Save a card to the vault. |
| Charge card | Submits the sale. The button is disabled until the amount, card, expiration, and security code are valid. |
| Approved / Declined | The result panel. Approved shows the transaction number, the authorization code and the breakdown (amount, sales tax, surcharge, tip, total); Declined shows the issuer's reason. |
| Void and Refund | Shown on the result panel right after an approval so you can reverse a mistake on the spot. Later, run them from Money → Transactions. |
Phone orders, deposits, and pay-by-phone balances all live here, anywhere you would have said "read me your card number". The keyed sale is a card-not-present transaction, so the billing ZIP and security code matter for the approval and for your rates.
Save a card to the vault
Saving a card lets you charge the same customer again later without asking for the number a second time. Use it for customers who order regularly, for deposits followed by a balance, or before setting up a recurring plan.
The card is stored as a secure token; the full number never sits in your account. Tick the box before you charge. If the customer does not have a customer record yet, saving the card creates one from the name and email on the sale.
You are done when the approval panel confirms the card was saved. The card then appears on Accept Payments → Saved Cards and in every card picker: the Charge a saved card panel in the terminal, invoice auto-charge, recurring plans, and subscriptions.
If the sale approves but the save fails, the sale stands and you simply do not have the card on file. Add it from Saved Cards → Add a card instead, which stores the card with no charge.
- 1Enter the amount and the card as usual.
- 2Tick Save this card to vault before clicking Charge card.
- 3Add the buyer email so the token is tied to the right customer record.
- 4Click Charge card. The approval panel confirms the sale and that the card was saved.
- 5Open Accept Payments → Saved Cards to add a nickname, mark it as the default, or archive it later.
| On this screen | What it does |
|---|---|
| Save this card to vault | Checkbox under the card fields. On approval the card is tokenized and attached to the customer on the sale. |
| Buyer email | Matches the saved card to an existing customer, or creates the customer record when there is none. |
| Charge a saved card | The panel on the same page where a saved card is picked and charged again. See Saved cards & charging a card on file. |
| Saved Cards page | Accept Payments → Saved Cards lists every stored card with its nickname, default flag, and how many recurring plans use it. |
Saving a card is a safe add-on. If it ever fails, the sale still goes through; you just will not have the card on file.
Surcharge & tips in the terminal
The terminal applies your pricing program for you. You key the base amount and the total box shows what the card will actually be charged, so there is nothing to calculate by hand.
With a surcharge program, a Surcharge program active banner sits above the form and the Subtotal, Surcharge, and Total lines appear as soon as a credit card is recognized. Debit and prepaid cards are never surcharged; the terminal detects them from the card number and drops the fee.
With dual pricing, two price tiles show the Card price and the Check (ACH) price for the amount you keyed. With Treat debit cards like ACH / cash turned on in Settings, the tiles read Credit price and Debit / ACH / cash price, and a note under the total tells you which price applied to the card you typed.
If your business takes tips, a Tip field appears on eligible sales and is added to the total before you charge. The tip field is hidden when a surcharge applies to that card. Tips can also be added later from the transaction while the batch is open.
If the surcharge or the second price does not appear, the program is not active on your account. Pricing programs are set up with your sales rep, and the dual pricing card is on Accept Payments → Settings.
| On this screen | What it does |
|---|---|
| Surcharge program active | Banner above the form when a surcharge program is on. It names the percentage added to credit card sales. |
| Subtotal / Surcharge / Total | The running total box. Surcharge appears only once the card is recognized as credit; the Total is what the card is charged. |
| Card price and Check (ACH) price | Dual pricing tiles showing both totals for the keyed amount. The card is charged the Card price. |
| Credit price and Debit / ACH / cash price | The same tiles when Treat debit cards like ACH / cash is on. A debit card keeps the lower price. |
| Credit card, credit price applied / Debit card, debit price applied | The note under the total telling you which price the typed card received. |
| Tip | Adds a gratuity to the total before the charge. Hidden when a surcharge applies to the card. |
Ring the base amount and let the terminal present the right total. The receipt itemizes the surcharge or shows the price that applied, which is what keeps your program compliant.
Sales tax in the terminal
Sales tax on the terminal is a setting, off until you turn it on, so a business that does not collect tax never sees a tax row. Go to Accept Payments → Tax rates and, under Virtual Terminal, tick Sales tax on card sales, Sales tax on bank (ACH) sales, or both.
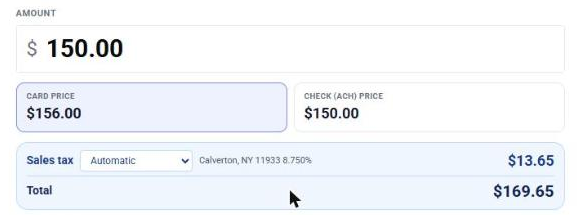
With a switch on, every sale on that rail offers two choices in the price panel: $0.00 No sales tax, the default on each new sale, and Automatic. Automatic answers from your own TaxJar or Avalara connection first, then from the ZIP lookup when your Tax rates page is set to ZIP lookup only or Both, and otherwise from the default row of your rate table. A ZIP is asked for only when the answer needs one: on the card rail it is the billing ZIP you already type with the card; on the bank rail a small ZIP box appears next to the choice.
Tax is added on top of the amount you entered. A surcharge, when one applies, is calculated on the taxed amount. The result panel and the emailed receipt itemize Subtotal, Sales tax, Surcharge, Tip and Total, the reprinted receipt from Money → Transactions shows the same lines, and the tax rides with the sale to your processor. A charge to a saved card adds the tax to the amount without itemizing it.
If Automatic shows no rate, the ZIP is missing or your rate table has no default row. Enter the ZIP, or add a default rate under Accept Payments → Tax rates. If the tax looks wrong for the area, run Test a ZIP on the Tax rates page to see what the lookup returns for that ZIP.
- 1Go to Accept Payments → Tax rates and tick the Virtual Terminal switch for card sales, bank sales, or both.
- 2On a sale, pick Automatic in the Sales tax row of the price panel when tax applies. Leave it on $0.00 No sales tax when it does not.
- 3Check the Sales tax amount and the Total before you charge.
| On this screen | What it does |
|---|---|
| Sales tax on card sales | Switch on Accept Payments → Tax rates. Off hides the Sales tax row on the card rail entirely. |
| Sales tax on bank (ACH) sales | The same switch for the bank rail. |
| $0.00 No sales tax | The default choice on every new sale. No tax is added. |
| Automatic | Looks the rate up: your connected provider, then the ZIP lookup when your lookup mode allows it, else your default rate row. The source shows next to the choice. |
| ZIP | Bank rail only: a five-digit box that appears next to Automatic when the lookup needs a ZIP. |
| Enter the billing ZIP for automatic tax | The card rail's reminder that Automatic is waiting for the ZIP you type with the card. |
| Sales tax amount | The tax on the sale, $0.00 until a rate answers. Recalculates when the amount or the ZIP changes. |
Tax is charged on top of the amount you entered, so type the pre-tax price and let the panel add the tax.
Gift cards & loyalty in the terminal
When your account has gift cards or loyalty enabled, the mode bar at the top of the terminal adds Gift Card and Loyalty next to Card/Check. Every stored-value and points operation runs from here, with the same keyed entry as a card sale.
Each mode is a row of tabs. Pick the tab, fill in the card number and the amount or points, and submit. The result panel shows the new balance and the transaction number, which you need for a later void, tip adjust, or refund.
You are done when the result panel confirms the operation, for example Redeem approved or Points added, with the new balance. Gift card and loyalty activity is reported in your eGift tools, not on the card Transactions page.
If a tab reports that the transaction is unsupported, that operation is not enabled for your gift program. Activate at the counter and balance checks work for every program; ask your rep about the rest.
| On this screen | What it does |
|---|---|
| Gift Card mode | Switches the terminal to gift card operations. Tabs: Redeem, Balance, Add Value, Activate, Void, Deactivate, Reissue, Store Credit, Tip Adjust, Balance Transfer, Expiration. |
| Redeem | Takes a payment from a gift card. Fields: Gift card number and Amount to redeem. Shows Redeem approved with the remaining balance. |
| Balance | Check balance looks up the card and shows its current value without changing it. |
| Add Value | Loads more value onto an existing card (Amount to add). |
| Activate | Activates a physical card you are handing out at the counter with an Activation amount. Online sales activate automatically. |
| Void | Reverses a gift transaction by its Transaction ID (the six-digit id from the result panel). |
| Deactivate | Closes a card. Choose Refund to cardholder for the remaining balance or Forfeit to just disable it. |
| Reissue | Moves the balance from an existing card to a new replacement card. |
| Store Credit | Issues merchandise credit onto a card, used when goods are returned in exchange for a gift card. |
| Tip Adjust | Adds a tip to a prior redeem using the Original redeem transaction ID. |
| Balance Transfer | Moves the balance from one existing card to another. Leave the amount blank to move the full balance. |
| Expiration | Sets a new expiration date on a card (YYYYMMDD) or clears it. |
| Loyalty mode | Switches to points. Tabs: Scan Coupon, Balance, Add Points, Redeem Points, Activate, Refund, Transfer, Void. |
| Scan Coupon | Look up coupon checks a customer's printed or emailed coupon code, marks it redeemed, and shows the card, customer, and points used so you honor the discount at the register. |
| Add Points / Redeem Points / Refund points / Transfer points / Void points | Adds, spends, restores, moves, or reverses points on a loyalty card. Each shows the new Point balance. |
| New balance / Point balance and Txn | The result panel after any operation: the balance now on the card and the transaction number to keep for voids or adjustments. |
Take a bank payment (eCheck)
Use the Check (ACH) rail to move money straight from a bank account instead of a card: larger invoices, business customers who pay by check, vendor payouts, or refunds to a customer's bank. It appears once bank payments are enabled on your account and the ACH Payment Terms are accepted.
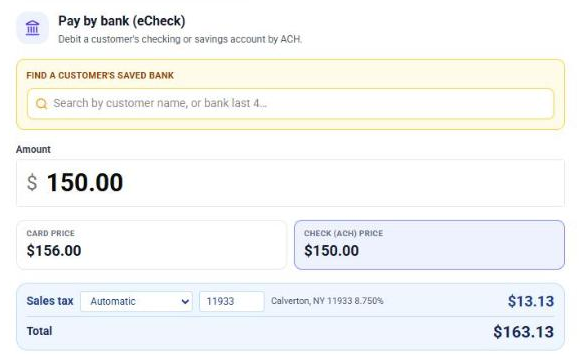
The bank rail reads the same way as the card rail: find a saved bank, the amount, the Card and Check (ACH) prices under it when dual pricing is on, then the price panel with Sales tax (when switched on for bank sales) and the Total, then the account fields. The bank rail charges the Check price.
Before you start you need the customer's bank details (account holder name, routing number, account number, and account type) or a bank you already saved for them, and for a debit, the customer's authorization (see the next section).
A bank payment is done when the terminal confirms it was submitted. Money does not move instantly. The customer gets a Payment submitted email at once and a receipt when the payment clears, both itemizing Subtotal and Sales tax when tax was charged. The payment shows on Money → ACH Transactions as Pending, moves to Processing when it is sent to the bank, and to Settled when the funds arrive. The deposit to your own bank follows the schedule in the Bank payments chapter.
If the routing number is not recognized, double-check it with the customer; the terminal looks up the bank name as you type and will not submit an unknown routing number. If the amount is refused, it is above your bank payment limits; split the payment or ask your rep to review your limits.
- 1Click Check (ACH) under the mode bar.
- 2Choose the direction. Debit (collect) pulls money from the customer's account into yours. Credit (pay out) sends money from you to them.
- 3To charge a bank you already stored, use Find a customer's saved bank and pick the account by name or last four. The account fields disappear and the form shows the account on file.
- 4Enter the amount. If Sales tax on bank sales is switched on, pick $0.00 No sales tax or Automatic in the price panel; Automatic asks for the customer's ZIP in the small box next to it when it needs one.
- 5Otherwise enter the bank details: Account holder name, Routing Number (the bank name appears once it is recognized), DDA Account Number, and the Account type.
- 6Add an optional description, complete the authorization step for a debit, then click Submit eCheck. The debit carries the total including tax. The confirmation shows the amount submitted and, for an emailed authorization, that the request went out.
- 7Follow the payment on Money → ACH Transactions until it settles.
| On this screen | What it does |
|---|---|
| Check (ACH) | The rail toggle that opens the bank payment form. Only shown when bank payments are enabled on your account. |
| Debit (collect) / Credit (pay out) | Direction of the payment. Debit collects from the customer and requires authorization. Credit pays out to the account and needs no authorization. |
| Find a customer's saved bank | Search box that lists banks stored on ACH Authorizations by customer name or account last four. Picking one charges the account on file with no re-keying. |
| Charging the saved account on file ending ... / Change | Confirms which stored account will be used. Change goes back to typing a new account. |
| Amount | The payment amount before tax. It must be within your bank payment limits. |
| Card price / Check (ACH) price | Shown under the amount when your account runs dual pricing. The bank rail charges the Check price. |
| Sales tax | In the price panel, only when Sales tax on bank (ACH) sales is switched on under Accept Payments → Tax rates: $0.00 No sales tax (default) or Automatic, with a ZIP box when the lookup needs one. |
| Total | The amount the debit or credit carries: the Check price plus sales tax. |
| Account holder name | The name on the bank account, as it appears at the bank. |
| Routing Number | Nine digits. The bank's name appears under the field once it is recognized. Bank not recognized means the number is wrong. |
| DDA Account Number | The checking or savings account number, digits only. On a saved bank it shows as on file. |
| Account type | Corporate Checking, Corporate Savings, Personal Checking, or Personal Savings. Business and personal accounts are handled differently by the bank network, so pick the right one. |
| Description | Optional text that shows on the ACH Transactions row and the customer's receipt. |
| Authorization | For debits only: I have the customer's authorization on file, or Email the customer to authorize. See Authorizing a bank debit. |
| Submit eCheck $X | Submits the payment for the total shown. On an emailed authorization the button reads Email authorization request for $X instead. |
Bank payments settle on the bank network's schedule, not instantly. Track every one on Money → ACH Transactions, which also shows when the money will be deposited to you.
Saved cards & charging a card on file
Saved Cards is the one place for every card stored at your business. Add a card with no charge, nickname it, mark one as the default for recurring billing, charge it, or archive it when the customer moves on. The same cards appear wherever you pick a card to charge: the terminal, invoice auto-charge, recurring plans, and subscriptions.
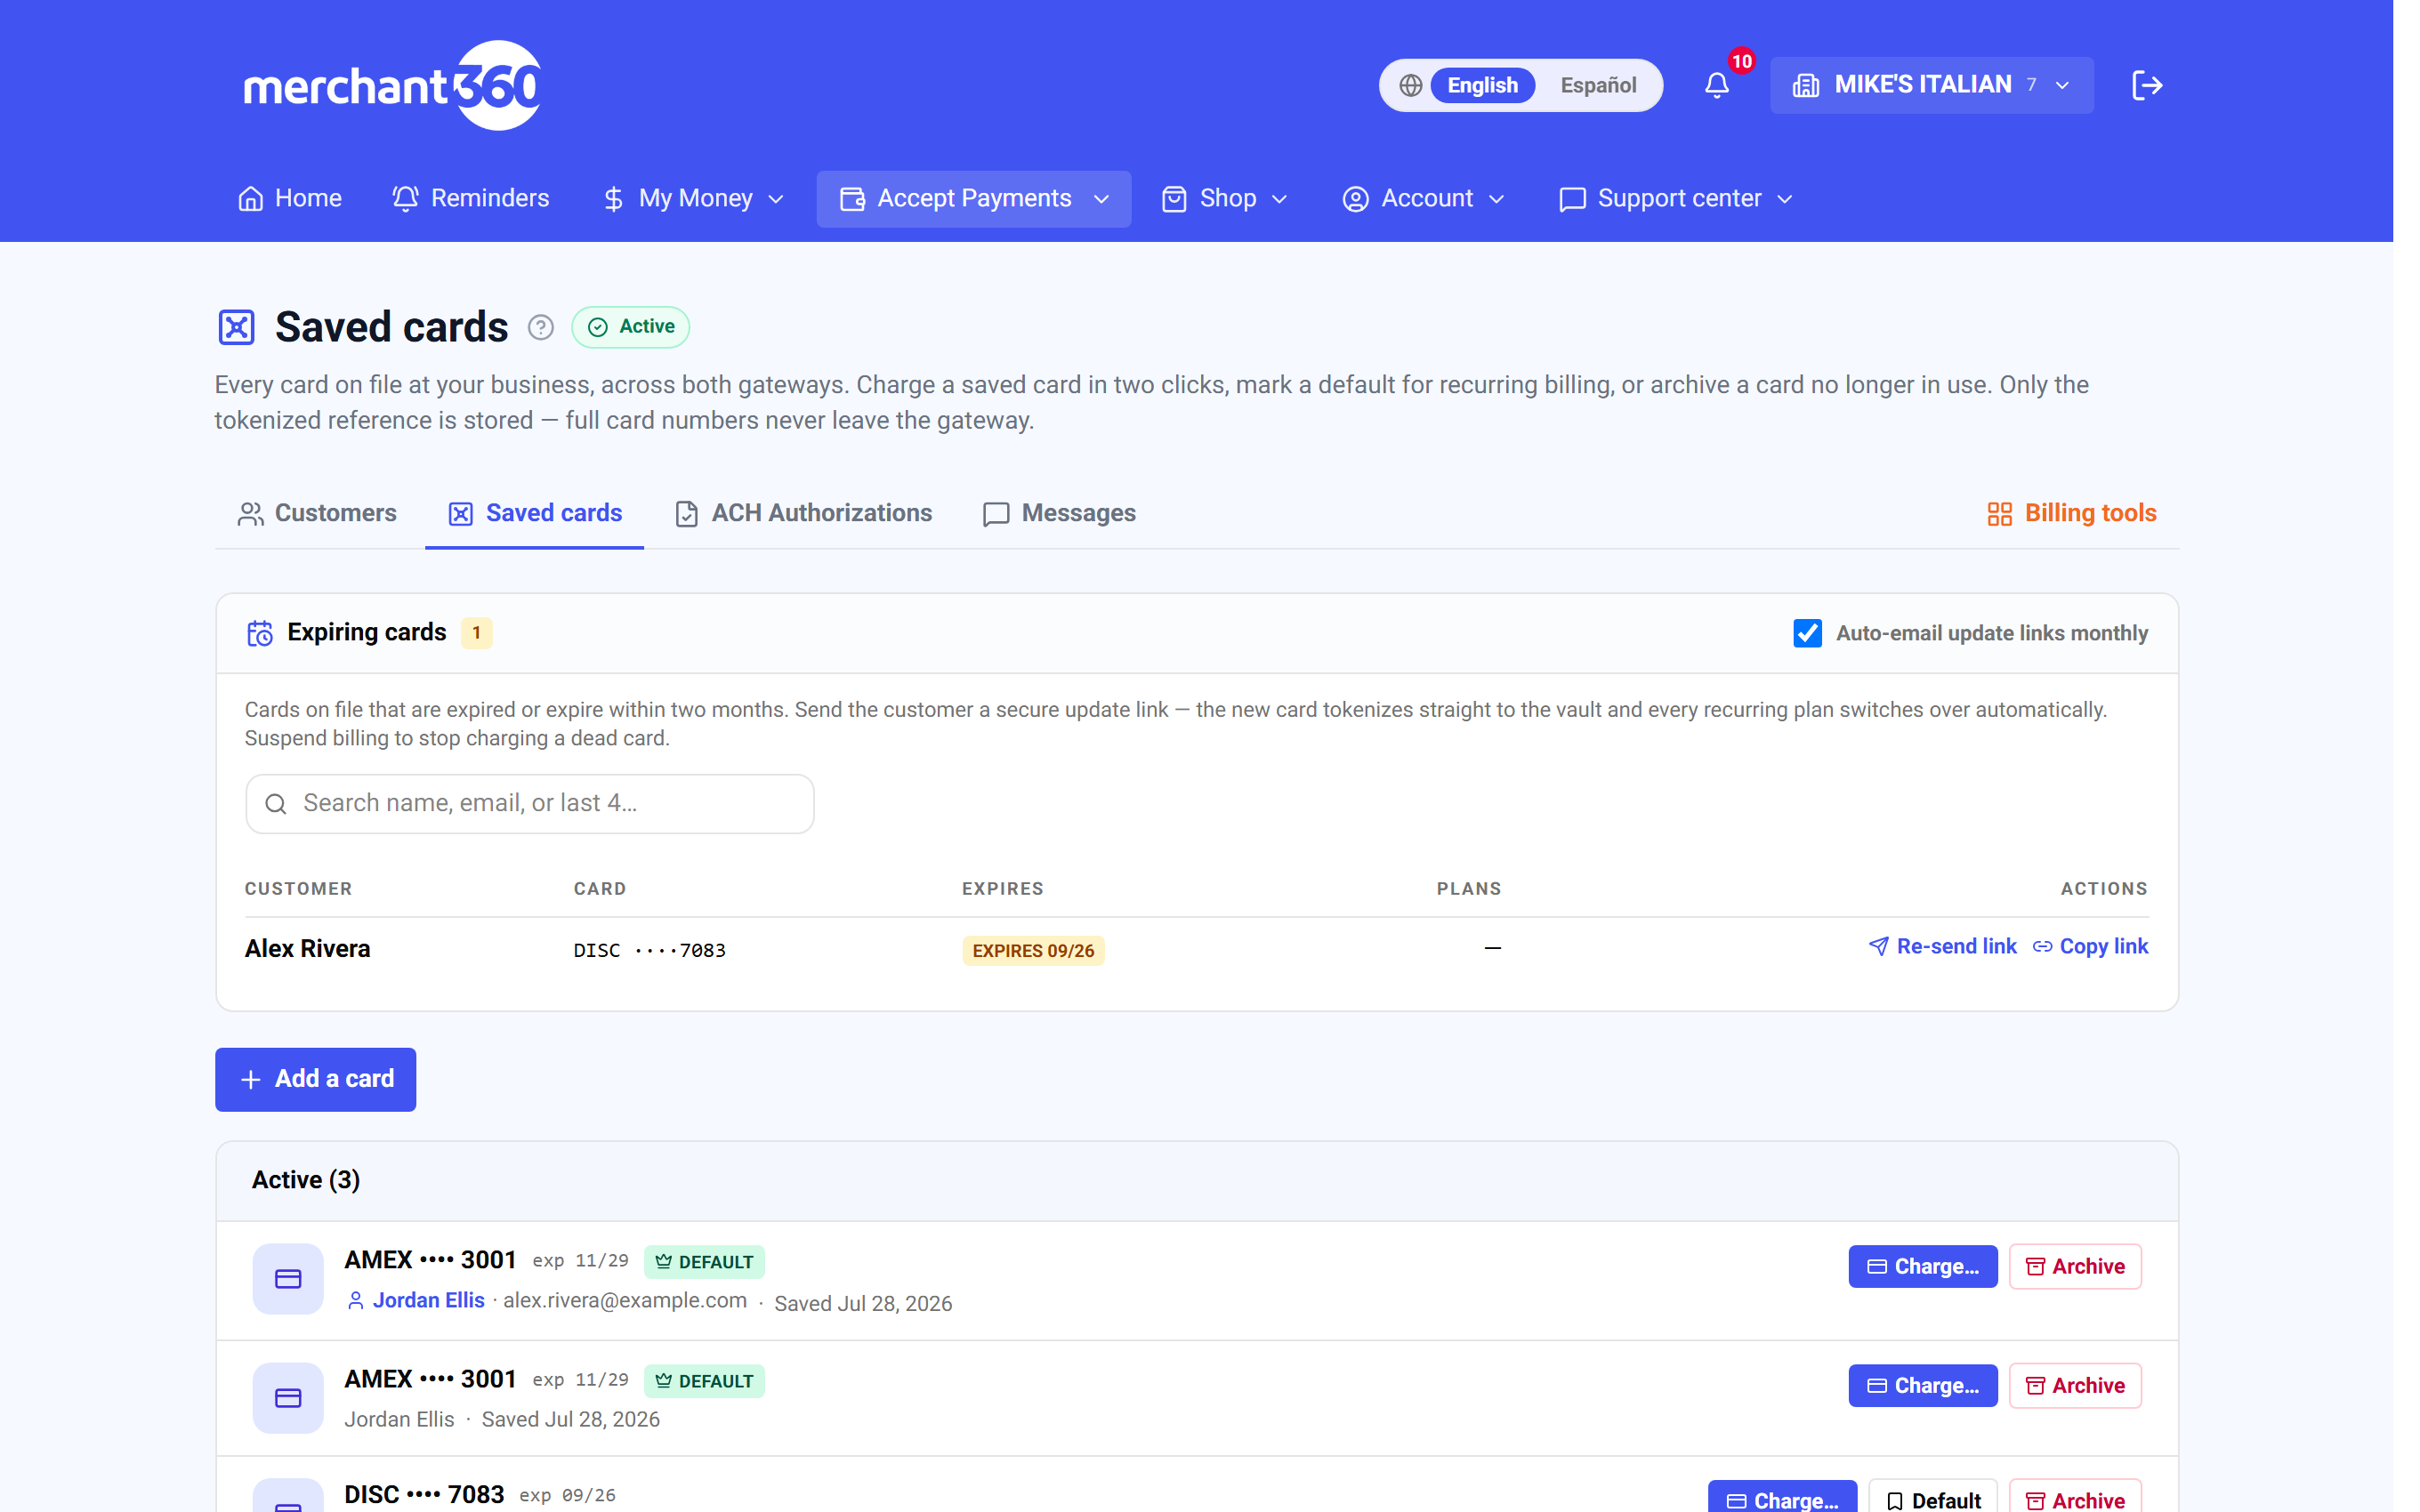
The page has four parts. The Add a card panel at the top. The Active and Archived lists, one row per card with brand and last four, nickname, the customer it belongs to, when it was saved and last used, and how many recurring plans use it. The Expiring cards panel, which lists cards expiring in the next two months with a link you can send the customer to update their card. And the Account Updater panel with the log of what the card networks reported. Cards your customers saved through LeadConnector checkouts appear in their own LeadConnector wallet section.
To charge a card on file, open the Charge a saved card panel on the virtual terminal, search by customer name, email, nickname, or last four, pick the card, and enter the amount. The card-entry fields disappear. The charge is done when the approval shows the amount and the card's brand and last four, and the customer gets the usual receipt.
If a saved card declines, check the Expiring cards panel and send the customer the update link, or run Check now to ask the network for a replacement number. If Add a card says saving is being enabled, card tokenization is not on for your account yet; contact EPI to turn it on.
- 1Add a card: click Add a card, enter the Card number, Expiry, Billing ZIP, Name on card, an optional Nickname and Email for receipts, tick Make this the default card if it should be the one recurring plans use, and click Save card. No charge is made.
- 2Charge a card on file from the Virtual Terminal: open Charge a saved card, type the customer's name, email, nickname, or last four, pick the card, enter the Amount and an optional Description or Invoice / reference number, and click Charge saved card.
- 3Or charge from this page: click Charge… on the card's row, enter the amount, and click Run charge.
- 4Mark a default with Default, or retire a card with Archive. Archiving a card used by an active subscription warns you first, so cancel or move the subscription on the Recurring page before archiving.
- 5Handle expiring cards: in the Expiring cards panel click Send update link (or Copy the update link to text it or read it over the phone). The customer enters the new card on a secure page and every plan on the old card moves to the new one.
| On this screen | What it does |
|---|---|
| Add a card | Opens the form to store a card with no charge: Card number, Expiry, Billing ZIP, Name on card, Nickname (optional), Email for receipts (optional), Make this the default card, Save card. |
| Active / Archived | The two lists of stored cards. Archived cards cannot be charged but can be restored from this page. |
| Default | The badge and the button that mark the card recurring billing should use for that customer. |
| N recurring | How many recurring plans or subscriptions charge this card. Check it before archiving. |
| Charge… | Opens the inline charge box (Charge $, Run charge, Cancel) and charges the card without leaving the page. The approval names the amount, brand, and last four. |
| Archive | Retires the card. Cards with active subscriptions warn you first. |
| Search name, email, or last 4… | Filters the Expiring cards panel. |
| Expiring cards: Customer, Card, Expires, Plans, Actions | One row per card expiring within two months. EXPIRED marks cards already past their date. |
| Send update link / Re-send link | Emails the customer a secure page to enter a new card. Needs an email on the customer record. |
| Copy the update link | Puts the same secure link on your clipboard to text it or read it over the phone. |
| Check now | Asks Visa, Mastercard, or Discover whether this card was reissued or renewed and saves the new number or expiry when there is one. |
| Pause every recurring plan charging this card | Stops the plans on that card until the customer updates it. Resume them from Recurring. |
| Account Updater: Automatic card updates | The panel's switch and the log of network checks (When, Card, Network, Result). Check expiring cards now runs a check on every expiring card. |
| LeadConnector wallet | Cards saved through LeadConnector checkouts: CRM contact, Card, Expires, Saved, Subscriptions, View in LeadConnector, Remove. A card with an active LeadConnector subscription cannot be removed until the subscription is cancelled there. |
| Charge a saved card (Virtual Terminal) | The terminal panel: Customer search, Card on file, Amount, Description, Invoice / reference number, Charge saved card. |
Paying by bank instead? The Check (ACH) side of the terminal has the same search for a customer's saved bank account. Find it by name or account last four and it charges the account on file with no re-keying.
Void or refund a sale
Voids and refunds run from the sale's transaction, not from the terminal, so there is one clear record of what happened to every payment. Right after an approval the terminal's result panel also offers Void and Refund for that sale, for a mistake you catch on the spot.
Which one you get depends on the batch. Before the batch settles, Void reverses the whole sale and the customer is never charged. After it settles, Refund returns the full amount or a partial amount to the same card. The two are never offered together.
A void is done when the transaction shows Voided. A refund is done when it shows Refunded, or a Partial Refund tag with the running total. The customer receives the refund on the same card in a few business days, and the transaction's detail page lists every refund with its approval code and a Refunded to date / Remaining breakdown.
If neither button appears, the sale was already voided or fully refunded, or it is a bank payment, which is cancelled from Money → ACH Transactions instead. If a large void or refund asks for a texted security code, enter the code sent to your mobile number to finish.
- 1Go to Money → Transactions and open the sale.
- 2If the batch has not settled yet, click Void. The whole sale is reversed before any money moves.
- 3If the sale has settled, click Refund, enter the full amount or a partial amount, and confirm. The money goes back to the same card.
- 4Use the same page to re-send or print the receipt, email it to a different address, add a tip, or adjust the captured total while the batch is still open.
| On this screen | What it does |
|---|---|
| Void | Reverses an unsettled sale in full. Shown only while the batch is open. |
| Refund | Returns money on a settled sale. Enter any amount up to what remains for a partial refund. |
| Partial Refund | The tag on a sale that was refunded in part, with the running refunded total. |
| Refunded to date / Remaining | The breakdown on the transaction detail page listing every refund with its approval code. |
| Re-send receipt / Print receipt | Sends the receipt again to the email on the sale or to a different address, or opens it to print. |
| Add tip / Adjust total | Changes the captured amount while the batch is still open, for example to add a tip written on the slip. |
| Texted security code | Large voids and refunds ask for a one-time code sent to your mobile number before they run. |
Void and refund are never both available: an unsettled sale shows Void, a settled sale shows Refund. If you are unsure, open the transaction and use whichever it offers.