
Handpoint terminal
A countertop card reader that takes the sale you ring up in Merchant360, or runs on its own with every sale reported back.
- What the Handpoint terminal is
- Push a sale from Merchant360
- Pay an open invoice on the terminal
- Dual pricing and tips on the terminal
- Receipts
- Void or refund a terminal sale
- Standalone: take a sale on the device
- Custom payment fields on the reader
- Name your card readers
- Who can use the terminal
- Getting a terminal
- The terminal in other tools
What the Handpoint terminal is
The Handpoint terminal is a PAX A920 smart terminal: a touchscreen card reader with a built-in receipt printer that connects over Wi-Fi or cellular. It takes chip (insert), contactless (tap, including Apple Pay and Google Pay) and swiped cards. The card is read on the device, so card data never passes through your computer or through Merchant360.
It works two ways. Pushed: you ring up the sale in Merchant360, in the Handpoint terminal page, and the amount appears on the device for the customer to pay. Standalone: staff type the amount on the terminal itself and take the card, with no computer involved. Either way the sale lands in your Merchant360 transactions.
The pushed flow fits any counter where the back office does the ringing up: a medical or dental front desk collecting a copay or an open invoice, an auto repair shop closing out a work order, a law office taking a retainer, a showroom, a parts counter. The person at the desk enters the amount or picks the invoice on their screen, and the customer pays on the terminal in front of them.
Because the card is present, these sales process at card-present rates, and the customer confirms the amount on the device before paying.
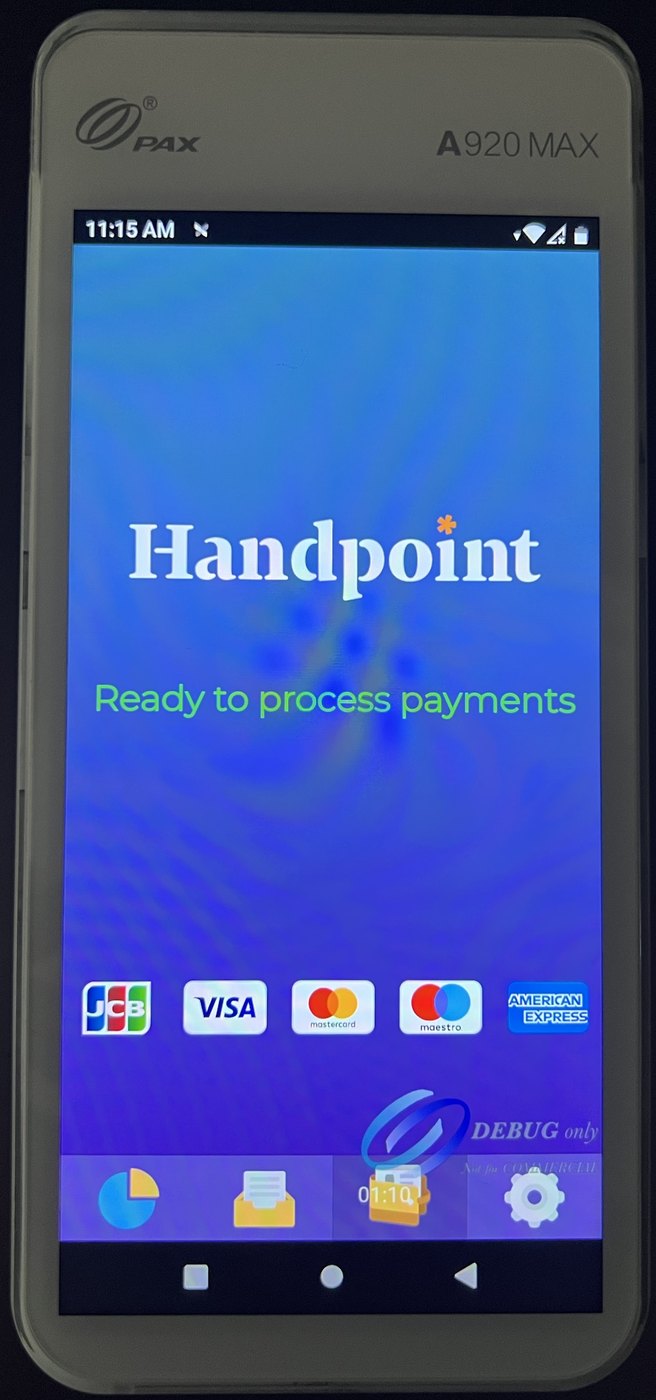
| On this screen | What it does |
|---|---|
| Ready to process payments (device) | The terminal's idle screen. It accepts a sale pushed from Merchant360 or a sale started on the device from here. |
| Reports icon (device home screen) | Opens the terminal's own end-of-day totals and transaction history. |
| Settings icon (device home screen) | Network, printer and device settings on the terminal. Tipping and refund permissions for the reader are managed by EPI. |
Several counters or exam rooms? An account can have more than one terminal. Name each one on the Card readers card under Billing settings, then each person on your team picks any terminal at charge time or is locked to one. See Name your card readers and Who can use the terminal below.
Push a sale from Merchant360
Open Take Payments → Handpoint Terminal. The page lists the terminals connected to your account; the one marked default is preselected. Enter the amount, add an optional reference such as an order or ticket number, and press Send Sale to Terminal.
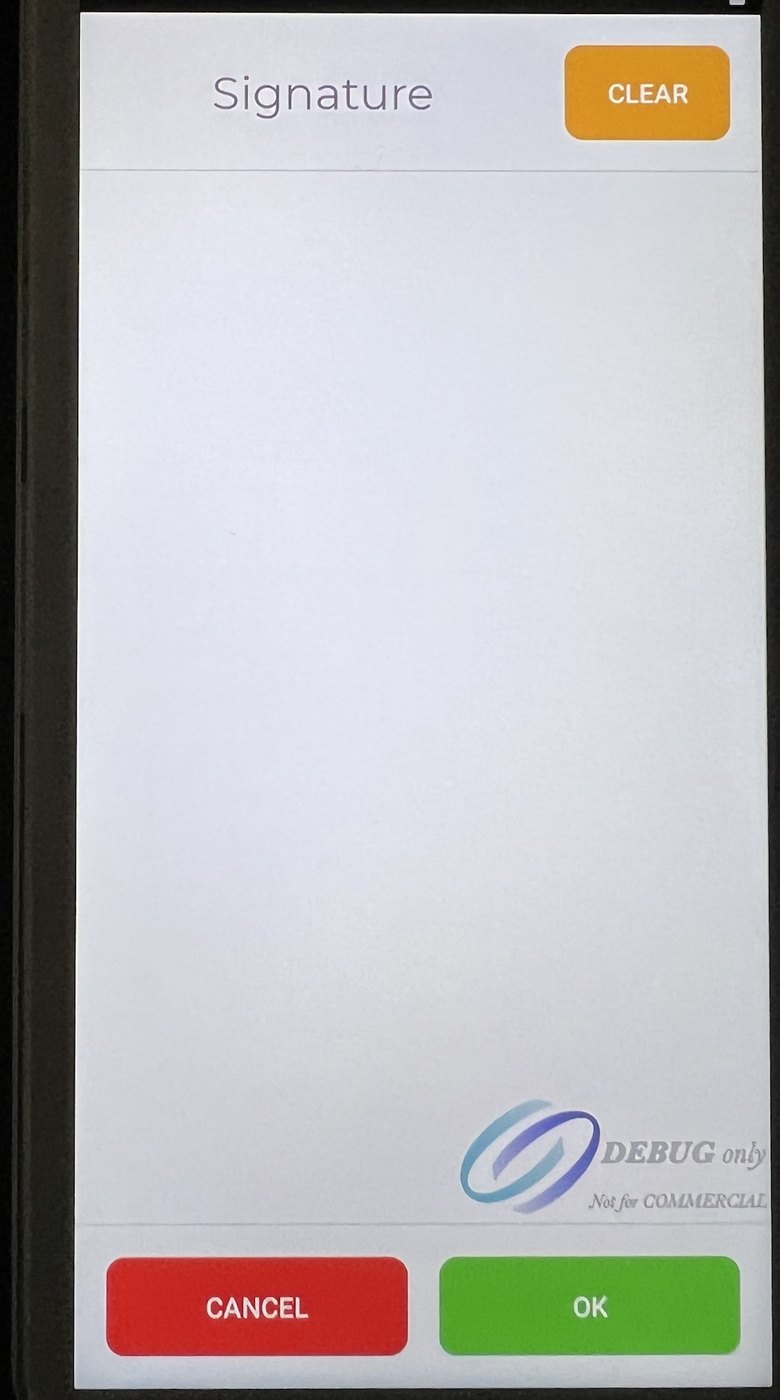
Merchant360 shows Waiting for the cardholder while the sale is on the device. The customer inserts, taps or swipes; if tipping is turned on for your reader the device asks for the tip first, and some cards ask for a signature on the screen. The result comes back to your screen in a few seconds: Sale approved with the card brand, last four digits and the amount, or the decline reason.
If the customer walks away or the amount was wrong, press Cancel on terminal. The sale is cancelled on the device and nothing is charged. A cancelled push is recorded as cancelled, not as a decline.
Sales pushed from Merchant360 wait about three minutes for the customer. If nobody presents a card in that time the page times out; the terminal returns to its ready screen and you can send the sale again.
- 1Go to Take Payments → Handpoint Terminal.
- 2Pick the terminal if your account has more than one. Press Refresh if a terminal you expect is not listed; it has to be switched on and online.
- 3Enter the amount. Add a reference if you want it on the transaction.
- 4Press Send Sale to Terminal and hand the customer the device or turn it to face them.
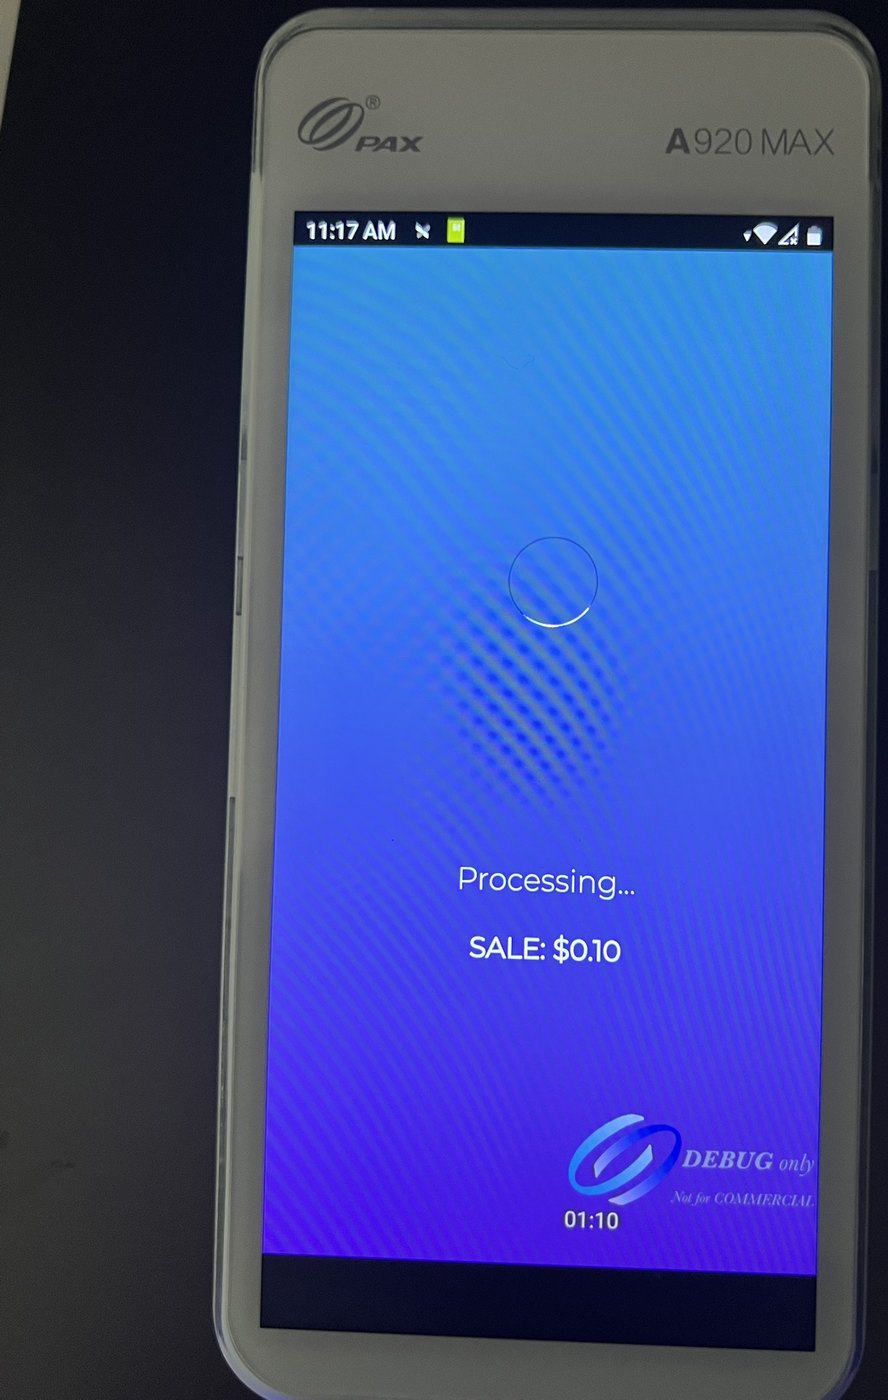
- 5The customer taps, inserts or swipes. The approval or decline shows on your screen and on the terminal.
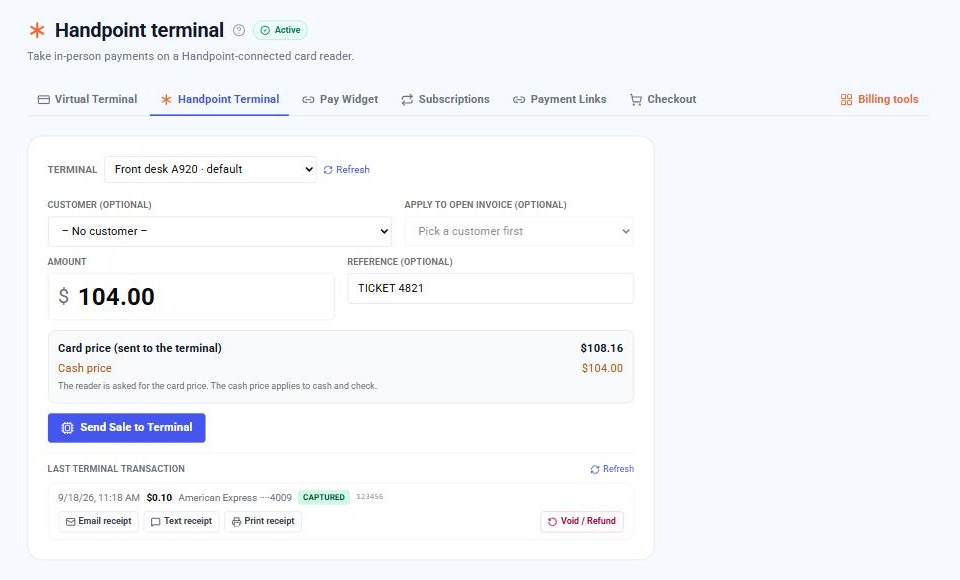
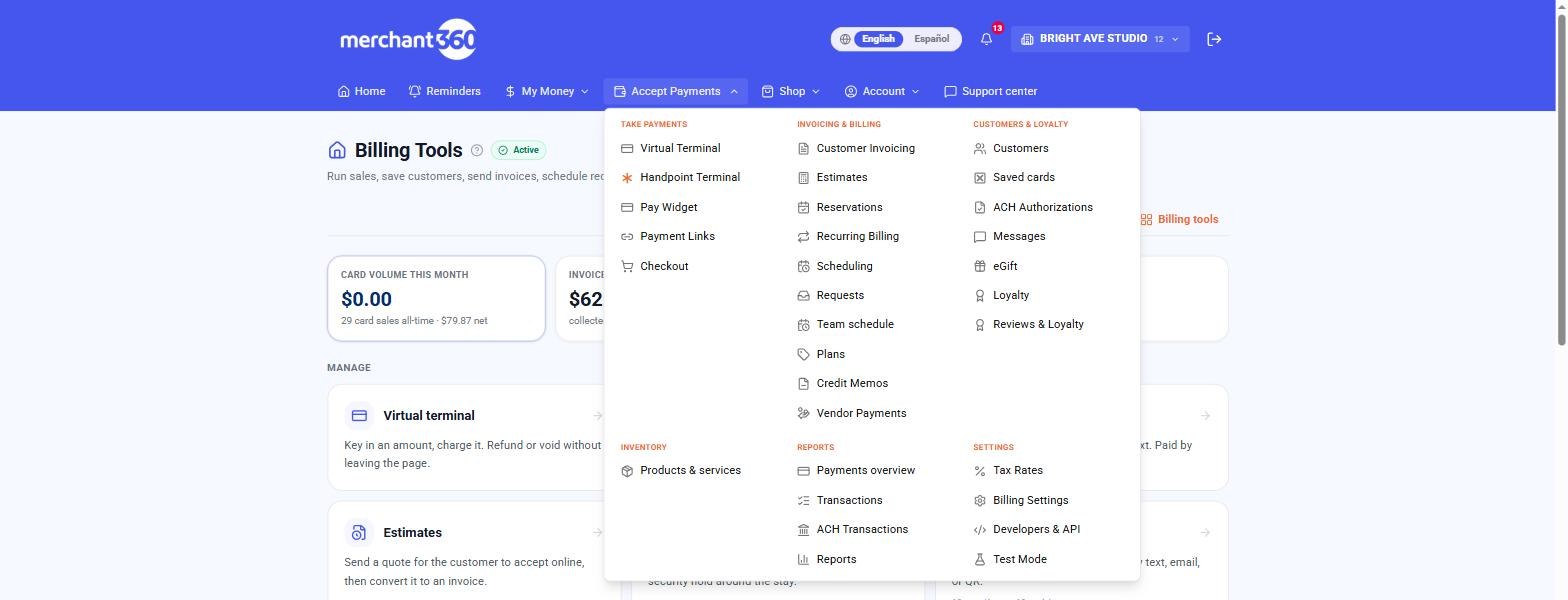
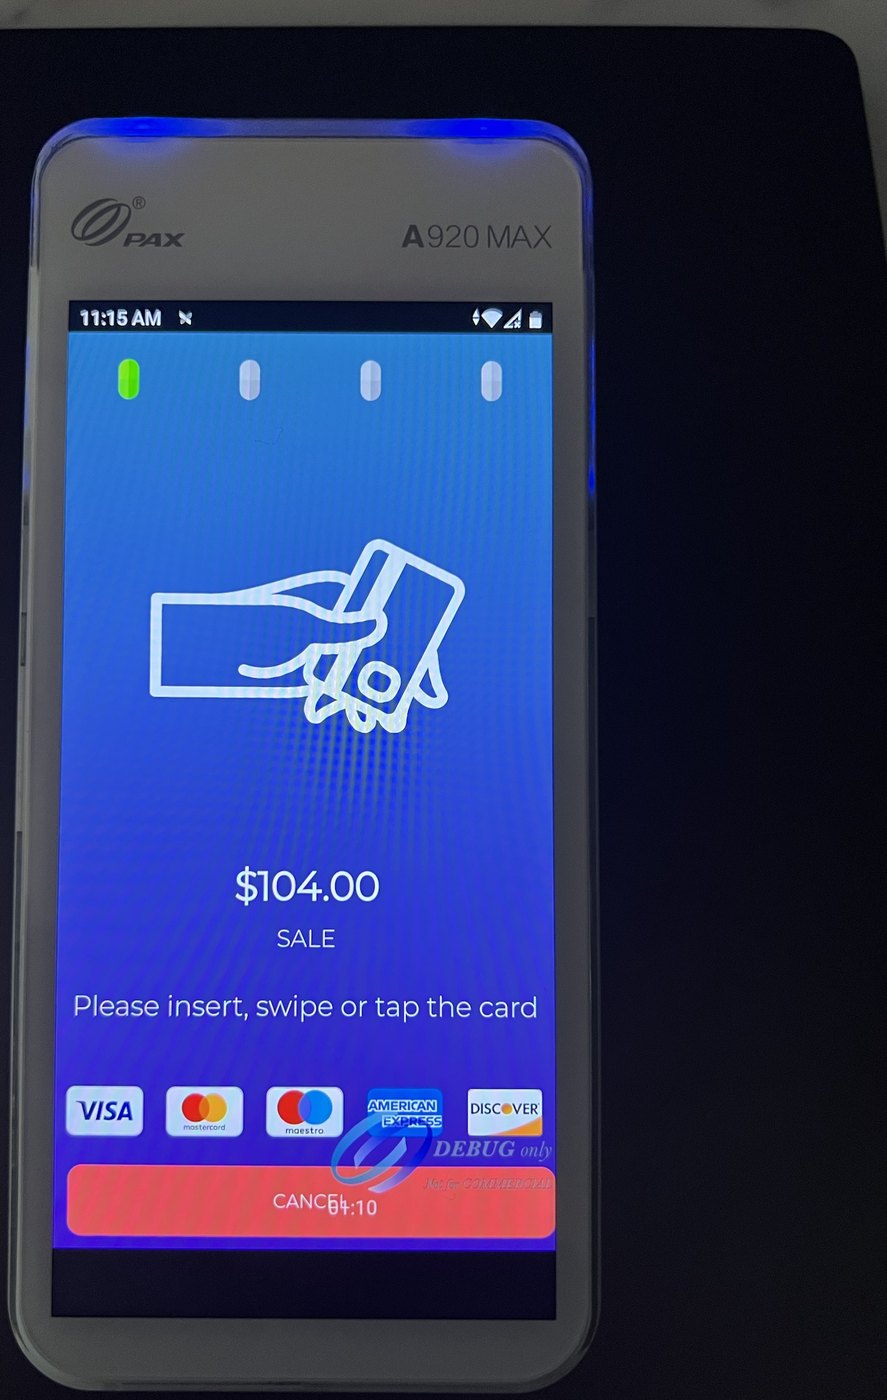
| On this screen | What it does |
|---|---|
| Terminal | Picks which connected reader receives the sale. The account's default reader is preselected; a person locked to one device sees only that device. |
| Refresh | Re-reads the list of connected terminals from Handpoint. Use it after switching a reader on. |
| Amount | The sale amount. With dual pricing this is the cash price and the card price shown beside it is what goes to the device. |
| Reference (optional) | Free text kept on the transaction, such as an order or ticket number. Prefilled with the invoice number when an invoice is applied. |
| Send Sale to Terminal | Pushes the amount to the reader. Merchant360 shows Waiting for the cardholder and polls for the result for about three minutes. |
| Cancel on terminal | Cancels the sale waiting on the device. Nothing is charged; the record shows CANCELLED. |
| Signature screen (device) | Shown when the card calls for a signature. The customer signs with a finger; Clear starts over, OK completes the sale, Cancel abandons it. |
| Sale approved / declined banner | The final result with card brand, last four and amount, or the decline reason. The transaction is on Money → Transactions at the same moment. |
The terminal has to be powered on and connected to the internet to receive a sale. If the picker says No terminals connected, check the device's Wi-Fi or cellular signal and press Refresh.
Pay an open invoice on the terminal
When a customer is at the counter to pay an invoice, you do not retype the balance. Pick the customer in the Customer field on the Handpoint terminal page; the Apply to open invoice list fills with their unpaid invoices and the balance due on each. Choose the invoice and the amount is prefilled with its balance and the reference reads Invoice followed by the number.
On approval the invoice is marked paid, the payment is recorded against it, and a receipt is emailed to the customer on file. The sale shows up on Money → Transactions and on the invoice itself. If the customer is paying part of the balance, change the amount before sending; the invoice keeps the remaining balance open.
Picking a customer without an invoice still helps: the receipt goes to that customer's email automatically, and the sale is tied to their record.
- 1On the Handpoint terminal page choose the customer in Customer (optional).
- 2Choose the invoice in Apply to open invoice. The amount and reference fill in.
- 3Adjust the amount for a partial payment if needed.
- 4Press Send Sale to Terminal. The customer pays on the device.
- 5On approval the invoice is marked paid and the customer's receipt is sent.
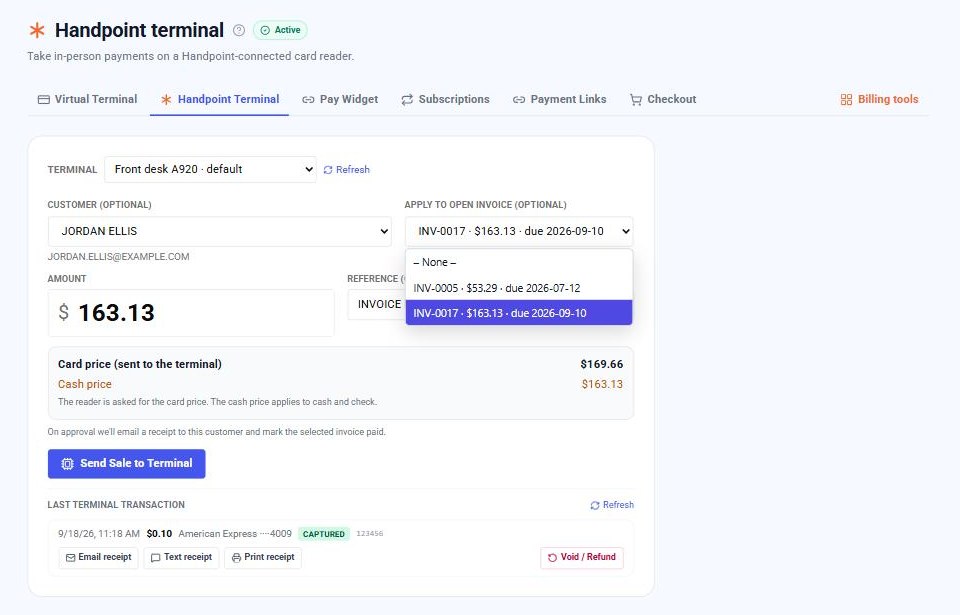
| On this screen | What it does |
|---|---|
| Customer (optional) | Ties the sale to a customer record. The receipt is emailed to that customer on approval and their open invoices load in the next field. |
| Apply to open invoice (optional) | Lists the chosen customer's unpaid invoices with the balance due. Picking one prefills the amount and the reference; on approval the invoice is marked paid. |
| On approval notice | Confirms what will happen when the sale approves: the receipt email, and the invoice being marked paid when one is applied. |
Dual pricing and tips on the terminal
If your account runs dual pricing, the amount you type on the Handpoint terminal page is the cash price. The page shows the card price beside it, and the card price is what goes to the device. Every card that pays on the terminal pays the card price, including debit cards: the device cannot tell card type before the tap, so the debit-as-cash option that applies to keyed and online payments does not apply here.
A surcharge program cannot apply on the terminal for the same reason, so the terminal shows one price and no surcharge line.
Tipping is a setting on the reader itself. When it is on, the device asks the customer for a tip before reading the card, with suggested amounts and a custom option. The tip shows on the transaction as a separate line and on the receipt.
| On this screen | What it does |
|---|---|
| Card price (sent to the terminal) | The typed cash price plus your dual pricing adjustment. This is the amount the customer sees and pays on the reader. |
| Cash price | The amount as typed. It applies to cash and check, not to the terminal. |
| Tip prompt (device) | Shown on the reader before the card is read when tipping is on for your account. The tip is recorded as its own line on the transaction. |
Receipts
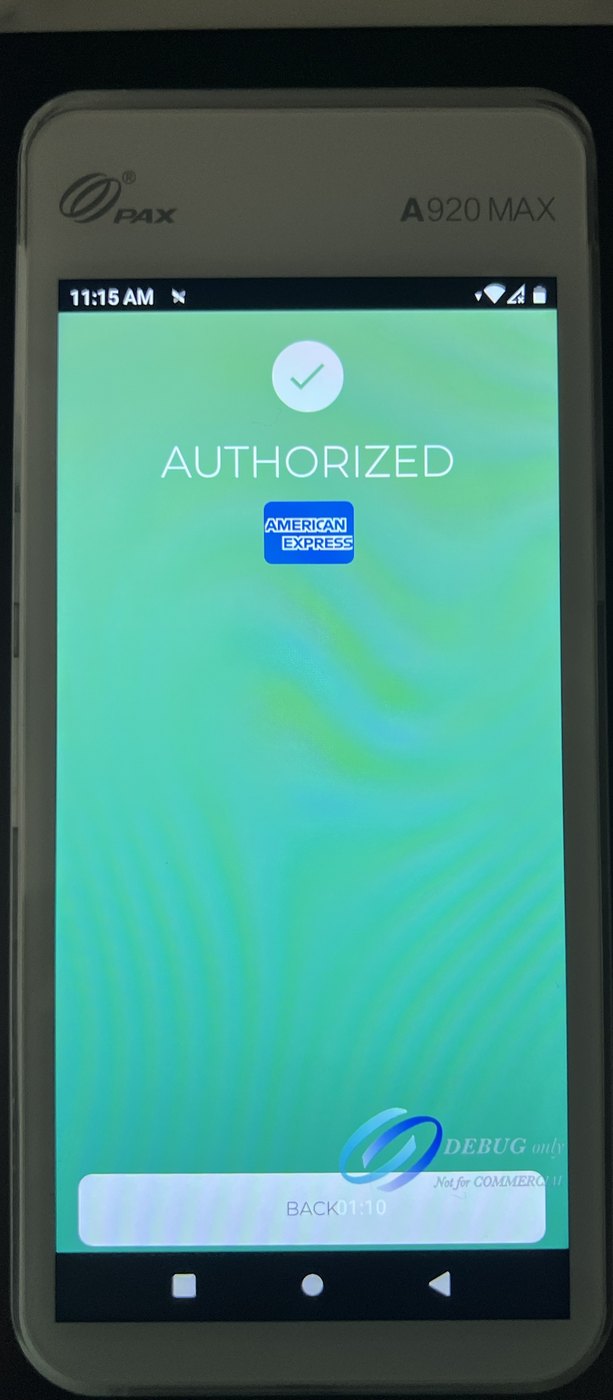
The terminal has a built-in printer. For a sale taken on the device itself, the approval screen offers Print customer receipt, Print merchant receipt and Send digital receipt, and a paper receipt is ready in a second or two.
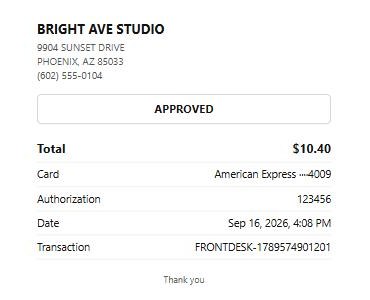
Merchant360 keeps its own copy. The Last terminal transaction panel under the sale form shows the most recent sale of the day with Email receipt, Text receipt and Print receipt. Email and Text prefill the customer's address or mobile number when the sale was tied to a customer; Print opens a printable receipt in a new window for your office printer.
When you picked a customer before sending the sale, the receipt is emailed to them automatically on approval. Older sales are on Money → Transactions; open one to resend its receipt.

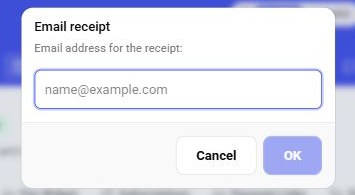
| On this screen | What it does |
|---|---|
| Print customer receipt (device) | Prints the customer copy on the terminal's built-in printer. |
| Print merchant receipt (device) | Prints the merchant copy for your records or a signature. |
| Send digital receipt (device) | Sends the receipt from the terminal to an email or mobile number the customer enters on the device. |
| Email receipt | Emails Merchant360's receipt for the last terminal transaction. Prefilled with the customer's email when the sale was tied to a customer. |
| Text receipt | Texts a receipt link to a mobile number. Prefilled with the customer's number when one is on file. |
| Print receipt | Opens a printable receipt in a new window for your office printer. |
Void or refund a terminal sale
The Last terminal transaction panel has one button, Void / Refund. Merchant360 chooses the right action: a full amount reversed within 24 hours and before the batch closes is a void, so the charge never settles and never appears on the customer's statement. Anything else, a partial amount or a later reversal, is a refund back to the same card. If a void is refused or declined, the refund runs in its place. Large reversals may ask for a texted security code.
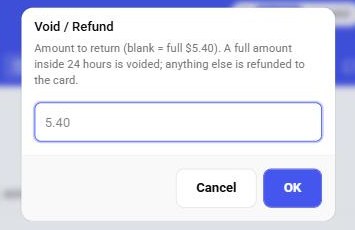
The prompt shows how much is left to reverse. Leave it as is for the full remaining amount or type a smaller amount for a partial refund. A sale that was already fully reversed shows Already reversed.
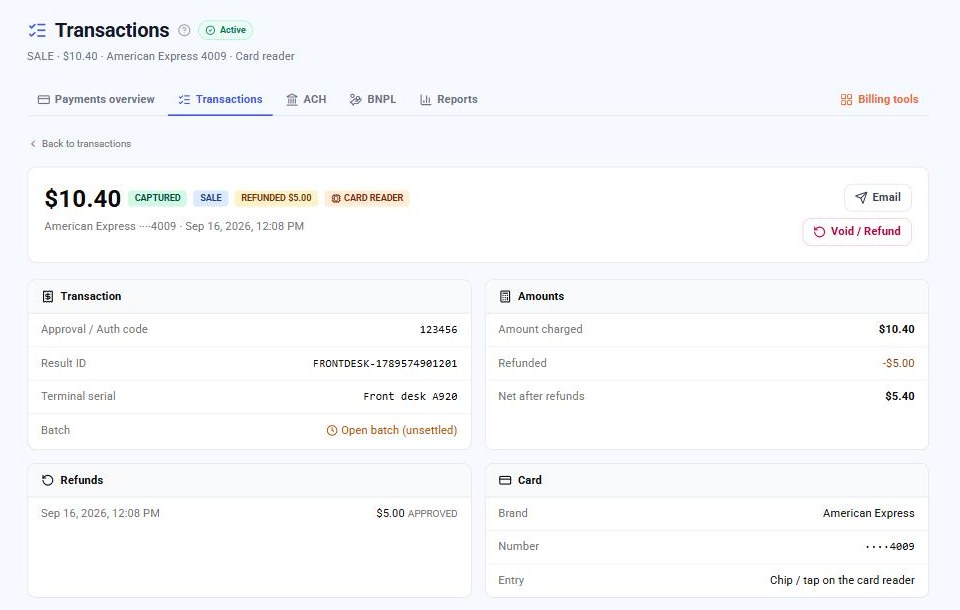
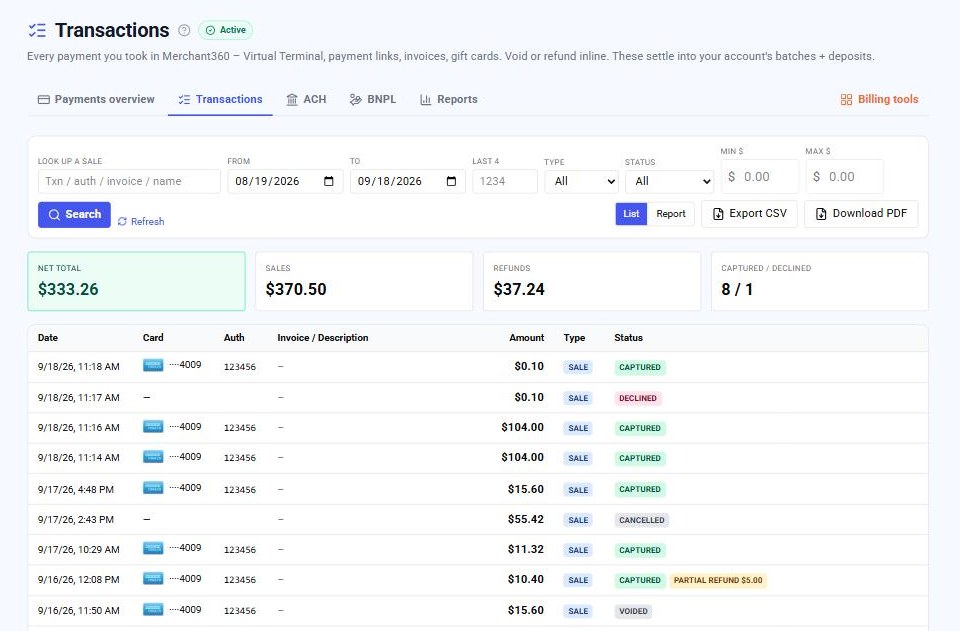
The same Void / Refund control is on Money → Transactions on the sale's row and on its detail page. The detail page shows the amount charged, the tip, what has been refunded, the net after refunds, and lists each refund with its date.
The customer does not need to be present and the card does not need to be tapped again for a void or a refund started from Merchant360.
- 1On the Handpoint terminal page find the sale under Last terminal transaction, or open it on Money → Transactions.
- 2Press Void / Refund.
- 3Confirm the full amount or type a partial amount.
- 4Read the result: Voided. The charge will not settle, or Refunded to the card.
| On this screen | What it does |
|---|---|
| Last terminal transaction | The most recent terminal sale of the day with its time, amount, tip, card, status and approval code. Refresh re-reads it. |
| Void / Refund | Reverses the sale. A full amount inside 24 hours and before the batch closes is voided; anything else is refunded to the card. The prompt shows the amount still available. |
| Refunded $X tag | Shows how much of the sale has already been refunded. Once nothing is left the button reads Already reversed. |
| Void / Refund (Transactions board and detail page) | The same action from Money → Transactions for any terminal sale, not only today's. |
Standalone: take a sale on the device
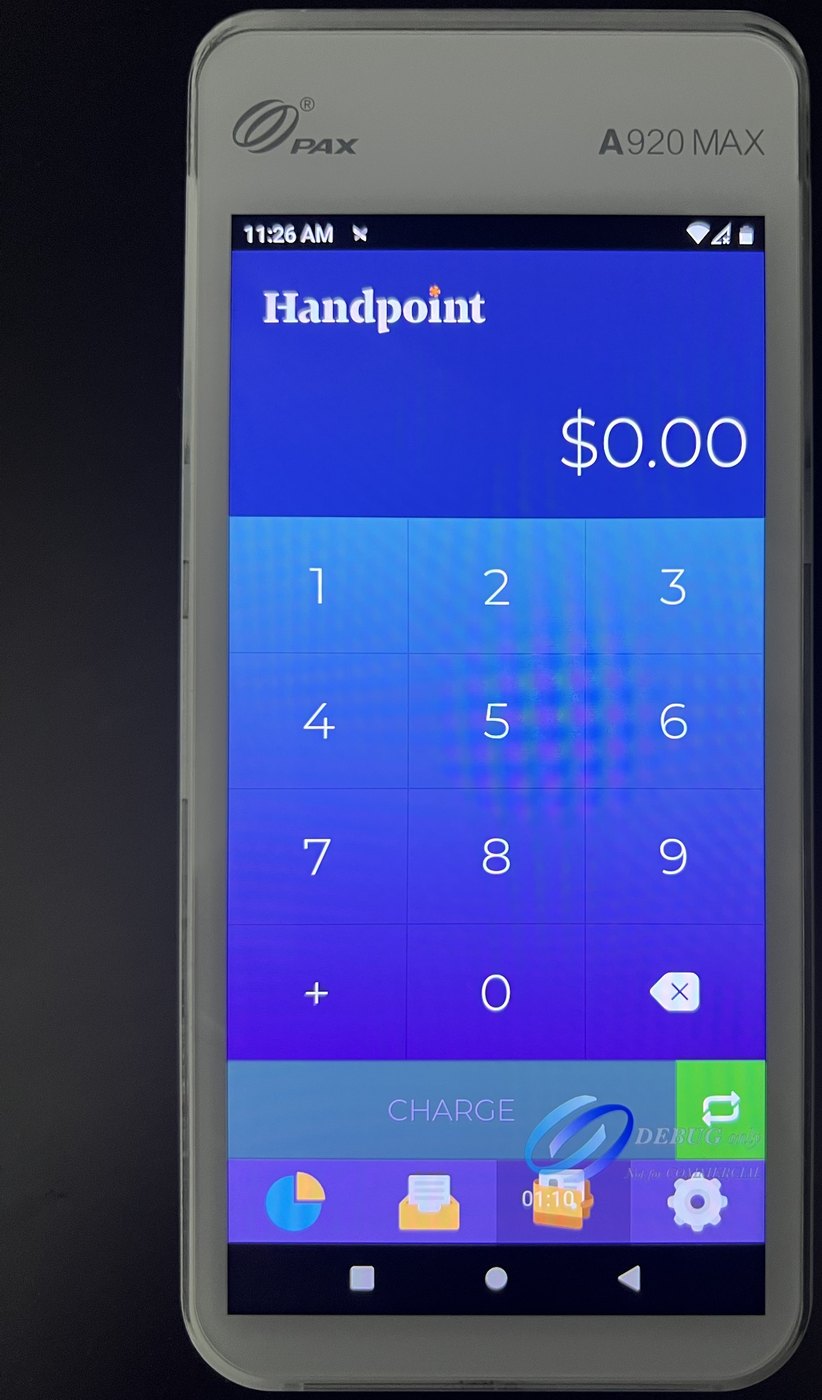
The terminal does not need Merchant360 open to take a payment. On the device, type the amount on the keypad and press Charge; the customer taps, inserts or swipes, and the terminal prints or sends the receipt. This is the mode for a counter with no computer, a mobile cart, a delivery, or a busy line where staff take the card first and reconcile later.
Every standalone sale is reported into Merchant360. Merchant360 reads the terminal's activity from Handpoint and lists each sale on Money → Transactions with the source Handpoint, the amount, tip, card brand and last four, the terminal serial number and the approval code. Sales taken on the device appear within a few minutes; press Refresh on the Transactions page if you are waiting on one. Refunds and reversals done on the device are reported the same way.
The transaction detail page for a terminal sale shows the amounts, the card, the terminal serial, the batch, and the customer and invoice when the sale was pushed from Merchant360. Standalone sales have no customer attached; you can still resend a receipt from the detail page.
The device also has its own reports: end-of-day totals and transaction history on the terminal, under the reports icon on its home screen.
| On this screen | What it does |
|---|---|
| Keypad (device) | Type the sale amount on the terminal. |
| Charge (device) | Starts the sale on the reader for the typed amount: tip prompt when tipping is on, then insert, tap or swipe. The + key adds another amount to the same sale and the backspace key clears the last digit. |
| Source column (Transactions) | Reads Handpoint for every sale taken on the reader, pushed or standalone. |
| Refresh (Transactions) | Re-reads the terminal's activity from Handpoint so a sale just taken on the device appears. |
| Terminal serial (transaction detail) | Which reader took the sale. Useful when more than one terminal is on the account. |
Run the register from Merchant360 whenever the sale should tie to a customer or an invoice. Use standalone when speed at the counter matters more than the record; the sale still reports back, only without the customer link.
Custom payment fields on the reader
If you record something with every sale, a patient ID, a work order number, a technician, add it as a custom payment field and turn on its Card reader surface under Billing Tools → Settings → Custom payment fields. The field then shows below the amount on the Handpoint terminal page. Required fields must be filled before the sale can be sent.
The values are kept on the transaction record in Merchant360; nothing is sent to the terminal. They show on the transaction detail page and on the Transactions board, and export with your reports.
| On this screen | What it does |
|---|---|
| Card reader surface (Custom payment fields card) | Turns a custom field on for the Handpoint terminal page. Off by default. |
| Custom field inputs (terminal page) | Appear below the amount. Required fields block Send Sale to Terminal until filled. Values are stored with the transaction and never sent to the device. |
Name your card readers
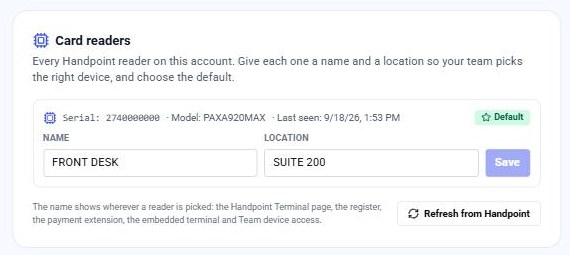
Handpoint knows your readers by serial number. The Card readers card under Billing Tools → Settings lists every reader on your account and lets you give each one a name and a location, so a front desk with three terminals picks Front desk, Exam room 2 or Parts counter instead of a ten-digit serial. The name shows wherever a reader is chosen: the Handpoint Terminal page, the register, the payment extension, the embedded terminal, Team device access and the reader's line on a transaction.
The card also holds the default. The default reader is preselected on the Handpoint Terminal page and is the one an integration charges when it does not name a reader. Each row shows the serial, the model and when Handpoint last listed the reader; a reader Handpoint is not listing right now stays on the card with its name so nothing is lost while it is powered off.
Names are yours; they are never sent to Handpoint or printed on receipts. Clearing both fields and saving puts the reader back to its serial.
- 1Go to Billing Tools → Settings and find the Card readers card in the Payments group.
- 2Type a name and, if it helps, a location for each reader, then press Save on that row.
- 3Press Make default on the reader most sales should go to.
- 4If a reader is missing, power it on and connect it, then press Refresh from Handpoint.
| On this screen | What it does |
|---|---|
| Card readers card (Billing settings, Payments group) | Lists every Handpoint reader on the account with its serial, model and when Handpoint last listed it. |
| Name | The label shown wherever a reader is picked. Saved in capitals like every typed field. Leave blank to fall back to the serial. |
| Location | Optional second part of the label, shown after the name: Front desk · Suite 200. |
| Save | Writes the name and location for that reader. Enabled only when something changed. |
| Make default | Makes this reader the one the Handpoint Terminal page preselects and the one an integration charges when it does not name a reader. One default per account. |
| Not listed by Handpoint right now | The reader was named earlier but Handpoint did not list it on this read; it is off or offline. The name is kept. |
| Refresh from Handpoint | Re-reads the reader list from Handpoint and records first/last seen for each. |
Team members locked to one device pick it from this list by name, so name the readers before you set up device access.
Who can use the terminal
Access to the Handpoint terminal page is a tool on each team member's row under Team: Handpoint terminal (card present). Clerks and above can have it. Register-only staff cannot reach the back office through it.
For a business with several terminals, each person with terminal access either chooses any terminal at charge time or is locked to one specific reader, picked by the name you gave it on the Card readers card. A locked person only ever sees their device in the terminal picker, so a front-desk login always charges on the front-desk reader.
| On this screen | What it does |
|---|---|
| Handpoint terminal (card present) | The tool checkbox on a team member's row that grants the Handpoint terminal page. |
| Any device / Locked to one device | Whether the person picks a terminal at charge time or is pinned to one reader, chosen by name from the readers on the Card readers card (a serial can be typed when none are named). A pinned person sees only that device in the picker. |
Getting a terminal
If your account does not have a terminal yet, the Handpoint Terminal page reads Add a card reader. When your sales office allows it, you order the reader on that page: pick the device, confirm the shipping address, and place the order. After the device ships, EPI activates it on your account and the sale form unlocks on this page. When orders go through your sales office, the page shows the office's phone and email instead.
The terminal arrives ready to use: power it on, connect it to Wi-Fi or let it use its cellular connection, and it shows Ready to process payments. Merchant360 lists it in the terminal picker as soon as it is online.
EPI Support is at (800) 966-5520 for an order, an activation, or a terminal that is not connecting.
| On this screen | What it does |
|---|---|
| Add a card reader | The state of the page before a terminal is on the account. Shows the order form when your office allows self-ordering, or the office's contact details. |
| Device | Which reader ships. The default device is preselected; the price shown is yours. |
| Ship to | Recipient, address and phone for the shipment. The address is checked before the order is placed. |
| Place order | Submits the order. EPI activates the reader on your account after it ships and the sale form unlocks. |
The terminal in other tools
The reader is available wherever Merchant360 takes a payment. The payment extension for Chrome and Edge shows Send to card terminal when your account has a reader, so a sale started in another program goes to the device. The embedded terminal offers a device mode for the same reason. Mindbody sales show Charge on terminal.
| On this screen | What it does |
|---|---|
| Send to card terminal (payment extension) | Pushes the amount from the extension to your reader instead of keying the card. |
| Device mode (embedded terminal) | Lets the embedded terminal send the charge to a reader the staff member picks. |
| Charge on terminal (Mindbody) | Sends a Mindbody sale to the reader for a card-present payment. |