
Invoices
Bill your customers and get paid online.
- Create and send an invoice
- Sales tax – rates, location, and taxable items
- Tax rates: pre-set, ZIP lookup, or both
- Choose how it gets paid
- How your customer pays
- Text a pay link (text-to-pay)
- Track what's outstanding
- Automatic payment reminders
- Partial payments & deposits
- Split into payments (installments)
- Reservations: deposit, balance on a date, security hold
- Autopay: save a card, auto-pay future invoices
- Coupons & promo codes
- Credit memos vs refunds
- Find anything, export everything
Create and send an invoice
An invoice is the bill you send a customer with a secure pay link. Build it once under Accept Payments → Invoices → New invoice; the customer pays online by card or bank, and the payment posts against the invoice by itself. Use it for any sale you are not collecting on the spot: services, deliveries, deposits, or a balance after an estimate.
Before you start, have the customer's email if you want to send it (an invoice without an email can still be saved and shared by link or text). A saved customer fills in Bill To with one pick; a new one can be saved to your directory as you go. Catalog items bring their own price and taxable setting, and your tax rates under Tax rates pick the rate from the Bill To state.
The builder has four parts. Bill To is who is paying. Line items are what they are paying for, from the catalog or typed free-text, each with quantity, unit price, an optional discount, and a taxable flag. The header sets the invoice date, due date, tax, and customer-facing notes. How will this be paid decides whether you email a pay link, charge a card, bill on a schedule, or split into a payment plan (see the next sections).
Done looks like this: after Save & Send the invoice page opens as Open, the customer has an email with the PDF and a Pay button, and the activity timeline shows Invoice created and Sent to customer. After Save Draft the invoice is a Draft you can finish later; drafts are not visible to the customer.
Need only a name and an amount? Quick invoice (Invoices → Quick invoice) takes a customer, an amount, and what it is for, and creates and emails it in one step, with Text2Pay to text the link as well.
If Save & Send is greyed out, add a customer email under Bill To. If a line will not save, every line needs a description and a quantity of at least 1 (a $0.00 price is allowed). If tax shows zero, see the next section. If the email fails after saving, open the invoice and use Send to customer to resend.
- 1Go to Accept Payments → Invoices and click New invoice.
- 2Under Bill To, pick an existing customer from the dropdown, or type a new name and email. Turn on Save as new customer to keep them in your directory.
- 3Add line items: a description, quantity, and unit price for each. Pull from your saved catalog to auto-fill the price, or type a one-off line. You can add a per-line discount (dollar or percent).
- 4Tax is handled for you: each line has a Taxable checkbox (a catalog item brings its own setting, so a non-taxable service stays untaxed). The rate comes from the customer's state using your tax settings, and it's applied only to the taxable lines. Enter a per-line percentage only if you need to override the rate on a specific line.
- 5Set the invoice and due dates, and your notes. Customer notes print on the invoice; internal notes stay private to your team. The invoice number is assigned for you.
- 6Click Save draft, or Save & send to email a branded invoice with a PDF and a secure pay link.
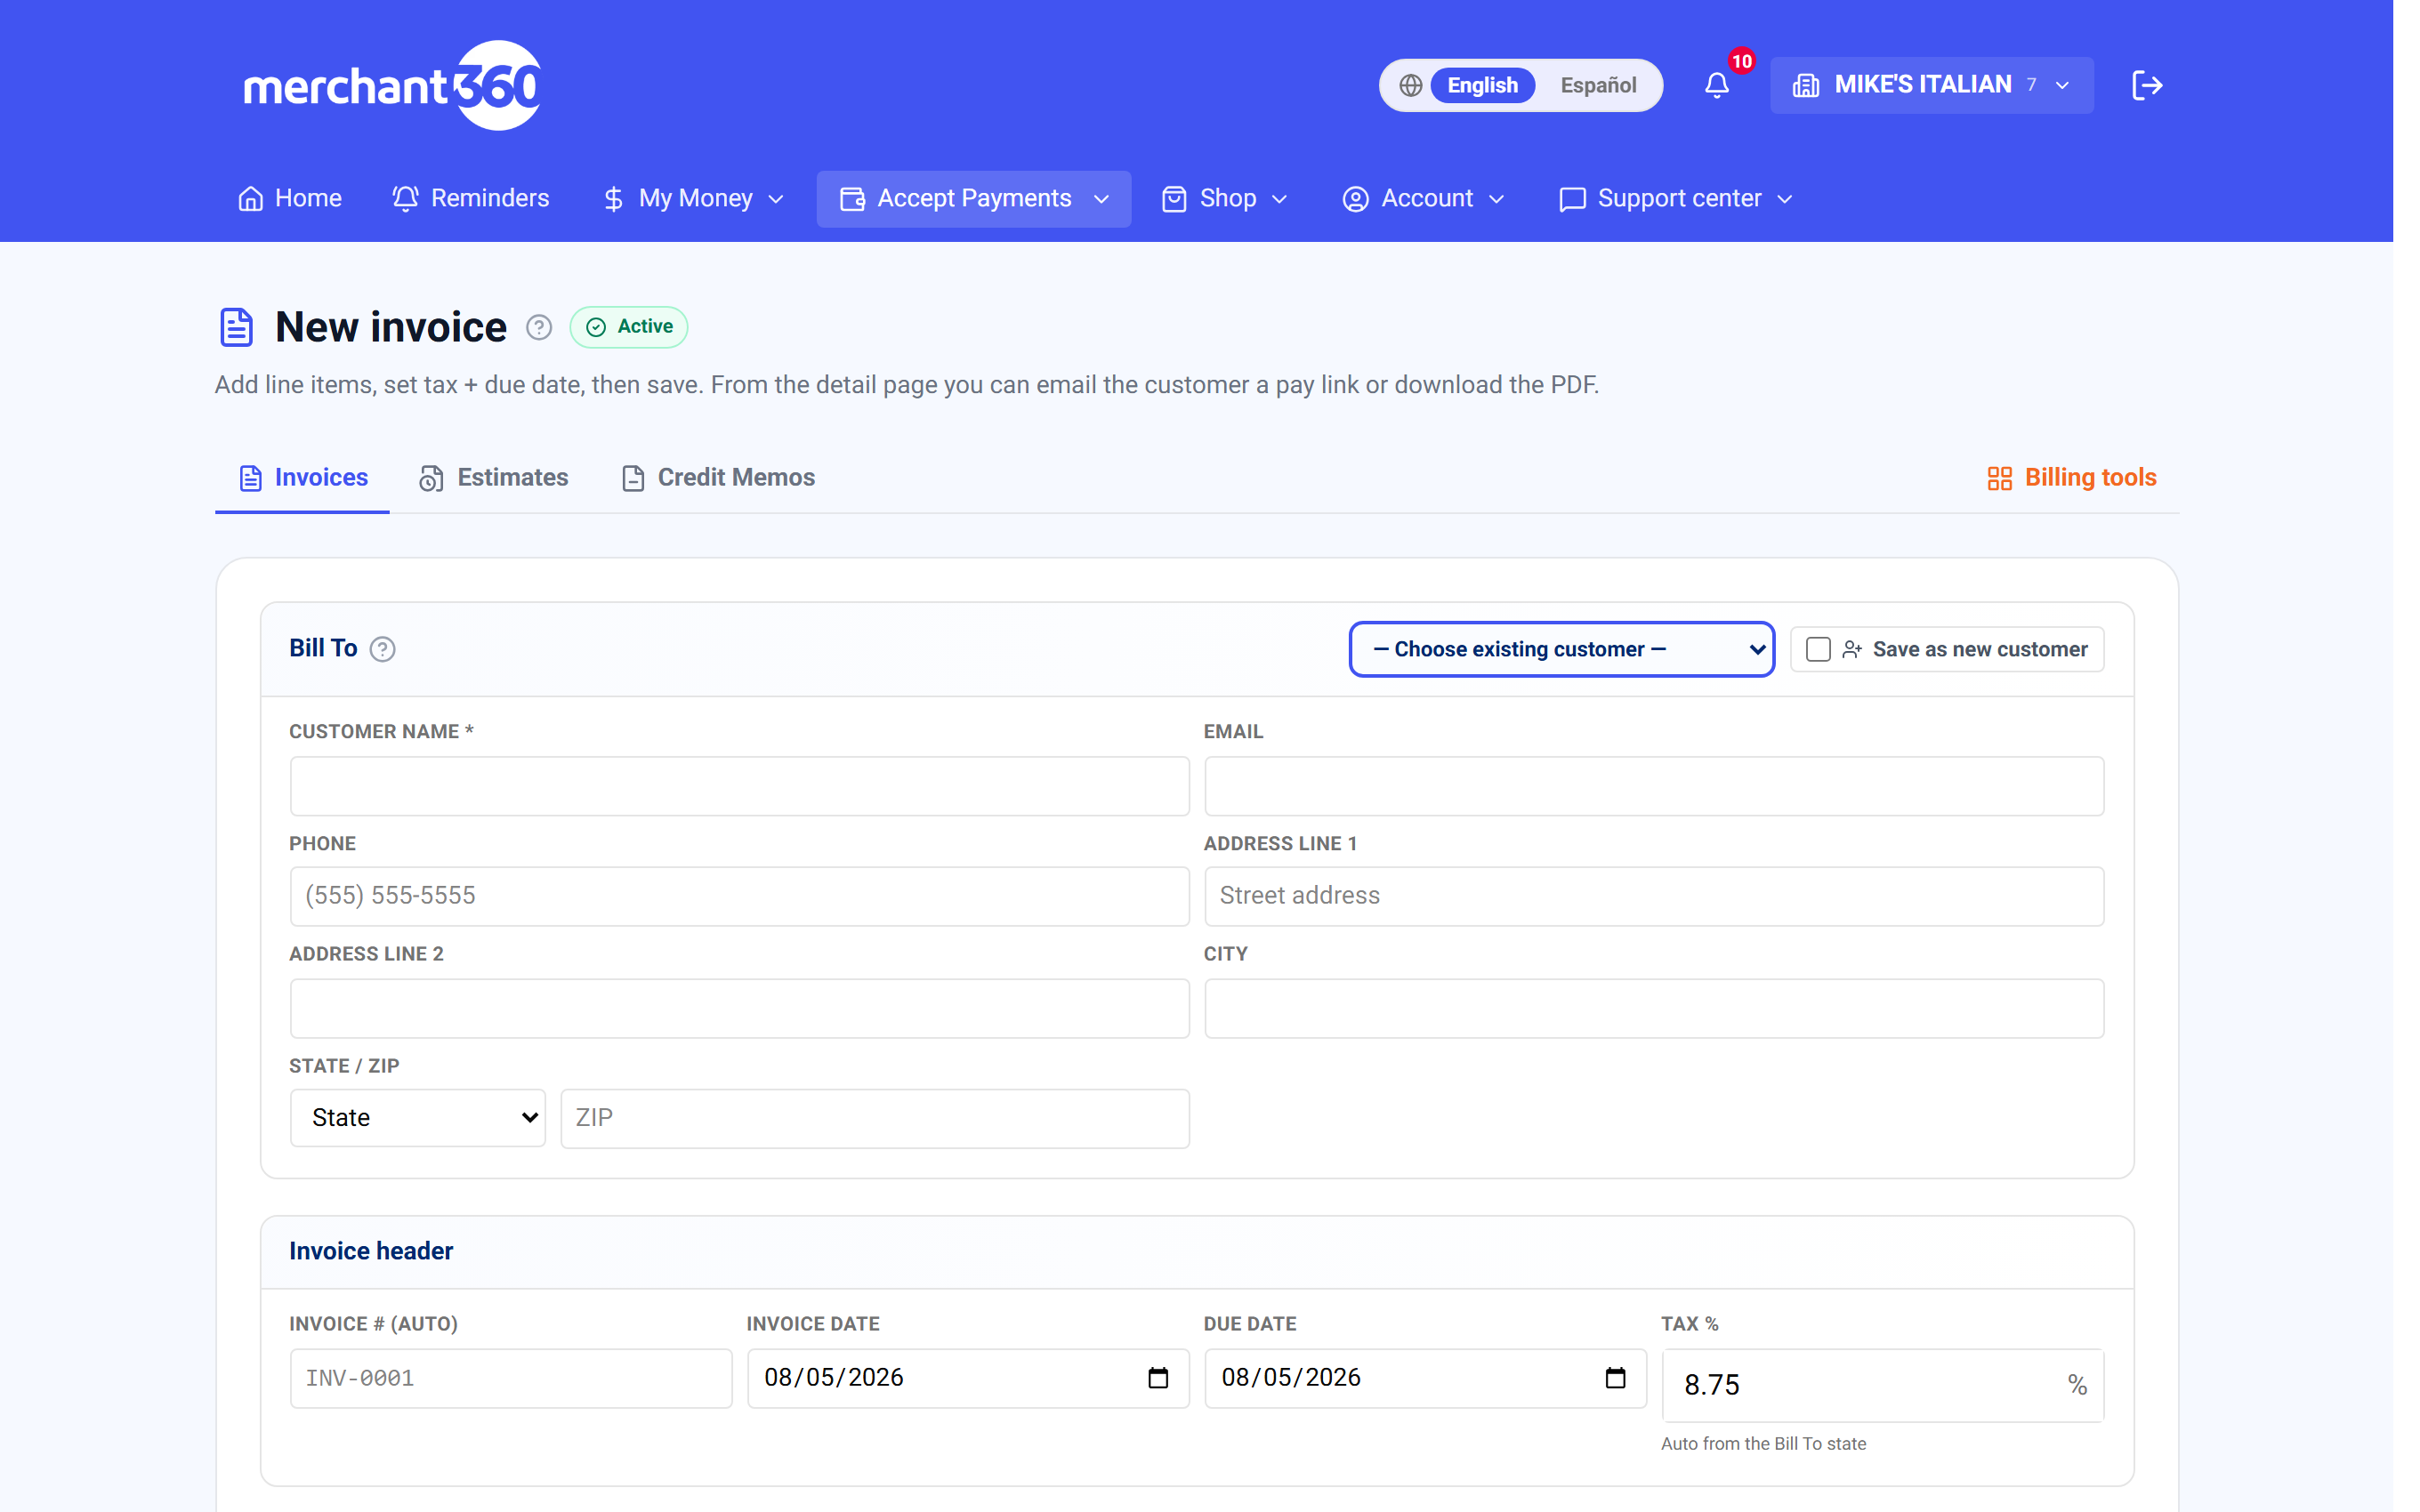
| On this screen | What it does |
|---|---|
| Bill To | Choose existing customer picks a saved customer and links the invoice to them; Unlink customer detaches it. Or type Customer name, Email, Phone, and address. Save as new customer stores these details as a reusable customer when you save. |
| Invoice header | Invoice # (auto) is assigned for you with your prefix. Invoice date, Due date, and the tax rate live here. |
| Tax | Shows auto from the Bill To state. Override lets you type a rate for this invoice; Reset to auto returns to the state rate. |
| Line items | From catalog picks a product or service and fills the price and taxable setting; Free-text / service types a one-off line. Each line has Description, Qty, Unit price, Discount, and a taxable checkbox. Catalog items show stock (on hand, only N left, out of stock). |
| New catalog item | Creates a product or service in your inventory from inside the builder. It appears under Products & services next time. |
| Customer-facing notes (optional) | Prints on the invoice and the pay page. Your default footer from Settings prints on every invoice. |
| Totals | Subtotal, discount applied, Tax, and Total update as you type. With dual pricing on, the card and cash totals are both shown. |
| How will this be paid? | Send invoice, Charge a card, Recurring, or Payment plan. See Choose how it gets paid. |
| Save Draft | Stores the invoice as Draft. Nothing is sent. |
| Save & Send | Creates the invoice, emails the customer the PDF and pay link, and opens the invoice page. Needs a customer email. |
| Attach the invoice PDF (Settings) | Under Settings → Reminders & delivery. On, the email carries the PDF; off, it carries the link alone. |
| Quick invoice | Customer, Email, Phone, Amount, What's it for, and Text2Pay. Create & email invoice sends it; Create invoice saves it open without an email. |
Tax comes from where your customer is: set your rates once under Accept Payments → Tax rates (a default rate plus any state-specific rates), and every invoice picks the right one from the Bill To state. Mark an inventory item Non-taxable and it's never taxed, even on a taxable order. Selling tracked inventory? Saving a real invoice draws down stock automatically, and voiding it puts the stock back.
Sales tax – rates, location, and taxable items
Merchant360 works out sales tax for you on invoices, estimates, checkout pages, and the mobile terminal, so you do not type a tax rate every time. Two things drive it: the rates you set once, and whether each item is taxable. You control both.
The rate follows your customer's location. You set a default rate plus any state-specific rates under Accept Payments → Tax rates. When you make an invoice, Merchant360 looks at the customer's Bill To state and applies the matching rate, or your default if there is no specific one, and the builder shows auto from that state. If you do not sell into a state, do not add a rate for it and nothing is charged there.
Whether tax applies is per item. Every inventory item has a Taxable yes/no setting. Physical goods are usually taxable; services, fees, and shipping often are not. When you add an item to an invoice, it brings its own taxable setting with it, and the rate is applied only to the taxable lines. A non-taxable item is never taxed, even on an otherwise taxable order. You can also flip a single line's taxable checkbox on the invoice if you need to.
Done looks like this: the Tax line on the invoice shows the rate in use, only taxable lines carry it, and when your books sync to QuickBooks or Xero the tax posts as real sales tax, not as a product line.
If tax comes out as zero when you expected some, check two things: the customer's Bill To state has a rate under Tax rates (or you have a default rate), and the item is marked Taxable in inventory. Both have to be true. If the builder says No tax rate configured for that state, add one under Tax rates or click Override and type the rate for this invoice. If tax shows on a service that should be exempt, untick that line's taxable checkbox or mark the item Non-taxable in inventory so it stays exempt everywhere.
- 1Set your rates once: go to Accept Payments → Tax rates. Add a default rate and a row for each state where you collect tax, and pick how automatic tax is looked up (next section).
- 2Mark your items: in Accept Payments → Inventory, open an item and set Taxable on or off. Do this once per item and it carries everywhere.
- 3Make an invoice as normal and fill in the customer's state and ZIP under Bill To (or Ship To). Leave Sales tax on Automatic and the rate appears with its source.
- 4Need something different on this invoice? Pick a rate from your table, choose Custom rate and type it, or choose No tax. Take money off with a Line discount on the line or an Invoice discount in the totals block.
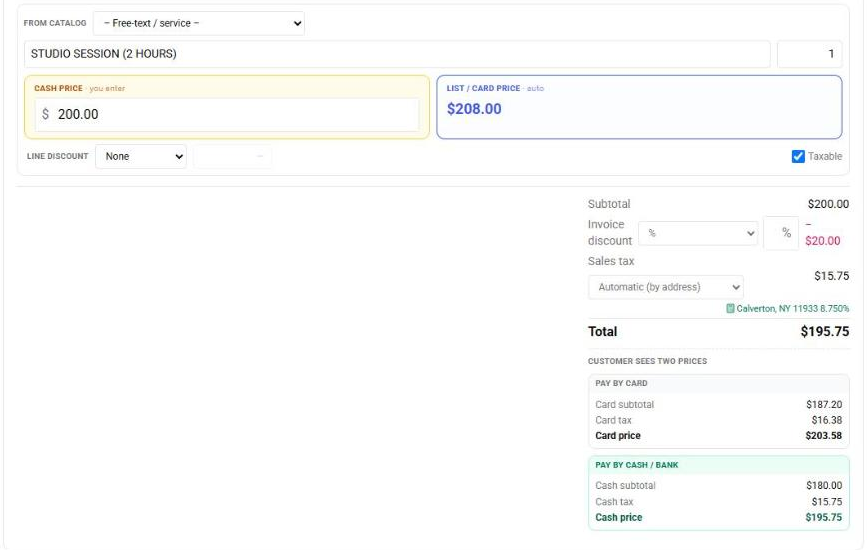
| On this screen | What it does |
|---|---|
| Default rate | The rate used when the Bill To state has no row of its own. Leave it blank to charge no tax outside your listed states. |
| State rows | One row per state you collect in, with that state's rate. Add, edit, or remove rows; changes apply to invoices created from then on. |
| auto from <state> | On the invoice builder, shows which state's rate was picked from Bill To. |
| Override | Types a one-off rate for this invoice. The header shows overridden. |
| Reset to auto | Removes the override and returns to the Bill To state rate. |
| Taxable checkbox (per line) | Whether this line carries tax. Catalog items set it from their own Taxable flag; non-taxable shows on the line. |
| Taxable (inventory item) | In Products, the item-level yes/no that carries into every invoice, estimate, and register sale. |
If tax comes out as zero when you expected some, check three things: Sales tax is not on No tax, the Bill To or Ship To state and ZIP are filled in and have a rate (a table row for that state, a default row, or the ZIP lookup switched on), and the item is marked Taxable. When your books sync to QuickBooks or Xero, this tax posts as real sales tax, so your accounting stays correct.
Tax rates: pre-set, ZIP lookup, or both
The Tax rates page has two parts. The rate table below is yours: a default rate plus a row per state, edited by hand. The Automatic sales tax card above it decides where the rate comes from whenever a document or a sale is set to Automatic.
Pre-set rates only uses your rate table: the row for the customer's state, else your default row. ZIP lookup only asks the platform's ZIP service for the current combined rate of the ship-to or billing ZIP, and never uses your table. Both asks the ZIP first and falls back to your table when there is no ZIP or no answer. The card shows whether the ZIP lookup service is ready, and Test a ZIP lets you look one up on the spot to see the rate and the place it resolved to.
Automatic tax is used on invoices and estimates set to Automatic, on the Virtual Terminal when Sales tax is on Automatic, and on invoices and estimates created through the API without a rate. If you connected Avalara or TaxJar under Integrations, that provider answers first in every mode.
The Virtual Terminal section of the same card holds the two switches from the terminal chapter – Sales tax on card sales and Sales tax on bank (ACH) sales – both off until you turn them on.
- 1Go to Accept Payments → Tax rates.
- 2Pick Pre-set rates only, ZIP lookup only, or Both. The choice saves at once.
- 3Type a ZIP under Test a ZIP and click Look up to confirm the service answers for your area.
- 4Tick the Virtual Terminal switches if you want tax offered on terminal sales.
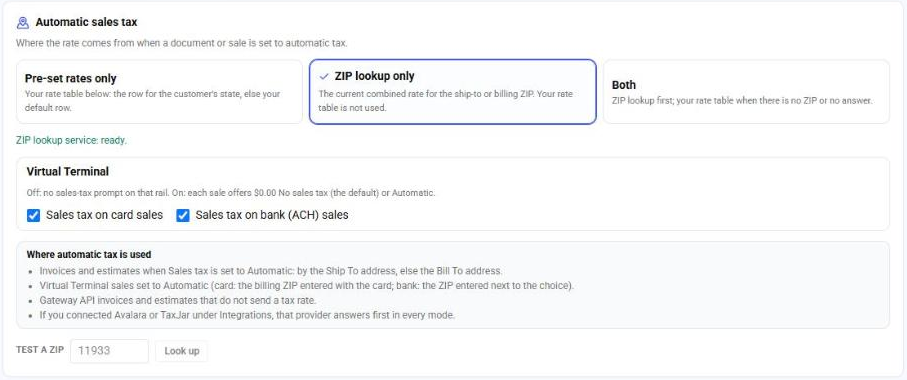
Pre-set rates only is where every account starts, so nothing changes until you choose a lookup mode. Your rate table stays useful in Both mode as the fallback and as the source for the terminal when no ZIP is known.
Choose how it gets paid
The How will this be paid section on the builder lets you decide up front how the money is collected. There are four modes, and the rest of the form changes to match.
Use Send invoice for most bills: the customer gets a pay link and pays when they are ready, by the due date. Use Charge a card when the customer has already given you a card, either one on file or a new one you key now, and wants it charged today or on a set date. Use Recurring when the same amount bills on a schedule. Use Payment plan to split one large balance into equal automatic card charges.
Done looks like this: Send invoice creates an Open invoice and emails the link. Charge a card with Now marks the invoice Paid the moment the charge approves and emails a receipt; with On a date the invoice stays Open and the charge runs on that date. Recurring creates the invoice and a schedule you can see under Recurring. Payment plan charges the first installment now and shows the Payment plan card on the invoice with the remaining charges.
If Charge a card shows No saved cards yet, use Add a new card and enter the card; it is saved to your vault when you create the invoice. If a charge on a date declines, the invoice stays Open, you are emailed, and the customer receives a pay link. If Recurring or Payment plan is missing, recurring billing or installments are not turned on for your account.
- 1Send invoice: email the customer a pay link and let them pay themselves. This is the default.
- 2Charge on file: pick a Card or bank on file, or Add a new card with the number, expiry, ZIP, and Name on card (the card is saved to your vault when you create the invoice). Under When to charge choose Now, or On a date and set the Charge date. Now marks the invoice paid and emails a receipt.
- 3Bank on file: the picker also lists the customer's saved bank accounts. Choose one to pull the invoice by ACH now, on a date, on a recurring schedule, or as a payment plan. A bank debit runs under the customer's signed recurring authorization: if they already signed one for that account, the schedule starts at once; if not, they get one email to approve it and the debit runs on its date once they do. The schedule shows under Recurring as Pending authorization until then. A bank debit files with the daily bank batch and settles in 1 to 3 business days, so the invoice shows paid on settlement, not the same minute.
- 4Recurring: set the Frequency (weekly, monthly, quarterly, every 6 months, or annual), the day it bills, the First charge date, and whether it Ends until cancelled or after a number of payments. Each cycle charges the card and emails a receipt (see the Recurring chapter).
- 5Payment plan: set the Number of payments and Every (days). The builder shows the plan in words, for example 4 payments of about $250 each, every 30 days, auto-charged to the card. The first payment is charged now.
| On this screen | What it does |
|---|---|
| Send invoice | Emails a pay link; the customer pays online. Creates an Open invoice. |
| Charge on file | Charges a saved card, a saved bank account, or a new card. Shows Card or bank on file, Add a new card, and When to charge. |
| Card or bank on file | Search the customer's vaulted cards and saved bank accounts by name or last four. A bank pulls by ACH under the customer's recurring authorization. |
| Add a new card | Card number, expiry, ZIP, and Name on card. Vaulted on save and available for future invoices and recurring billing. |
| When to charge | Now charges as soon as you save. On a date opens Charge date and runs the charge that day. |
| Recurring | Frequency, On day, First charge, and Ends (Until cancelled, or After N payments). Creates a schedule under Recurring. |
| Payment plan | Number of payments and Every (days). Splits the balance into equal card charges, the first one now. |
Charge on file and Payment plan need a card or a bank on file. Pick one, or add a new card right in the builder; it is vaulted on save so you never key it again.
How your customer pays
Customers pay on a secure hosted page with no account and no login. The emailed invoice's Pay button, or the link you copy or text, opens it directly. The page shows who the invoice is from, what it is for line by line, any attachments, what has already been paid, and the balance due.
They pay by card, and if your account has bank payments turned on, by bank too; the page calls it Pay by bank (ACH). If your account runs a surcharge program, a credit card shows the surcharge itemized before they confirm (debit cards are never surcharged); with dual pricing they see the card and cash prices per your program. Where gift cards are enabled, they can apply one first and pay any remainder by card. Where American Express Pay with Points is on, an eligible Amex card can apply Membership Rewards points.
The moment the payment goes through: the invoice flips to Paid (or Partial), the payment posts against it automatically, both of you get a receipt by email (as set under Settings → Receipts), and the transaction shows in Money → Transactions like any other sale. A bank payment shows as Pending bank payments on the invoice until it clears, and the customer's bank account is verified before the first debit.
The pay page can also take a coupon code, offer Split into payments if you have enabled installments, let the customer enroll in autopay so future invoices charge their saved card automatically, and let the customer fill in any custom payment fields you have set up. Partial payments (when you allow them) let the customer pay part of the balance now; the invoice tracks the remainder.
Customers do not even need the emailed link: with the Pay Widget on your website they can look the invoice up themselves by invoice number and email and pay it there (see the WordPress chapter). And if you collected money another way, cash or a check in the mail, open the invoice and Record a payment to mark it paid or partial.
If the customer says the link does not work, the invoice may have been voided or replaced by an edit (the old link tells them so and points to the new one), or the pay link expired; open the invoice and send a fresh link. If a card is declined on the page, the customer sees the reason and can try another card; nothing posts to the invoice. If bank payment is missing from the page, it is not enabled under Settings → Payment methods, or the ACH Payment Terms have not been accepted yet.
| On this screen | What it does |
|---|---|
| Pay button | In the invoice email. Opens the hosted pay page for that invoice. |
| Card | Pays by Visa, Mastercard, Discover, or American Express. Shows the card price, and the surcharge line where a surcharge program applies. |
| Pay by bank (ACH) | Pays from a bank account when bank payments are on. The account is verified first; the invoice shows the payment as pending until it settles. |
| Gift card | Applies a gift card balance first; any remainder is paid by card. |
| Coupon code | Applies a promo code you created under Settings → Coupons and shows the reduced balance. |
| Amount | Shown when you allowed a partial amount. The customer pays between $1 and the balance. |
| Split into payments | Shown on qualifying invoices when installments are on. The customer picks a plan and sees the schedule. |
| Save this card and automatically pay future invoices | Enrolls the customer in autopay when Offer autopay enrollment on invoices is on under Settings. |
| Custom payment fields | Any fields you set up under Settings → Custom payment fields, filled in by the customer and saved with the payment. |
| Record a payment | On the invoice page, for money collected outside the app. Amount, Method (Cash, Check, Other), and a Note. Marks the balance down without running a card. |
| Payment methods (Settings) | Card, Bank (ACH / eCheck), and Cash/Check switches that decide what the pay page offers. Bank needs the ACH Payment Terms accepted by the owner. |
| Receipts (Settings) | Email customers a payment receipt, Email me when a payment comes in, and the Receipt footer message. |
Text a pay link (text-to-pay)
Email is not the only way to send an invoice. Open the invoice and find the Share this invoice card. Alongside the pay link and Copy button is Text the link, which sends the customer an SMS from your business with the invoice number, the balance, and a tap-to-pay link.
Use it for customers who live on their phone, for a balance due today, or when an email bounced. Texting a draft invoice sends it and moves it to Open. The activity timeline records the text like any send.
To text every invoice automatically, turn on Text2Pay under Settings → Reminders & delivery. Invoices with a mobile number then go out by text as well as email, on send and on each reminder. Quick invoice has the same Text2Pay checkbox per invoice.
Done looks like this: the card shows Text sent to the customer, and the timeline shows the send. The customer taps the link and lands on the same pay page as the email.
If the send is blocked, the customer has replied STOP to texts from your business; ask them to reply START, or send by email. If the number is a landline the text cannot be delivered; check the number on the customer's profile. Texts are transactional and every message includes the opt-out line automatically.
- 1Click Text the link. The customer's mobile number fills in if you have it.
- 2Click Send text. The customer gets an SMS from your business with the invoice number, the balance, and a tap-to-pay link.
- 3Texting a draft invoice sends it and moves it to Open.

| On this screen | What it does |
|---|---|
| Share this invoice | The card on the invoice page with the customer's pay link. |
| Copy | Copies the pay link to your clipboard to paste anywhere. Shows Copied. |
| Open the customer view | Opens the pay page as the customer sees it, in a new tab. |
| Text the link | Reveals the Customer mobile number field, filled in from the customer's profile when you have it. |
| Send text | Sends the SMS with the invoice number, balance, and pay link. Shows Text sent to the customer. |
| Text2Pay (Settings) | Under Reminders & delivery. Invoices with a mobile number also go out by text, on send and with each reminder. |
Texts are transactional and honor opt-outs: if a customer has replied STOP, the send is blocked, and every message includes the opt-out line automatically.
Track what's outstanding
The invoice list opens with four counters: Open (with the total balance outstanding), Overdue (past due date), Paid (cleared invoices), and All-time. Each invoice carries a status: Draft, Open, Partial, Paid, or Void. Overdue is a flag on open invoices past their due date, shown in the Due column.
Search by invoice number, customer, or email, page through with Prev and Next, and click any row to open the invoice. The list is your daily view of who still owes what; sort your follow-ups from the Overdue counter down.
Open an invoice for its full detail and controls: Send to customer (a fresh pay link by email, with an amount and expiry), the Share card with Copy and Text the link, Record a payment, Send reminder, Issue credit memo, Duplicate it into a fresh draft, Edit, Void invoice, or Delete invoice (only an invoice that never collected a payment). The PDF button downloads the invoice, Attachments lets you upload files that go with the email and show on the pay page, and the Payment links & payments table lists every link issued and every payment received. The Activity timeline shows everything that happened, down to the paying card's last four.
Editing an already-sent invoice replaces it: the original is voided and a new numbered invoice is issued and emailed, so the customer always has one correct version. The old link tells them it was replaced and points to the new one.
If a payment is missing from an invoice, check the Payment links & payments table: a bank payment shows as processing until it settles, and a payment taken on the virtual terminal without picking the invoice posts to the customer but not the invoice, so use Record a payment to apply it. If an invoice will not delete, it collected a payment; void it instead. If Void asks for a reason, that note is kept internally and cancels any pending pay links.
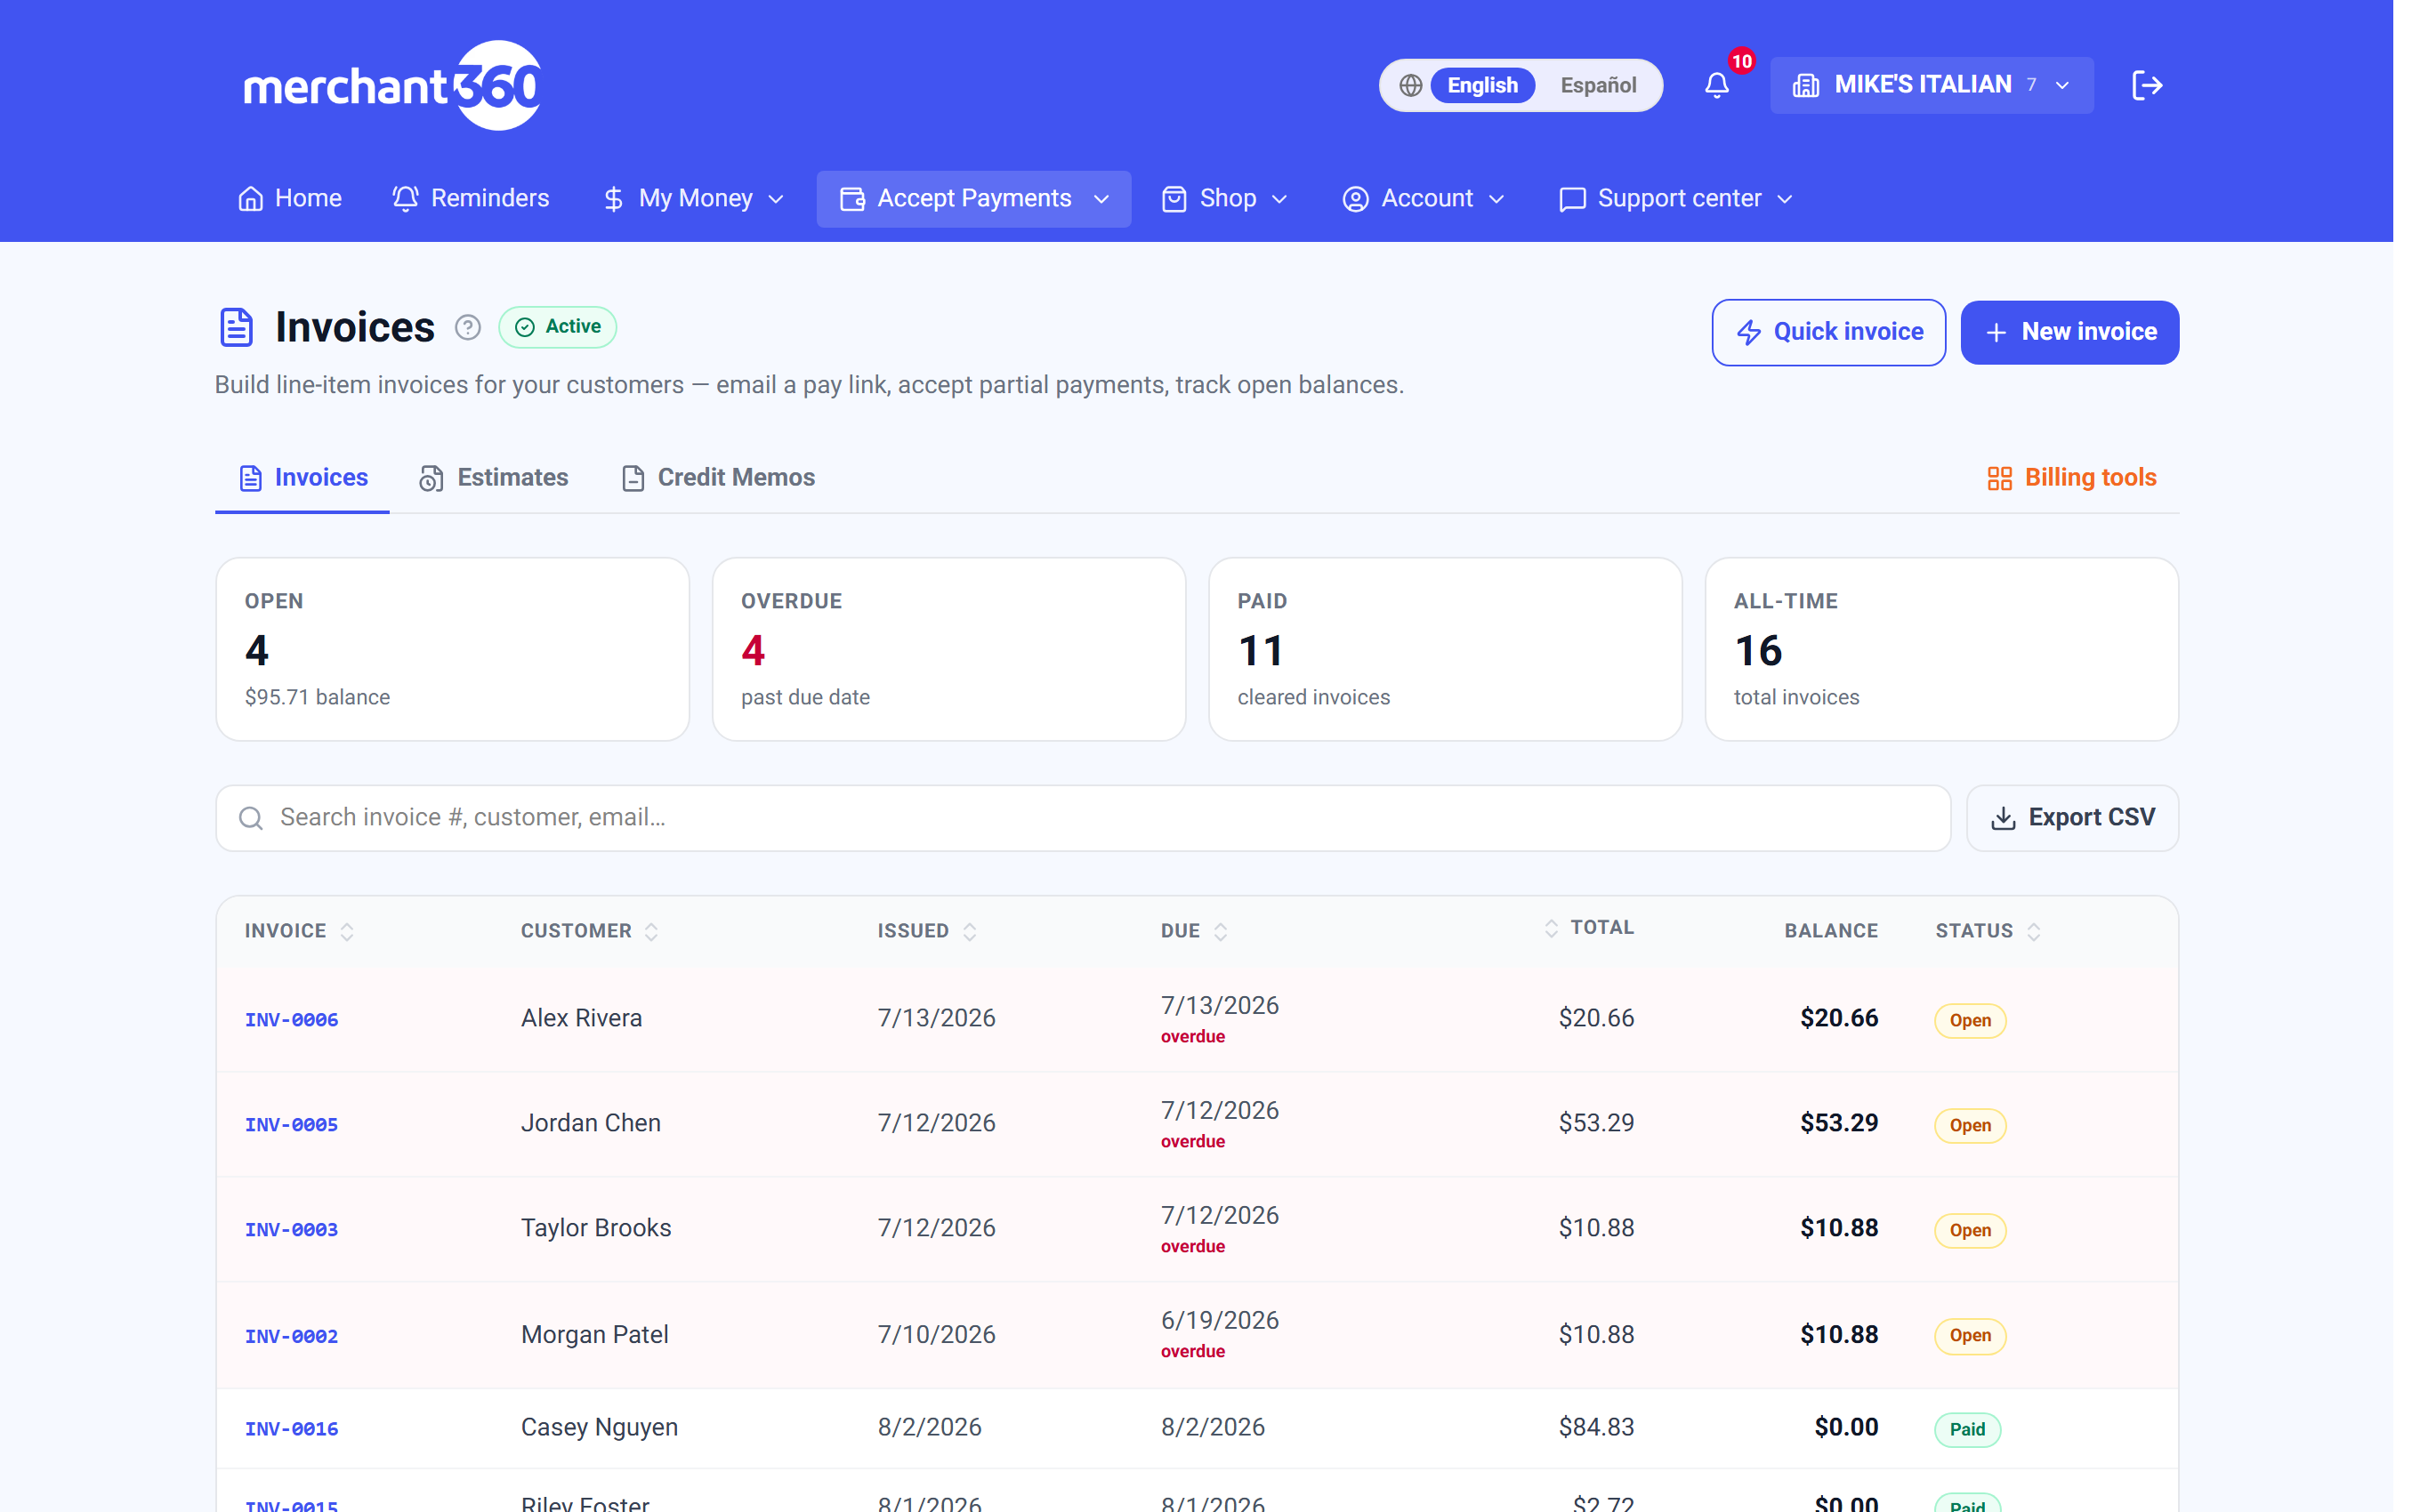
| On this screen | What it does |
|---|---|
| Open / Overdue / Paid / All-time | Counters at the top with the balance outstanding, the count past due, cleared invoices, and total invoices. |
| Search | Filters the list by invoice number, customer name, or email. |
| New invoice | Opens the builder. |
| Export CSV | Downloads the list you are looking at, respecting the search. |
| Status pill | Draft (not sent), Open (sent, unpaid), Partial (some paid), Paid, or Void. Overdue shows on open invoices past their due date. |
| Send to customer | Issues a new pay link. Amount ($) defaults to the full balance, Expires in (days) sets the link life, Send email emails it, and the partial checkbox lets the customer choose how much to pay. Send & email link or Generate pay link (no email). |
| Record a payment | Marks money collected outside the app (Cash, Check, Other) with an amount and note. |
| Send reminder | Emails the customer their balance and pay link now. One manual reminder per invoice per day. |
| Issue credit memo | Reduces the balance without moving money. See Credit memos vs refunds. |
| Duplicate | Copies the customer and lines into a fresh draft. |
| Edit | Opens the builder with this invoice. Saving voids the original and issues a replacement that is emailed to the customer. |
| Void invoice | Cancels the invoice and its pending pay links. Asks for a reason that is kept internally. |
| Delete invoice | Removes an invoice that never collected a payment, along with its pay links and any reservation attached. Cannot be undone. |
| Downloads the invoice as a PDF. | |
| Attachments | Choose file and Upload (PDF, JPG, or PNG, 8 MB each). Sent with the invoice email and shown on the pay page. Remove deletes one. |
| Payment links & payments | Every link issued with its amount and status, and every payment with its card or bank last four. View transaction opens the sale. |
| Activity | The timeline: created, sent, reminders (manual and automatic), pay links, payments, bank payment initiated or canceled, duplicated, voided, and edits. |
| Totals | Subtotal, Tax, Total, Paid, Balance due, Pending bank payments, and Credit balance when the customer overpaid. |
Editing an already-sent invoice replaces it: the original is voided and a new numbered invoice is issued and emailed, so the customer always has one correct version.
Automatic payment reminders
Turn on Automatic payment reminders under Accept Payments → Settings → Reminders & delivery and open invoices are chased for you at five points: a week before the due date, on the due date, and at 7, 30, and 60 days past due. Each email shows the balance with a pay-now button, and paid invoices are never chased. With Text2Pay on, an invoice with a mobile number is reminded by text as well.
You can also send a one-off reminder any time from the invoice's page with Send reminder, whether or not automatic reminders are on. Manual reminders are limited to one per invoice per day. Each reminder, automatic or manual, is logged on the invoice's activity timeline.
Next to reminders lives Automatic monthly statements: turn it on and, on the 1st of each month, every customer with an open balance gets a statement of account by email: their open invoices, an aging summary, and one link that pays everything at once. One statement per customer per month, and customers who owe nothing get nothing. It is the same statement the Statement pay link on a customer's profile creates, just on a schedule.
Late fees are the other lever on the same page. Enable automatic late fees, choose a flat amount or a percent of the balance, a grace period in days past due, how often it repeats, and the maximum times it applies. The fee appears as a line on the invoice and raises the balance the reminders chase.
Your own to-do list is separate: the Reminders page (Tools → Reminders) gathers overdue invoices, cards expiring soon, follow-ups, and upcoming appointments in one place, with Mark done and Snooze 3 days on each.
If a customer says they got no reminder, check that the invoice is Open (drafts and paid invoices are never chased), that the customer record has an email, and that the toggle is on. If reminders are going to the wrong address, fix the email on the customer's profile; reminders use the invoice's Bill To email.
| On this screen | What it does |
|---|---|
| Automatic payment reminders | Toggle. On, open invoices are emailed a week before, on the due date, and 7, 30, and 60 days past due. |
| Automatic monthly statements | Toggle. On the 1st of each month, every customer with an open balance gets a statement with one pay-all link. |
| Text2Pay | Toggle. Invoices with a mobile number also go out by text on send and with each reminder. |
| Attach the invoice PDF | Toggle. Sends the PDF with the pay link on invoice emails. |
| Late fees | Enable automatic late fees, Fee type (Flat amount or Percent of balance), Amount or Percent, Grace period (days past due), Repeat every (days), Max times to apply, and Save policy. |
| Send reminder (invoice page) | Emails the balance and pay link now. Shows Reminder sent; once per invoice per day. |
| Reminders page | Your to-do list of overdue invoices, expiring cards, follow-ups, and appointments. Mark done clears one; Snooze 3 days hides it until then. |
Partial payments & deposits
A partial payment lets the customer pay some of an invoice now and the rest later, and the invoice keeps track. Use it for deposits before work starts, for a customer who wants to pay in two halves, or when you agreed to a payment on account.
When you send or share a pay link from the invoice page, tick Let the customer choose how much to pay and the pay page gains an Amount field. The customer can pay anything from $1 up to the balance, and the invoice shows Partial until it is paid in full. Every payment appears in the Payment links & payments table and the balance due updates.
To collect a specific deposit, set the Amount ($) on the pay link yourself instead, for example $500 of a $2,000 invoice. The customer sees exactly that amount on the pay page. Later, send a new link for the remainder (it defaults to the full remaining balance), or let the reminders chase it.
Done looks like this: the invoice reads Partial, Paid shows what has come in, Balance due shows the rest, and the customer's receipt shows the amount paid and the balance remaining.
If the customer paid more than the invoice total, the invoice shows a Credit balance; refund the difference from Money → Transactions. If you want a deposit collected at the moment a quote is accepted, use an estimate with Require a deposit to accept (see the Estimates chapter). For a deposit plus a balance charged on a date plus a security hold, use a reservation.
| On this screen | What it does |
|---|---|
| Amount ($) | On Send to customer. Leave the Full amount for the whole balance, or type a specific deposit amount for this link. |
| Let the customer choose how much to pay (min $1, up to the balance) | Checkbox. Adds an Amount field on the pay page so the customer picks the amount. |
| Expires in (days) | How long the link stays payable. |
| Send & email link / Generate pay link | Creates the link and emails it, or creates it for you to copy or text. |
| Partial | The invoice status once a payment smaller than the balance has posted. |
| Paid / Balance due | In Totals: what has come in and what is still owed. |
Split into payments (installments)
Installments let customers pay a larger invoice over time on their card, automatically, without you becoming the bank. The first payment is charged when they check out; the rest are charged to the same card on the cadence you allow until the invoice is paid in full.
First turn it on under Accept Payments → Settings → Invoices & estimates in the Split into payments card: switch on Let customers split invoices into payments, set the Minimum invoice balance that qualifies, the Max payments (2, 3, 4, 6, or 12), and Charge every (Weekly, Every 2 weeks, or Monthly). Card only; bank payments cannot be split.
On qualifying invoices, the pay page then offers Pay in full or a split. The customer picks a plan and sees the schedule before confirming: the first payment today, then the rest on the cadence. You can also start a plan yourself from the builder with the Payment plan mode when the customer's card is in hand.
Track it on the invoice's Payment plan card: how many payments are made, the amount of each, the next charge date, the plan status (Active or Failed), and a Cancel plan button. Cancelling stops future charges; anything already collected stays applied. Each installment posts to the invoice as a payment and shows in Transactions.
If an installment declines, the plan shows Failed, you are emailed, and the customer gets a link to update the card. Once a new card is saved the plan resumes. If the pay page does not offer a split, the balance is below your minimum, the customer chose bank payment, or the setting is off.
| On this screen | What it does |
|---|---|
| Let customers split invoices into payments | Toggle in Settings. Shows the split option on the pay page for balances at or above your minimum. Card only. |
| Minimum invoice | The smallest balance that can be split. |
| Max payments | 2, 3, 4, 6, or 12. The customer can pick any count up to this. |
| Charge every | Weekly, Every 2 weeks, or Monthly between installments. |
| Pay in full / Split into payments | On the pay page. The customer picks and sees the schedule before paying the first installment. |
| Payment plan card | On the invoice: payments made, amount each, next charge date, and status. |
| Cancel plan | Stops future installments. Collected payments stay applied; the remaining balance stays open on the invoice. |
Installments run on the card the customer enters at checkout, which is saved for the plan. It's a way to close a big invoice now without becoming the bank.
Reservations: deposit, balance on a date, security hold
A reservation is an invoice with three money steps: a deposit at booking, the balance charged to the card on file on a date you set, and a security hold placed before the start and released after the end. The invoice behind every reservation appears in your Invoices list like any other. Rental units and rates, availability, online booking, moving and re-pricing a stay, your cancellation policy, customer self-service, charging against the hold and the Security holds report are all in the Reservations chapter.
Autopay: save a card, auto-pay future invoices
Autopay lets a good repeat customer stop thinking about invoices. On the pay page, the customer can tick Save this card and automatically pay future invoices on their due dates. Where bank payments are on, there is a bank (ACH) version too; the account is verified before the first debit.
The offer appears on your pay pages only when Offer autopay enrollment on invoices is on under Accept Payments → Settings → Payment options. Turn it on once and every invoice pay page carries the checkbox.
Once enrolled, each new invoice for that customer is charged automatically on its due date, not the moment you send it, so they always have until the due date. The invoice email still goes out so they know what is coming. When the charge approves, the invoice flips to Paid and both of you get a receipt; the payment shows in the customer's Payments list as Invoice autopay.
You see and manage the enrollment on the customer's profile under the Autopay card: it shows On with the method (Card on file or Bank (ACH)), or Off. Turn off stops it any time; invoices from then on go back to the pay link. The customer's Account Updater and Expiring cards tools keep the saved card current so autopay keeps working after a reissue.
If an autopay charge declines, the invoice stays Open, you are emailed, and the customer gets a pay link, so nothing is lost. If a customer wants to change the card, send them an update link from Saved cards → Expiring cards, or have them pay the next invoice with the new card and tick the autopay box again.
| On this screen | What it does |
|---|---|
| Offer autopay enrollment on invoices | Toggle under Settings → Payment options. Adds the autopay checkbox to your invoice pay pages. |
| Save this card and automatically pay future invoices | The checkbox the customer ticks on the pay page. Saves the card to your vault and enrolls them. |
| Autopay card (customer profile) | Shows On or Off, and the method: Card on file or Bank (ACH). On means future invoices are charged on their due dates. |
| Turn off | Ends the enrollment. Future invoices are not charged automatically. |
| Invoice autopay | The source shown in the customer's Payments list for a charge autopay ran. |
Coupons & promo codes
A coupon is a code the customer types on the pay page for a discount you decided in advance. Use it for a seasonal promotion, a referral thank-you, or a make-good you want to offer without editing the invoice.
Create codes under Accept Payments → Settings → Invoices & estimates → Coupons. Click New coupon, enter the Code, choose the Type (% off or $ off) and the value, and optionally set Max uses and an Expires date. Create coupon makes it live at once. Each coupon shows how many times it has been used, and Deactivate retires it without deleting the history; Activate brings it back.
The customer enters the code on the pay page, sees the discount and the reduced balance, and pays that amount. The discount books automatically as a credit memo on the invoice so your receivables stay accurate and the invoice shows Paid, not Partial.
If a code is rejected on the pay page, it has expired, reached its max uses, or is deactivated. Codes are not case sensitive. If you want a discount on one invoice for one customer, a per-line discount in the builder or a credit memo on the invoice page is simpler than a coupon.
| On this screen | What it does |
|---|---|
| New coupon | Opens the form. |
| Code | What the customer types, for example SPRING10. |
| Type | % off or $ off, with the Percent or Amount ($) field that matches. |
| Max uses (optional) | Stops the code after this many redemptions. |
| Expires (optional) | The last day the code works. |
| Create coupon | Saves it and makes it usable on pay pages right away. |
| Deactivate / Activate | Turns a code off or back on. Past uses are kept. |
| used | The count of redemptions shown on each coupon. |
Credit memos vs refunds
A credit memo adjusts what a customer owes without moving money. Use one to write off a balance you will not collect, correct a bill after the fact, or record the outcome of a dispute. A refund returns money to the customer's card or bank. The two are different actions in different places, and using the wrong one leaves your books off.
Issue a credit memo from the invoice's page with Issue credit memo. Pick the Type: Adjustment (a pricing correction or goodwill credit), Write-off (bad debt, cancel the remaining balance), Refund (money you returned to the payer another way, recorded here so the invoice reflects it), or Chargeback win (credit after winning a dispute). Enter the Amount, capped at the remaining balance, and an optional Reason, then Issue & apply credit. The invoice's balance drops, the memo appears in the activity timeline, and the invoice reads Paid when the balance reaches zero. Nothing is emailed to the customer.
To return money to a card, go to Money → Transactions, open the original sale, and refund it there (see the Virtual terminal chapter). The refund posts to the customer's Payments list and, if the invoice was overpaid, clears the Credit balance shown in Totals.
If the invoice shows a Credit balance, the customer paid more than the total; refund the difference from Transactions rather than issuing a memo. If you need to undo a credit memo, issue a new invoice for the amount; memos are not deleted so the history stays clean. Refunds above your large-refund limit ask for a texted security code.
| On this screen | What it does |
|---|---|
| Issue credit memo | Opens the form on the invoice page. Shows the balance currently due, which caps the credit. |
| Type | Adjustment, Write-off, Refund, or Chargeback win. Sets how the credit is categorized in your books. |
| Amount | The credit, up to the remaining balance. |
| Reason (optional) | An internal note, for example Goodwill credit for late delivery. |
| Issue & apply credit | Posts the memo, reduces the balance, and logs it on the timeline. |
| Refund (Transactions) | On the original sale under Money → Transactions. Sends money back to the same card or bank account. |
| Credit balance | In the invoice Totals when payments exceed the total. Refund the difference from Transactions. |
Find anything, export everything
The invoice and estimate lists search by number, customer, or email with full pagination, so nothing hides. Type part of an invoice number, a name, or an email and the list narrows as you go; the counters at the top stay for the whole account.
Export CSV pulls your invoice data for the accountant or a spreadsheet, respecting your current search, with one row per invoice: number, customer, issued and due dates, total, balance, and status. Do the same on the Estimates and Customers lists. Every invoice page keeps its full activity timeline: created, sent, reminded, paid, duplicated, edited, and voided, with the payer's card or bank last four on each payment.
For the money side, Money → Transactions and Reports show every payment these invoices collected, and the bookkeeping sync (QuickBooks or Xero) carries invoices and payments across if you have connected it.
If an invoice does not appear in search, check the location switcher (each location has its own list) and the spelling of the customer name. If the export is missing invoices, clear the search first; the export follows the filter you have on.
| On this screen | What it does |
|---|---|
| Search | Narrows the list by invoice or estimate number, customer, or email. |
| Prev / Next | Pages through long lists. Showing X to Y of Z tells you where you are. |
| Export CSV | Downloads the current list as a spreadsheet file. |
| Activity | On each invoice: every event with its date, including automatic reminders by kind and payments by last four. |
| View transaction | Jumps from a payment on the invoice to the sale under Transactions. |