
Payment links, widget & checkout
Let customers pay you without an invoice.
Payment links
A payment link is the fastest way to collect money without an invoice. You create a link, send it by email, text, or chat, and the customer pays on a secure hosted page on any device. Use it for a deposit, a quote the customer accepted by phone, a tip jar, or any one-off amount.
Each link is single-use: it locks after the first successful payment so it cannot be paid twice. Links can expire on a schedule (30 days by default), carry an invoice number and description for your records, and ask for any custom payment fields you enable.
A link is paid when its row shows Paid. The payment appears on Money → Transactions with the description and invoice number, the customer gets a receipt, and your payment alert goes out if Email me when a payment comes in is on. A bank payment on a link shows as paid once the debit is initiated and settles on the bank schedule.
If a customer says the link does not open, check the row: Expired links need a new link, Cancelled links were stopped on purpose, and a Paid link has already been used. If the customer's phone number is missing, Text is unavailable; add the number to the customer or paste the URL into your own message.
- 1Go to Accept Payments → Payment Links and click New Payment Link.
- 2Enter the Amount, or leave it at $0.00 to let the customer choose how much to pay. Add an Invoice #, an Expires in (days) value (blank never expires), a Description, and a Link name for your own records.
- 3Add the Customer name, email, and phone so the link is tied to the customer and Text is available. Choose which Custom fields on this link to ask: All fields, Choose fields, or None.
- 4Click Create Link. The green banner shows the URL: click Copy URL to paste it into an email or chat, or Text to send it straight to the customer's phone.
- 5Watch the board. Each link shows Pending, Paid, Cancelled, or Expired. Click Cancel on a link you no longer want paid.
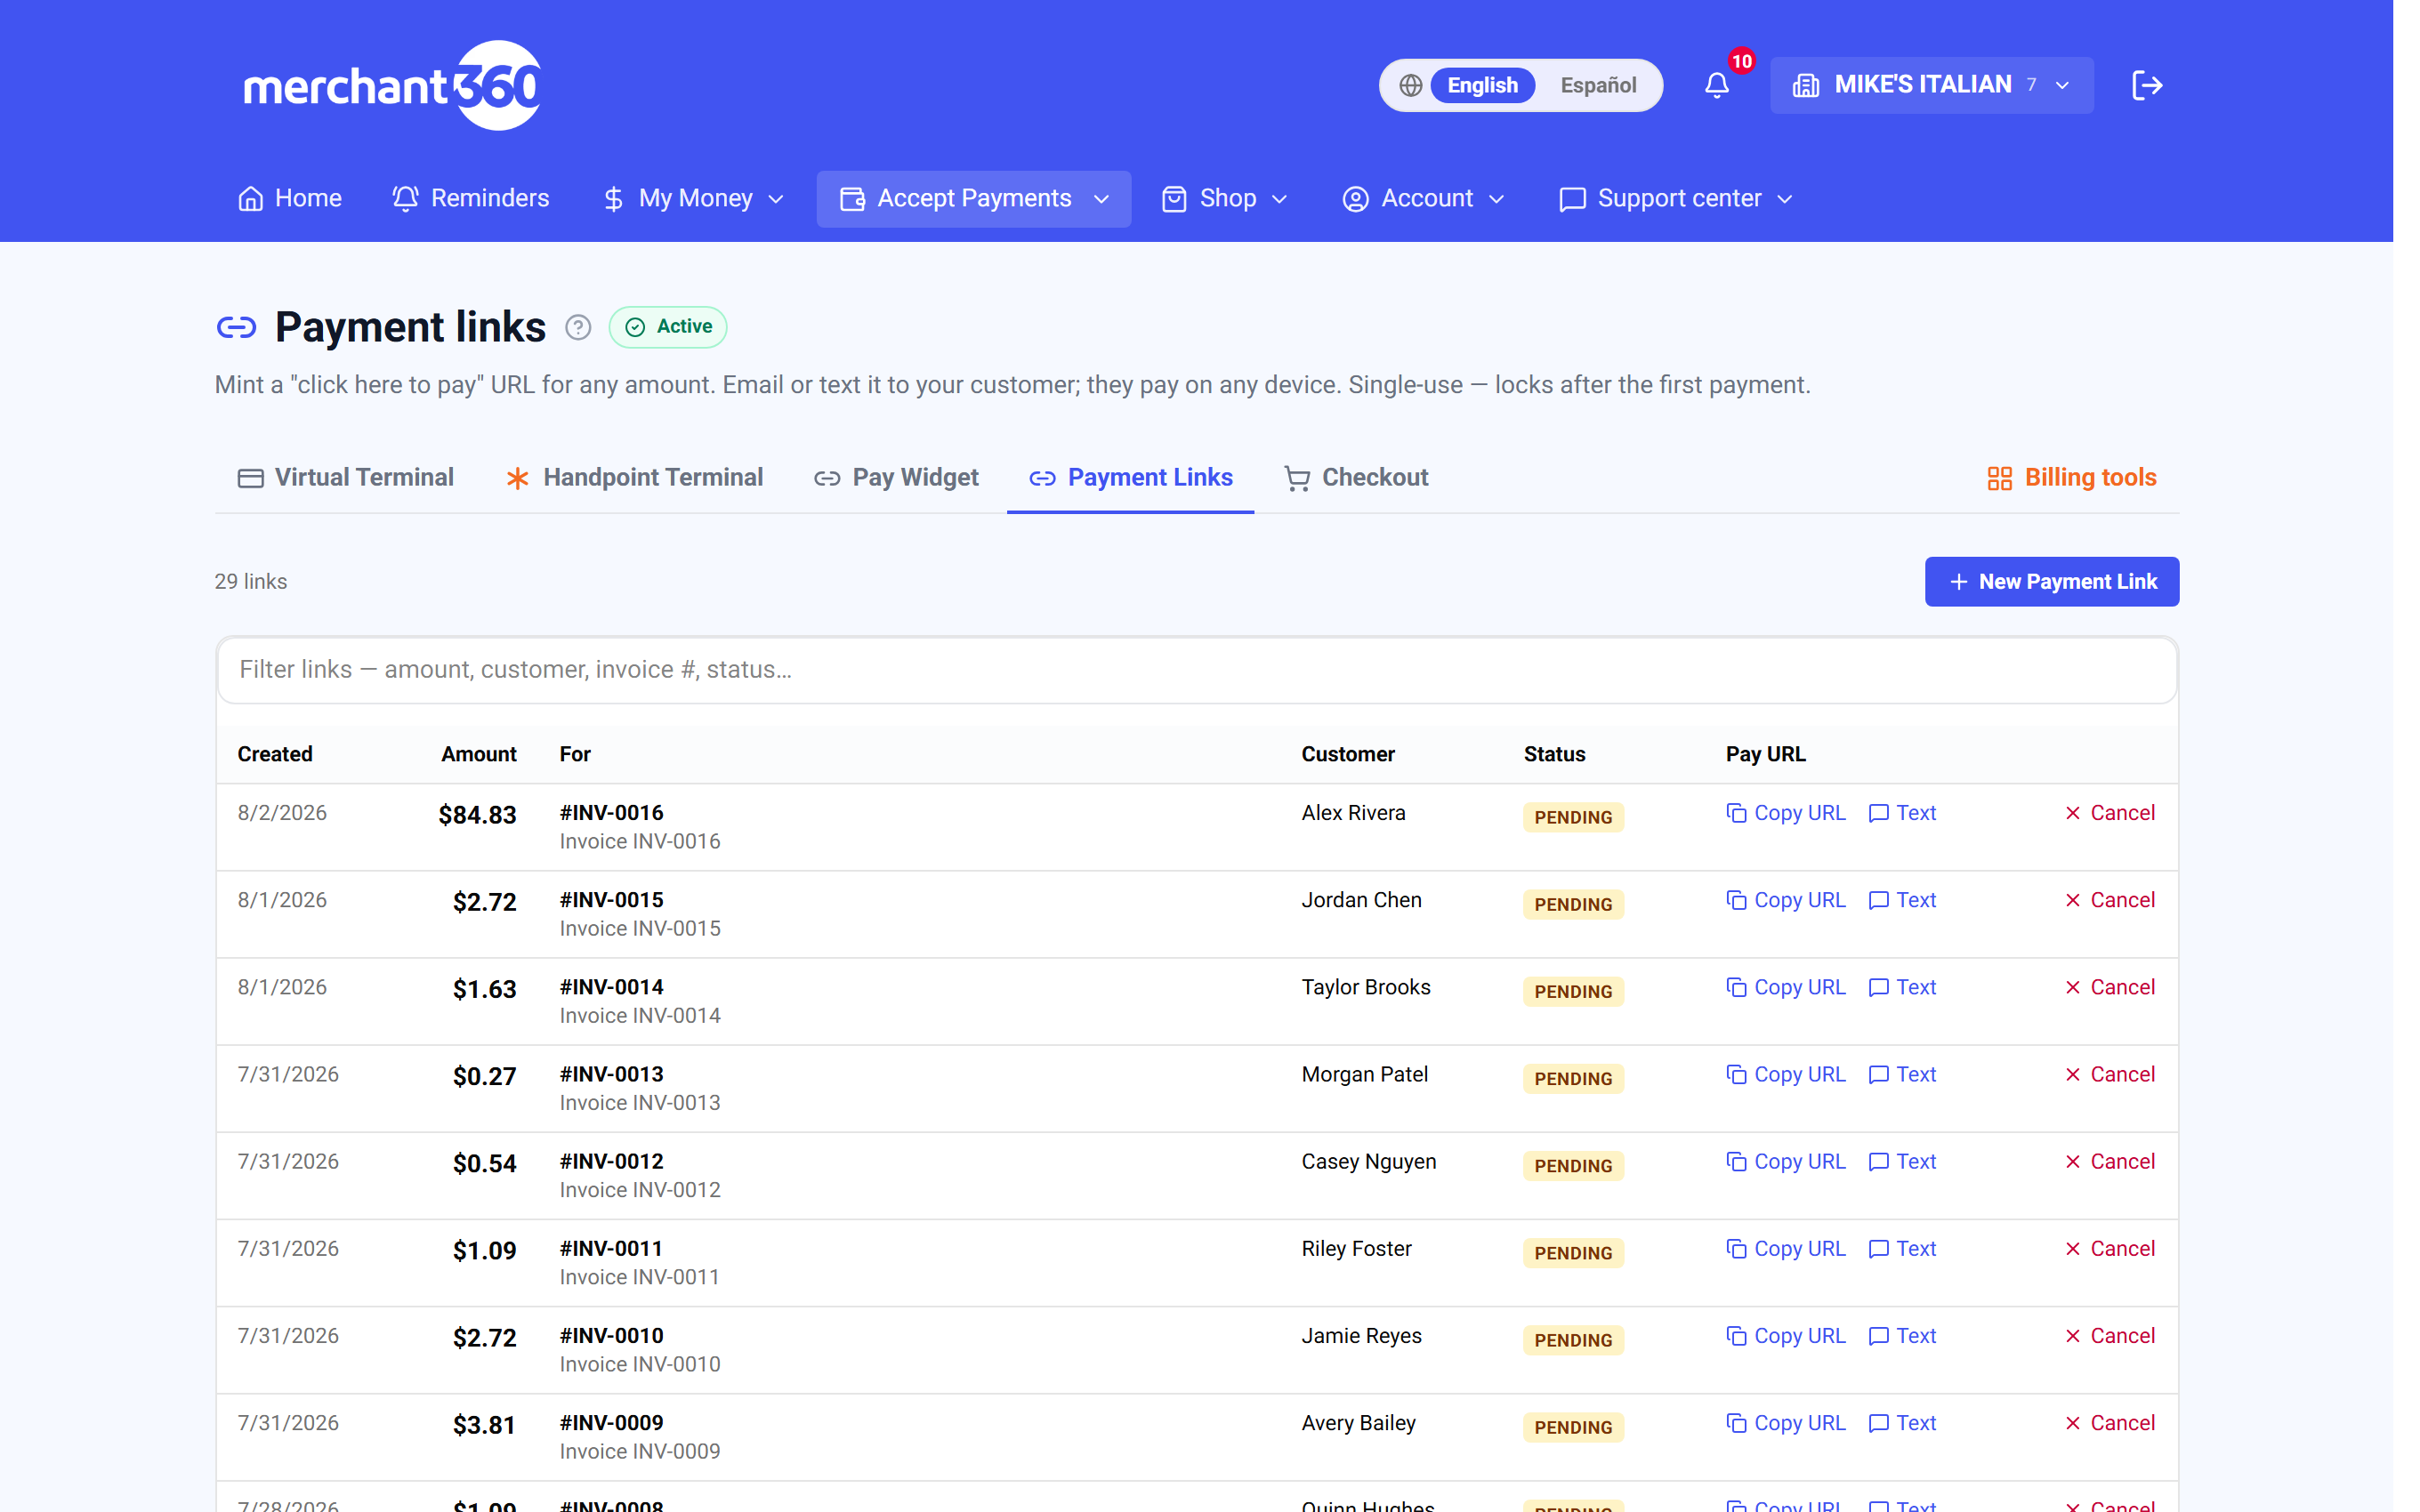
| On this screen | What it does |
|---|---|
| New Payment Link | Opens the form to create a link. |
| Amount * | The amount the customer pays. Leave it at $0.00 to let the customer choose the amount. |
| Invoice # (optional) | A reference that prints on the pay page, the receipt, and the transaction. |
| Expires in (days) | How long the link stays payable. Default 30; blank means never. |
| Description (optional) | What the payment is for, shown to the customer and saved on the transaction. |
| Link name (optional) | A private label for your board, for example March deposit. |
| Customer name / email / phone (optional) | Ties the link to a customer and enables Text to the phone number. |
| Custom fields on this link | All fields, Choose fields, or None: which of your custom payment fields the pay page asks. |
| Create Link | Creates the link and shows the URL banner. |
| Copy URL | Puts the pay URL on your clipboard. |
| Text | Sends the link by SMS to the customer's mobile number. STOP-compliant like every Merchant360 text. |
| Cancel | Stops a link so it can no longer be paid. The row shows Cancelled. |
| Filter links | Narrows the board by amount, customer, invoice #, or status as you type. |
| Created, Amount, For, Customer, Status, Pay URL | The board columns. Status is Pending, Paid, Cancelled, or Expired. |
Text a link for the fastest pay: the customer's saved phone fills in, and the SMS is STOP-compliant like every Merchant360 text. Leave the amount open for a tip jar or a donation.
The pay widget & your hosted pay page
The pay widget gives you two things: a hosted pay page at your own link that you can share, print as a QR code, or preview, and an embeddable form you paste into your own website so customers pay without leaving your site. Both use the same settings.
Go to Accept Payments → Pay Widget. The first time, click Turn on the Pay Widget; this needs card processing to be active. The widget starts with one-time fixed-amount payments, a $1 floor, and a $10,000 ceiling, all of which you can change.
You are done when the status pill reads Live and the Master switch is On. Copy URL gives you the public pay page address, and Preview shows exactly what a customer sees. Every payment through the page or the embed lands on Money → Transactions and in the widget's Recent activity list.
If customers report that payments are unavailable, the Master switch is Off. If a payment is refused for its amount, it is outside the Amount range. If your logo is missing on the page, upload it on the Business profile card in Settings.
- 1Master switch: turn payments on or off. While off, visitors see a payments aren't available notice on both the hosted page and the embed.
- 2Payment types: tick what the page accepts: Fixed amount, Donations, Save card on file, Pay external invoice, Pay Merchant360 invoice, or Subscriptions. Customers can only use types you tick here.
- 3Amount range: set a Minimum and Maximum. These are enforced on the server, so nobody can tamper with the link to pay outside the range.
- 4Branding: set your Brand color, an optional Logo URL, and the Success redirect and Cancel redirect pages customers land on. Your logo otherwise comes from your business profile.
- 5Receipts: the From email is the address customers reach when they reply to a receipt, and the BCC email gets a copy of every receipt. Both are also on the Receipts card under Settings, which applies to every channel and takes priority when filled in.
- 6Embed snippet: pick the Payment type, copy the snippet, and paste it into your website where the form should appear. It renders a secure payment frame, so no card data ever touches your site.
- 7Pay Now button: build a ready-to-paste payment button for your website or email. The full walkthrough is in the Payment buttons section below.
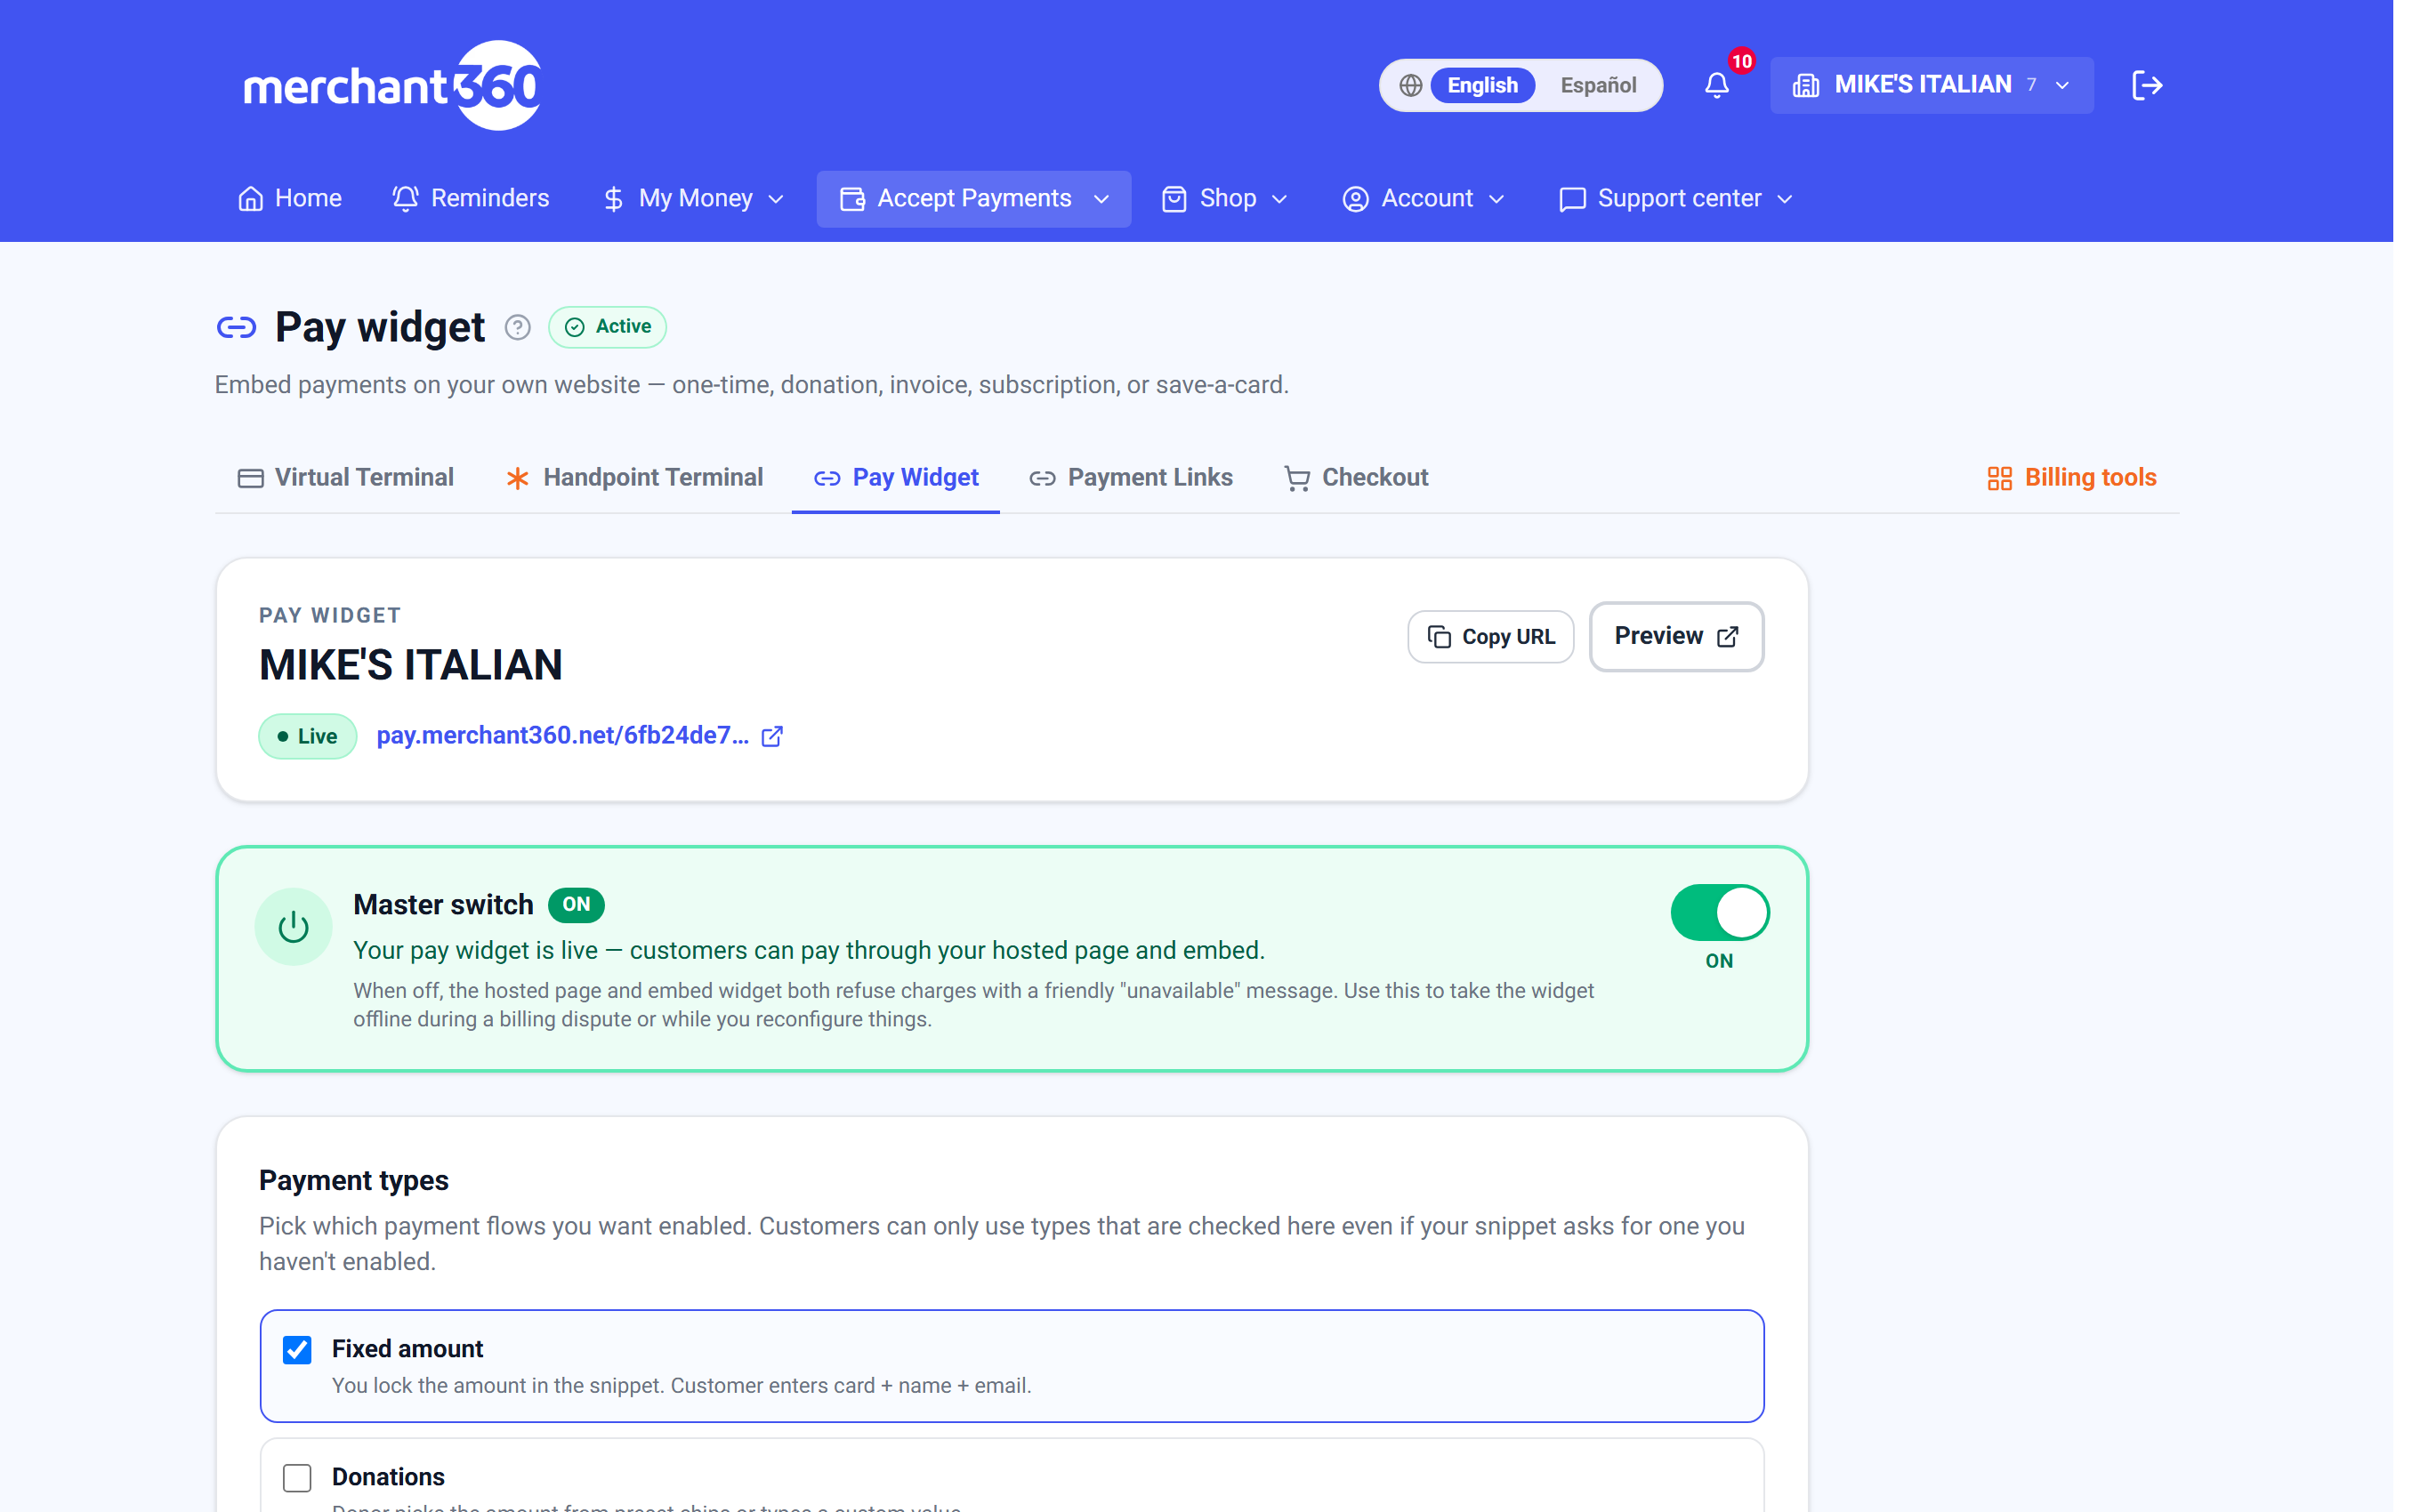
| On this screen | What it does |
|---|---|
| Turn on the Pay Widget | Provisions the widget and issues your first API key. Shown once, before activation. |
| Live / Off / Revoked / Not configured | The status pill at the top of the page. |
| Master switch | On accepts payments on the hosted page and the embed. Off shows a payments aren't available notice on both. |
| Copy URL | Copies the public address of your hosted pay page. |
| Preview | Opens the hosted pay page as a customer sees it. |
| Payment types | Fixed amount, Donations, Save card on file, Pay external invoice, Pay Merchant360 invoice, Subscriptions. Only ticked types work, even if a snippet asks for another. |
| Amount range: Minimum / Maximum | Server-side limits on every one-time payment and donation. |
| Branding: Logo URL, Brand color, Success redirect, Cancel redirect | The look of the page and where customers land after paying or cancelling. |
| Receipts: From email, BCC email | Receipts go to the customer automatically from Merchant360 under your business name. From is the reply-to address; BCC copies you. Settings → Receipts overrides both when filled in. |
| Embed snippet: Payment type, Copy | The code to paste into your site for the chosen payment type. |
| Recent activity | The last 50 events on your widget with When, Mode, Customer, Card, and Outcome, and a Refund button for each charge (partial refunds supported). |
Copy your public pay-page URL to share it directly, or use Preview to see exactly what a customer sees before you send it out.
What your pay page can accept
The Pay Widget is one tool that changes shape based on which payment types you turn on. Each type is a different way to collect. Mix and match them, or run just one; the page shows only what fits the link a customer opens.
Subscriptions need plans. On the Subscriptions page (linked from the widget) create each plan with a name, amount, billing period, and optional trial, setup fee, number of payments, and terms. Customers pick a plan on your pay page, the first payment is charged immediately, and the card is kept on file for the rest. The Subscribers list shows every enrollment with its status and next charge, and lets you pause, resume, retry a failed charge, or cancel.
The page also accepts what your Payment methods card allows: card, and bank when bank payments are enabled. Under dual pricing both prices are shown and the customer's choice sets the total.
If a customer cannot sign up for a plan, the Subscriptions payment type is off or the plan is archived. If a type the snippet asks for is not ticked under Payment types, the widget refuses it, so tick the type first.
- 1Fixed amount: you set the price (through the embed's amount or the Pay Now button) and the customer pays it. Best for a product, a booking, or a set fee.
- 2Donations: the giver picks the amount from preset chips or types a custom value. Best for nonprofits, tips, and pay-what-you-want.
- 3Save card on file: no charge; the customer's card is vaulted for a future invoice or subscription.
- 4Pay external invoice: the customer types your own invoice number and the amount, and pays it. Best when your invoices live in QuickBooks, Xero, or another system.
- 5Pay Merchant360 invoice: the customer looks up an invoice you sent from Merchant360 by their email and customer code, sees the balance, and pays it. No link needed.
- 6Subscriptions: the customer enrolls in a plan you set up (daily to yearly) and the card is billed automatically.
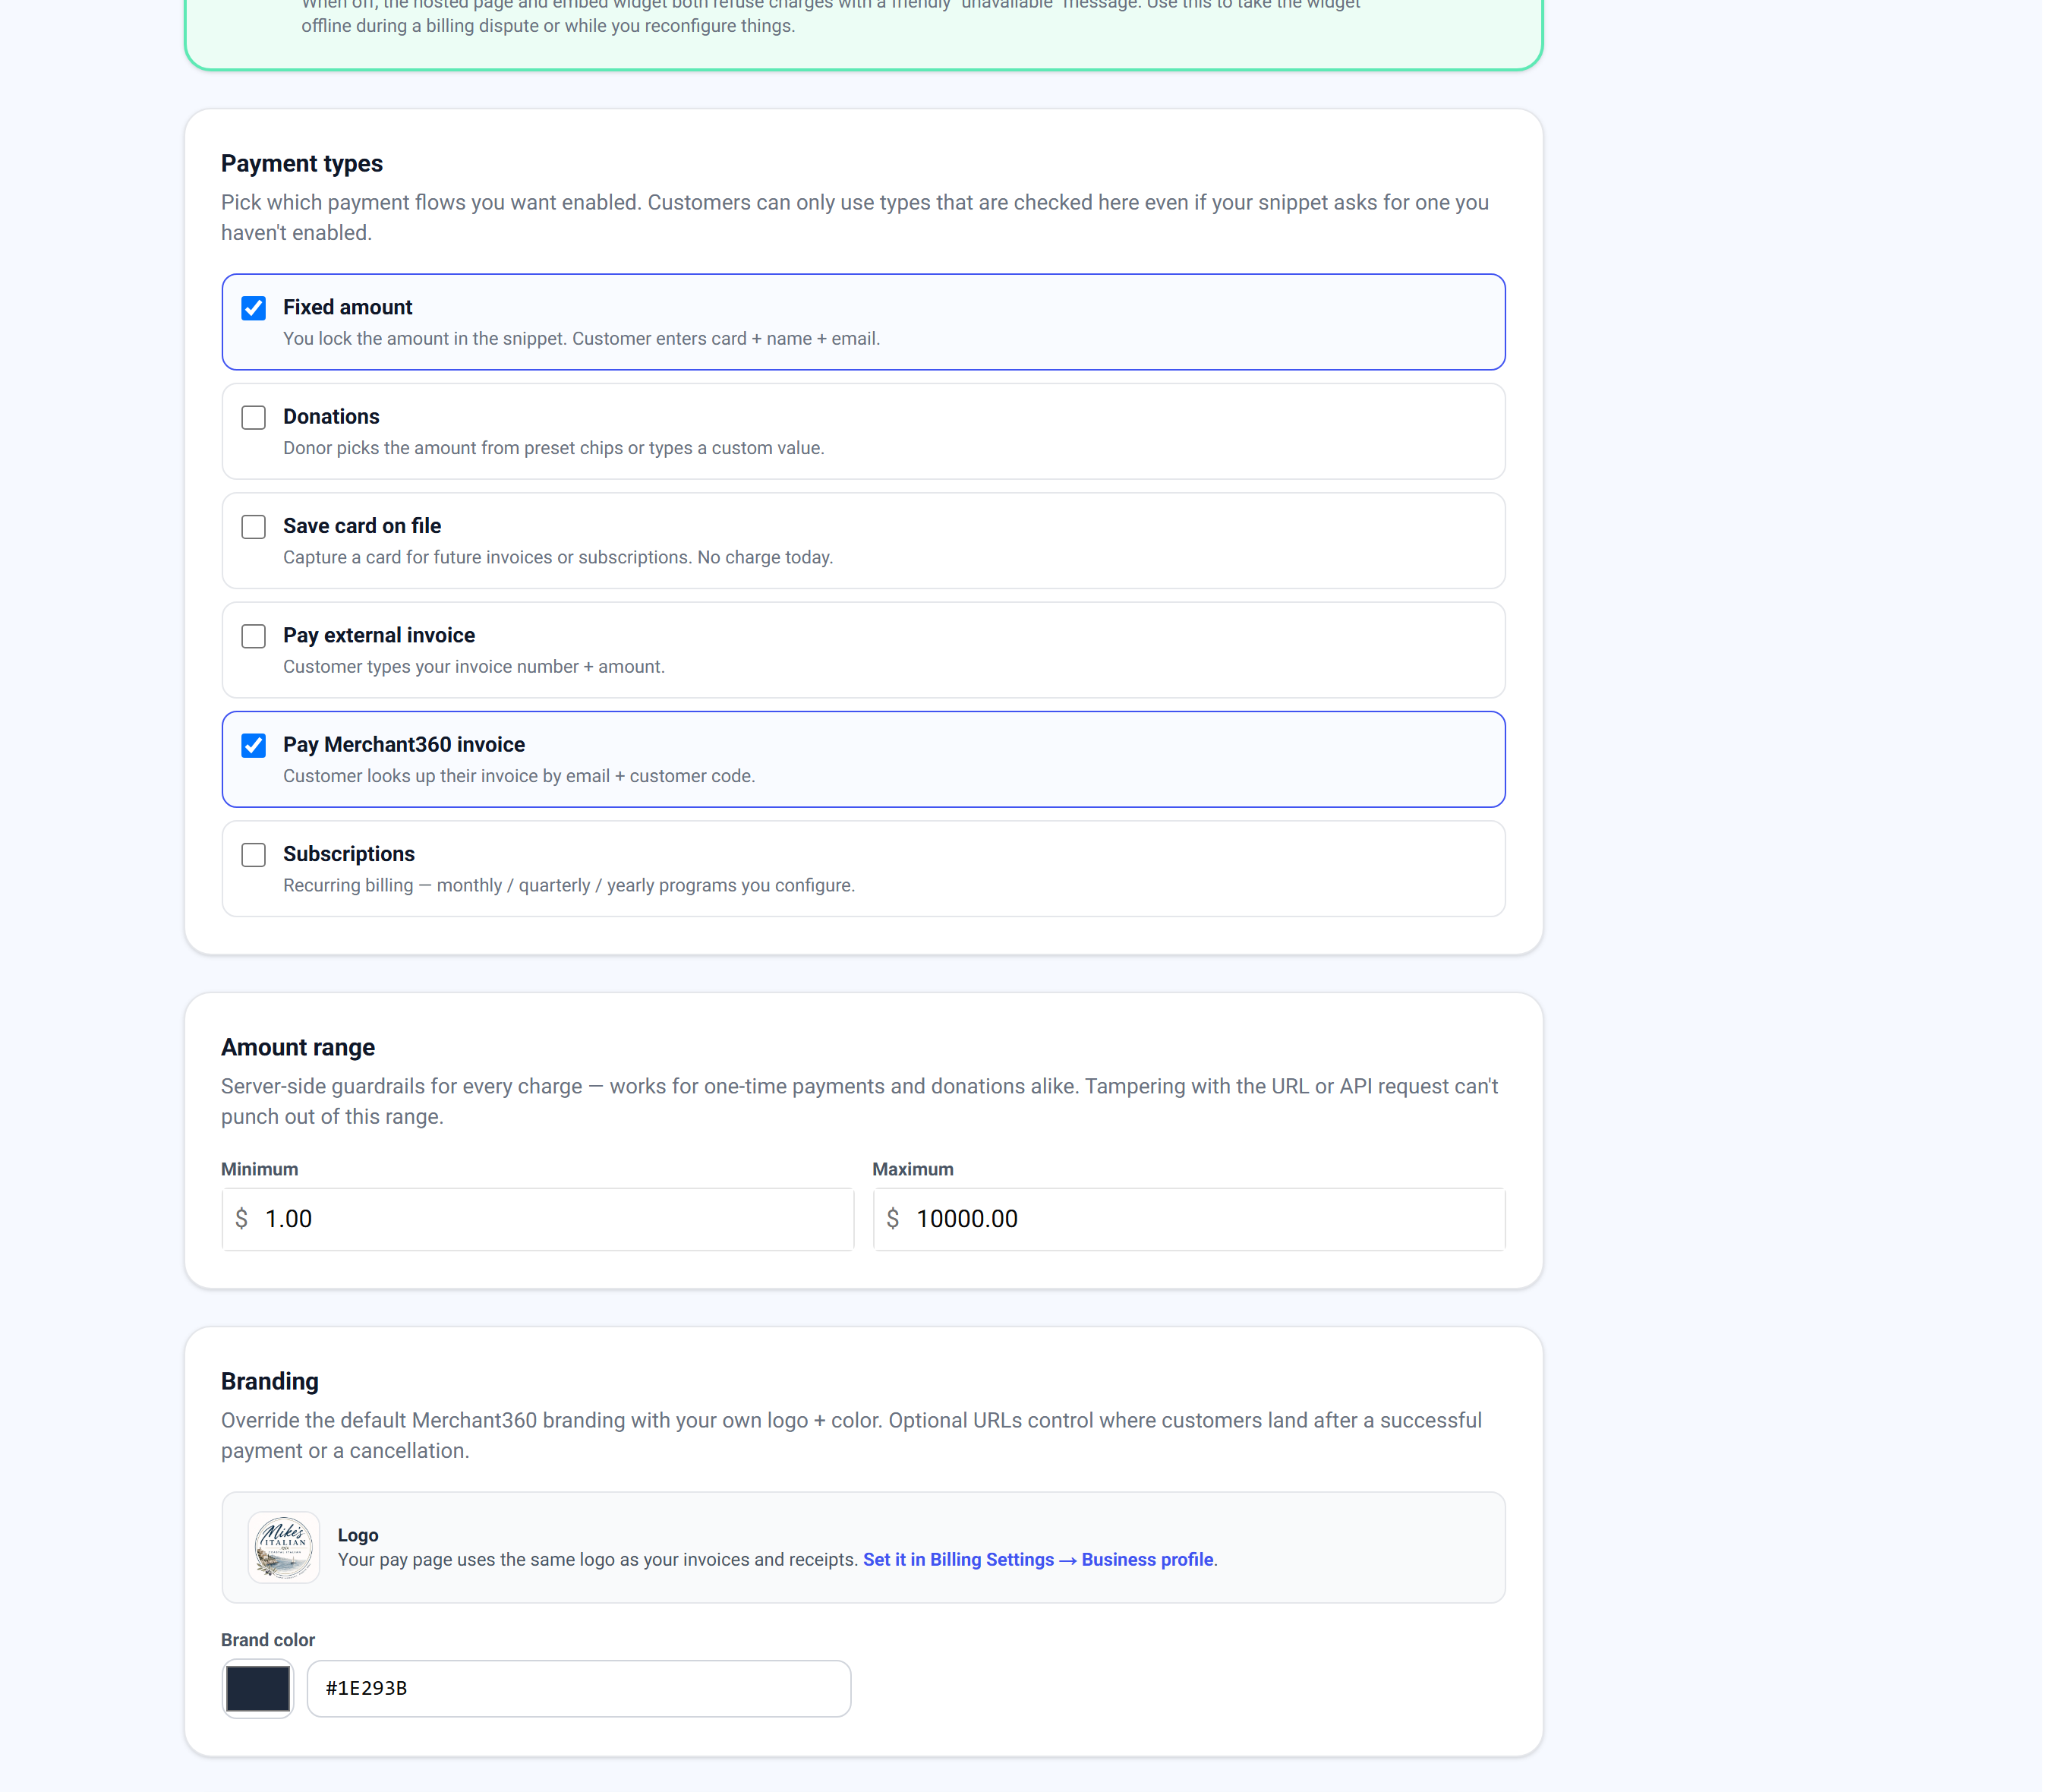
| On this screen | What it does |
|---|---|
| Payment types | The six checkboxes that decide what the widget offers. Coming soon marks a type not yet available on your account. |
| + New plan | Opens the New subscription plan form: Plan name, Description, What's included, Amount, Billing period (Daily, Weekly, Every 2 weeks, Monthly, Quarterly, Every 6 months, Yearly), Number of payments, Free trial (days), One-time setup fee, Terms, Create plan. |
| Archive (plan) | Hides a plan from new sign-ups. Existing subscribers keep billing. |
| Subscribers: All / Active / Paused / Failed / Cancelled | Filters the enrollment list. Each row shows the plan, payment count, and Next charge. |
| Pause / Resume / Retry now / Cancel | Per-subscriber actions. Retry now re-runs a failed charge once the customer updated their card. |
| Enable the Subscriptions payment type above | The warning shown on the plans card until Subscriptions is ticked. |
Turning on more types does not clutter the page; the widget shows only what fits the link a customer opens.
API keys for developers
If you build your own website or app, the API key card on the Pay Widget page issues a key for server-to-server charges and for verifying payments. Issue a key, Re-issue to rotate it, or Revoke it. The full key is shown only once, so save it when it is created.
The embedded widget and hosted pay page do not need the key: they authenticate through the snippet itself. The key is only for direct calls from your server. Anyone with the key can run charges against your account, so treat it like a password.
Verify a payment on your thank-you page: when a Pay Now button sends the customer to your Success URL, we add ?m360_ref=... to the address. From your server (never the browser), call GET /api/cygma/v1/verify?reference=<that value> with your API key in the Authorization header. It replies whether the payment truly cleared, with the amount and card last four, so you can confirm the order before you fulfil it.
You are done when the card shows the key prefix with its issued date. For scoped keys, webhooks, and Test versus Live keys, use the Developers page instead; it is the fuller developer console.
If a key leaks, click Re-issue: the old key stops working immediately and the new one is shown once. If Revoke is used by mistake, any integration using the key breaks until you issue a new one and update your server.
| On this screen | What it does |
|---|---|
| Issue key / Re-issue | Creates a key or replaces the current one. The old key stops verifying at once. |
| New key issued, save this now | The one-time display of the full key with Copy and Show / Hide. After you close the card only the prefix remains. |
| Revoke | Disables the key. Any server-to-server integration using it stops working. |
| No key on file | Shown until you issue a key. The widget and hosted page work without one. |
Developer checkout (hosted sessions)
Checkout (Accept Payments → Checkout) is for developers building payments into their own site or app. Instead of a drag-and-drop page, your code creates a secure checkout session through the Merchant360 API and sends the customer to a hosted pay page, or opens it as a popup with the Checkout Button. Card details never touch your site, and we redirect the customer back and notify your webhook when they pay.
The page gives you Get API keys, the API docs, and Try the demo, plus a list of every checkout session with its amount, description, customer, and status. Custom payment fields you enable for Checkout in Settings appear on the hosted page too.
A session is done when its status reads COMPLETE and view payment opens the transaction. Sessions created with a Test key carry a test badge and never move money.
If you just want a no-code way to collect a payment, use a payment link or the pay widget instead. If a session shows EXPIRED, the customer did not pay in time; create a new session. BANK PAYMENT PROCESSING means the customer chose Pay by bank and the debit is settling.
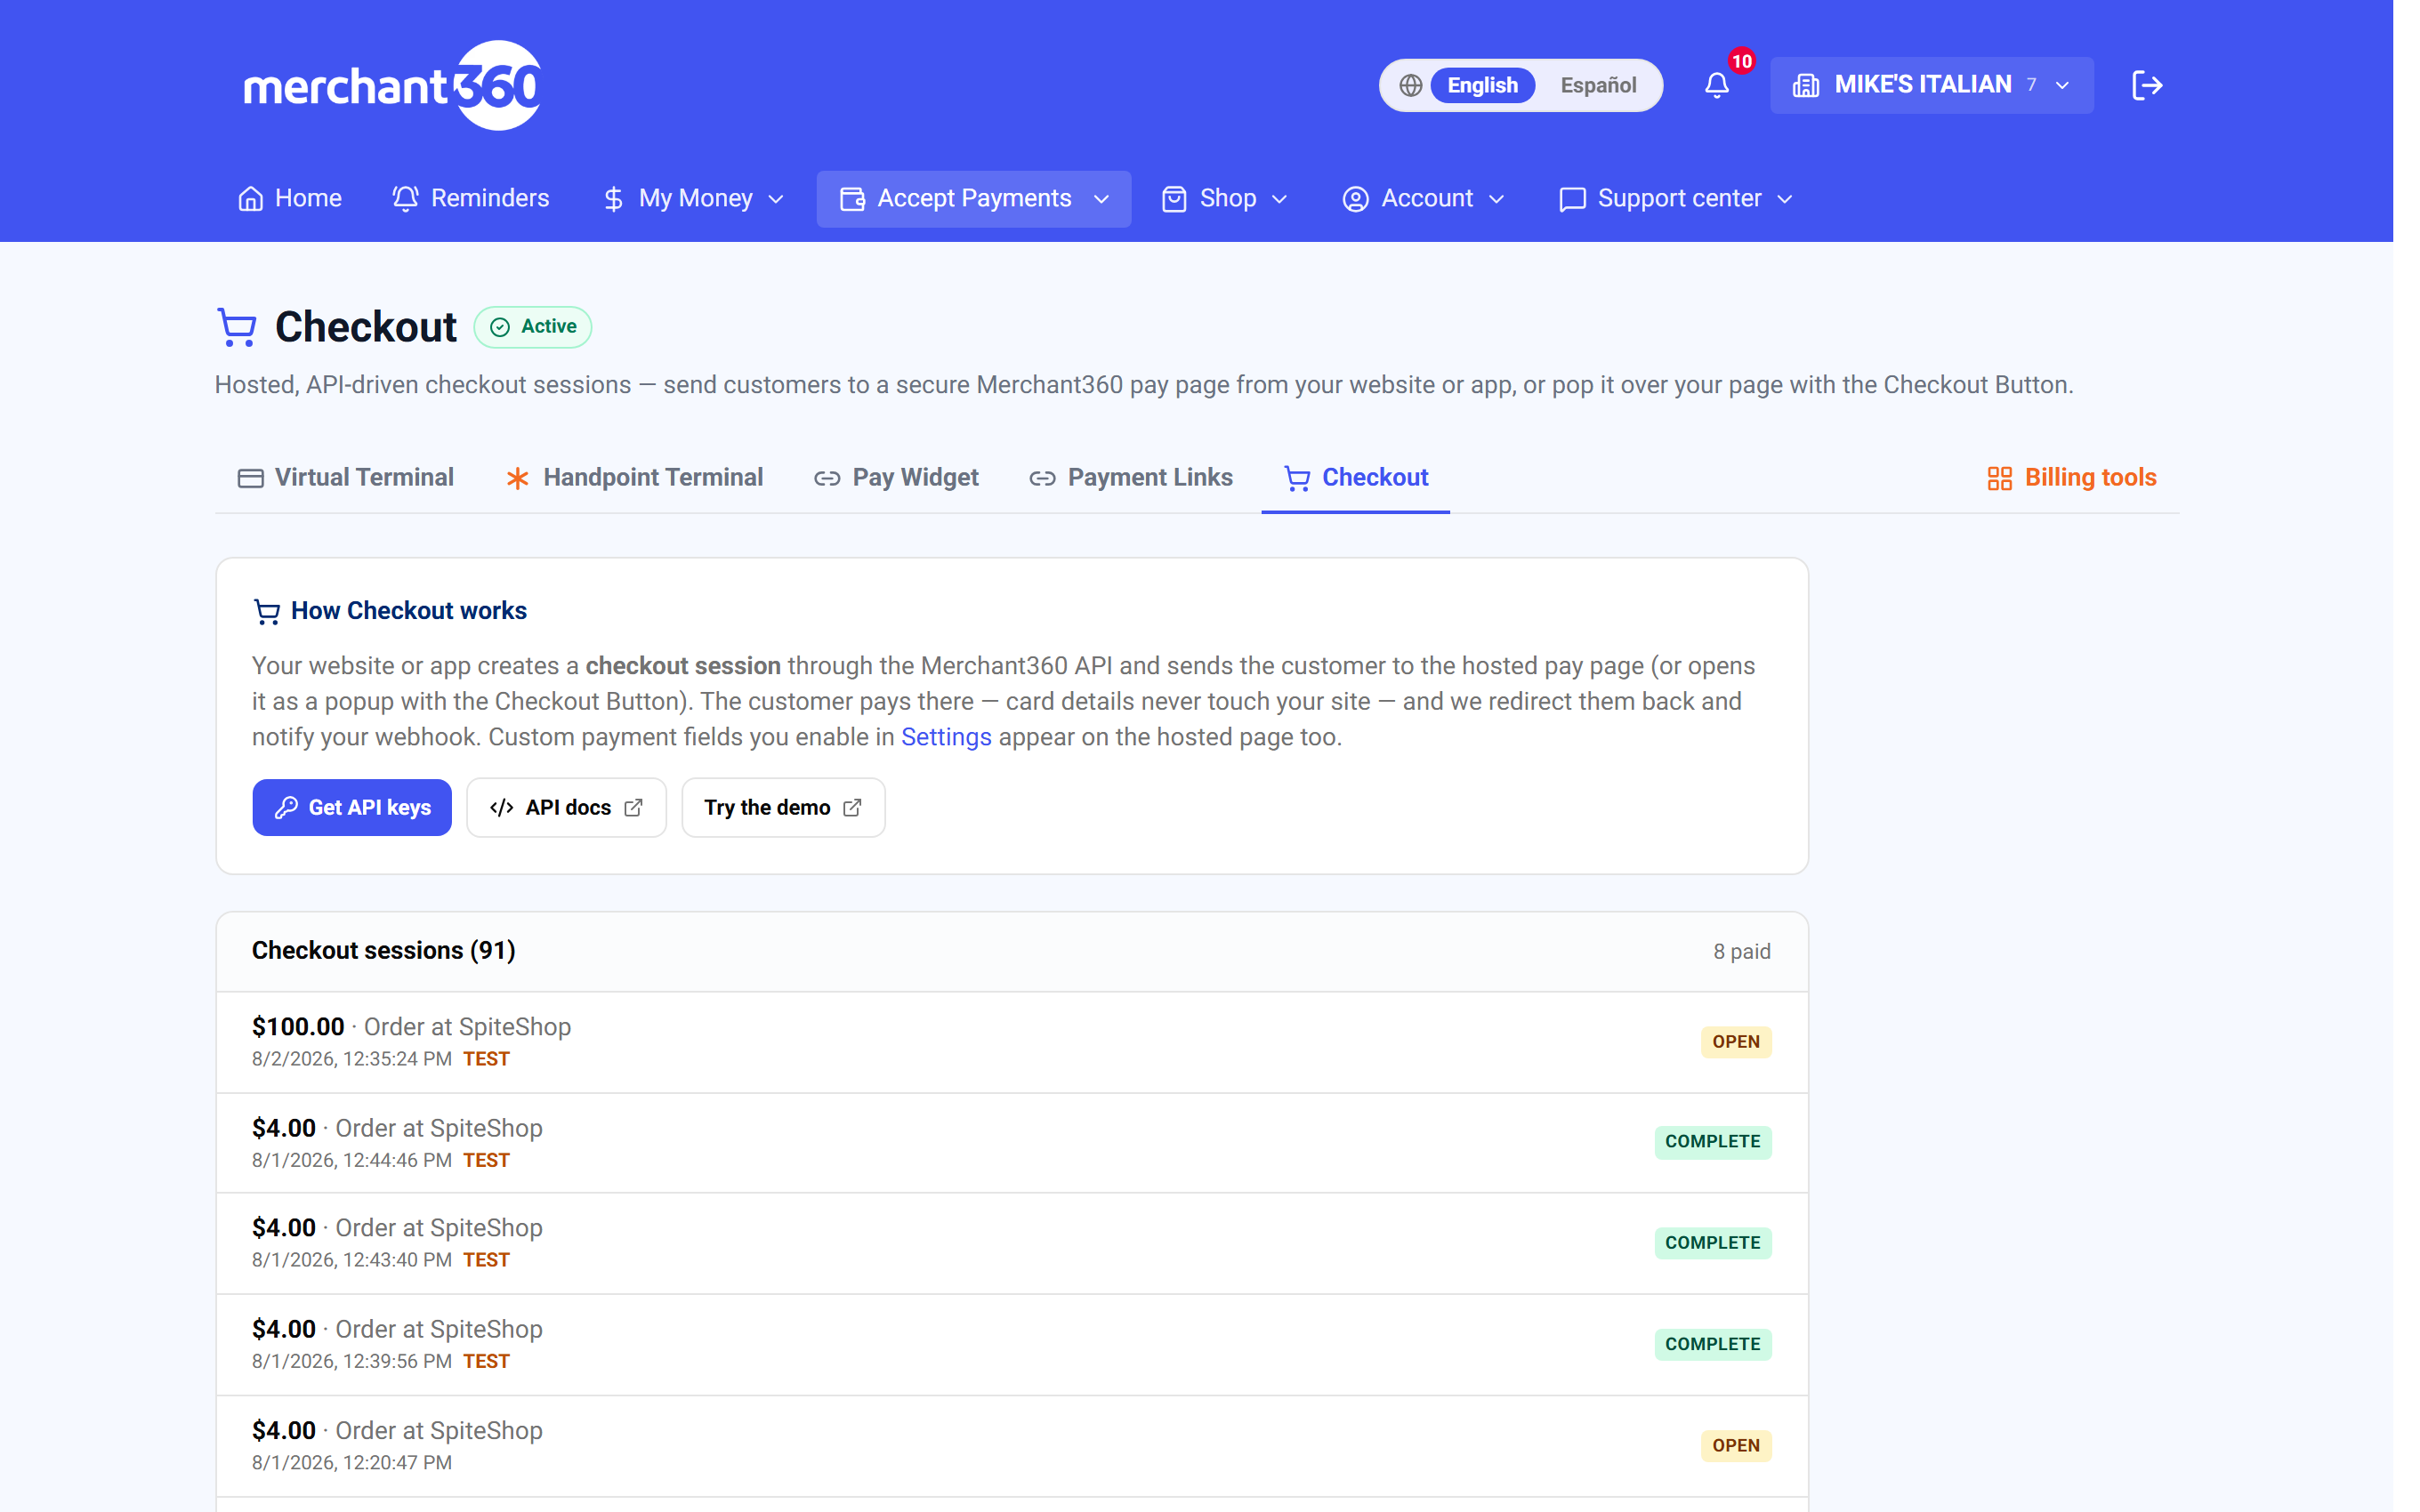
| On this screen | What it does |
|---|---|
| Get API keys | Opens the Developers page to create a Test or Live key with the checkout scope. |
| API docs | The developer documentation for creating sessions and handling webhooks. |
| Try the demo | Opens a sample checkout so you can see the hosted page before you integrate. |
| Checkout sessions (N) | Every session created on your account, newest first, with a count of how many are paid. |
| OPEN / BANK PAYMENT PROCESSING / COMPLETE / EXPIRED | The session status. OPEN is awaiting the customer; COMPLETE is paid; EXPIRED was not paid in time. |
| test | Badge on sessions created with a Test key. |
| view payment | Opens the transaction behind a completed session. |
What your customer sees on the hosted checkout
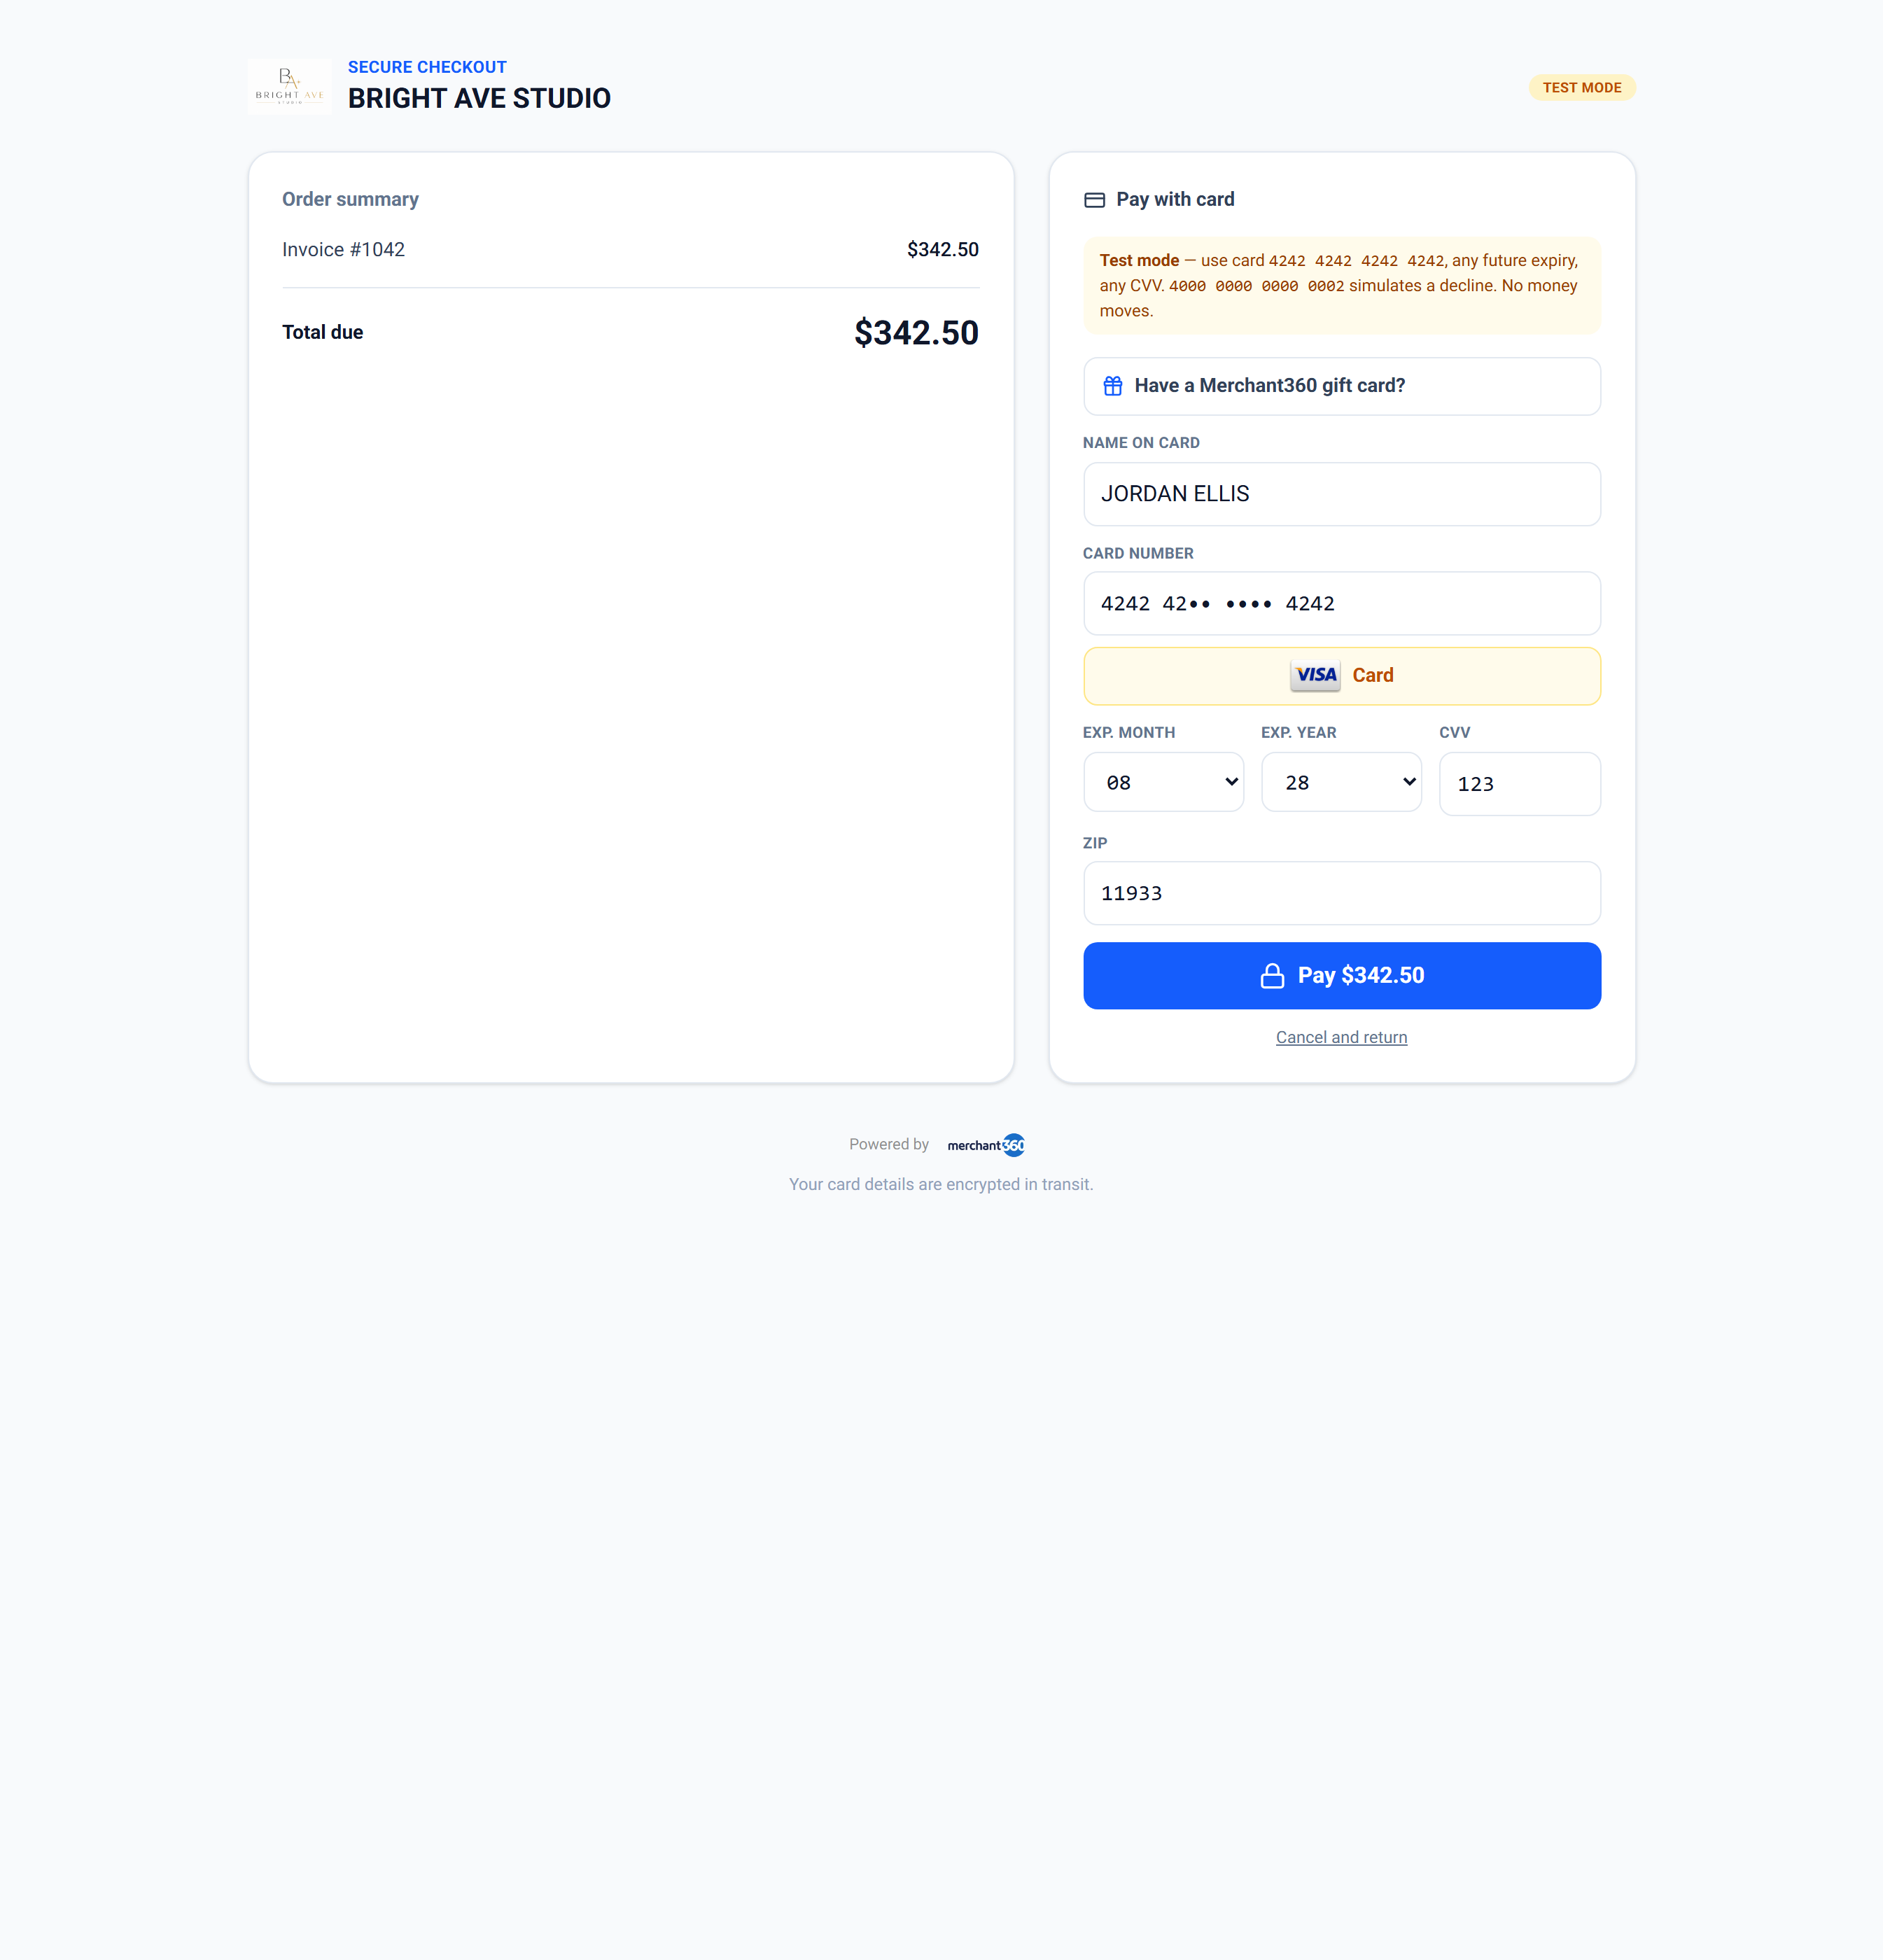
Every checkout session opens the same secure page: your logo and business name up top, the order summary on the left, and the payment form on the right. It is the page behind the Payment Extension's Open secure checkout, API-created sessions, WooCommerce's redirect and popup modes, and LeadConnector payments.
Where Apple Pay is available, an Apple Pay button appears above the card form automatically. On an iPhone or Mac the customer confirms with Face ID or Touch ID; in other browsers they scan a quick code with their iPhone. Nothing to set up on your side, and your pricing rules (surcharge or dual pricing) show on the Apple Pay sheet. The same button appears on your e-invoices' pay page.
On the card form, the card number masks its middle digits the moment the customer moves to the next field, the brand chip (Visa, Mastercard, Amex, Discover, and Credit or Debit) appears from the first digits, and expiry is picked from dropdowns, never typed. Mobile keychains can autofill the customer's own saved card. The Pay with Vault bar sits above the form for returning customers, and the Save my card with Vault box under it lets a new customer save their card for next time.
Sessions created with a Test key show a test-mode banner and never move money. Any custom payment fields enabled for Checkout are asked on the form, and the receipt is emailed the moment the payment succeeds.
If the Apple Pay button is missing, the customer's device or browser does not support it; the card form works as normal. If a customer's card is refused with an address error, the ZIP did not match the card's billing address.
| On this screen | What it does |
|---|---|
| Logo and business name | Pulled from your Business profile in Settings. |
| Order summary | The amount, description, and line items your session passed in. |
| Apple Pay | One-tap wallet payment where supported. Shows your surcharge or dual pricing on the sheet. |
| Pay with Vault | The bar returning customers use to pay with a card saved anywhere on Merchant360, verified by a texted code. |
| Card number, Exp month, Exp year, CVV, Billing ZIP | The secure card form. Number masks on blur; expiry is picked from dropdowns. |
| Brand chip | Visa, Mastercard, Amex, or Discover plus Credit or Debit, shown from the first digits. |
| Save my card with Vault to check out faster everywhere | Unchecked by default. Saves the card on success, tied to the customer's mobile number. |
| Custom payment fields | Any field you enabled for Checkout in Settings, asked before Pay. |
| Pay $X | The button always shows the exact total the card will be charged. |
| Test mode banner | Shown on sessions created with a Test key. No money moves. |
Payment methods on the hosted checkout
The hosted checkout adapts to how the customer pays and to what your Payment methods card allows. Card is always there. Pay by bank appears when bank payments are enabled, and the session then shows BANK PAYMENT PROCESSING until the debit settles. Under dual pricing the customer sees the card price and the cash price and the total follows their choice.
The payment is done when the page shows the paid confirmation and the customer is sent to your success page. Card payments appear on Money → Transactions at once; bank payments appear on Money → ACH Transactions and settle on the bank schedule.
If Pay by bank is missing, switch on Bank (ACH / eCheck) on the Payment methods card. If the gift card box is missing, your eGift program is not on. If a split payment's card portion declines, the gift redemption is reversed automatically so the balance never strands.
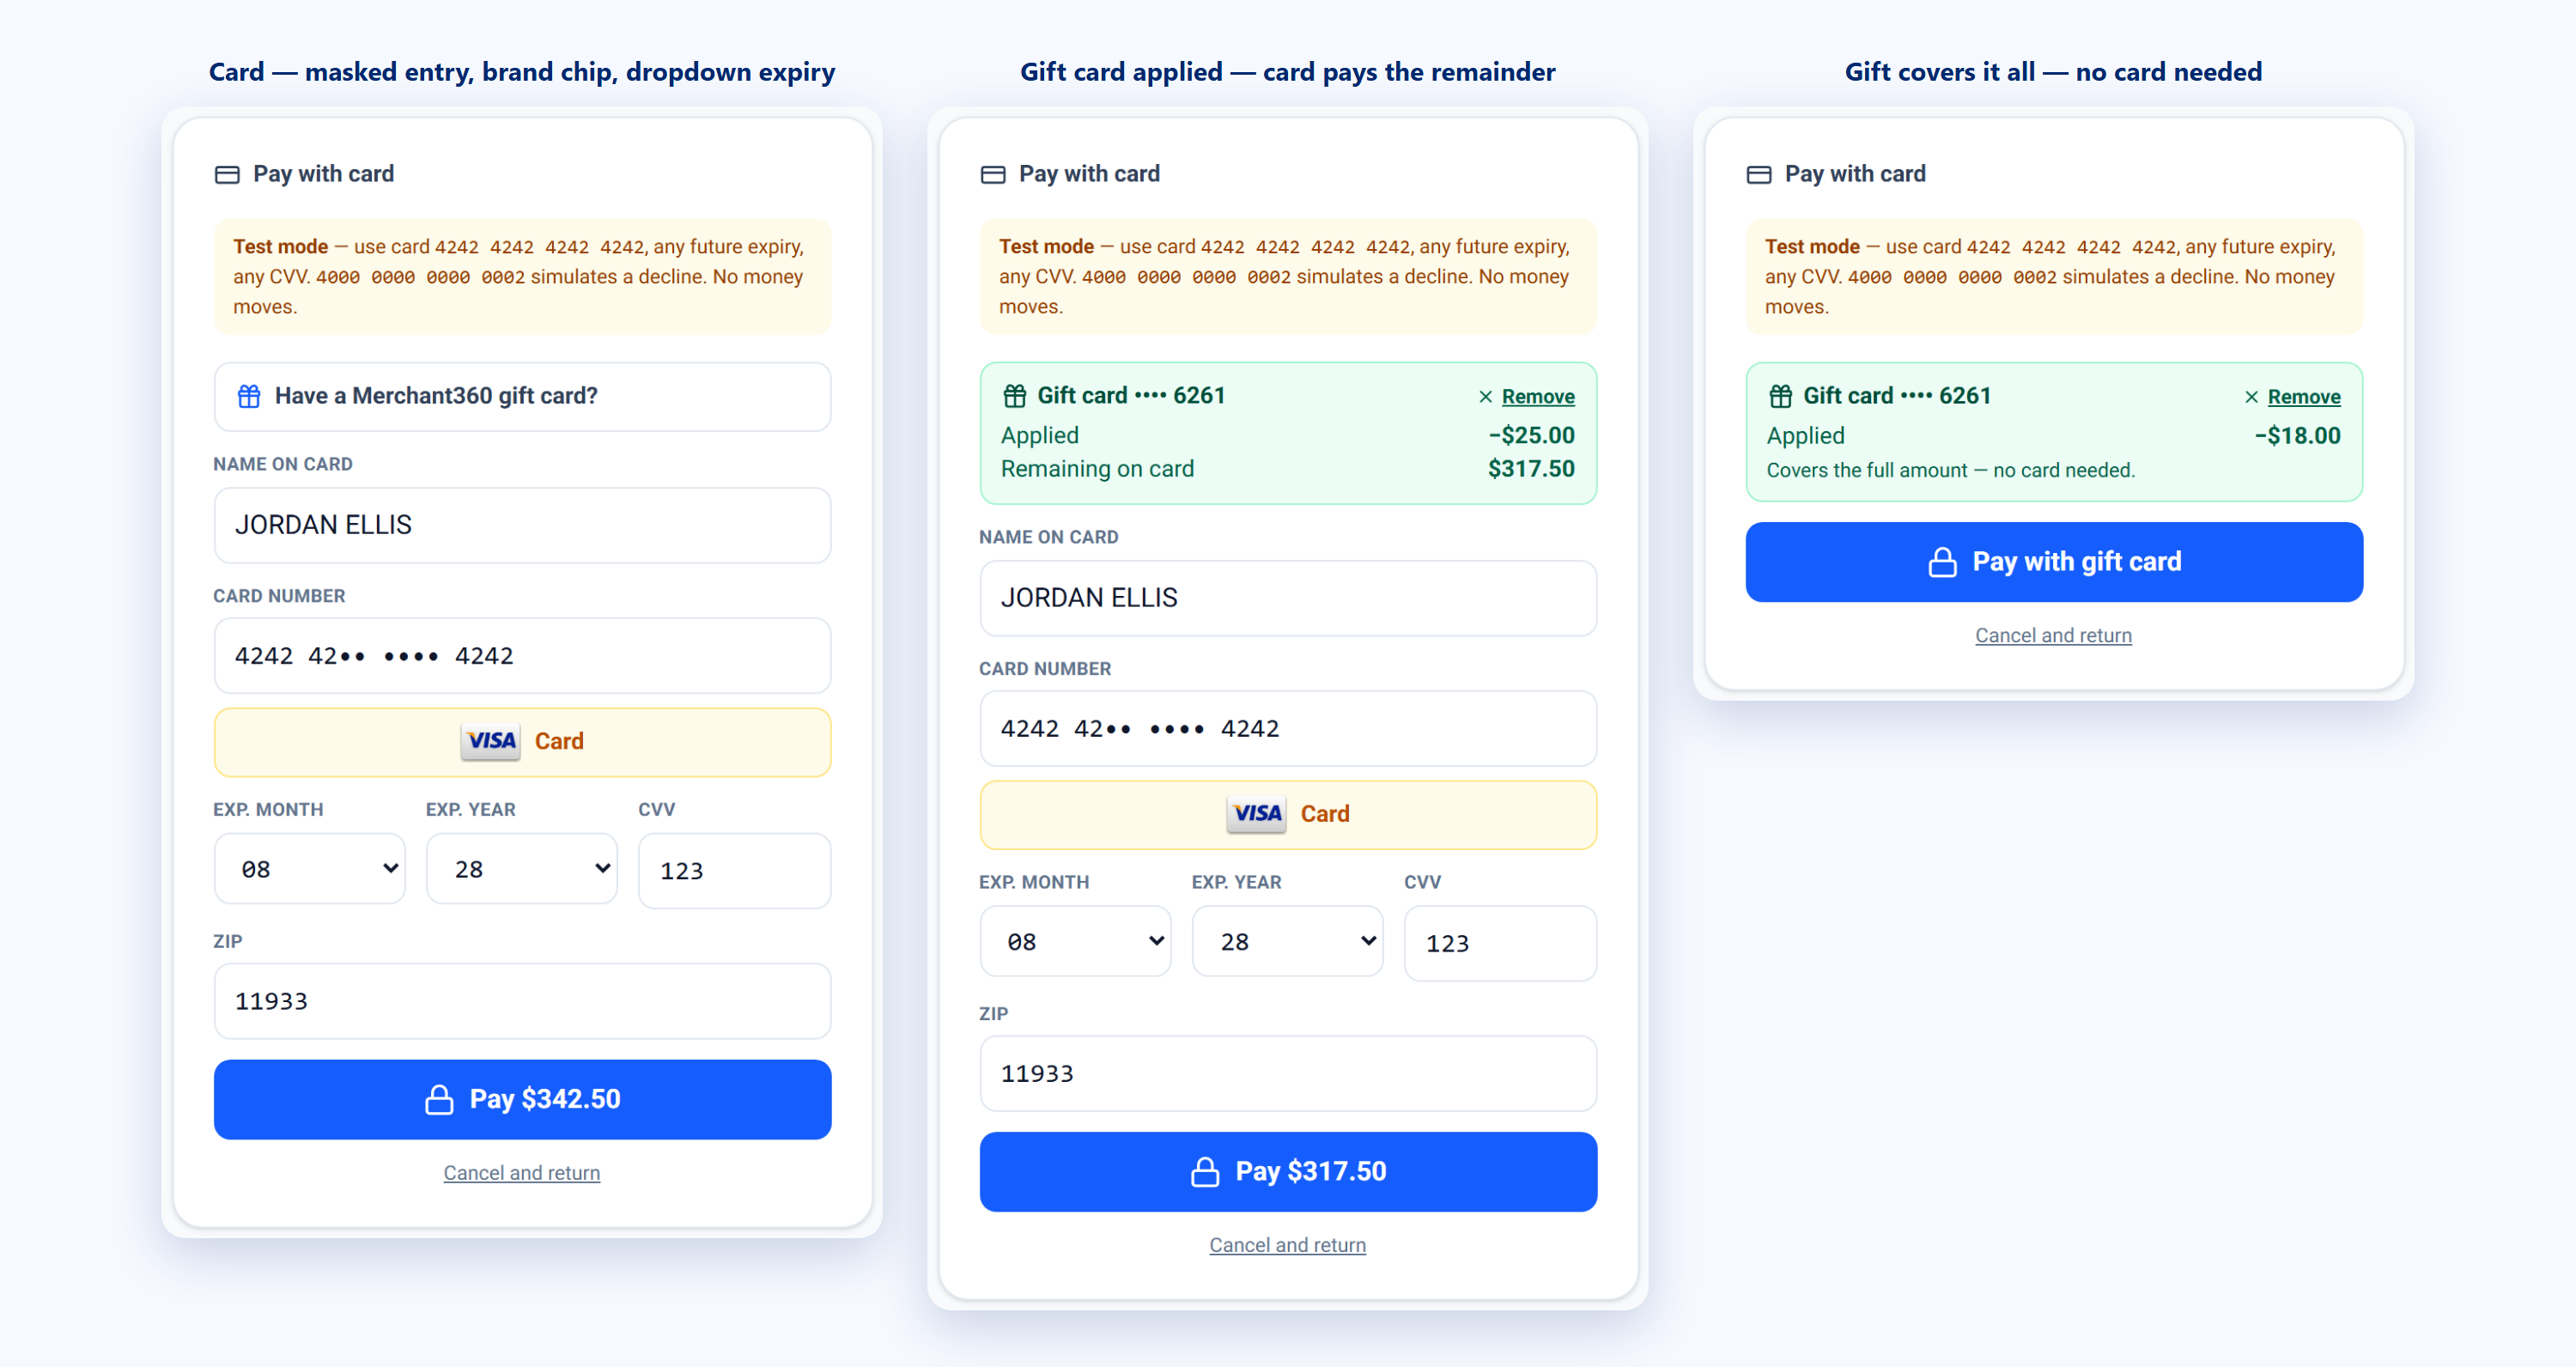
- 1Card: the standard flow with masked number entry, brand chip, dropdown expiry, CVV, and ZIP, with the Pay button always showing the exact total. If your account runs a credit-card surcharge, the itemized Subtotal / Surcharge / Total box appears above Pay on credit cards.
- 2Pay by bank: the customer connects their bank or types the routing and account numbers, accepts the debit authorization on the page, and the payment shows the cash price under dual pricing. It settles in a few business days.
- 3Gift card, partial: when your eGift program is on, Have a Merchant360 gift card? appears above the card fields. Applying a card shows exactly what it covers and what remains; the customer's card pays the remainder, and any surcharge is computed on the card portion only.
- 4Gift card, full: a gift card covering the whole amount removes the card fields entirely and the button becomes Pay with gift card.
| On this screen | What it does |
|---|---|
| Card / Pay by bank | The tender choice at the top of the form. Pay by bank shows only when bank payments are on. |
| Subtotal / Surcharge / Total | The itemized box shown on credit cards when a surcharge program is active. |
| Card price / Cash price | Both totals under dual pricing; the tender sets which one is charged. |
| Have a Merchant360 gift card? | Opens the gift card entry when your eGift program is on. Apply shows what the card covers and what remains. |
| Pay with gift card | The button when a gift card covers the whole amount; no card is needed. |
| Apple Pay | One-tap wallet payment where supported. |
Refunding an order paid partly by gift card? Refund the card portion as normal, and void the gift redemption from your eGift tools so the stored value goes back on the card.
Developers: API keys & webhooks
The Developers page (in the Merchant360 menu, owner-only) is home base for building on Merchant360. It has two parts: scoped API keys and a signed-webhooks console with a delivery log. Only the account owner can create or revoke keys and endpoints.
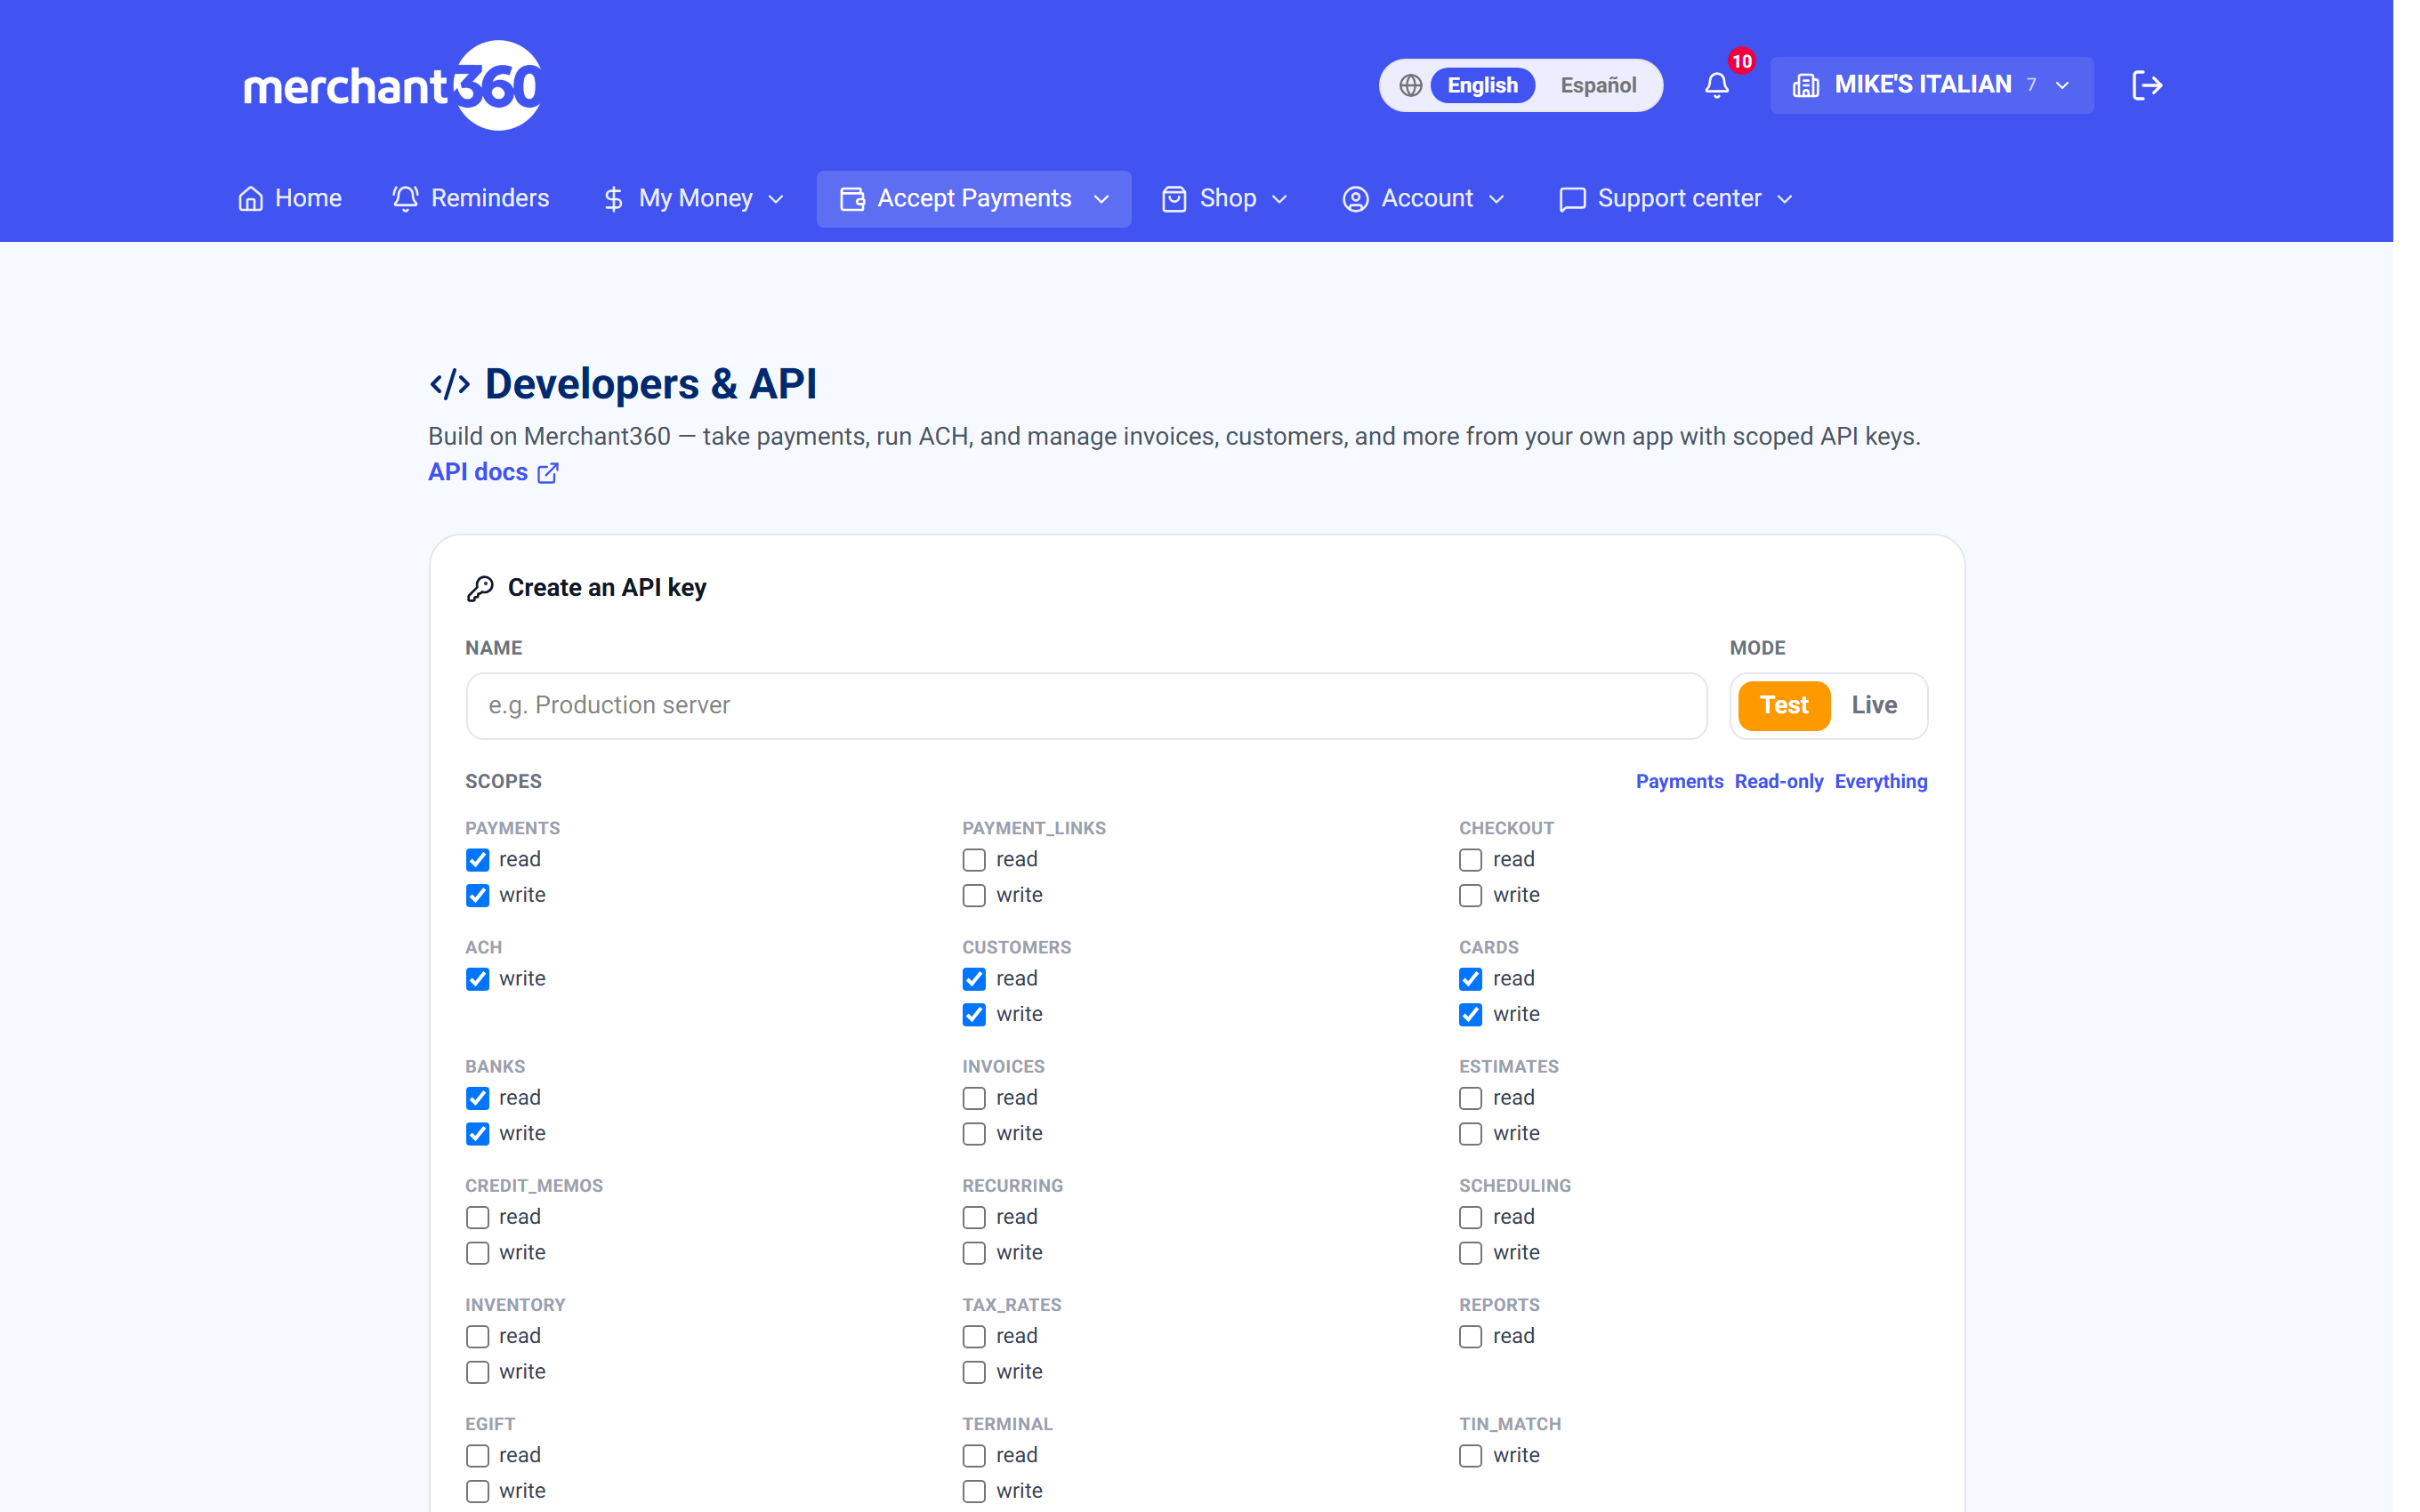
API keys: each key has a name, a Test or Live mode, and the scopes it is allowed. Presets cover Payments, Read-only, or Everything, or tick scopes one by one. Test keys hit the sandbox and land on Test Mode Transactions; Live keys move real money. The full key is shown once at creation. The same API charges cards and bank (ACH) alike.
Webhooks: add your https endpoint and choose which events to receive: all events, or specific ones such as invoice paid, payment succeeded or refunded, and ach settled or returned. Every delivery carries an M360-Signature header your server verifies with the signing secret, which is shown once and can be rotated.
You are done when the key appears under Your keys with its scope count and last-used date, and the endpoint shows Enabled with deliveries in the Recent deliveries log. Send test event proves the wiring before real events arrive.
If a delivery shows a failed status, check the Code column (your server's HTTP response) and click Retry; failed deliveries also retry on their own with backoff. If a key was exposed, Revoke it and create a new one. If you cannot see the page, you are signed in as a team member; it is owner-only.
- 1API keys: under Create an API key enter a Name, pick the Mode (Test or Live), choose a preset or tick Scopes, and click Create key. Copy the key from the Key created banner; it will not be shown again. Creating a key asks for a texted security code.
- 2Revoke a key from Your keys, or tick several and click Revoke selected keys to revoke them together.
- 3Webhooks: click Add endpoint, enter the Endpoint URL (https), choose All events or the specific events, and save. Store the Signing secret shown once.
- 4Watch deliveries in Recent deliveries, with the status and attempt count, and Retry a failed one. Use Send test event to confirm your receiver, Rotate secret if the secret leaks, and Disable or Delete to stop deliveries.
| On this screen | What it does |
|---|---|
| Create an API key: Name, Mode, Scopes | Name labels the key (e.g. Production server). Mode is Test or Live. Scopes limit what the key can do; presets are Payments, Read-only, Everything. |
| Create key | Mints the key after a texted security code. The Key created banner shows it once with Copy. |
| Your keys | Every key with its scope count, last used date (or never used), and Revoke. |
| Revoke / Revoke N selected keys | Disables one key or every ticked key. Apps using them stop working immediately. |
| Add endpoint | Opens the form: Endpoint URL (https), Events (All events, or specific ones), Cancel. |
| Signing secret, shown once | The secret used to verify the M360-Signature header. Store it now; rotate the endpoint if you lose it. |
| Enabled / Disabled | Whether the endpoint currently receives deliveries. |
| Send test event | Posts a sample event to the endpoint so you can confirm your receiver. |
| Rotate secret | Issues a new signing secret. The old one stops verifying immediately. |
| Disable / Delete | Pauses deliveries, or removes the endpoint. Deliveries stop immediately. |
| Recent deliveries: When, Event, Status, Attempts, Code | The delivery log per endpoint. Code is your server's HTTP response. Refresh reloads it. |
| Retry | Re-sends a failed delivery now. |
This is developer territory. If you work with an ISV or a web developer, point them here; if you do not build software, you can skip it.