
Products & services
The catalog behind your invoices, estimates, and payment links – built for retail and service businesses.
Your product catalog
Products & services (Accept Payments → Products & services) is the one catalog behind everything you bill for. Add an item once and it appears in the line-item picker on invoices, estimates, payment links, and work orders. Price a thing once and every tool agrees on it.
An item can be a product, a service, a digital good, a bundle that rings several components at once, or a variable item that generates a child for each size or colour. A service works exactly like a product without stock; Consultation, 1 hour needs a price, not a quantity on hand.
The editor is organised into tabs so you only look at what your business actually needs. A dental practice fills in General and Pricing and is finished. A liquor store works through all of them. The Stock tab disappears entirely for anything that does not track stock.
Start here before you send your first invoice, and use Import CSV if you already have a price list in a spreadsheet: it takes a file with the item name, SKU, price, cost, quantity, and classification columns and creates or updates items in one pass. Done looks like this: every row in the catalog has a price, physical goods show an On hand figure, and the margin column reads the way you expect.
If an item does not show in the invoice picker, it is probably archived; use the Archive filter to find it and restore it. If a margin reads blank, the item has no cost on the Pricing tab. If an import fails, open the error list, fix the named rows in your spreadsheet, and import again; rows that already loaded are not duplicated.
- 1Click New item and give it a name, a SKU (or leave it blank and one is generated), and a description.
- 2Set how it is sold: Each, or by Weight for a deli or produce scale item.
- 3Classify it: Department, Category, Brand, and a Default vendor.
- 4Move through Pricing, Identifiers & Barcodes, and Stock as needed, then Save.
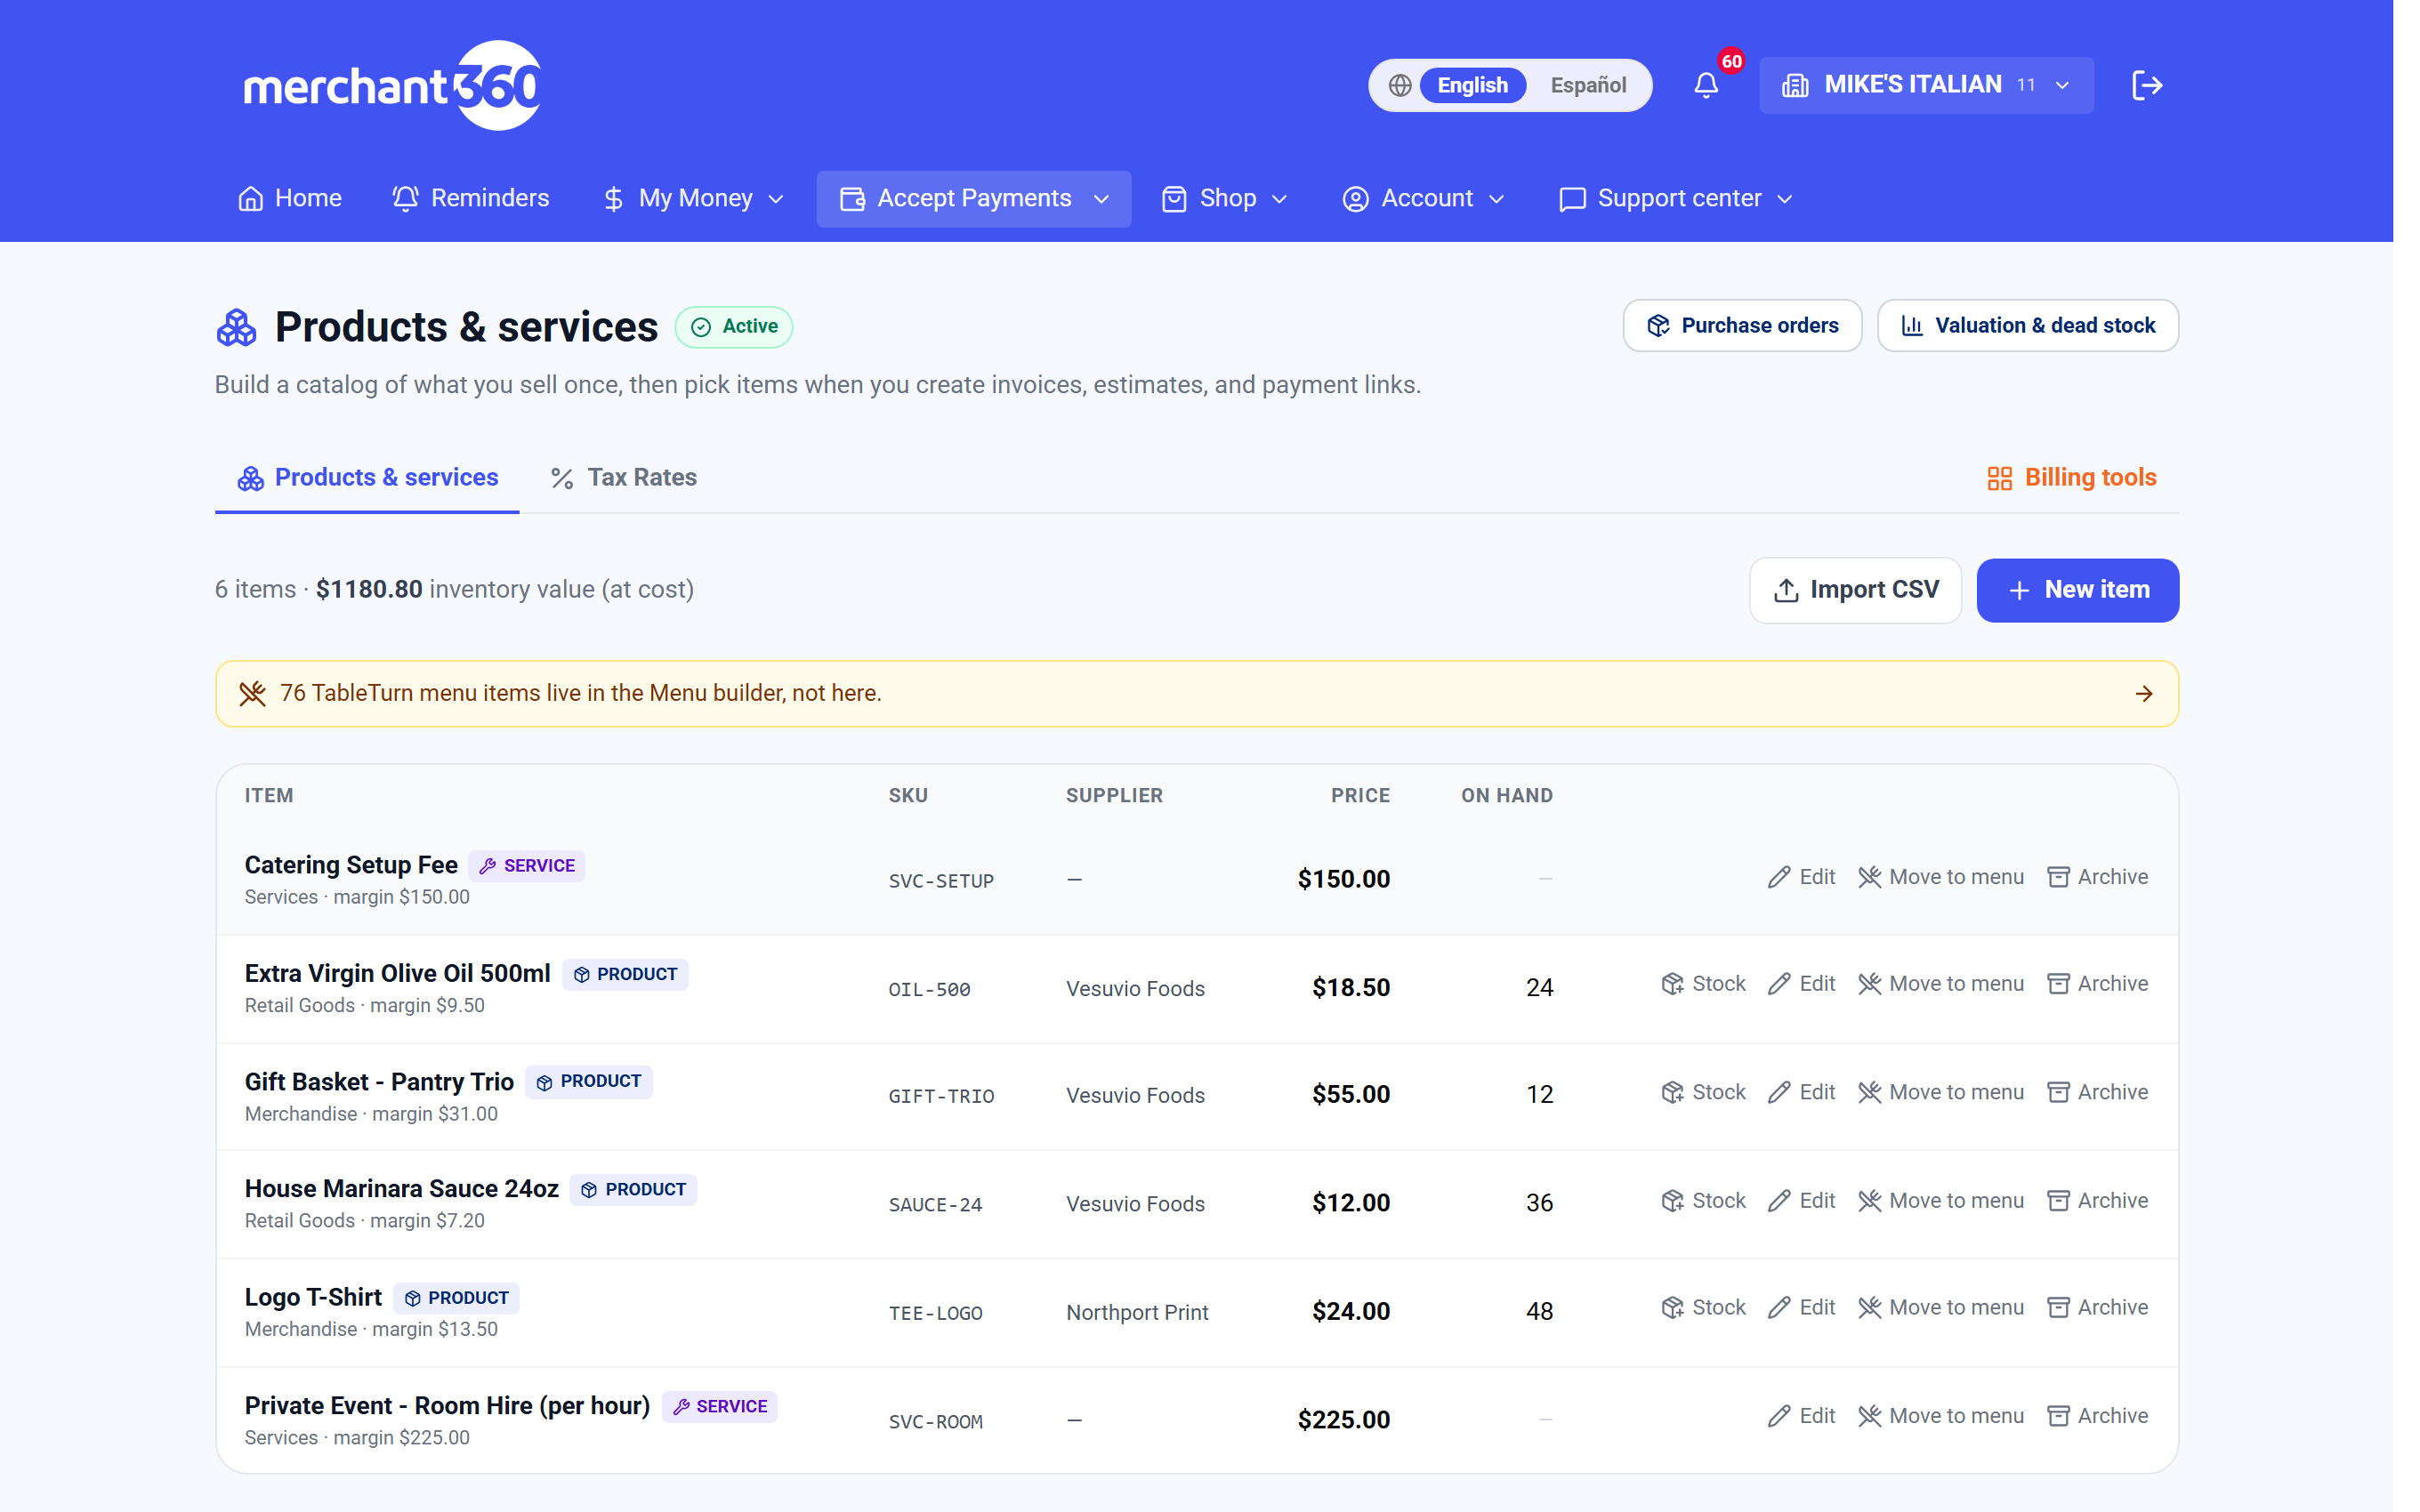
| On this screen | What it does |
|---|---|
| New item | Opens the item editor on a blank item. Pick the type first: Product, Service, Digital, Bundle, or Variable. |
| Import CSV | Uploads a spreadsheet of items. The column list is shown on the import screen. Existing SKUs are updated, new ones are created. |
| Purchase orders | Opens the purchase-order list, where low-stock items become a draft order to your supplier. |
| Valuation & dead stock | Opens the report of what your stock is worth and what has not sold. |
| Search | Filters the catalog by name, SKU, or barcode. |
| Item / Supplier / Price / On hand columns | The catalog rows. The margin shows under the price when a cost is set, and a Low badge appears when on hand is at or below the low level. |
| Stock | On a catalog row. Opens Adjust stock to receive, count, or write off with a reason: Received, Customer return, Count correction, Damage / loss, or Adjustment, then Apply. |
| Edit | Opens the item editor on that item. |
| Move to menu | Sends the item to your online ordering menu so it can be sold there. |
| Archive | Hides the item from every picker without deleting its history. Archived items can be restored. |
| General / Pricing / Identifiers & Barcodes / Stock / Bundle & Variants tabs | The editor's tabs. Stock only shows when Track inventory is on. Bundle & Variants only shows for those types. |
| Save | Saves the item from any tab. It stays at the top right. |
Save sits at the top right and stays there on every tab.
Departments, categories, brands & vendors
Classification used to be free text, which is how a catalog ends up holding Beverages, beverages, and Bevrages as three different things. Each of these is now a real list you pick from: Department (Liquor, Grocery), Category (Red Wine, which can sit under a parent like Wine), Brand, and Default vendor.
You do not have to set these lists up in advance. Click the + beside any picker, type the name, press Enter, and it is created and selected on the spot, without leaving a half-filled item to go find a settings page. Type the same name twice and it reuses the existing entry rather than making a duplicate.
Consistent classification is what makes everything downstream work: filtering the catalog, reading a margin report by department, and knowing who to reorder from. The Default vendor is also what groups items on an auto-drafted purchase order, so set it on anything you reorder.
Done looks like this: every item has a department and category, physical goods have a default vendor, and the catalog filters cleanly by any of them.
If two spellings of the same category already exist, pick the correct one on each item and the unused spelling drops out of the list. If an item is charging tax you do not expect, untick Taxable. If a shelf price already includes tax, tick Price includes tax so the receipt does not add it again. If a service keeps showing as out of stock, turn Track inventory off on its General tab.
- 1Pick a Department, Category, Brand, and Default vendor, or click + to create one as you go.
- 2Tick Taxable, and Price includes tax when your shelf price already has tax baked in.
- 3Tick Available online for anything you sell through an online channel.
- 4Leave Track inventory on for physical goods; turn it off for services and anything that should never be blocked as out of stock.
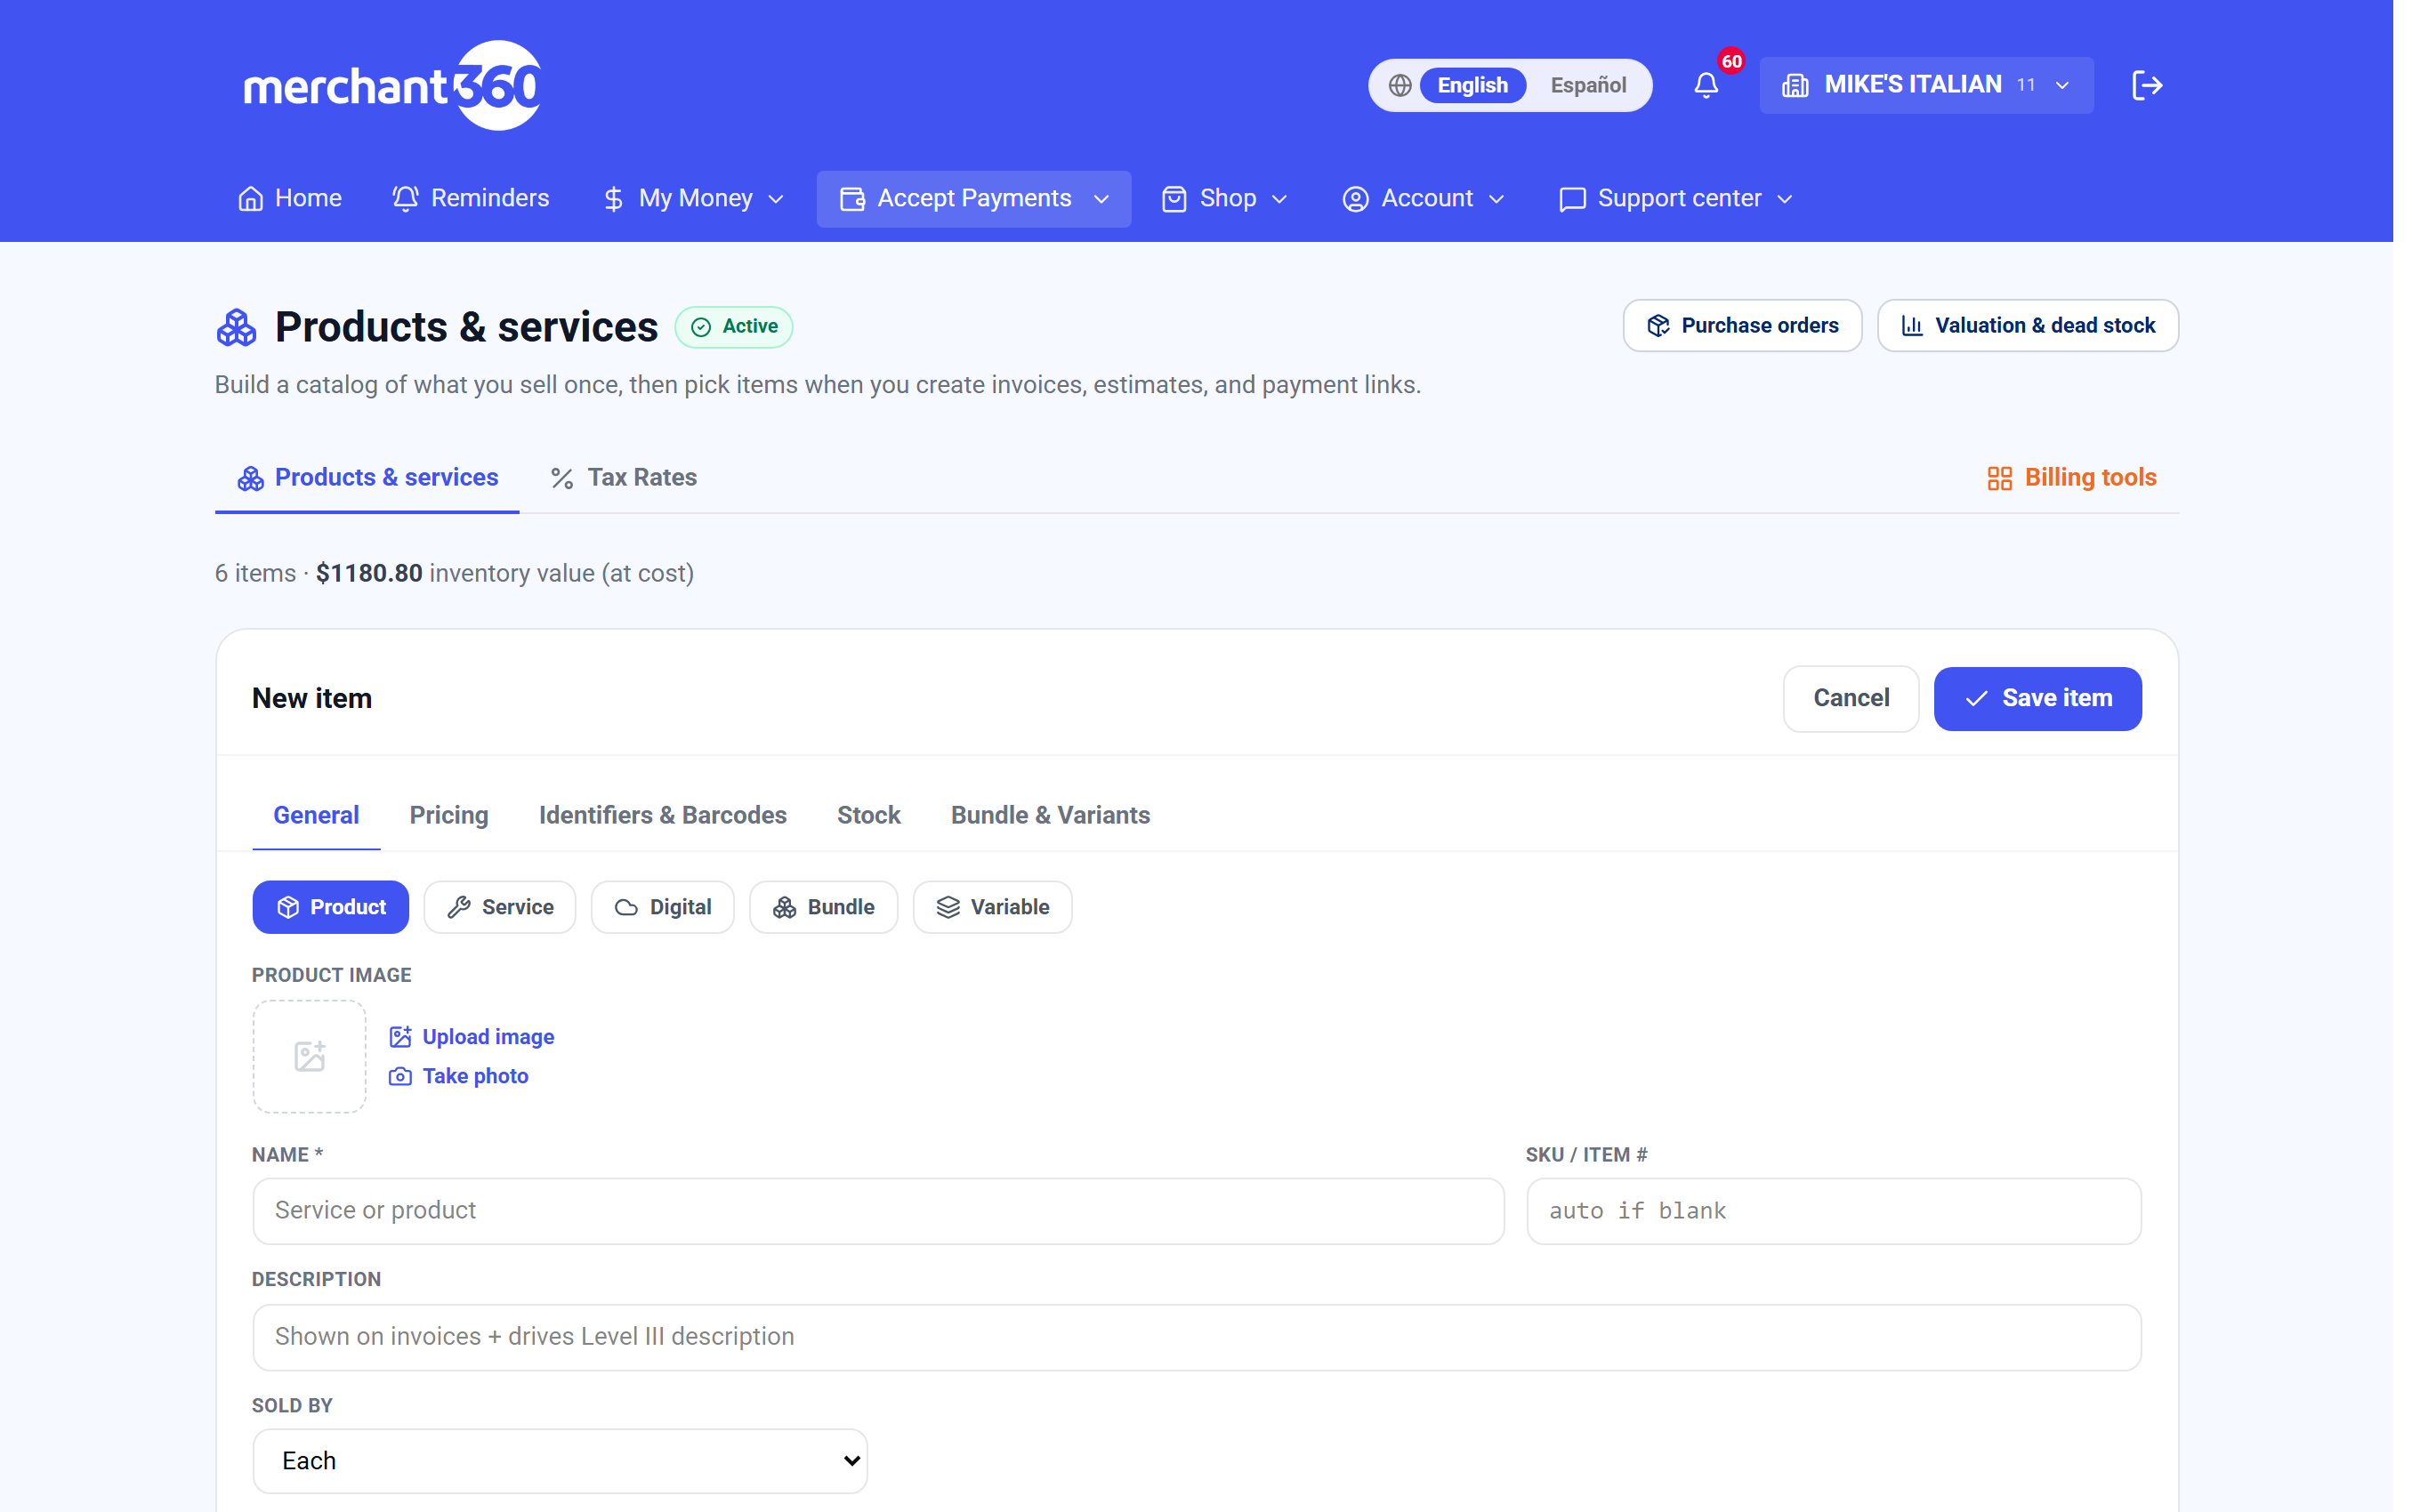
| On this screen | What it does |
|---|---|
| Department | The top-level grouping, such as Liquor or Grocery. Used by catalog filters and margin reporting. |
| Category | The grouping under a department. A category can sit under a parent category. |
| Brand | The maker or label, for filtering and reorders. |
| Default vendor | Who you buy the item from. Purchase orders are grouped by this vendor. |
| + beside a picker | Creates a new entry from the name you type and selects it. A name that already exists is reused. |
| Taxable | Adds sales tax to this item on invoices and receipts. |
| Price includes tax | Treats the list price as tax-inclusive so tax is backed out rather than added. |
| Available online | Lets the item be sold through your online channels. |
| Track inventory | Turns on the Stock tab and the on-hand count. Off for services and digital goods. |
| Sold by: Each / Weight | Whether the item is sold per unit or per weight on a scale. |
| Save | Saves the General tab with the rest of the item. |
Pricing, cost & scheduled price changes
The List price is what a card pays. If you run dual pricing you can also set an exact Cash price on the item; leave it blank and your account-wide dual-pricing rate is used instead. Setting it per item is how you pin a clean shelf price rather than a derived one, such as a $9.99 that has to read $9.75 in cash.
Three costs are tracked: Vendor cost is what you are billed, Average cost is the weighted average of the stock you are holding, and Last cost is what the most recent delivery actually cost. Your live margin is shown as you type. Average cost and Last cost update on their own when you receive stock against a purchase order.
A markup rule lets a price follow cost instead of being retyped: choose which cost to work from, whether the markup is a percentage or a flat amount, and the value. Scheduled price changes let you set tomorrow's price today. Enter the new price and an effective date, and it applies automatically on that date, before the store opens, without anyone remembering to do it.
Done looks like this: the margin under the price reads the way you expect, cost updates itself with each delivery, and price changes you planned show up on the morning they were due.
If the margin looks wrong, check which cost the markup rule is working from. If a scheduled change did not apply, open the item and confirm the effective date and that the change was saved. If a discount takes an item below what you will sell it for, set a Minimum price on the Identifiers tab and it becomes a floor.
- 1On the Pricing tab, enter the List price and, if you run dual pricing, an exact Cash price.
- 2Enter Vendor cost. Average cost and Last cost fill in as deliveries are received.
- 3Optionally set a markup rule: the cost to work from, percent or flat, and the value.
- 4To plan a change, enter the new price and its effective date under Scheduled price changes, then Save.
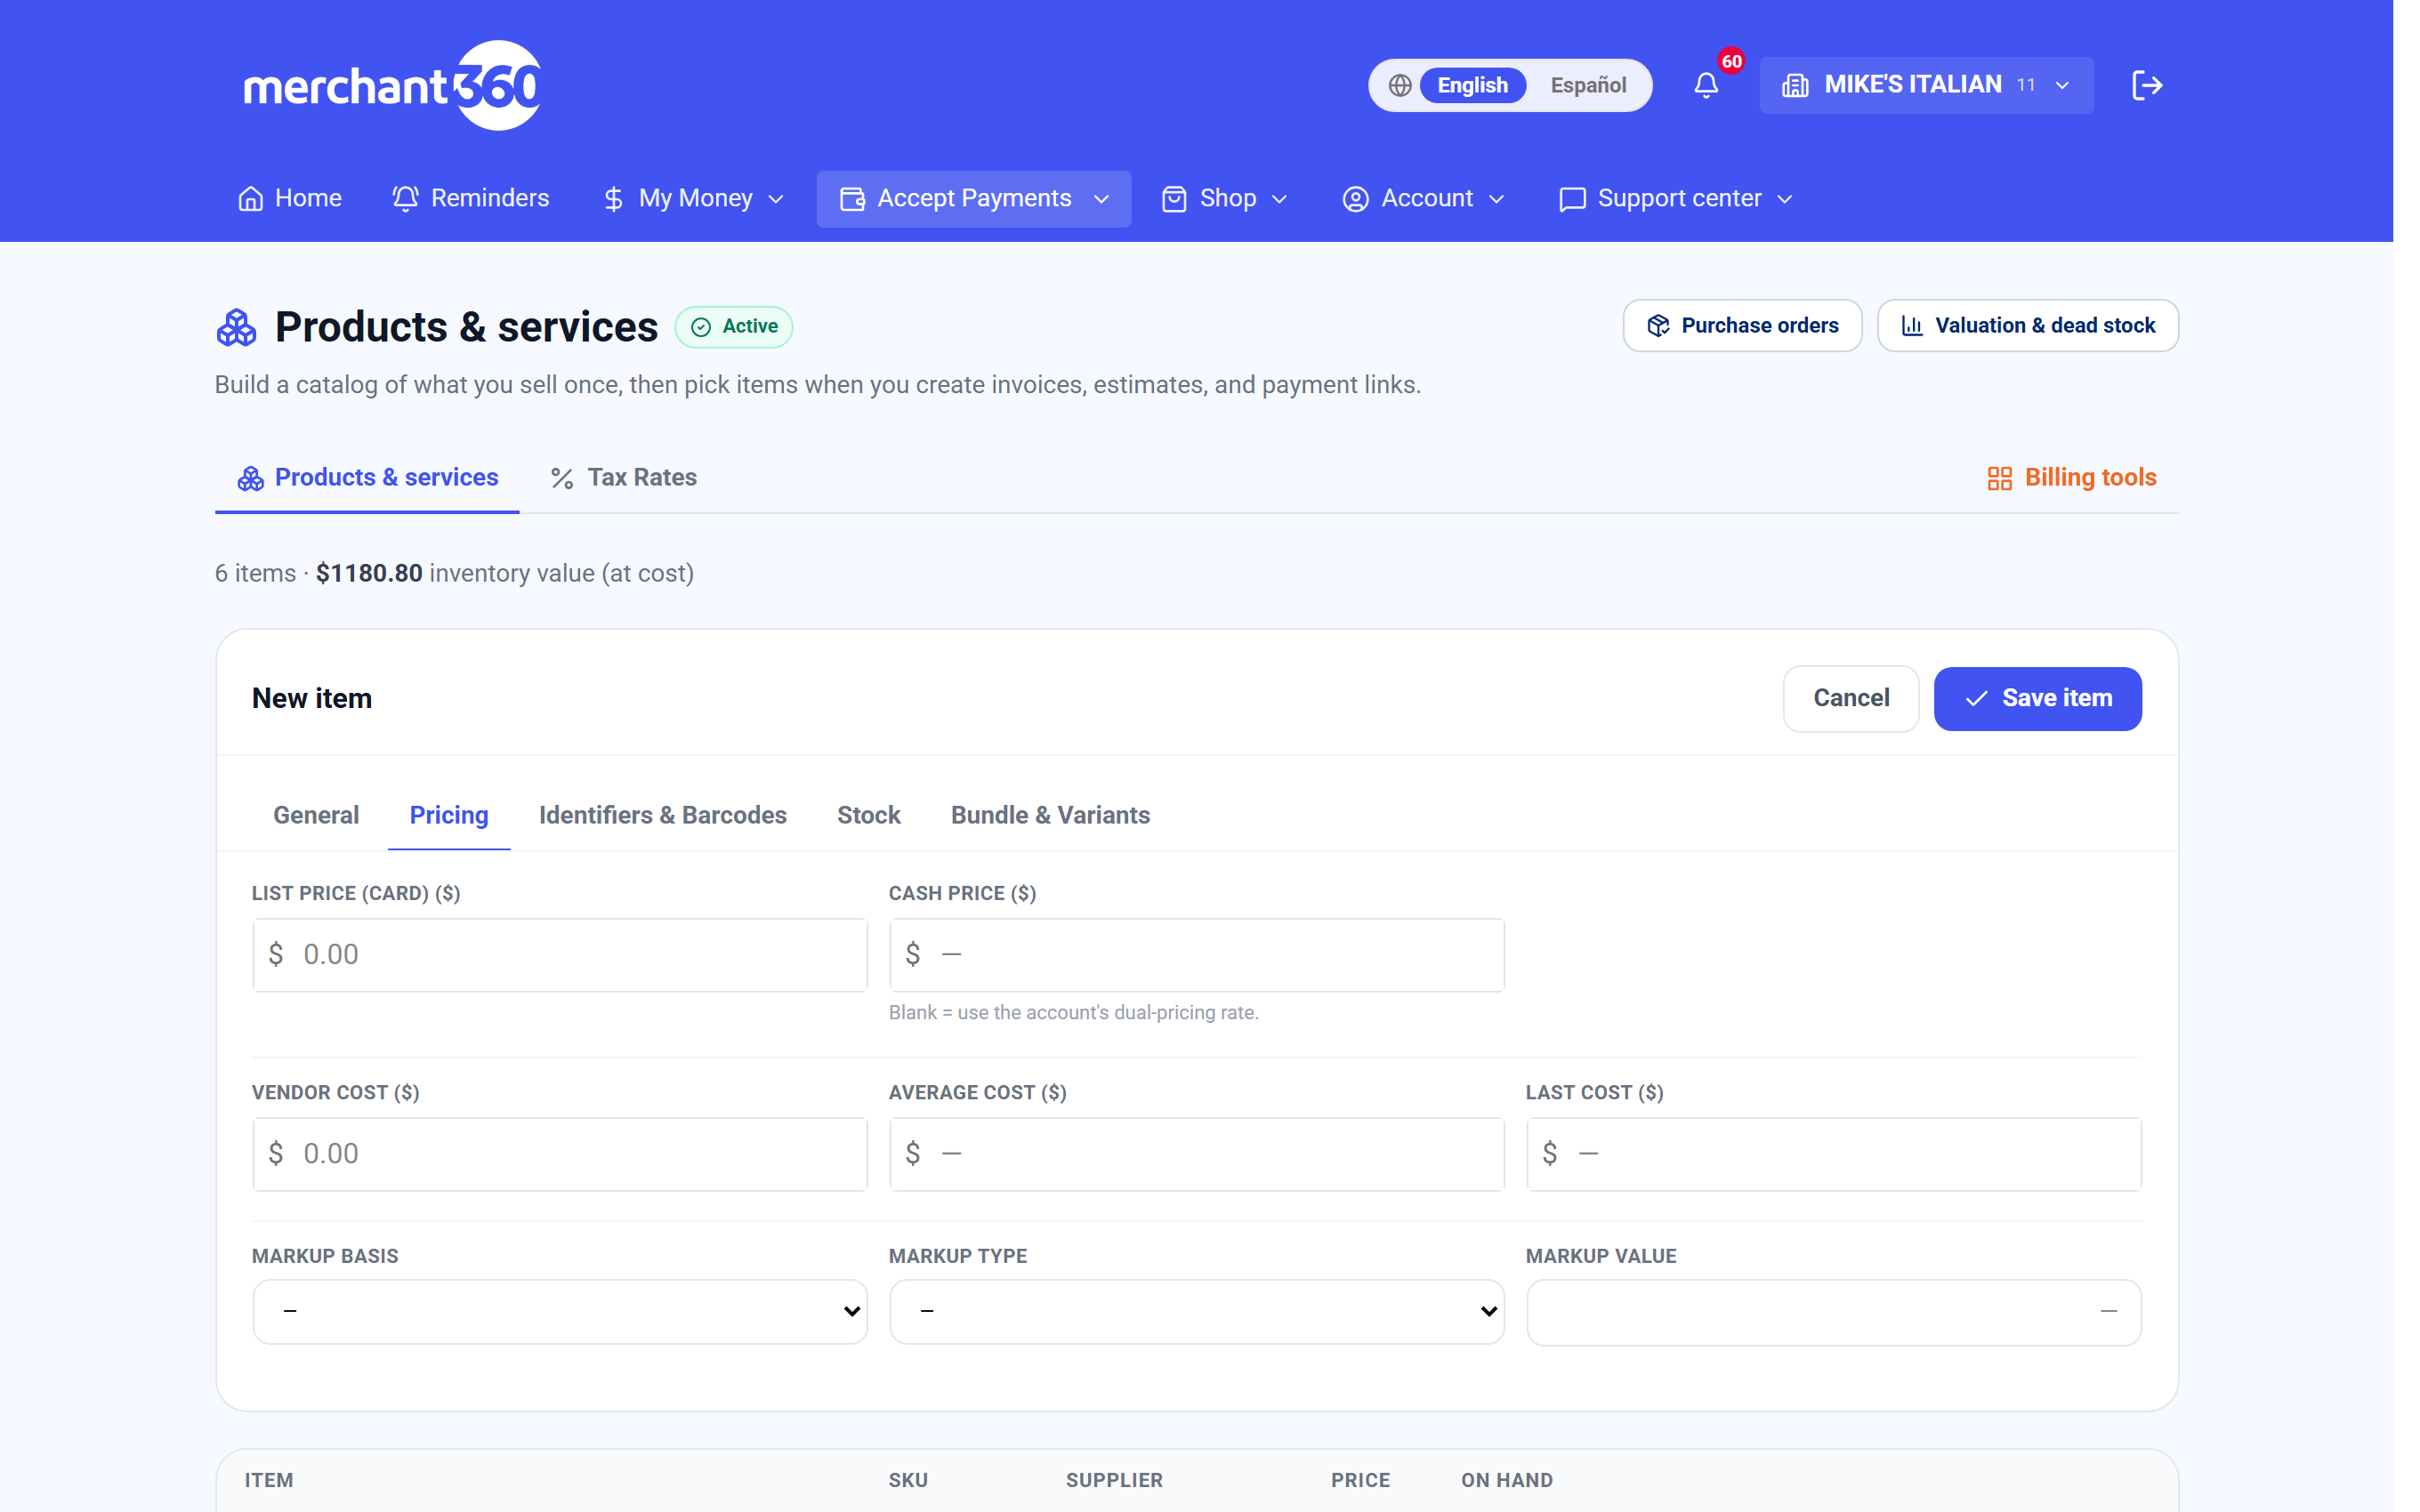
| On this screen | What it does |
|---|---|
| List price | The card price and the default on every invoice line. |
| Cash price | An exact cash price for dual pricing. Blank uses your account-wide rate. |
| Vendor cost | What your supplier bills you. Drives the margin and the markup rule. |
| Average cost | The weighted average cost of the stock on hand. Updated as stock is received. |
| Last cost | The unit cost on the most recent delivery. |
| Margin | Shown live as you type, from the list price and the chosen cost. |
| Markup rule | Which cost to work from, percent or flat amount, and the value. The price follows cost when it changes. |
| Scheduled price changes | A new price and an effective date. It applies on that date automatically. |
| Minimum price | On the Identifiers & Barcodes tab. A floor no discount or rule can go below. |
| Save | Saves pricing with the rest of the item. |
A Minimum price on the Identifiers tab acts as a floor, so a discount or a markup rule can never take an item below what you are willing to sell it for.
SKU, UPC, PLU & barcodes
Retail uses several codes for the same item and they are not interchangeable. The SKU is your own internal number. The UPC is the barcode printed on the package. The PLU is the short code a cashier keys for loose produce. The Vendor item # is what your supplier calls it when you reorder.
One item can also answer to several barcodes. A case, an old label, and a distributor's own code can all be added under Alternate barcodes, each with the quantity that scan represents, so scanning a case of twelve adds twelve, not one.
Fill these in for anything you scan or reorder. Done looks like this: scanning any barcode the item carries finds it, a case scan adds the right quantity, and the vendor item number prints on purchase orders.
If a scan finds nothing, the code is not on the item yet, so add it under Alternate barcodes with quantity 1. If a case scan adds one instead of twelve, edit the alternate barcode's quantity. If a SKU was left blank, one was generated for you and can be replaced with your own.
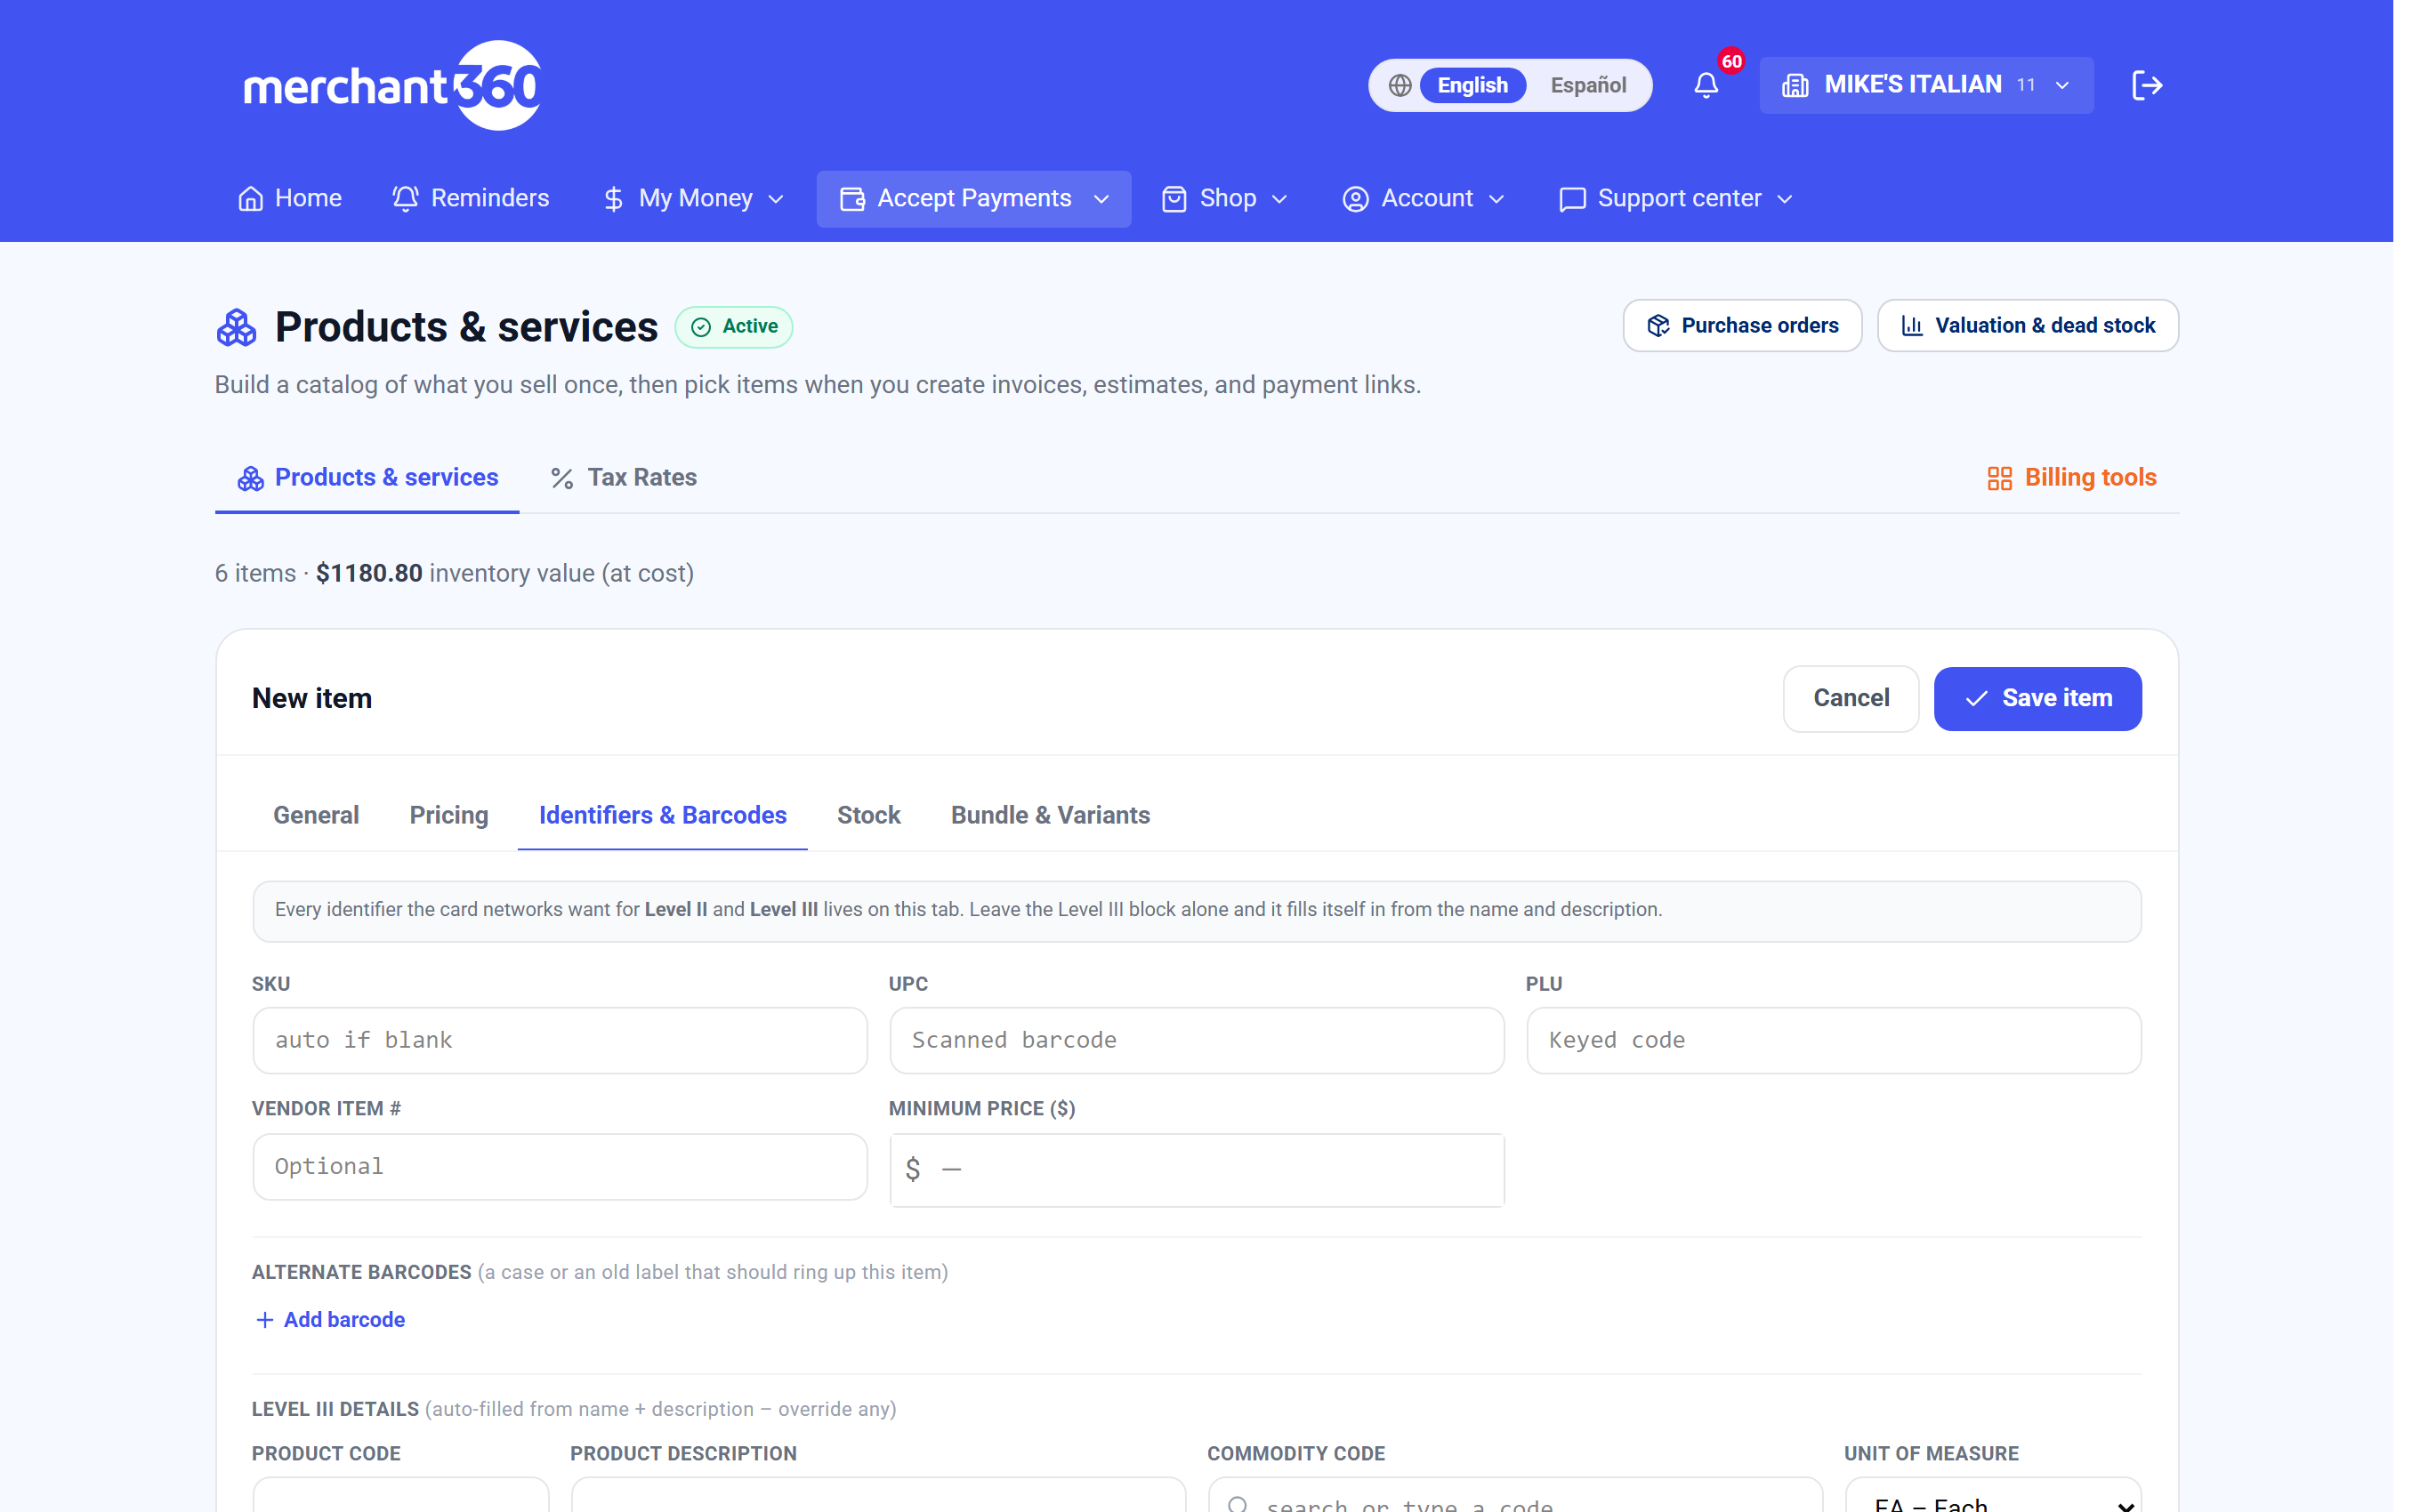
| On this screen | What it does |
|---|---|
| SKU | Your internal number. Generated if left blank. |
| UPC | The barcode printed on the package. Scanning it finds the item. |
| PLU | The short code keyed for loose produce or bulk goods. |
| Vendor item # | The supplier's own code. Printed on purchase orders. |
| Alternate barcodes | Extra codes the item answers to, each with the quantity one scan represents. |
| Minimum price | A floor no discount or markup rule can go below. |
| Level III: product code, commodity code, unit of measure | Filled in from the item's name and description and editable. Sends enhanced line-item data on qualifying business, corporate, and government cards. |
| Save | Saves the identifiers with the rest of the item. |
Selling to business, corporate, or government cards? The Level III block on this tab (product code, commodity code, unit of measure) fills itself in from the item's name and description, and you can override any of it. When those fields are set, qualifying transactions pass enhanced line-item data, which can mean lower interchange on eligible commercial cards.
Stock, reordering & shelf locations
Turn on Track inventory and Merchant360 keeps a live quantity on hand. Every sale decrements it, and each change is written to a movement ledger, so on-hand is always reconstructable rather than a number someone typed.
Four levels drive reordering, and they answer different questions. Low level is the point at which the item is flagged for reorder. Reorder qty is how many you buy when it is. Min order qty is your vendor's minimum. Safe qty is the cushion you never want to drop below. Shelf / bin records where the item physically lives, so whoever is picking or counting can find it.
Purchase orders turn the low-stock list into an order. Open Purchase orders from the top of the catalog; every item at or below its reorder point is listed with its on hand, reorder level, suggested quantity, and unit cost. Generate draft PO builds one order for the vendor you name, and Auto-draft by supplier builds one draft per supplier from every low-stock item at once. Mark the order Sent when it goes to the supplier, then when the delivery arrives open it and use Receive stock to enter what came in; on hand goes up and the item's average and last cost update.
Valuation & dead stock shows what your stock is worth at cost and which items have not sold, so you know what to discount or stop reordering. Done looks like this: on hand matches the shelf, Low badges appear before you run out, and each delivery is received against a purchase order instead of typed in.
If on hand is wrong, use Stock on the row with the reason Count correction rather than editing the number, so the ledger explains the change. If an item never shows in the low-stock list, its Low level is blank. If a purchase order shows Partial, only some lines were received, so open it and receive the rest when they arrive. Cancel PO removes an order that was never sent.
- 1Turn on Track inventory on the General tab.
- 2Set the quantity on hand, and the Low level that should flag a reorder.
- 3Add Reorder qty, Min order qty, and Safe qty if you buy to a plan.
- 4Use Stock on any catalog row to receive, count, or write off, with a reason; every change lands in the ledger.
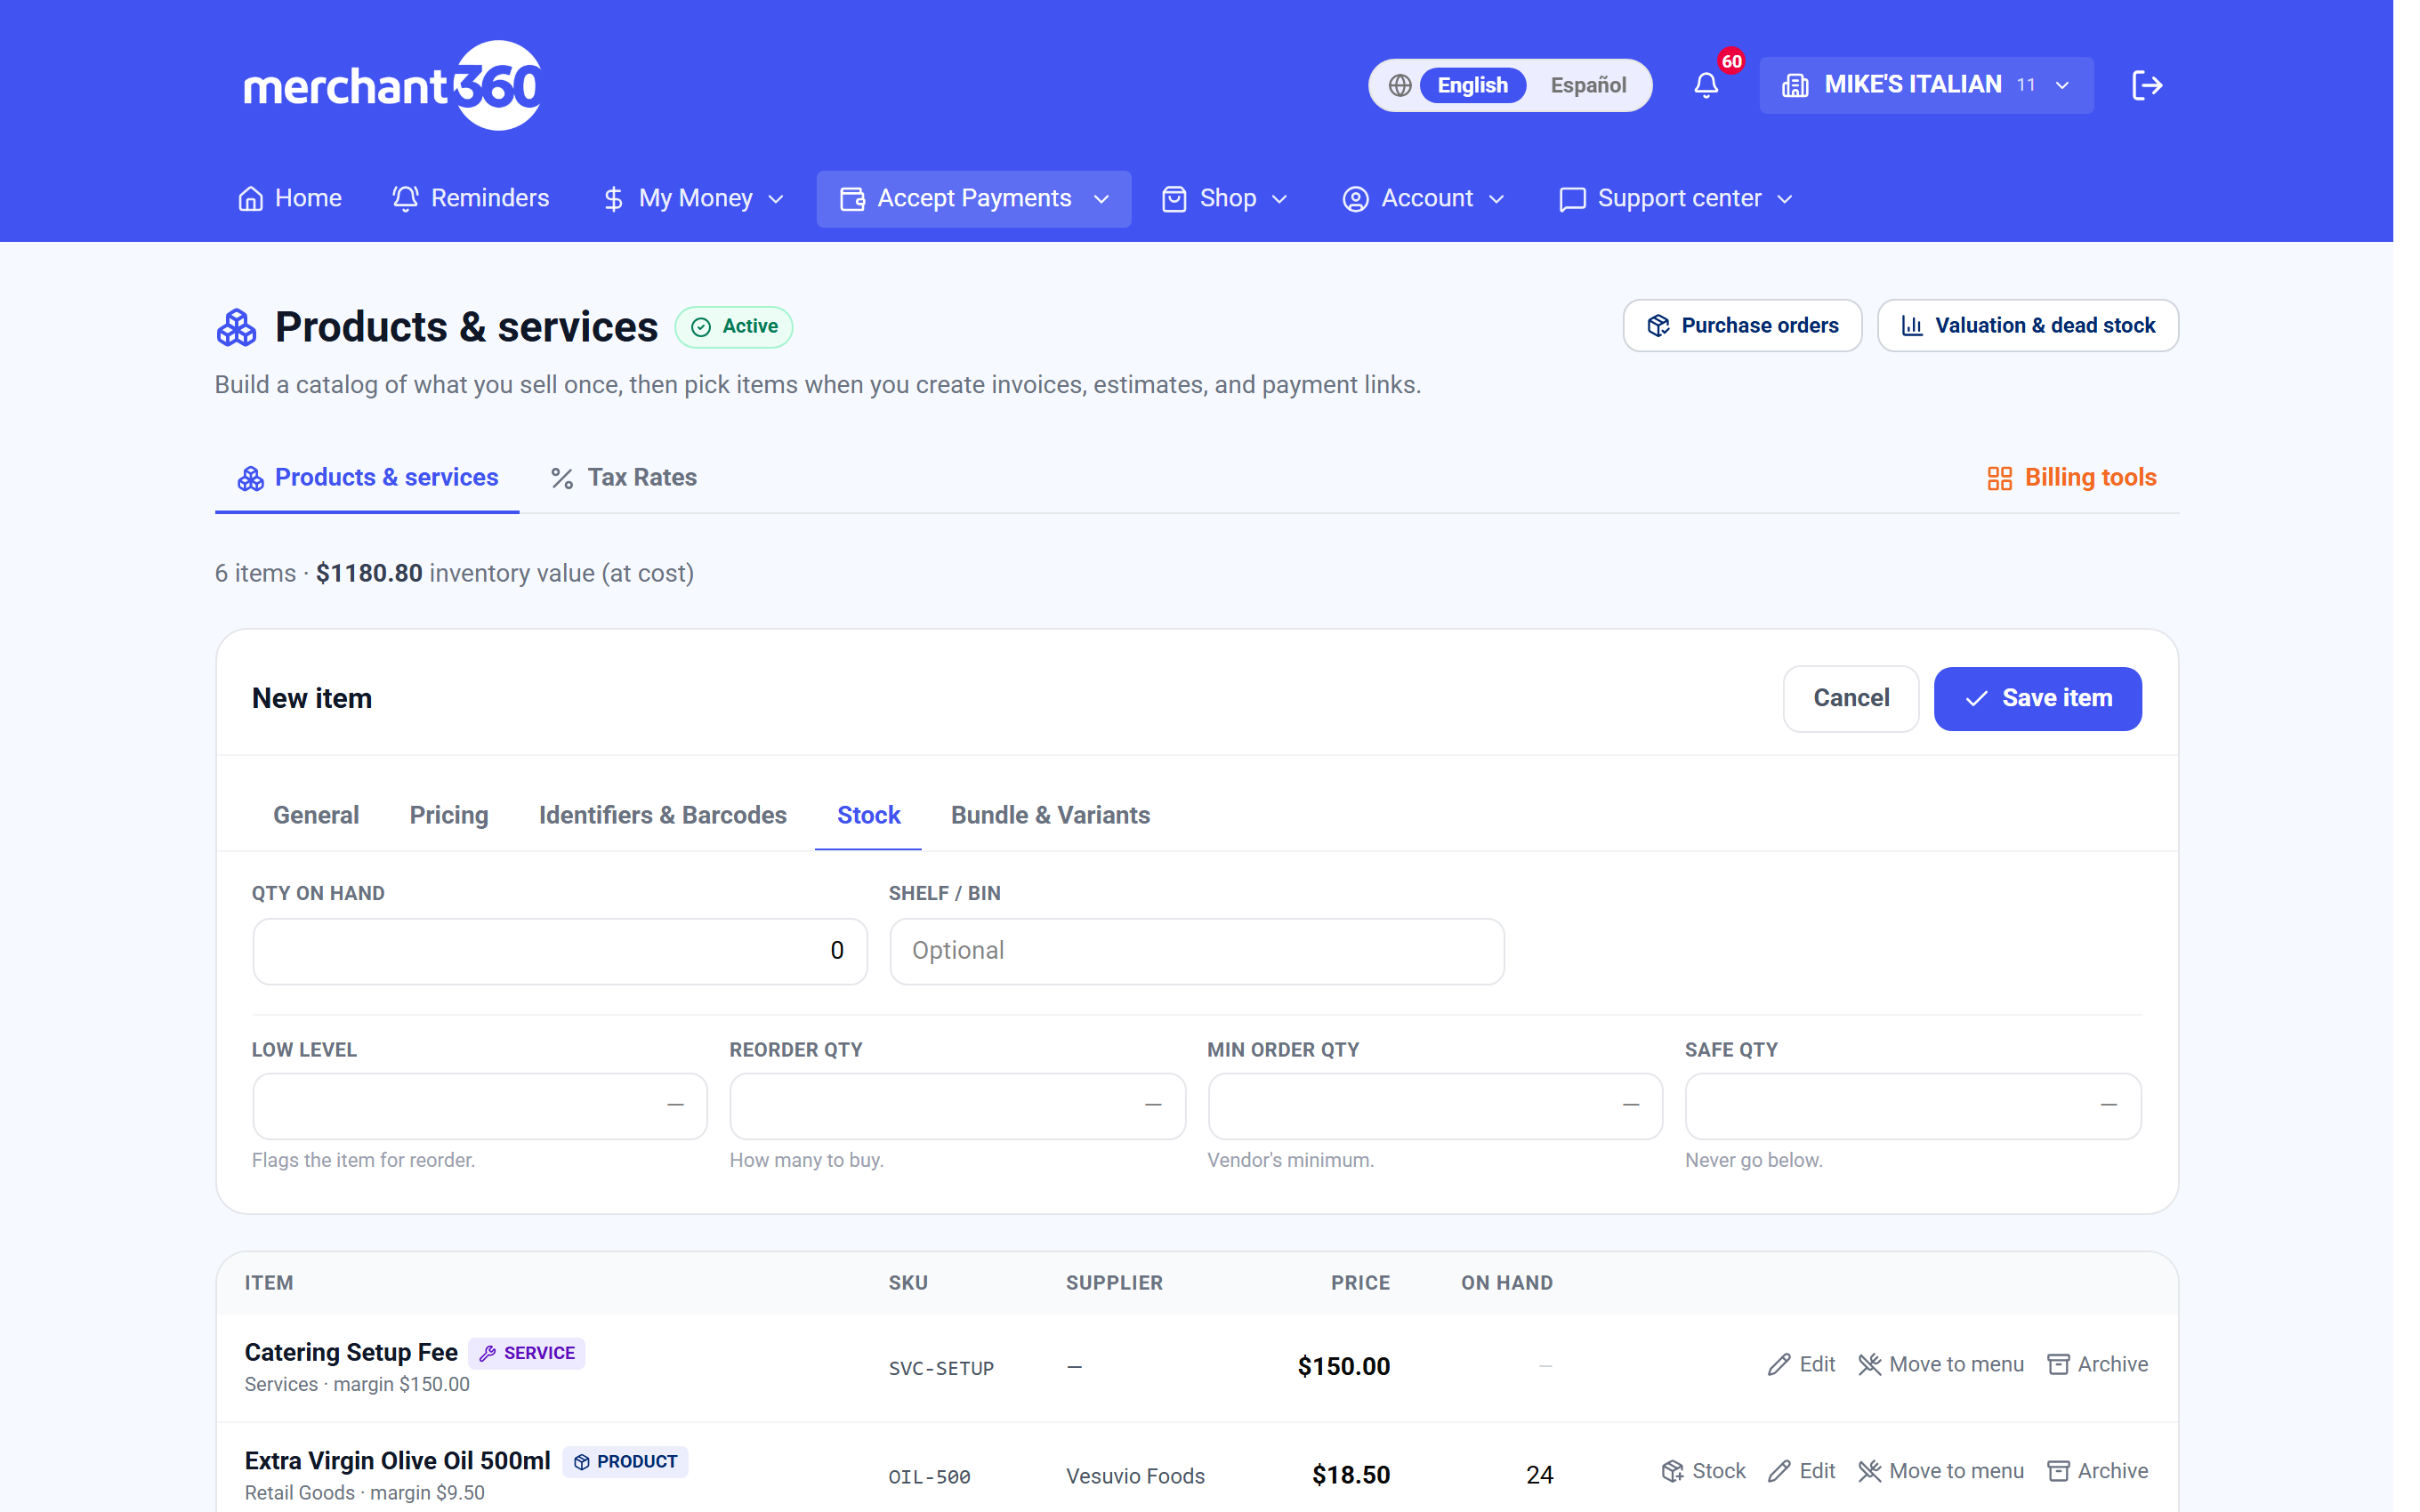
| On this screen | What it does |
|---|---|
| Track inventory | On the General tab. Turns on the Stock tab and the on-hand count. |
| Quantity on hand | The live count. Sales reduce it, receipts increase it, and every change is in the movement ledger. |
| Low level | At or below this, the row shows a Low badge and the item appears in the purchase-order low-stock list. |
| Reorder qty | How many to buy when the item is low. Used as the suggested quantity on a draft purchase order. |
| Min order qty | Your vendor's minimum per order. |
| Safe qty | The cushion you never want to drop below. |
| Shelf / bin | Where the item physically lives, for picking and counting. |
| Stock (on a catalog row) / Adjust stock | Changes on hand with a reason: Received, Customer return, Count correction, Damage / loss, or Adjustment. Apply writes it to the ledger. |
| Purchase orders | Opens the purchase-order page. Below reorder point lists every low item with On hand, Reorder at, Suggested, and Unit cost. |
| Vendor name / Generate draft PO | Builds one draft order to the vendor you type from the low-stock items. |
| Auto-draft by supplier | Builds one draft PO per supplier from all low-stock items, using each item's default vendor. |
| PO # / Vendor / Status / Lines / Subtotal / Created | The purchase-order list. Status is Draft, Sent, Partial, Received, or Cancelled. |
| Mark sent | Records that the order went to the supplier. |
| Receive stock | On an open order. Enter a Receive now quantity per line and on hand, average cost, and last cost update. A line shows full when it is complete. |
| Cancel PO | Cancels a purchase order that will not be filled. |
| Valuation & dead stock | A report of stock value at cost and items with no recent sales. |
Purchase orders and the valuation / dead-stock report are on the buttons at the top of the catalog. Both work from these levels.
Bundles & variants
A bundle is one item that rings several components at once and decrements each component's stock, such as a gift basket or a starter kit. A variable item carries option groups such as Size or Colour and generates one real child item per combination, each with its own price adjustment, SKU, and stock.
Both live on the Bundle & Variants tab, and both are set by choosing the item type on General first. Use a bundle when you sell a set of things you also sell separately, so stock stays right on each part. Use a variable item when one product comes in sizes or colours you count separately.
Done looks like this: selling a bundle reduces each component's on hand, and each size or colour of a variable item shows in the catalog as its own row with its own SKU and stock.
If a bundle will not save, one of its components has no stock tracking or was archived. If a variant is missing, add the option value on the parent and the child is generated. If a child needs a different price, set its price adjustment rather than editing the parent price.
- 1Create the item and choose Bundle or Variable as the type on the General tab.
- 2On the Bundle & Variants tab, add each component and its quantity for a bundle, or add option groups and their values for a variable item.
- 3Set a price adjustment per child where needed, then Save.
| On this screen | What it does |
|---|---|
| Item type: Bundle / Variable | On the General tab. Chooses which section the Bundle & Variants tab shows. |
| Components | For a bundle. The items and quantities that ring together and are decremented on sale. |
| Option groups and values | For a variable item. Groups such as Size or Colour and the values that generate child items. |
| Price adjustment | Per child item. Added to or taken from the parent price. |
| Child SKU and stock | Each generated child has its own SKU and on-hand count. |
| Save | Saves the bundle or variants with the rest of the item. |