
Team & User Permissions
Invite your staff, give each person exactly the tools their job needs, and keep the money views scoped to what they should see.
Roles - the starting point
Every person on your Team page has one role, chosen as Access type when you invite them. The role sets the broad shape of what they can do; Tool access, described later, narrows it module by module.
Owner has full access, including billing, security, the Developers page, and other people's access. Manager has full operations: everything except the owner-only settings. Accountant sees invoices, transactions, and exports. Clerk covers daily operations such as taking payments and sending invoices. Billing Tools only starts with nothing and gets exactly the modules you grant. Register signs in to the TableTurn POS only and never sees Merchant360.
Pick the smallest role that covers the job. A bookkeeper is an Accountant. A front-desk person who only sends invoices is Billing Tools only with the Invoices module. Someone who runs the shop when you are away is a Manager.
Inviting anyone asks for a security code texted to your phone. The person receives an email with a link to create their own password, and the same email asks them to add their mobile number so they can receive their own codes.
A role is set at invite time. To move someone to a different role, remove them and invite them again with the new access type. If the invite email did not arrive, resend it from Pending invites.
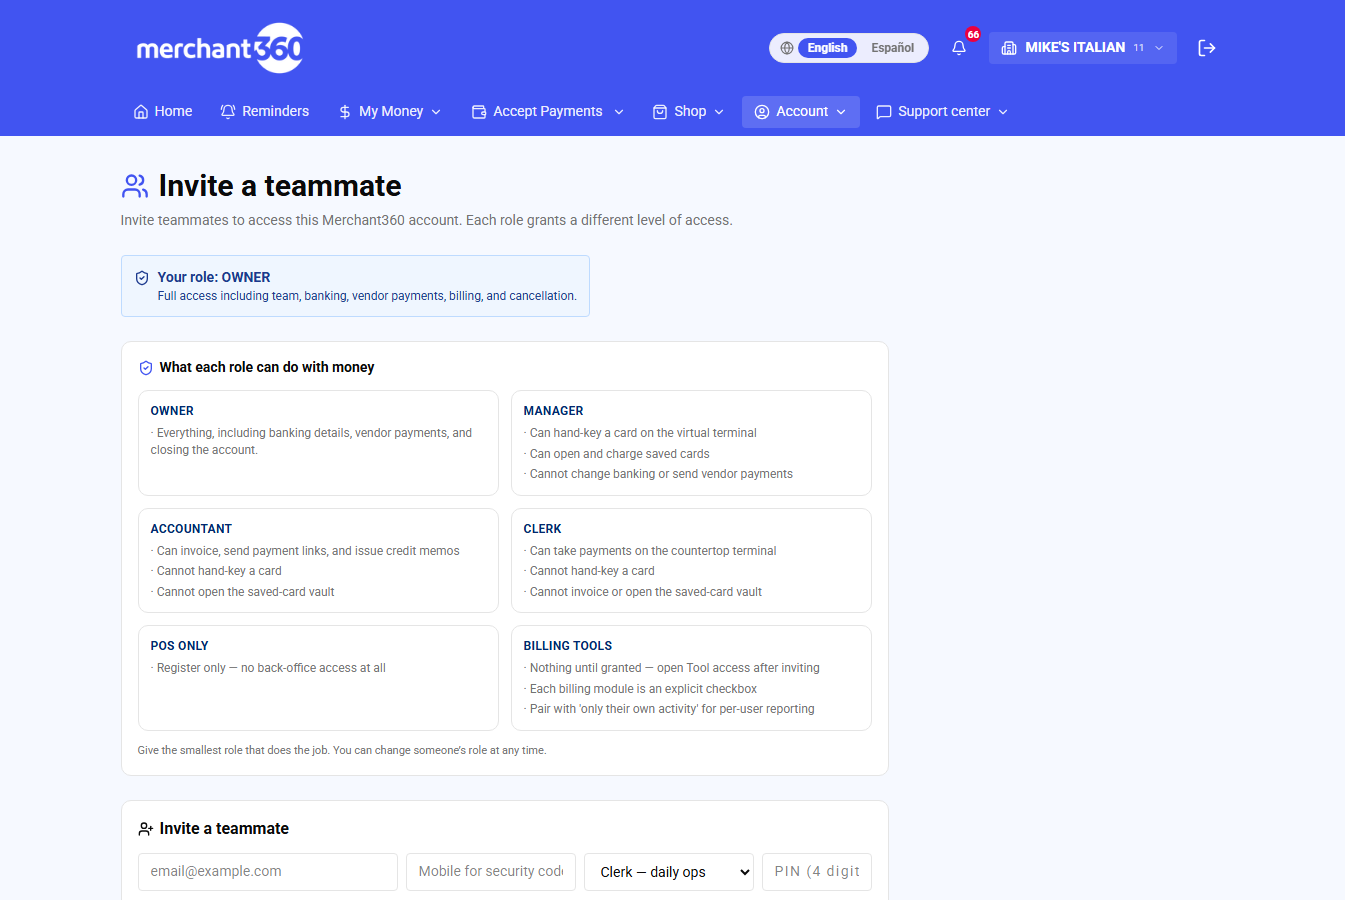
| On this screen | What it does |
|---|---|
| Invite a teammate | Opens the invite form. |
| Email address | Where the invite link is sent. It becomes the person's login. |
| Mobile for security codes | The number that will receive the person's own security codes once they set up. Optional at invite, required before they can do anything that needs a code. |
| Access type | Owner (full access), Manager (full operations), Accountant (invoices + exports), Clerk (daily ops), Billing Tools only (grant modules per user), or Register (TableTurn POS only). |
| Register PIN (optional) | A PIN for the TableTurn register if the person also works the POS. |
| Input the code to finish inviting the user / Confirm invite | Enter the six-digit code texted to you, then Confirm invite sends the email. Resend code sends another code; Back returns to the form. |
| Pending invites | People who have not finished setting up. Resend the invite from here. |
| Active members | Everyone with a working login, with their role and a Security codes ready or no mobile note. |
| Remove | Revokes the person's access after you confirm. Asks for a texted code. |
The Billing Tools only user
Billing Tools only is the role for someone who should reach a few specific tools and nothing else. It grants no modules on its own. After the invite, or during it with Set tool access now, you tick the modules the person may use, and only those appear in their menu.
Use it for a receptionist who sends invoices, a bookkeeper who only exports transactions, or an outside assistant who runs the virtual terminal. Because the role starts empty, adding someone with it is safe by default.
A Billing Tools only user never sees Account, Security, Team, or Developers. They cannot change settings, and their view of Transactions can be limited to their own activity with the Only their own activity switch.
You are done when the person signs in and their menu shows exactly the modules you granted. Tool access can be changed at any time from their entry on the Team page.
If the person reports an empty menu, no modules have been granted yet. Open their Tool access panel and tick at least one.
| On this screen | What it does |
|---|---|
| Access type: Billing Tools only | Creates a user with no modules. Grant modules under Tool access. |
| Set tool access now (optional) | Shown on the invite form. Opens the module checklist so you can grant access as part of the invite. |
| Tool access (per member) | The module checklist, Handpoint device choice, and Only their own activity switch for that person. |
This is the right choice for front-desk staff at a practice or clinic: give them the terminal, keep everything else off.
Tool access - per-person module control
Tool access is the panel under each teammate on the Team page. It lists every Billing Tools module as a checkbox, plus two device and visibility settings. Tick a module and it appears in that person's menu; untick it and it disappears at their next page load.
It works with every role. A Manager already sees everything, so unticking a module hides it from that manager. A Billing Tools only user sees nothing until you tick modules. Owners always see everything and their panel cannot be edited.
Changes save as soon as you make them, and the panel shows Saved. The person does not need to sign out; the menu updates on their next click.
Modules cover the billing tools you see in your own menu: invoices, estimates, reservations and rentals, customers, virtual terminal, transactions, deposits, reports, fraud tools, team schedule, and the rest. The list grows as new tools are added, and new modules are off for restricted users until you grant them.
If a person still sees a module you unticked, ask them to reload the page. If a module you expect is missing from the checklist, it is not turned on for your account; your account manager can enable it.
- 1Account → Team → find the teammate (or open 'Set tool access now' while inviting) → Tool access.
- 2Check the modules they may use; uncheck the ones they may not.
- 3Save. Changes apply immediately - even before the invite is accepted.
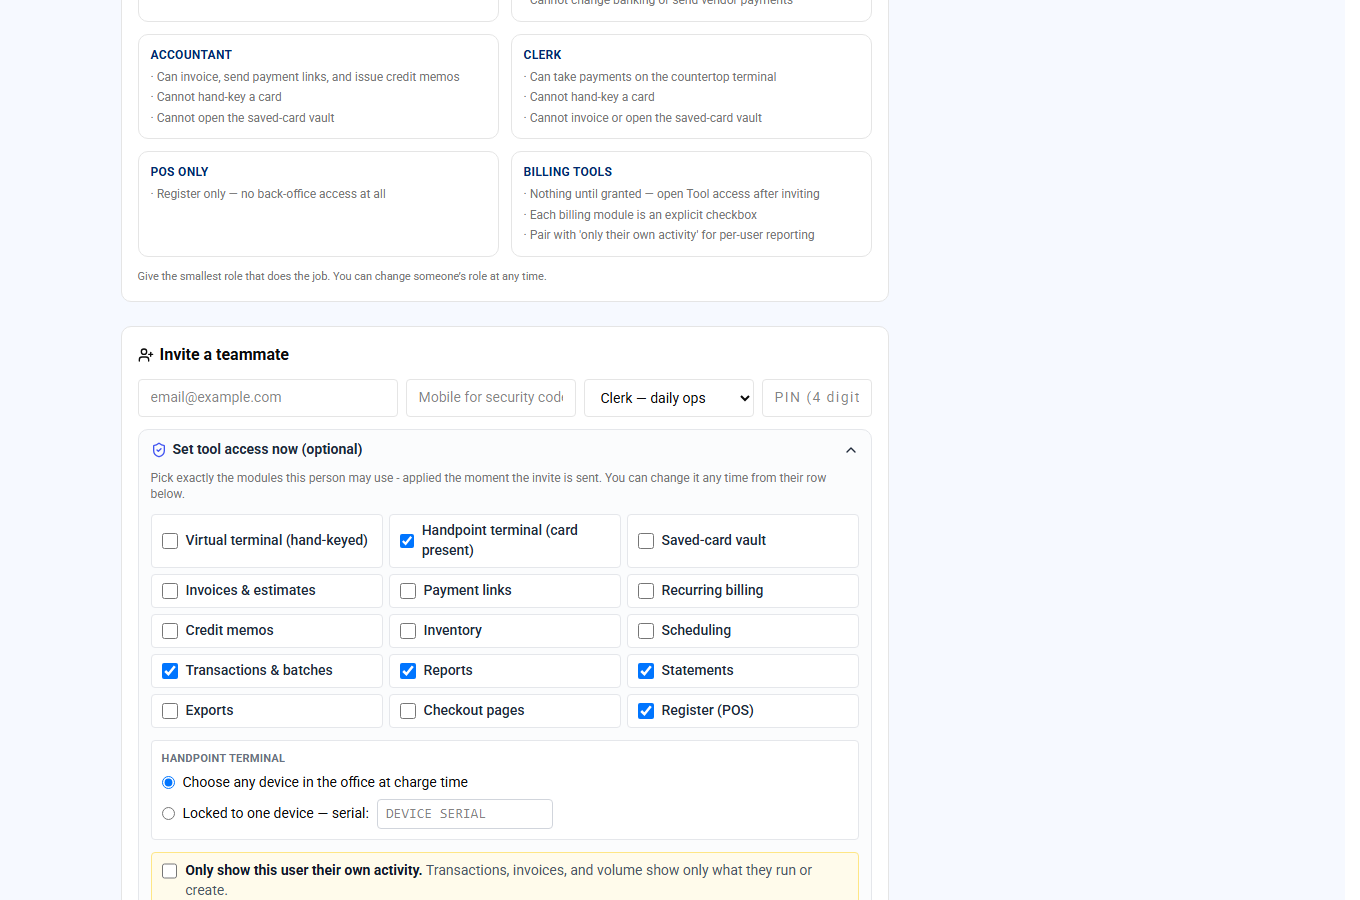
| On this screen | What it does |
|---|---|
| Module checkboxes | One per billing tool. Ticked means the module shows in that person's menu and they can use it. |
| Handpoint terminal | Choose any device in the office at charge time, or Locked to one device with its serial. Covered in the next section. |
| Only show this user their own activity. | Limits Transactions and reports to payments the person took themselves. Covered later in this chapter. |
| Saved | Confirms the change was stored. The panel saves on every click. |
Handpoint devices - any device, or locked to one
If you take card-present payments with Handpoint card readers, each teammate's Tool access panel decides which reader they can send a charge to. This matters when you have more than one reader, for example one at each register or one per delivery driver.
Choose any device in the office at charge time lets the person pick from the account's readers each time they charge. Locked to one device pins them to a single reader by serial number, so the charge always goes to that device and the picker is skipped.
Lock a person to a device when they always work the same station, or when a reader travels with them. Leave it on any device for managers who float between stations.
If a person cannot find their reader in the picker, the reader is not set up on the account yet. If a locked person reports charges going to the wrong reader, the serial on their panel points at a different device; update it.
| On this screen | What it does |
|---|---|
| Choose any device in the office at charge time | The person sees a picker of the account's Handpoint readers on every card-present charge. |
| Locked to one device, serial | Enter the reader's serial number. Every card-present charge from this person goes to that reader with no picker. |
Only their own activity
Only show this user their own activity is a switch in each teammate's Tool access panel. When it is on, the person's Transactions, deposits, and reports show only the payments they took themselves. Payments taken by anyone else on the account are not listed for them.
Use it for sales staff who should see their own sales but not each other's, or for an outside assistant who processes payments but should not see your full revenue.
Because the person cannot see a colleague's payment, they cannot open it to refund or void it either. Owners always see everything, and the switch cannot be set on the owner.
If a person needs to work with a payment a colleague took, either turn the switch off for them or have a manager handle it.
| On this screen | What it does |
|---|---|
| Only show this user their own activity. | On or off. On limits Transactions, deposits, and reports to the person's own payments. |
Why we text you a code
Certain changes can give someone else access to your account or move your money, so Merchant360 confirms it is really you before they go through. It texts a six-digit code to the mobile number on your profile and asks for it. Inviting a teammate, removing one, turning billing tools back on, creating an API key, connecting the Payment Extension, changing the large-refund threshold, and refunds over your threshold all ask for a code.
The code goes to the number under Account, Login & security, which is the same number used for sign-in verification. Keep it current; if you change phones, update the number while you still have the old one.
Every teammate has their own number for their own codes. A person without a mobile number on file cannot complete any action that needs a code, and their entry on the Team page shows this. You can add their number for them from their entry until they verify their own.
If the code does not arrive within a minute, use Resend code. If it never arrives, check the number on the Security page and make sure your phone can receive texts from short codes. Codes expire after a few minutes, so request a new one rather than reusing an old text.
| On this screen | What it does |
|---|---|
| Text me a verification code | Sends the six-digit code to the mobile number on your profile. |
| 6-digit code field | Enter the code from the text. The action completes as soon as it is accepted. |
| Resend code | Sends a fresh code if the first did not arrive. |
| Security codes ready / no mobile (Team page) | Each teammate's entry shows whether they can receive codes. Add mobile lets the owner enter a number until the person verifies their own. |