
Mobile terminal app
Take a card or cash payment anywhere, from your phone.
- What is the mobile terminal?
- Signing in
- Face ID, Touch ID, and fingerprint sign-in
- Try a test sale (demo mode)
- The menu
- Ring up a sale
- Discount, tax & tip
- Tips
- Loyalty on the mobile terminal
- Tap to Pay on iPhone
- Bluetooth card reader
- A reader sale, step by step
- A reader sale, the screens
- Present the card
- Key a card
- Cash & change due
- Card and cash pricing (dual pricing & surcharge)
- Surcharge on the mobile terminal
- Capture a signature
- Gift cards on the go
- Void or refund a sale
- Receipts
- Dark or light
- Settings
- Settings: card reader and sign-in
What is the mobile terminal?
The Merchant360 terminal is a free app for iPhone and Android that turns your phone into a payment terminal. Key in a card, take cash, add a tip, apply a discount, scan an item, and email or text a receipt, all from your pocket.
Use it wherever a counter terminal is not: deliveries, markets, house calls, tableside, or a second line at the register. The app signs in with the same Merchant360 login and reads the same catalog, tax rates, and discount presets as your other tools.
Everything it does (sales, refunds, receipts) lands in the same transactions, batches, and reports as the rest of your account. There is one set of books, whether the sale happened on your phone, in the virtual terminal, or on a checkout page. Open Money → Transactions on the web to see a phone sale seconds after it approves.
The app takes keyed (typed) card entry and cash on iPhone and Android, chip, contactless, and swiped cards with the Bluetooth card reader, and contactless payments with Tap to Pay on iPhone where it is available on your account.
If the app is not in your app store yet, it is in pilot. Ask your sales rep to add you, and you receive an install link by email. If the app opens but shows no sale screen, your processing is not live yet; the app works once the account is approved.
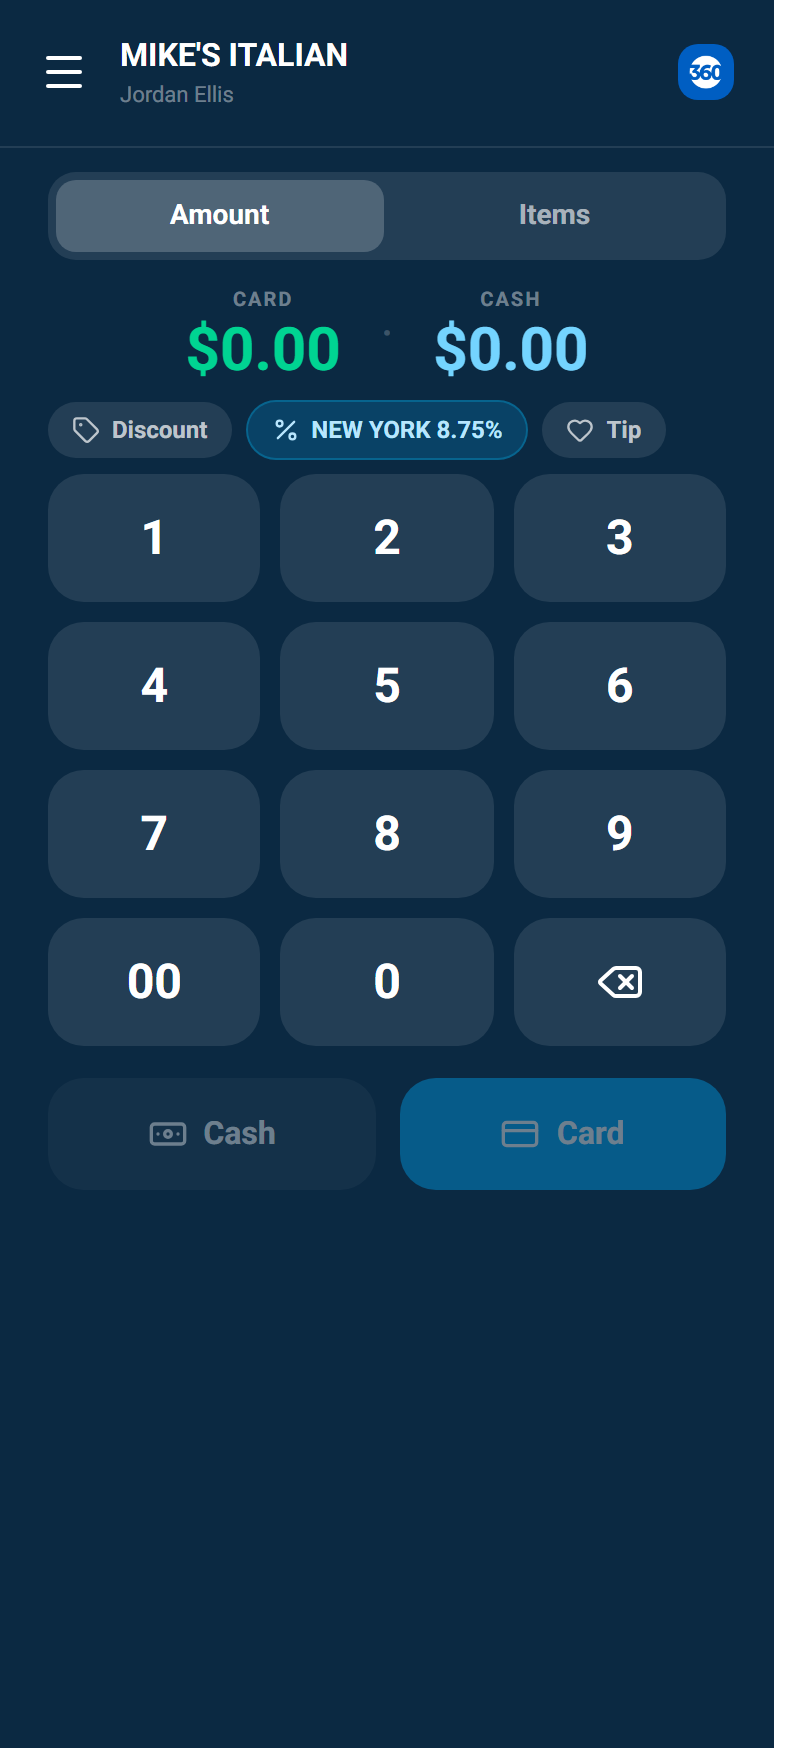
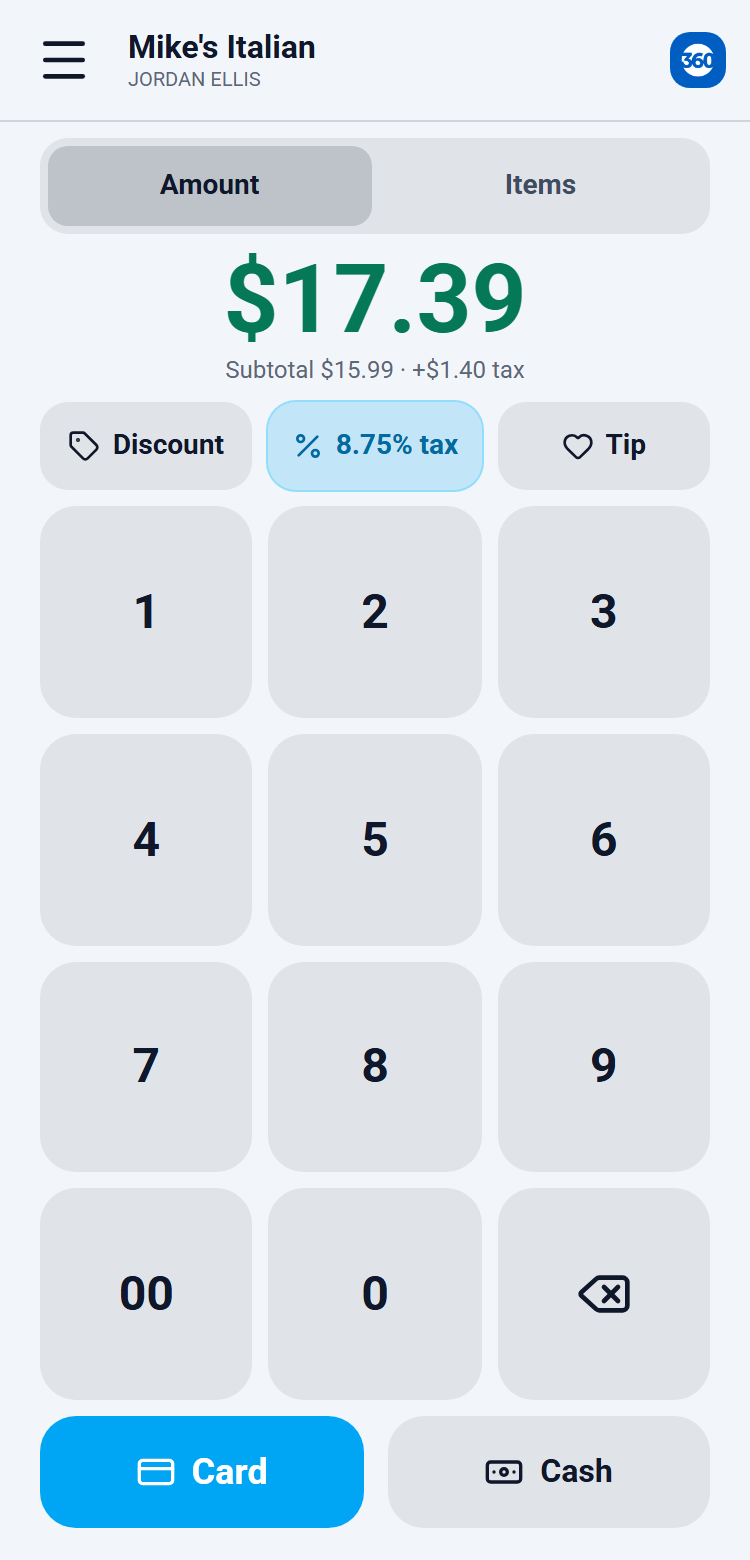
| On this screen | What it does |
|---|---|
| Sale screen | The home of the app. Build a total with the keypad or your catalog, then choose Card, Cash, Reader, or Tap to Pay. |
| Menu | The icon at the top left. Opens New sale, Gift cards, Transaction history, Card reader, Settings, and Sign out. |
| Card | Keys a card by hand. Reads Key card when a reader or Tap to Pay is available. |
| Cash | Takes a cash payment and shows the change due. |
| Reader | Charges the card on the paired Bluetooth reader. Appears in green when a reader is connected. |
| Tap to Pay | Charges a contactless card or phone held to your iPhone. Shown only where Tap to Pay on iPhone is on for your account. |
The app is coming to the App Store and Google Play. If you want early access, ask your sales rep to add you to the pilot.
Signing in
Open the app and enter the mobile number enrolled for two-factor sign-in on your Merchant360 account. A code is texted to that phone; enter it to sign in. Turn on Remember this phone to skip the code on that device for 90 days.
Two other ways in: tap Use my email instead to enter your Merchant360 email and get a code texted to the mobile number on that account (no password typed), or tap Use password to sign in with your Merchant360 email and password.
Before the code sign-ins work, the number has to be enrolled. On the web, open Account → Security, enter the mobile number, and confirm the texted code once. Teammates enroll their own number the same way, or the owner enters it on their invite.
If your login covers several locations, the menu lets you switch between them after sign-in. If the code does not arrive, tap Resend, check that the number is the one on the Security page, or fall back to Use password. Five wrong codes lock the sign-in for a short time; wait and try again.
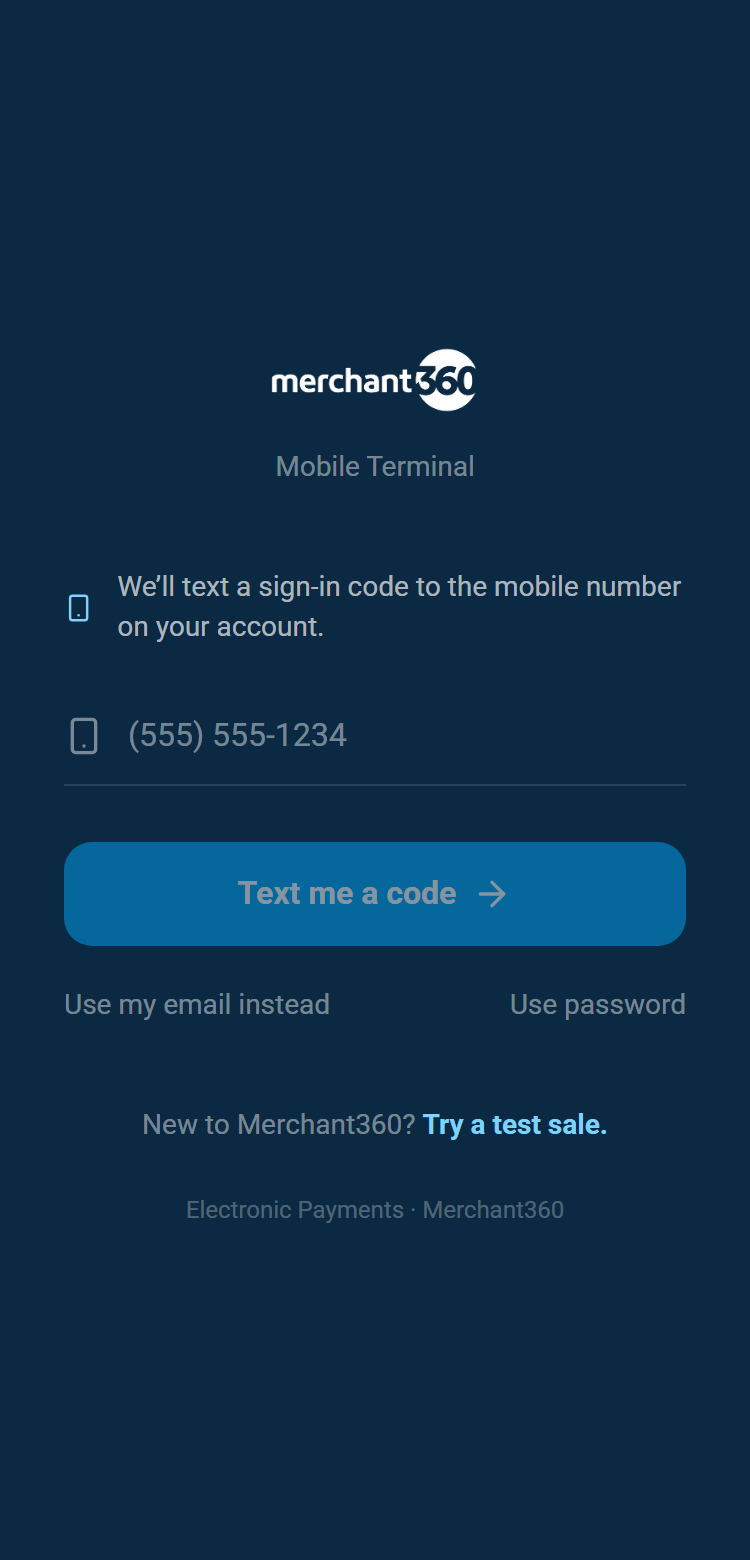
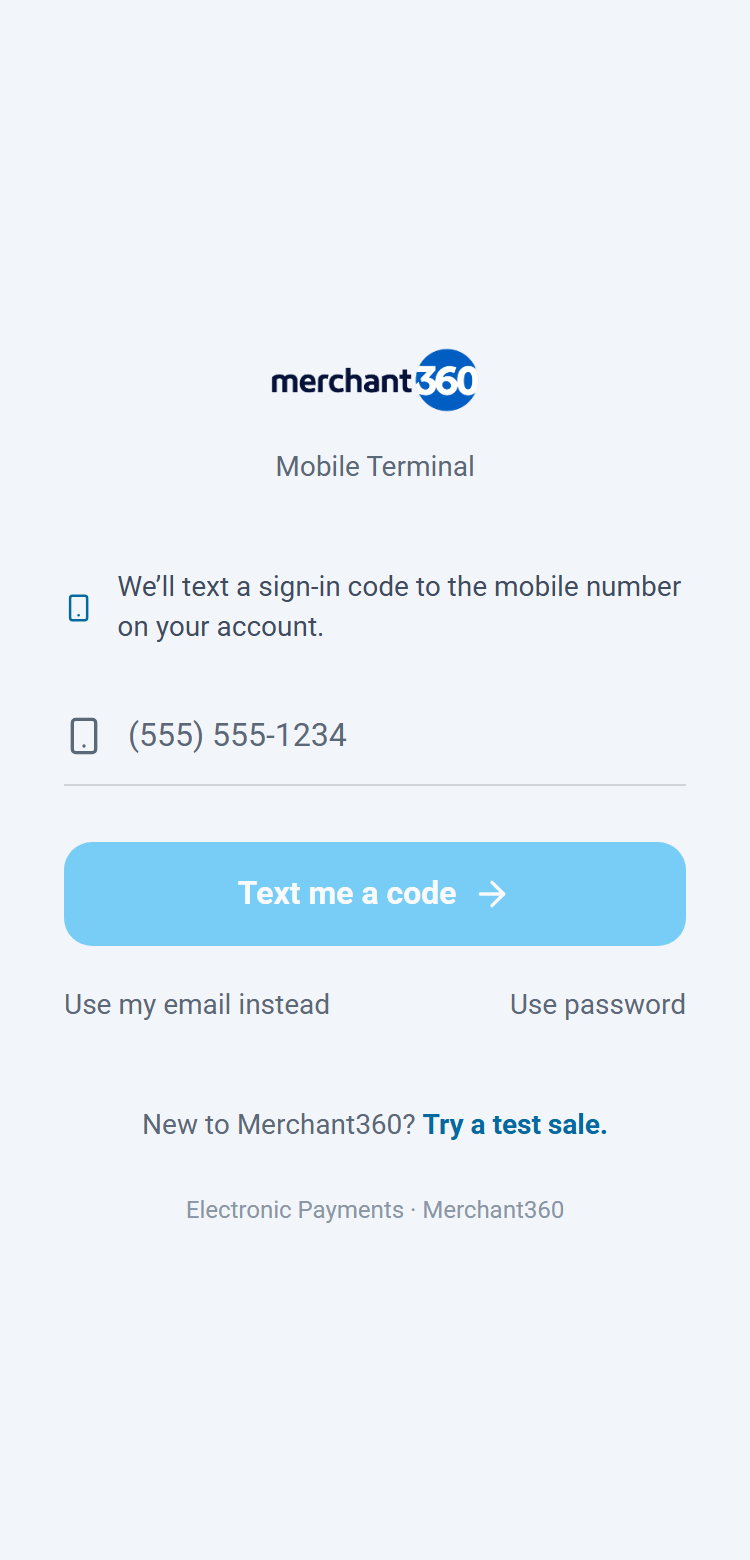
| On this screen | What it does |
|---|---|
| Mobile number | The number enrolled under Account → Security. A 6-digit code is texted to it. |
| Code | The 6-digit code from the text. Enter it to sign in. |
| Remember this phone | Skips the code on this device for 90 days. It appears under Trusted Devices on the Security page, where you can revoke it. |
| Use my email instead | Signs in with your Merchant360 email; the code still goes to the mobile number on that account. |
| Use password | Signs in with your Merchant360 email and password. |
| Resend | Sends a fresh code. |
Face ID, Touch ID, and fingerprint sign-in
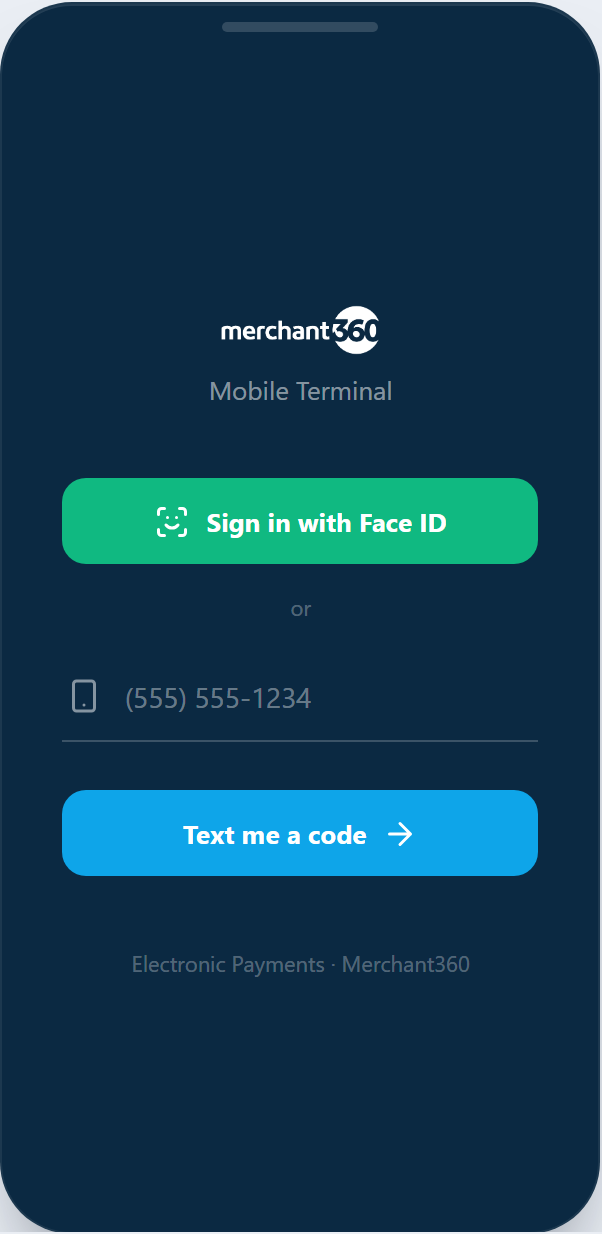
In the installed app on a phone with biometrics set up, the first sign-in with a code or password ends with an offer to turn on Face ID (iPhone), Touch ID, or fingerprint or face unlock (Android). Tap Turn on and confirm with your face or finger.
From then on the app opens with a biometric prompt, and the Sign in with Face ID button is on the sign-in screen. Signing out does not remove it; biometric sign-in still works the next time you open the app. Each phone is enrolled separately, so a second phone goes through the offer again.
Turn it off from Settings → Sign-in on that phone, or remove any phone from the list there. A phone that has not signed in for six months asks for a code or password again before biometric sign-in can be turned back on.
If the biometric prompt fails or the phone's face or fingerprint data changed, tap Use password or the code sign-in instead; the app then offers to turn biometrics on again.
| On this screen | What it does |
|---|---|
| Turn on | Enrolls this phone for biometric sign-in after a code or password sign-in. The phone confirms with your face or finger. |
| Not now | Skips the offer. It is shown again on the next sign-in. |
| Sign in with Face ID / Touch ID / fingerprint | On the sign-in screen, opens the app with the phone's biometric check. |
| Settings → Sign-in | Turns biometric sign-in on or off for this phone and lists every phone enrolled. The X removes a phone; it needs a code or password next time. |
Try a test sale (demo mode)
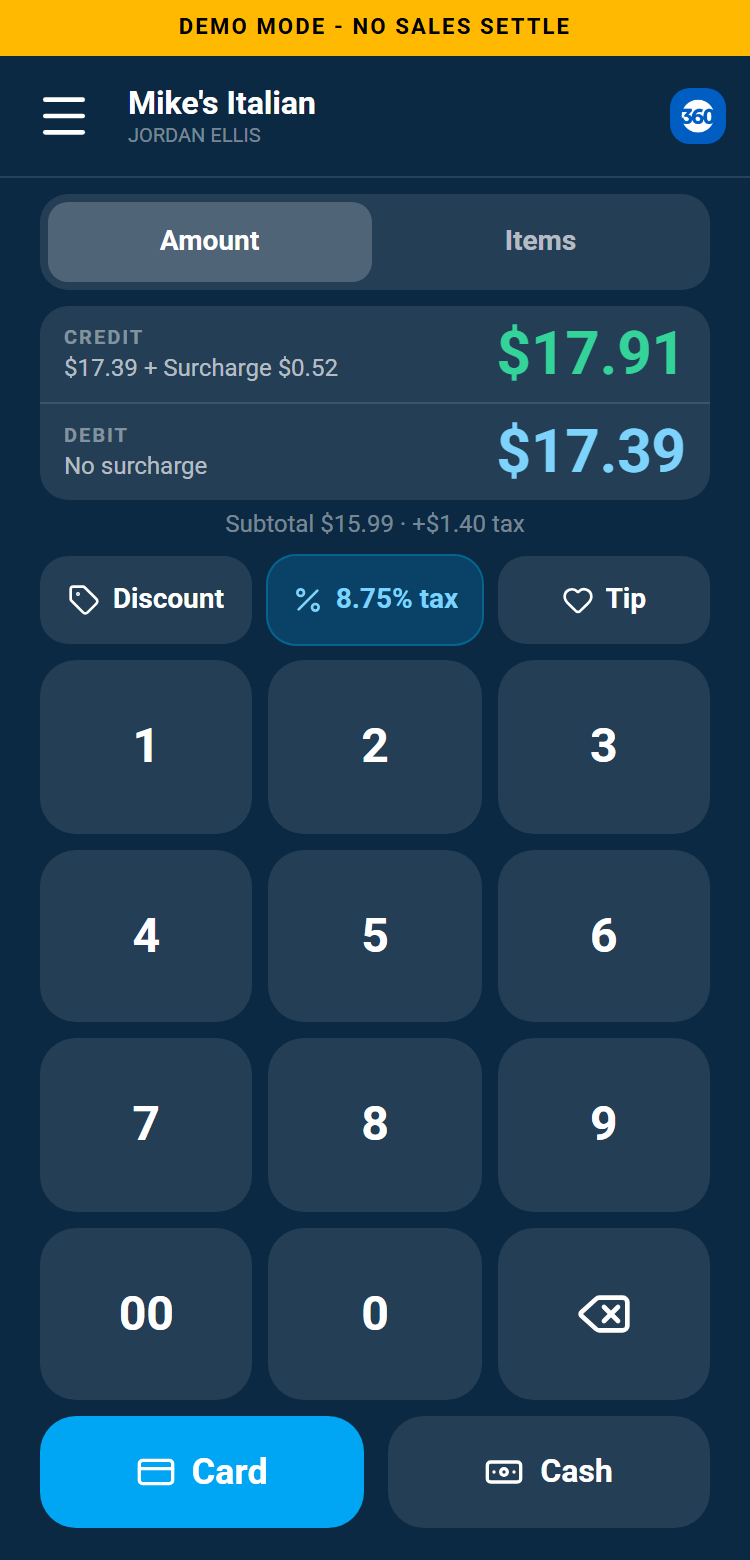
On the sign-in screen, tap New to Merchant360? Try a test sale. to open demo mode. No account or sign-in is needed. Demo mode is the full sale flow (keypad, items, discount, tax, tip, card, cash, signature, receipt, history, void) running on a sample shop.
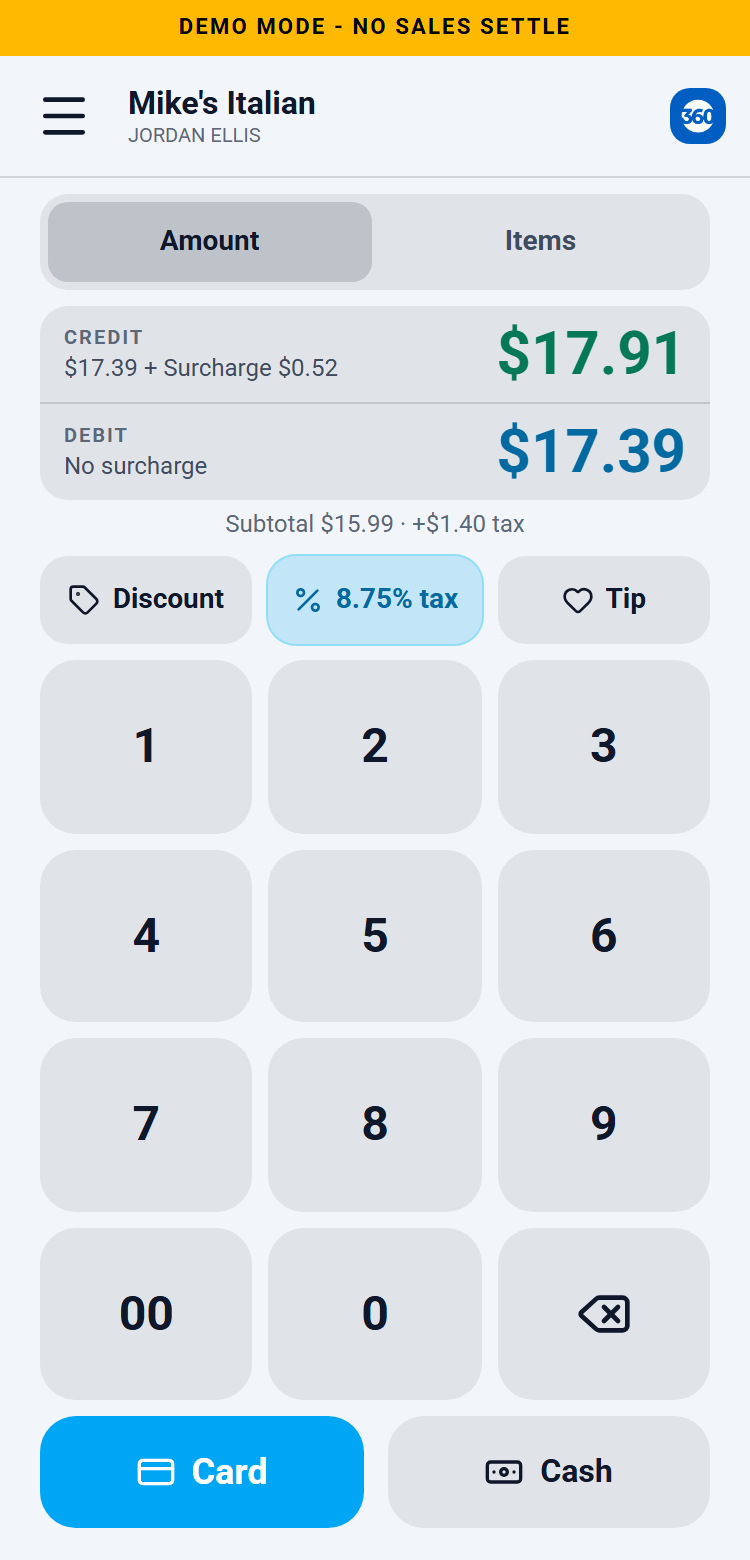
An amber bar reading DEMO MODE - NO SALES SETTLE stays at the top of every demo screen. Every demo sale is approved on the phone. No card is charged, no money moves, nothing is deposited, and nothing about a demo sale is sent to Merchant360 or shows up in your transactions or reports.
The card screen opens with a test card number already filled in, so you never need a real card. A Bluetooth card reader can be paired and used in demo mode: the reader takes the chip, tap, or swipe, and the read is discarded on the phone without being sent anywhere. Receipts are shown on the screen and marked as a demo; texting and emailing receipts, Gift cards, Settings, and Tap to Pay on iPhone are part of the signed-in app only.
Demo sales are kept only while the demo is open. Tap Exit demo in the menu to return to the sign-in screen. Closing the app also ends the demo; the app always opens on the sign-in screen. Once you sign in, you are in the live app, and there is no demo mode inside a signed-in account.
| On this screen | What it does |
|---|---|
| New to Merchant360? Try a test sale. | On the sign-in screen. Opens demo mode without signing in. |
| DEMO MODE - NO SALES SETTLE | The amber bar on every demo screen. It cannot be dismissed. If you do not see it, you are in the live app and sales are real. |
| View receipt | On the approved screen in demo mode. Shows the itemized receipt on the phone, marked as a demo. Nothing is sent. |
| Exit demo | In the demo menu. Clears the demo sales and returns to the sign-in screen. |
To show the surcharge rules in a demo: the pre-filled test card reads as credit and shows the surcharge; a card number starting with 4000 05 reads as debit and shows no surcharge.
The menu
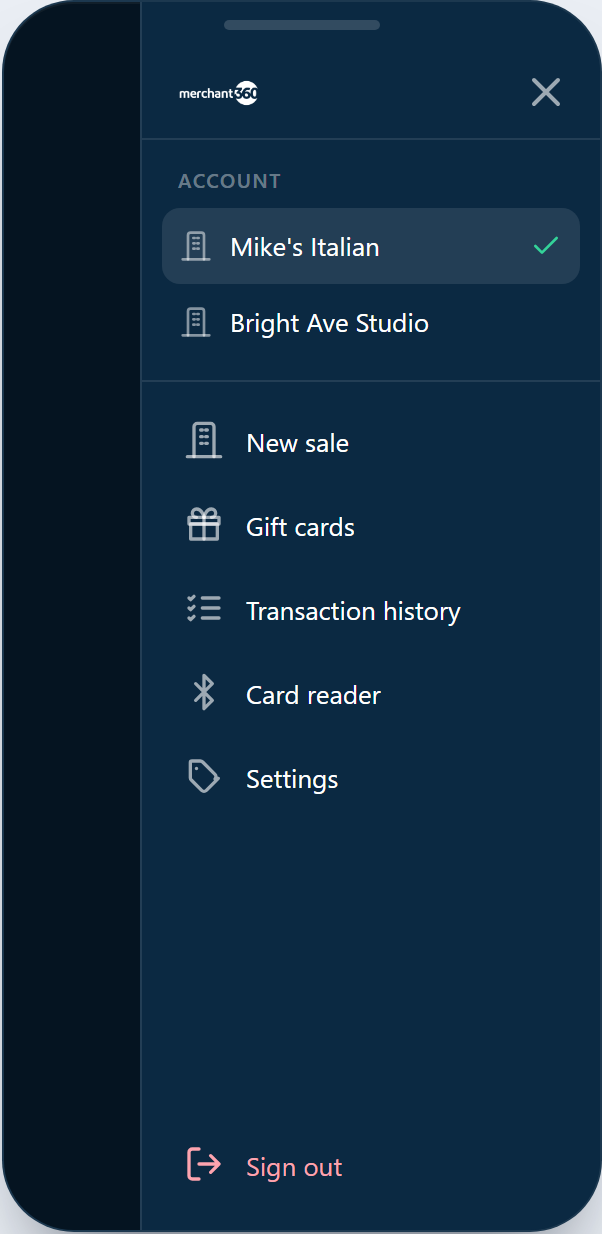
The menu (the icon in the top-left) is your hub. New sale returns to the sale screen, Gift cards opens the gift card actions, Transaction history lists recent sales with their reversal options, Card reader pairs and manages the Bluetooth reader, Settings holds discount presets, tax, tips, signature, and sign-in, and Sign out ends the session.
If your login covers more than one location, the menu also switches between them. The business name at the top shows which location the next sale is filed under; check it before ringing up.
If a menu item is missing, that tool is not on for your account or your access type does not include it. Gift cards, for example, appears only when your eGift program is set up.
| On this screen | What it does |
|---|---|
| New sale | Opens the sale screen with an empty total. |
| Gift cards | Activate, add value, redeem, refund, or check the balance of a gift card. |
| Transaction history | Recent sales from this account with Void or Refund on each. |
| Card reader | Find, connect, update, disconnect, or forget the Bluetooth card reader. |
| Settings | Discount presets, sales tax, tips, signature, card reader, and sign-in options. |
| Location | Shown with more than one location. Switches which business the app is working in. |
| Sign out | Ends the session. Biometric sign-in still works next time if it is turned on. |
Ring up a sale
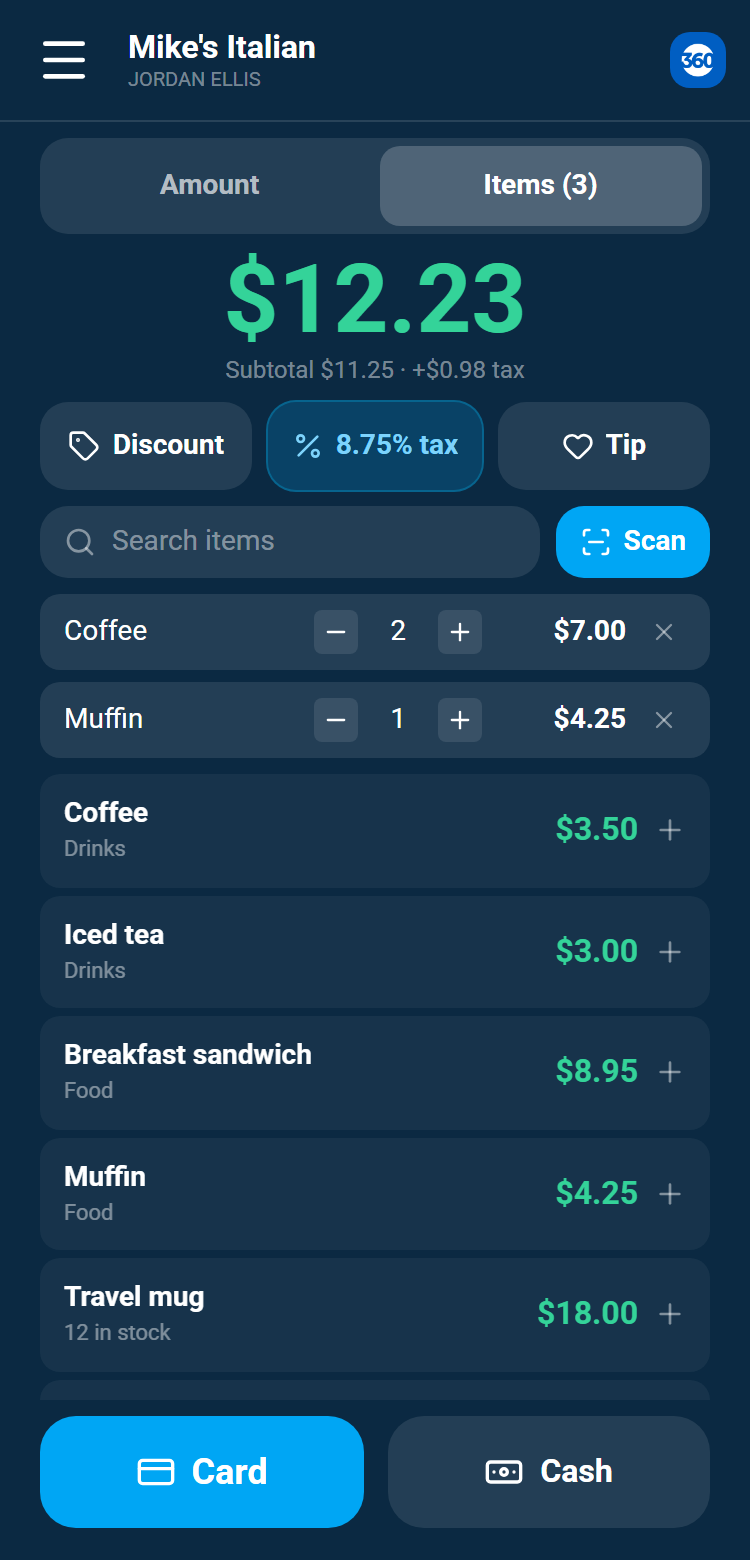
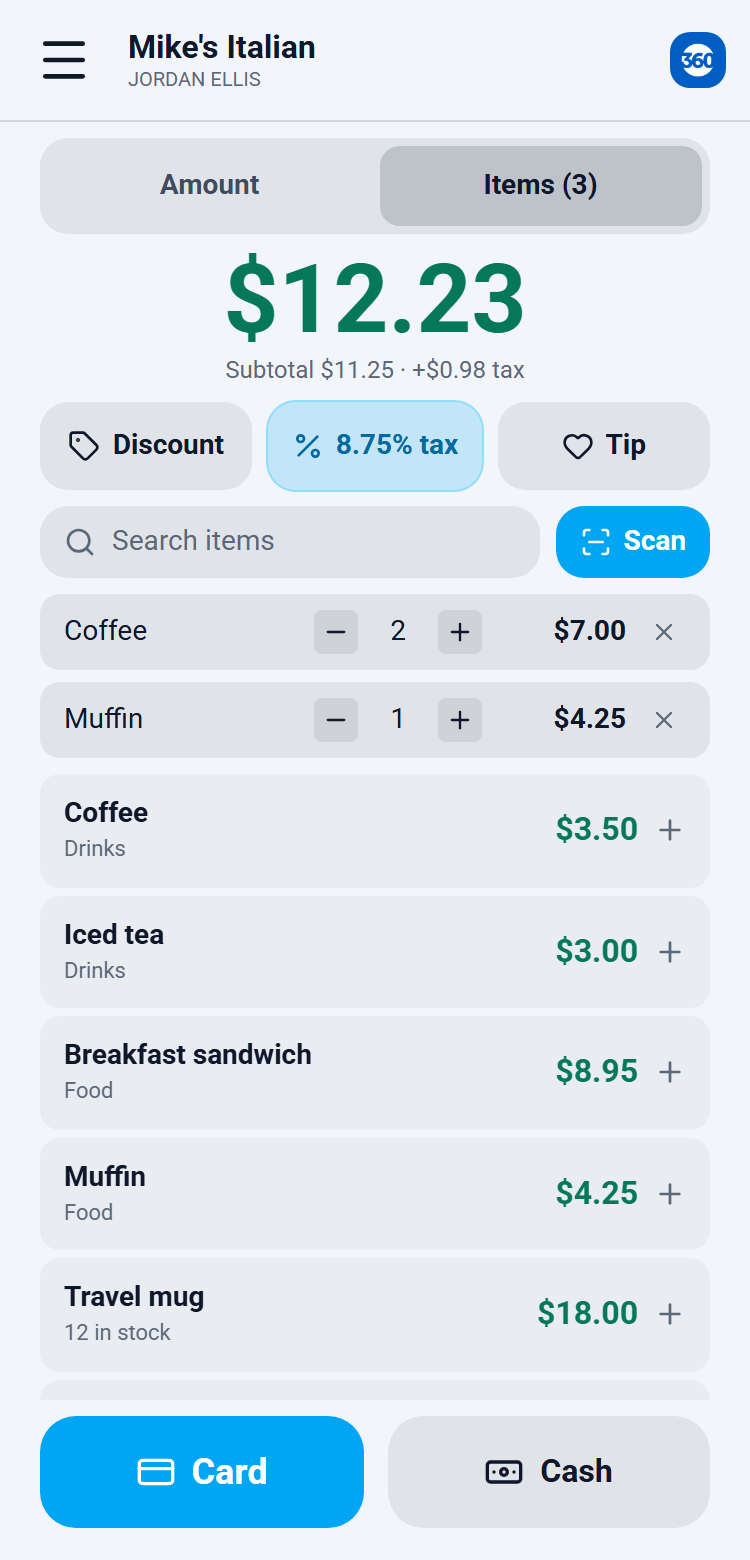
The sale screen has two ways to build a total, shown as an Amount / Items toggle at the top. Amount is a keypad for a quick, no-catalog sale. Items searches your Merchant360 catalog, adds products to a cart with quantity steppers, and shows live stock counts.
Use Amount when the customer just owes a number. Use Items when you want the receipt itemized and stock drawn down. The catalog is the same one your invoices and register use, so a price or tax change made on the web shows on the phone right away.
Open-price items ask for a price as you add them. In the installed app, Scan reads a product barcode with the camera and drops the item straight into the cart. When the cart is right, the running total at the top is what the customer pays, before any discount, tax, or tip you add next.
If an item does not appear in search, it is not in your catalog or is marked as a register-only item; add it under Products on the web. If an item shows out of stock, the app still lets you sell it, but the count goes negative until you receive stock.
- 1Amount: tap the amount on the keypad for a quick, no-catalog sale.
- 2Items: search your Merchant360 catalog, tap items into a cart with quantity steppers, and see live stock counts. Open-price items ask for a price as you add them.
- 3In the installed app you can tap Scan to read a product barcode with the camera and drop the item straight into the cart.
| On this screen | What it does |
|---|---|
| Amount / Items | Switches between the keypad and the catalog cart. The total carries the mode you were in. |
| Keypad | Types the sale amount in dollars and cents. |
| Search | Finds catalog items by name. Tap an item to add one to the cart. |
| Scan | Installed app only. Reads a barcode with the camera and adds the matching item. |
| Quantity steppers | Plus and minus on each cart line change the count; removing the last one deletes the line. |
| Stock count | Shows on hand for tracked items, and warns when only a few are left or the item is out of stock. |
| Price prompt | Appears for an open-price item; enter the price for this sale. |
| Clear | Empties the keypad or the cart to start over. |
Discount, tax & tip
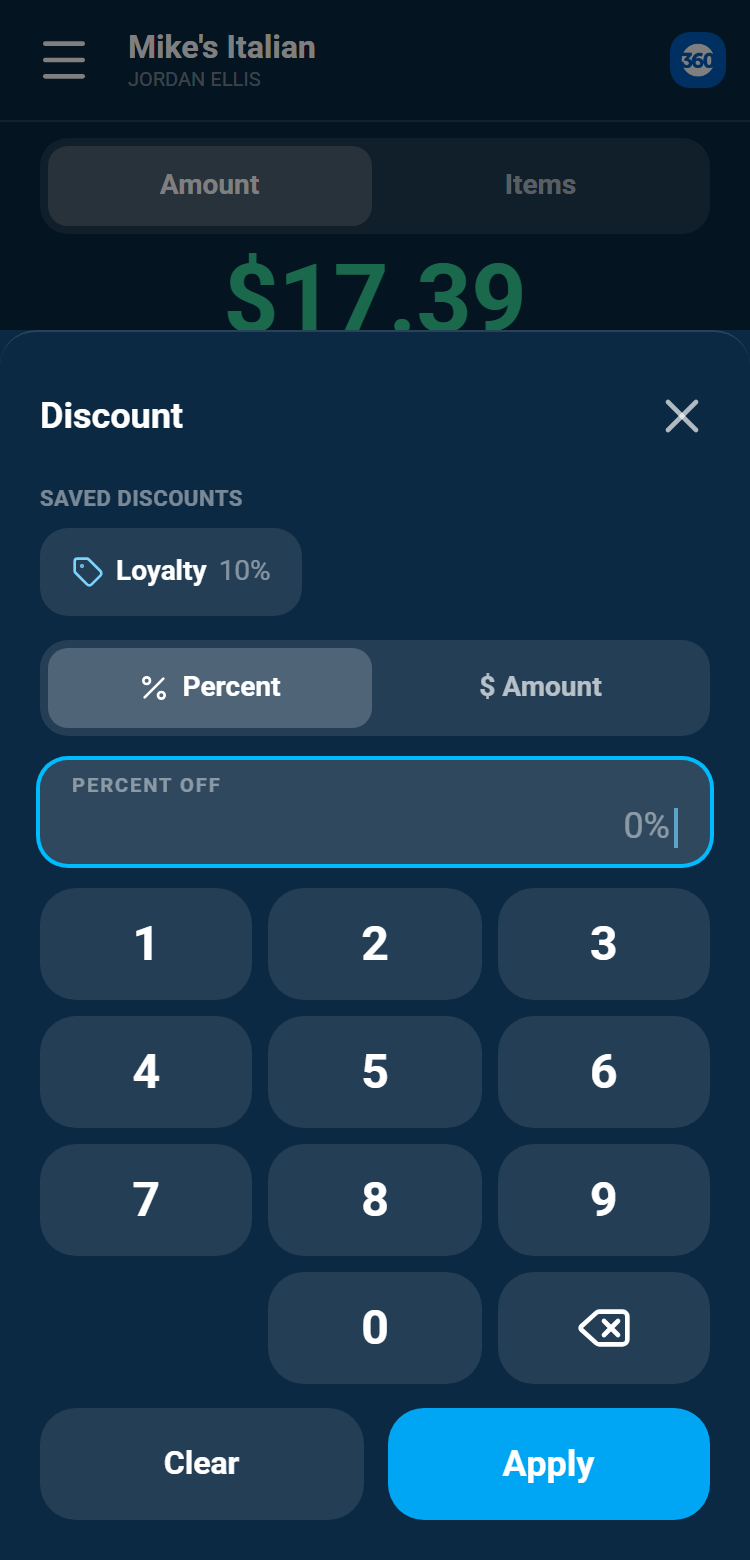
Under the total, three chips apply a Discount, Tax, or Tip to the sale. Each opens a sheet, and the total updates as soon as you confirm.
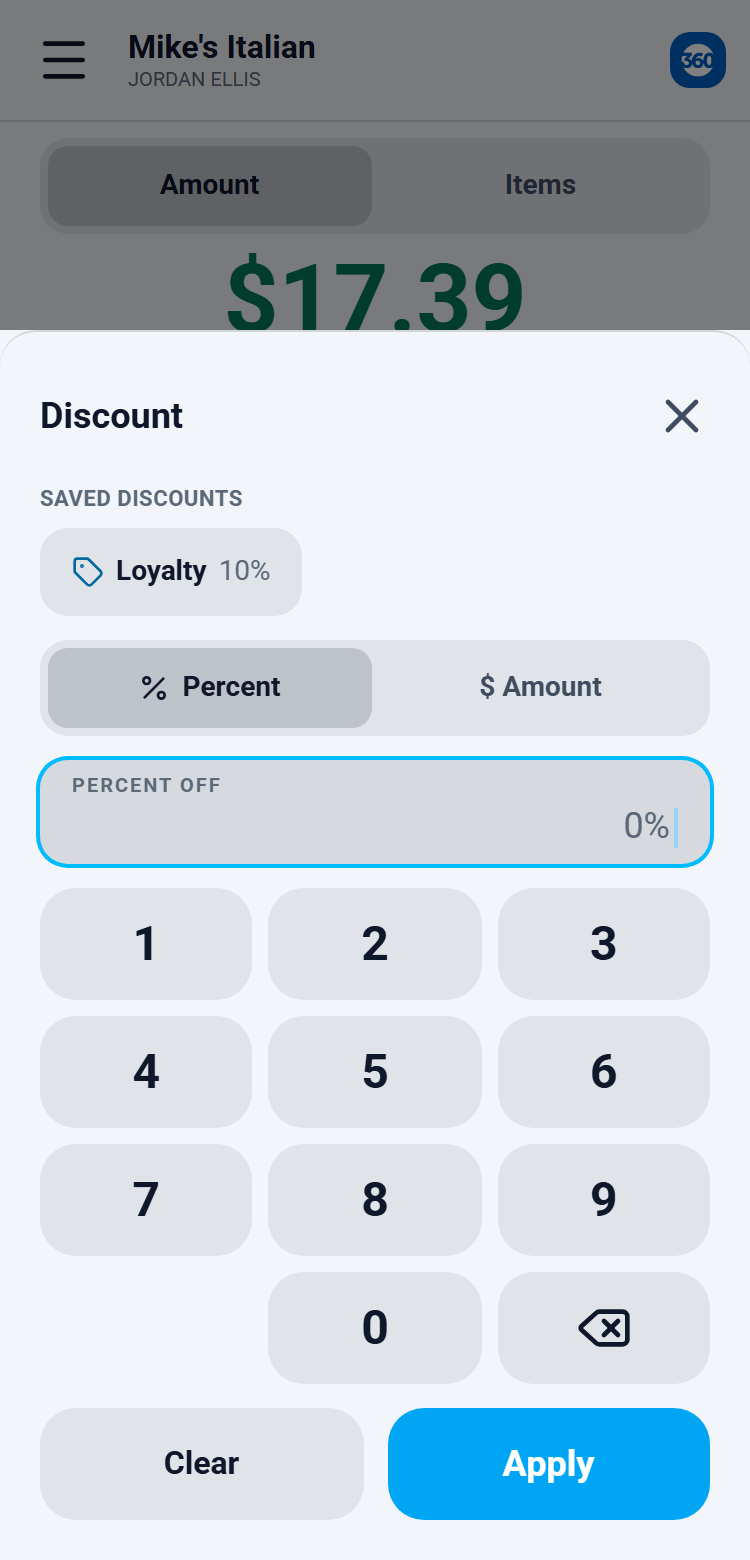
Discount shows your saved presets as one-tap pills, or lets you enter a percent or a dollar amount for this sale. Tax lists your Merchant360 tax rates; with Apply default rate automatically on in Settings, your default rate is already applied and the chip shows it. Tip lets you enter a tip the customer told you, as a preset percent or a custom amount.
All three come from your Merchant360 settings. Discount presets are managed in the app under Settings. Tax rates are managed on the web under Accept Payments → Tax rates and are read-only in the app. Tip presets are set under Settings → Tips.
Order matters: a percent discount comes off the subtotal, tax is figured on the discounted subtotal, and a percent tip is figured on the discounted subtotal before tax. The receipt shows each as its own line.
If the Tax chip shows no rates, add a rate on the web under Tax rates and reopen the app. If a discount preset is missing, it is turned off under Settings → Discount presets.
A fourth chip, Details, appears beside them when you have turned on the Mobile terminal surface for a custom payment field (Settings → Custom payment fields on the web; it is off by default). Tap it to fill the fields. A required field is checked when you choose Card, Reader, Tap to Pay or Cash, so the sale never stops after the card is presented. What you enter is saved with the sale, cash included, and with the card transaction.
| On this screen | What it does |
|---|---|
| Discount chip | Opens the discount sheet. Tap a preset pill, or enter a percent or dollar amount, then apply. The chip shows the discount in use. |
| Tax chip | Lists your Merchant360 tax rates. Tap one to apply it to this sale, or None to sell tax-free. |
| Tip chip | Enters a tip the customer told you: a preset percent or a custom dollar amount. Skips the customer tip prompt for this sale. |
| Remove | On any of the three sheets, clears that discount, tax, or tip from the sale. |
Tips
Tips are part of the sale itself: the tip is sent with the transaction as a tip, shows as a Tip line on the receipt and in Transaction history, and is reported as a tip in your transaction and batch reports. There is no separate tip adjustment step after the sale.
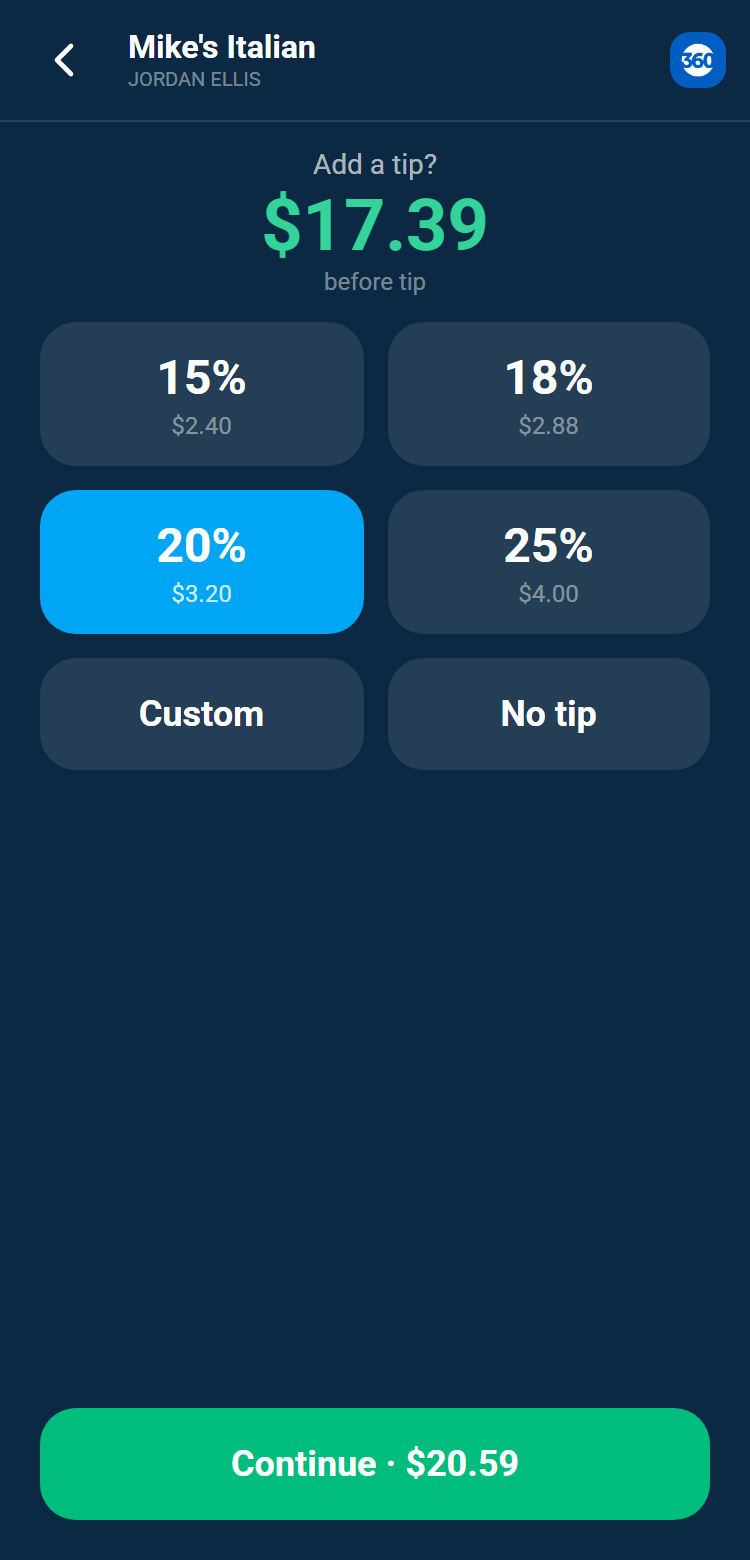
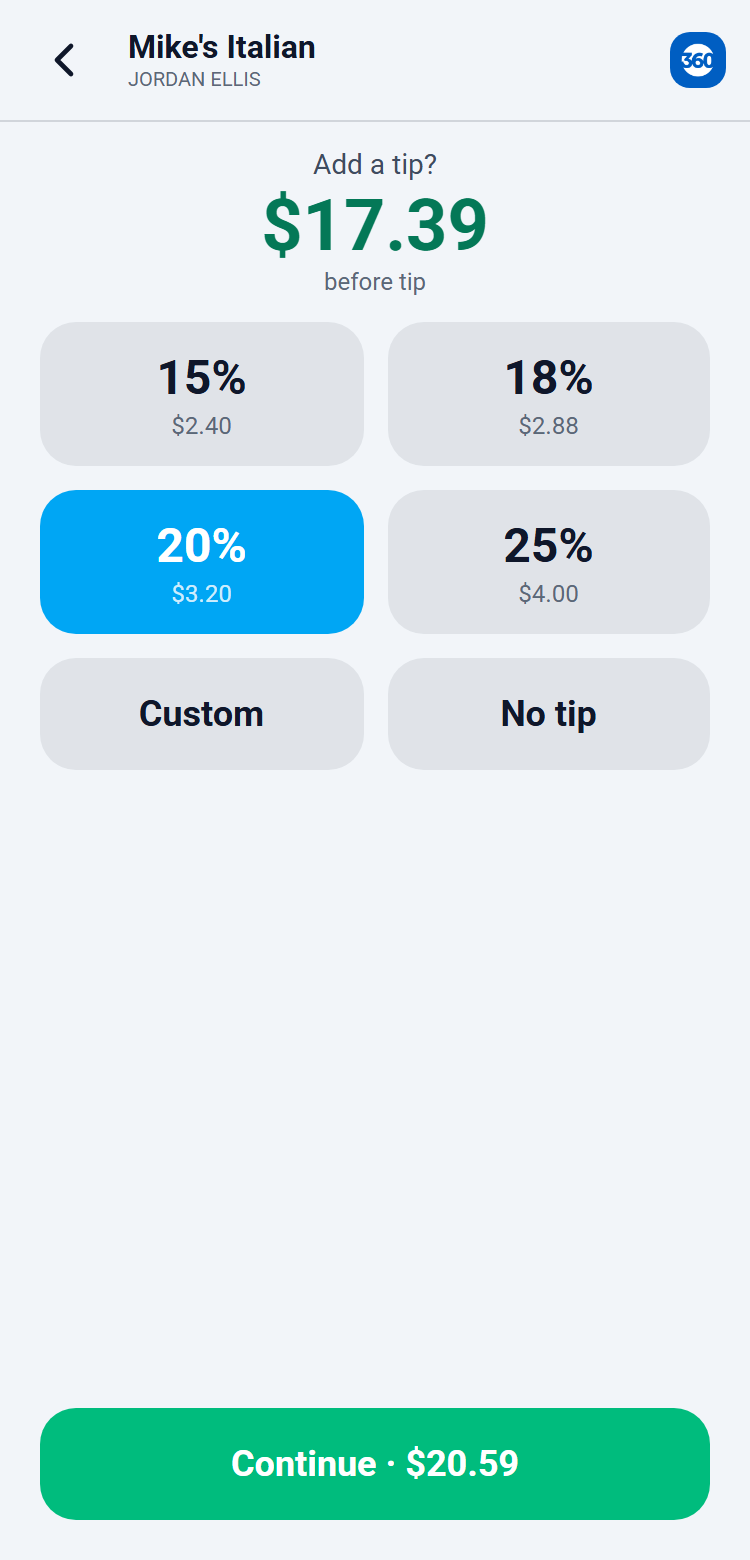
Two ways to add one. The Tip chip on the sale screen is for you, when the customer tells you the tip. The customer tip prompt is for the customer: turn on Tip prompt under Settings → Tips, and every card tender (Reader, Tap to Pay, Key card) first shows the customer the amount with your preset percents, plus Custom and No tip. Tap Continue to go on to the card.
Presets are yours to set (up to six whole percents, for example 15, 18, 20, 25). Percent tips are figured on the subtotal after any discount, before tax. If you already entered a tip with the Tip chip, the customer prompt is skipped.
Done looks like this: the approved screen shows the subtotal, the Tip line, and the total charged, and the same lines appear on the texted or emailed receipt. The tip is inside the card charge, so it settles with the batch and appears in the tips column of your batch report.
If the customer prompt does not appear, Tip prompt is off under Settings → Tips, the sale is cash, or a tip was already entered with the chip. If a customer wants to change a tip after approval, void the sale (same day) and run it again with the right tip.
| On this screen | What it does |
|---|---|
| Tip prompt | Settings → Tips. On, every card tender shows the customer tip screen before the card is taken. |
| Preset percents | Up to six whole percents shown as buttons on the customer tip screen. |
| Custom | Lets the customer type a dollar amount. |
| No tip | Continues with no tip added. |
| Continue | Locks in the customer's choice and moves on to the reader, Tap to Pay, or the card entry screen. |
| Tip line | Shown on the approved screen, the receipt, and Transaction history for every sale that carried a tip. |
Cash sales take a tip through the Tip chip; the customer prompt appears on card tenders.
Loyalty on the mobile terminal
With your Merchant360 loyalty program on, turn on Settings → Loyalty → Ask for the customer's loyalty phone before payment. Every sale then opens a Loyalty page before the tip and the payment: key the customer's phone on the keypad and tap Look up, or Skip.
The page shows their points (or punches) and what this sale earns. With a points program, the rewards their points cover are listed; Use takes one off this sale (a free-item reward takes the item's price off when that item is on the ticket). With a punch card, Use reward appears when the card is full. Continue to payment goes on to the tip and the card or cash.
The visit counts when the payment is approved. A reward used on a sale that is cancelled or declined goes back. Refunding or voiding the sale from History takes the points or punch it earned back off and returns the reward it used.
The PAX Payment App has its own loyalty switch in its terminal settings; this one is for the phone app.
Tap to Pay on iPhone
Where Tap to Pay on iPhone is available on your account, the sale screen shows a Tap to Pay button above Card and Cash. It works on iPhone XS or later running a current version of iOS, in the installed app. Tap to Pay on iPhone is not available on Android; Android phones take keyed card entry, cash, and the Bluetooth reader.
The first time you use it, Apple's Terms and Conditions sheet appears once. Accept them to turn the reader on for your business. Nothing else needs pairing; the phone itself is the reader.
Done looks like this: the phone confirms the read with a check mark, shows Approved with the card's last four, then the signature pad if your settings ask for one, then the receipt options. The sale appears in Transaction history and on the web under Transactions like any other card sale.
If the Tap to Pay button is missing, it is not turned on for your account (ask your sales rep), the phone is older than iPhone XS, or iOS needs updating. If the read fails, ask the customer to hold the card flat against the top of the phone and keep it there until the check mark appears. A declined card shows the message with Try again and Key card instead.
- 1Build the total as usual (Amount or Items, with any discount, tax, or tip), then tap Tap to Pay.
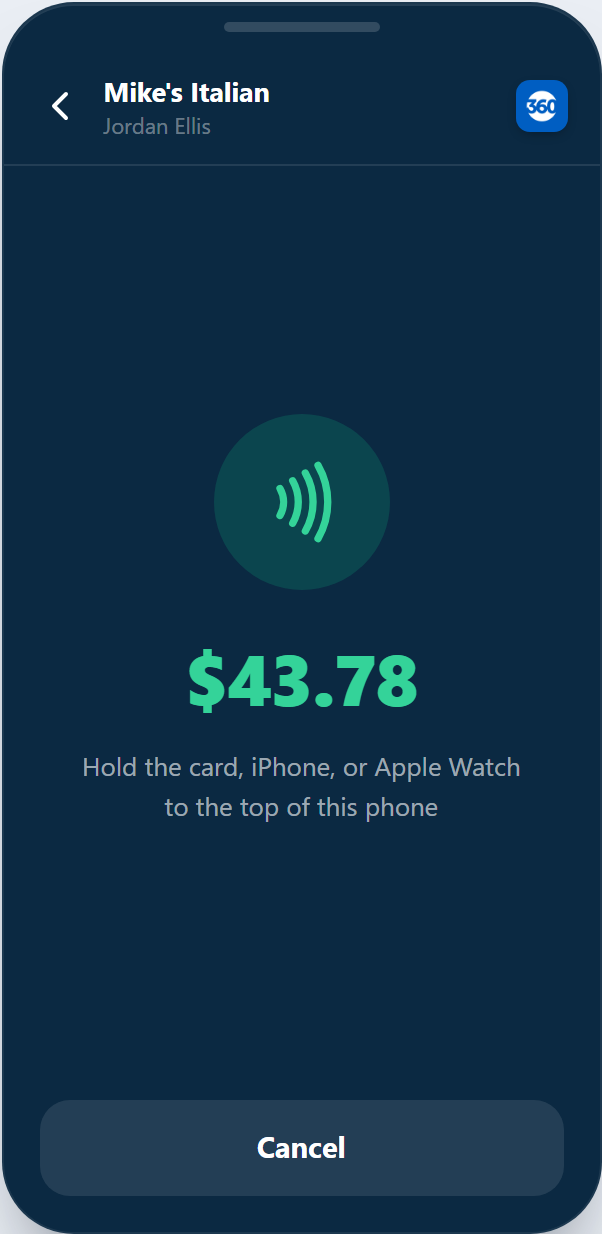
- 2The phone shows the amount and a contactless prompt. The customer holds their card, iPhone, or Apple Watch to the top of your phone until it confirms the read.
- 3If the card asks for a PIN, the customer enters it on your screen.
- 4Approval shows on the phone. If your settings ask for a signature, the signature pad appears next, then the approved screen with Text and Email receipt options.
| On this screen | What it does |
|---|---|
| Tap to Pay | Starts a contactless read for the total on screen. The customer holds their card, iPhone, or Apple Watch to the top of your phone. |
| Terms and Conditions | Apple's one-time sheet. Accept turns Tap to Pay on for your business on this phone. |
| PIN entry | Appears when the card asks for a PIN; the customer enters it on your screen. |
| Cancel | Stops the read and returns to the sale with nothing charged. |
| Try again / Key card instead | After a decline or failed read, retry the tap or switch to keyed entry. |
Tap to Pay sales appear in Transaction history with the same void and refund options as keyed sales, and follow the same surcharge or dual-pricing rules as the rest of the app.
Bluetooth card reader
The Bluetooth card reader takes chip (insert), contactless (tap), and swiped cards on iPhone and Android. Pair it once from the menu under Card reader; the app reconnects to it on every launch after that.
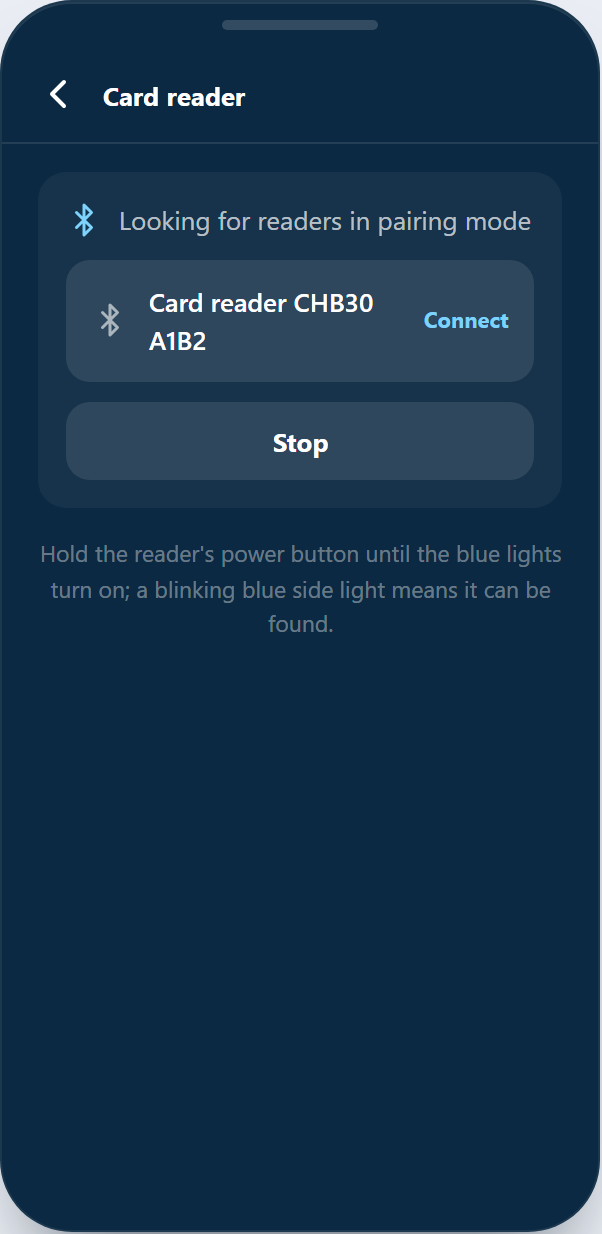
To pair: hold the reader's power button until the blue lights turn on and the side light blinks, open Card reader, tap Find readers, allow Bluetooth (and location, which Android needs to find nearby devices), then tap your reader in the list. The first time, the phone may ask for the reader's 6-digit Bluetooth passkey, printed on the back of the reader.
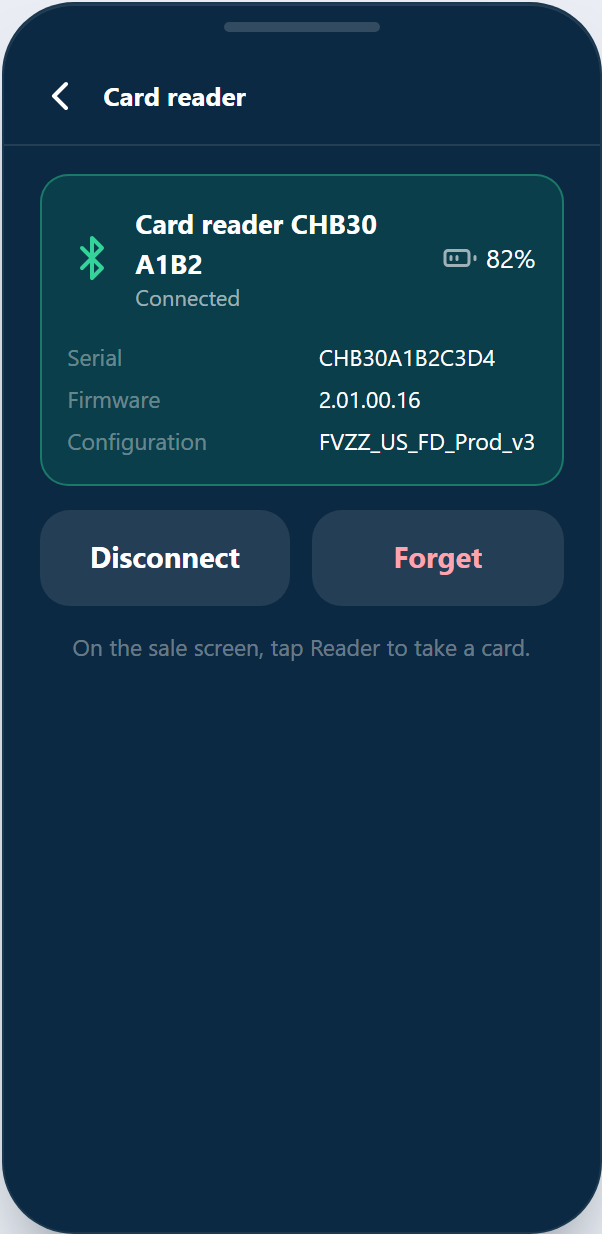
The Card reader screen shows the connected reader's battery, serial number, and firmware, offers an Update reader button when the reader needs one, and lets you Disconnect or Forget the reader. Settings also shows the reader paired on your account with its serial number, so support can identify it.
Done looks like this: the Reader button on the sale screen turns green, and Card reader shows Connected with the battery level. Chip and contactless cards do not need a ZIP or CVV, and the receipt shows the card's last four and entry method.
If the reader is not found, make sure it is charged and in pairing mode (side light blinking), Bluetooth is on, and on Android that location permission was allowed. If it was paired to another phone, tap Forget on that phone first; a reader connects to one phone at a time. If Update reader appears, keep the reader charged and near the phone until the update finishes; it can take a few minutes.
- 1Build the total as usual (Amount or Items, with any discount, tax, or tip), then tap Reader.
- 2The phone shows the amount and the reader lights up. The customer inserts, taps, or swipes the card on the reader. For a chip card the reader may ask the customer to pick a card application or to remove the card when it is done.
- 3Approval shows on the phone. If your settings ask for a signature, the signature pad appears next, then the approved screen with Text and Email receipt options.
- 4An unreadable card shows the message with Try again and Key card instead. A declined card shows the red Declined screen with the processor's message and the choices Try another card, Key card instead, and Cancel sale. Nothing was charged.
| On this screen | What it does |
|---|---|
| Find readers | Scans for readers in pairing mode and lists them by serial number. Tap one to connect. |
| Connect | Reconnects the reader already paired on this phone. |
| Battery / Serial / Firmware | The connected reader's status. Support may ask for the serial number. |
| Update reader | Installs a required firmware update. Keep the reader powered and nearby until it completes. |
| Disconnect | Drops the Bluetooth connection but keeps the pairing; Connect brings it back. |
| Forget | Removes the pairing from this phone so another phone can pair the reader. |
| Reader | On the sale screen, charges the total on the reader. Green when connected. |
| Try again / Key card instead | After a decline or unreadable card, retry on the reader or switch to keyed entry. |
Reader sales appear in Transaction history with the same void and refund options as keyed sales, and follow the same surcharge or dual-pricing rules as the rest of the app. Chip and contactless cards do not need a ZIP or CVV.
A reader sale, step by step
The whole flow from a connected reader to a receipt, screen by screen. Use this the first day with a new reader, then it becomes muscle memory.
Done looks like this: the Approved screen with the itemized total, the card's last four, the Text and Email receipt buttons, and the sale in Transaction history with Void available until the batch settles.
If the reader lights up but never reads, ask the customer to insert a chip card fully or hold a contactless card still on the reader. If Authorizing spins for more than a few seconds, check the phone's data or Wi-Fi connection; the reader talks to the phone, and the phone talks to the network. Nothing is charged until the Approved screen shows.
- 1Connect the reader: open the app; a paired reader reconnects on its own (a green Reader button appears on the sale screen). If it does not, open menu → Card reader and tap Connect, or Find readers for a new one.
- 2Build the sale: on the Items tab, search or scan products into the cart and adjust quantities, or use the Amount tab and type a total. Apply a Discount, Tax, or Tip if needed.
- 3Check the total: the amount at the top is what the customer pays. With dual pricing, the screen shows both the Card and Cash price; the Reader and Key card buttons charge the card price, Cash charges the cash price.
- 4Tap Reader: the phone shows the amount and "Insert, tap, or swipe the card" while the reader lights up. The customer inserts a chip card, taps a contactless card or phone, or swipes. A chip card may ask the customer to pick a card application, and asks to be removed when it is done.
- 5Approval: the phone shows Authorizing, then the signature pad if your settings ask for one (the customer signs or you tap Skip), then the Approved screen with the itemized total and the Text and Email receipt buttons.
- 6Unreadable: the message shows with Try again and Key card instead. Declined: the red Declined screen shows the processor's message with Try another card, Key card instead, and Cancel sale. Nothing was charged.
| On this screen | What it does |
|---|---|
| Reader (green) | Shows the reader is connected. Tap to send the total to the reader. |
| Insert, tap, or swipe the card | The prompt while the reader waits. Cancel returns to the sale. |
| Card application | A chip card with more than one application asks the customer to pick one on the reader. |
| Remove card | The reader asks for the chip card back when the read is done. |
| Authorizing | The charge is being approved. Wait for Approved or the decline message. |
| Signature pad / Skip | Shown when Settings asks for a signature. Skip is available when signatures are Optional. |
| Text / Email | Sends the receipt from the Approved screen. |
Every reader sale lands in Transaction history like any other card sale, with Void on the day of the sale and Refund after.
A reader sale, the screens
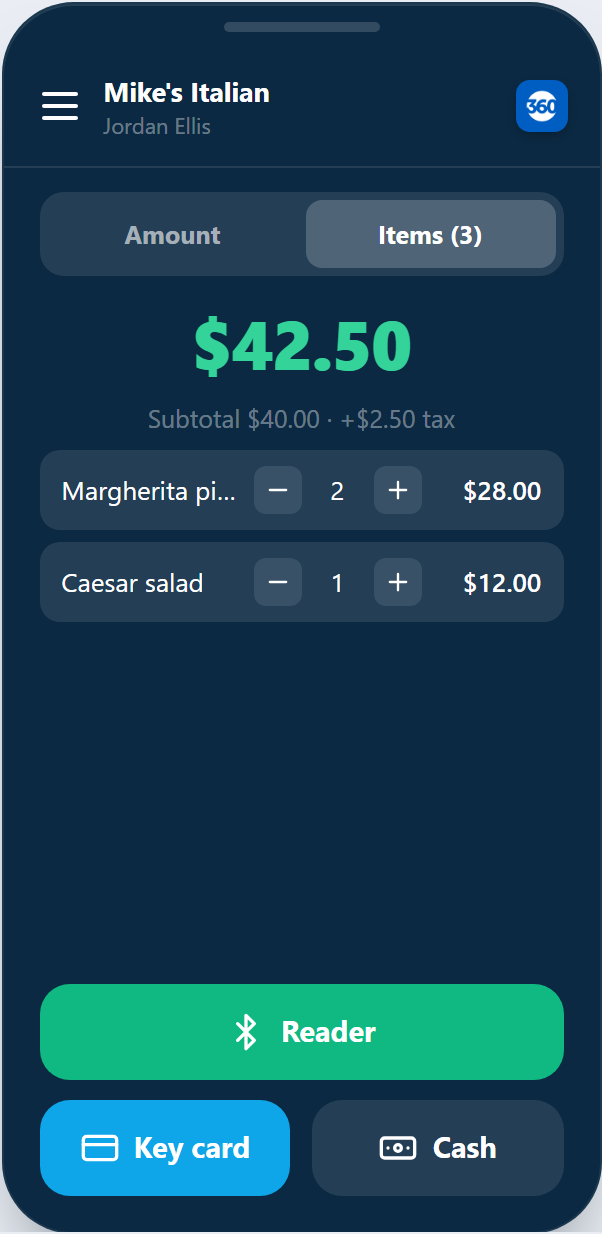
The sale screen with a reader connected: the cart (or keypad total), the amount, and the green Reader button above Key card and Cash. With dual pricing on, the Card and Cash prices show side by side; Reader and Key card charge the card price, Cash charges the cash price.
If the Reader button is grey, the reader is paired but not connected; open menu → Card reader and tap Connect. If it is missing, no reader has been paired on this phone yet.
| On this screen | What it does |
|---|---|
| Cart / total | The lines and the running total. Tap a line to change the quantity. |
| Reader | Charges the total on the connected reader. |
| Key card | Opens keyed entry for a card that will not read. |
| Cash | Takes cash and shows change due. |
Present the card
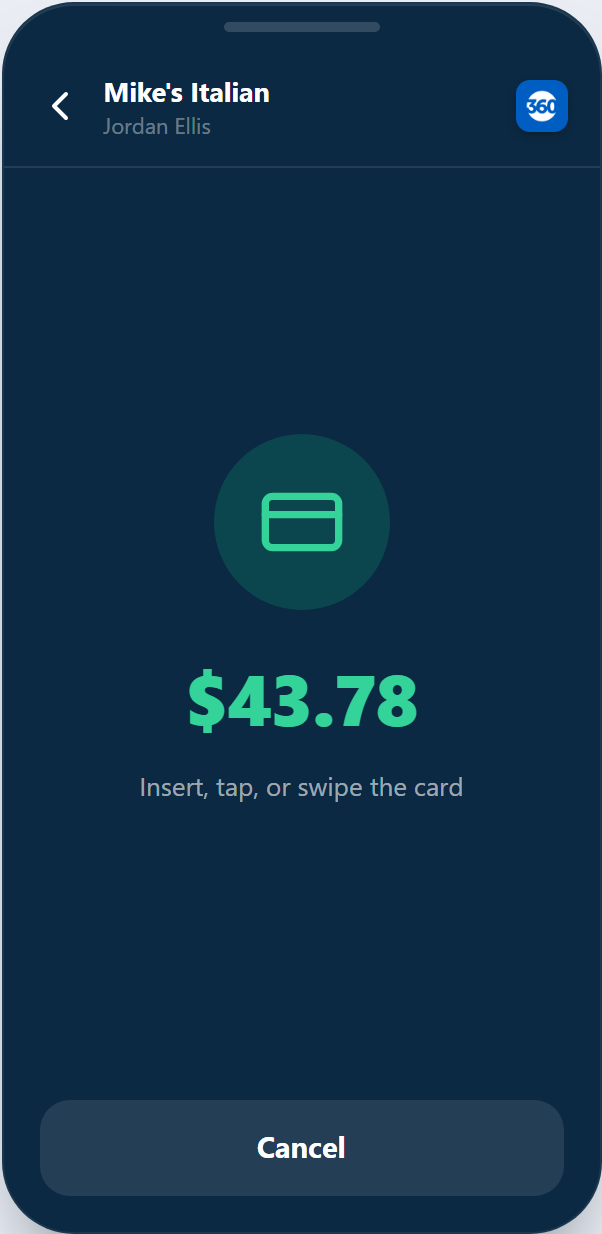
The reader screen shows the amount and the prompt Insert, tap, or swipe the card while the reader waits. The customer inserts a chip card, taps a contactless card or phone, or swipes. Cancel returns to the sale with nothing charged.
After the read, the flow continues exactly like a keyed sale: signature (if turned on in Settings), then the Approved screen with receipt options. See Capture a signature and Receipts below.
If the reader beeps but the screen does not move on, the read was rejected; the message shows with Try again and Key card instead. Nothing is charged on a failed read.
| On this screen | What it does |
|---|---|
| Amount | The total being charged, including any discount, tax, and tip. |
| Insert, tap, or swipe the card | The waiting prompt. The reader's lights show it is ready. |
| Cancel | Stops waiting and returns to the sale. |
Key a card
At the bottom of the sale screen, Card comes first (the higher price, when dual pricing is on) and Cash second. Card is the keyed entry screen; with a card reader connected or Tap to Pay available, that button reads Key card and the reader or Tap to Pay button sits above it.
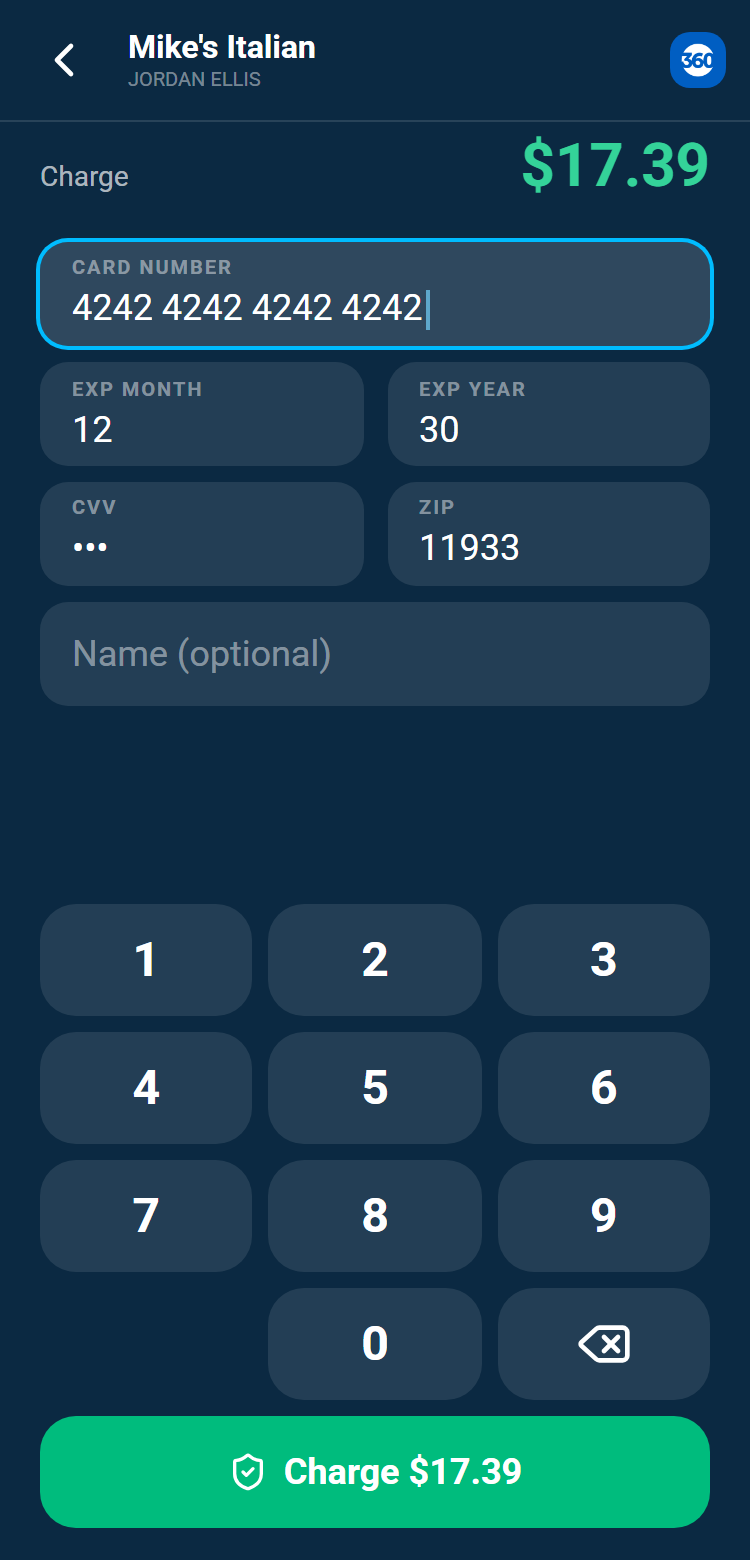
Card opens the entry screen: card number, expiry (MM/YY), CVV, ZIP, and an optional name. Tap Charge to run it. The card number is masked as soon as you leave the field and is never stored on the phone. There is no saved-card lookup in the app today; it takes a freshly keyed card. To charge a card on file, use the customer's profile on the web.
Done looks like this: Approved with the card's last four, then the signature pad if required, then the receipt options. A keyed sale is marked as keyed in Transaction history and in your reports.
If the charge declines, the message names the reason where the card issuer gives one (for example insufficient funds or an address mismatch on the ZIP). Check the ZIP and expiry and try once more, or ask for another card. Keyed cards carry a higher rate than chip or contactless, so use the reader or Tap to Pay when the card is present.
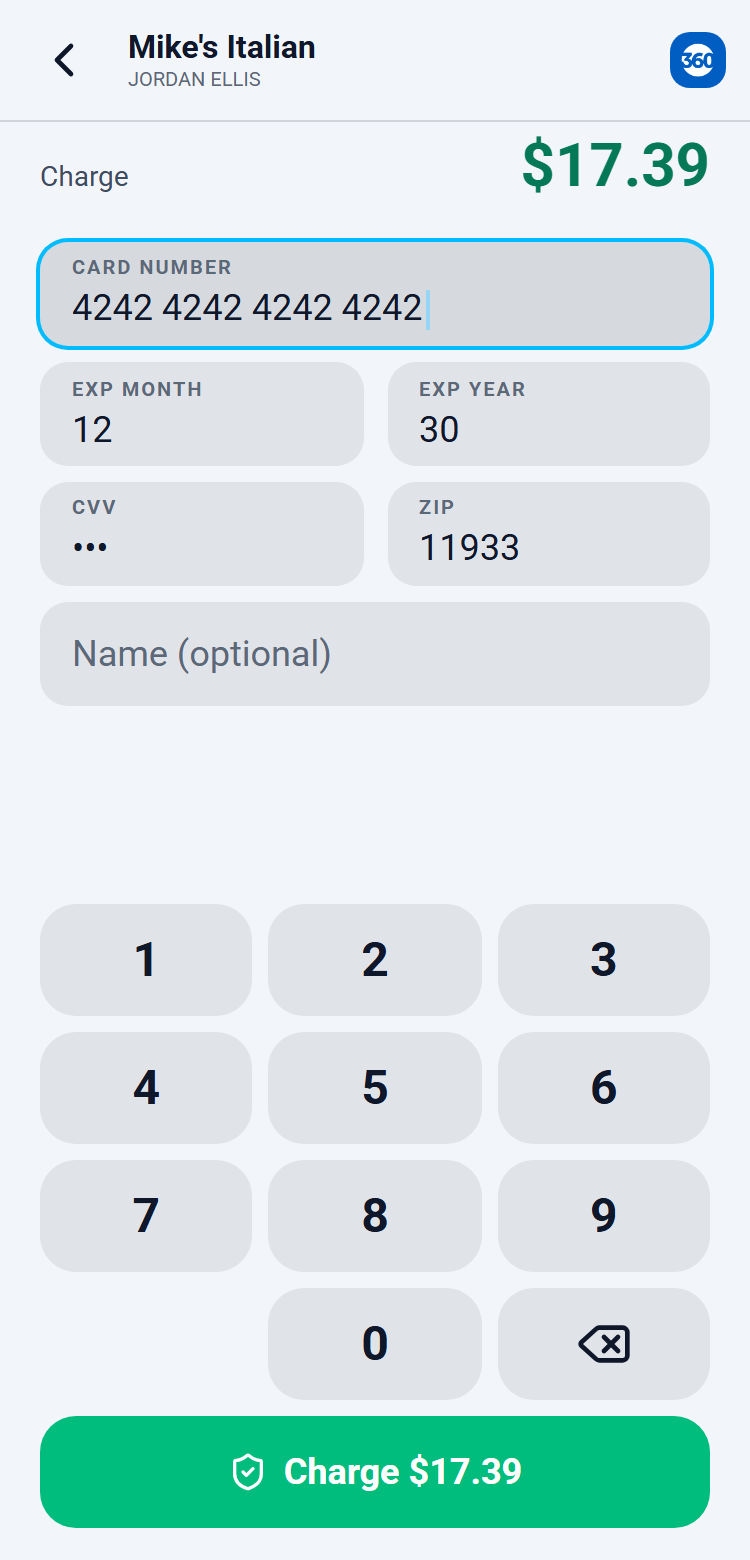
| On this screen | What it does |
|---|---|
| Card number | The 15 or 16 digit number. Masked after entry. |
| Expiry (MM/YY) | The month and year on the card. |
| CVV | The 3 digit code on the back (4 on the front for American Express). |
| ZIP | The cardholder's billing ZIP, checked by the issuer. |
| Name (optional) | Prints on the receipt. |
| Surcharge line | With a surcharge program, appears as you type: the surcharge for a credit card, or no surcharge for a debit card. |
| Charge | Runs the card for the total. Approval shows next. |
Cash & change due
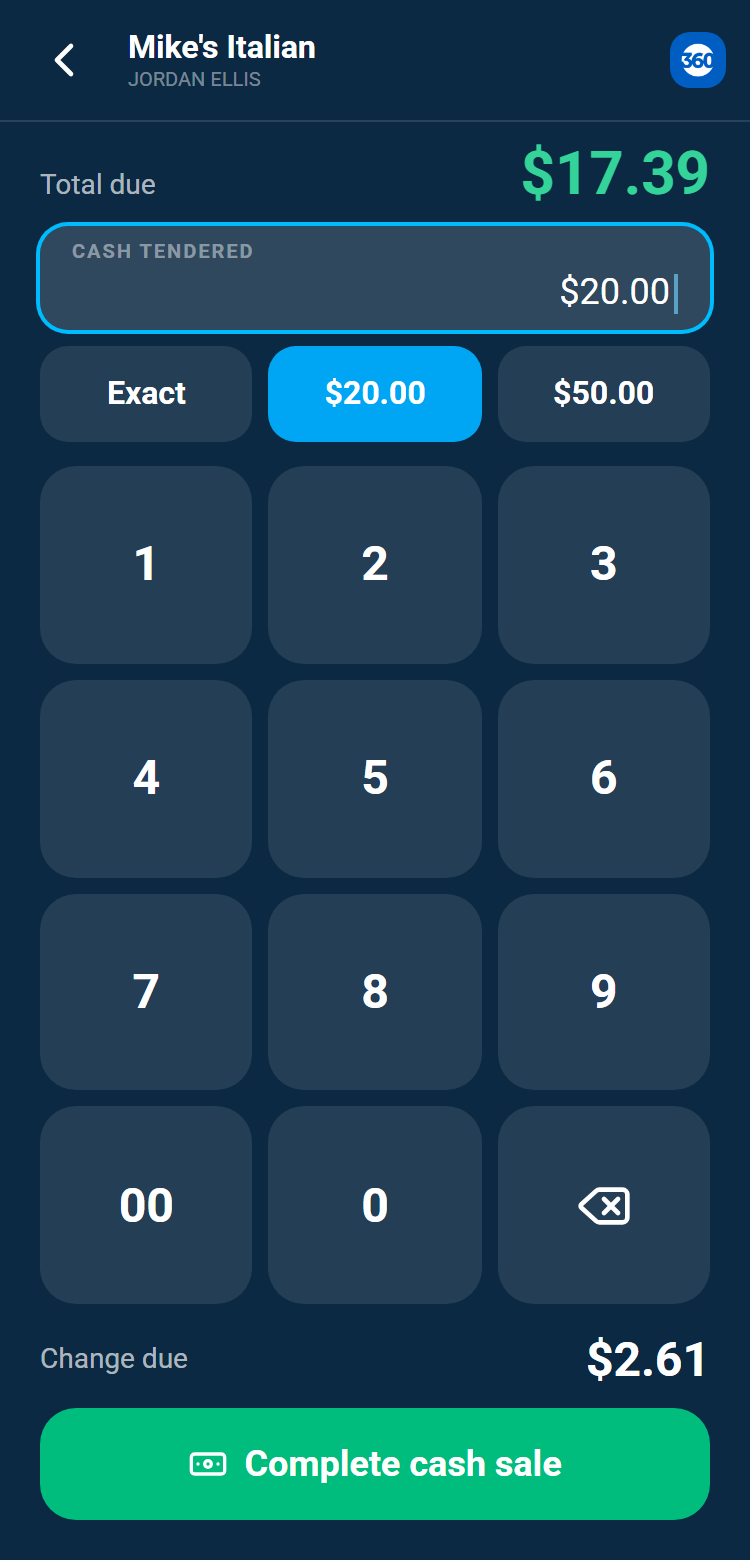
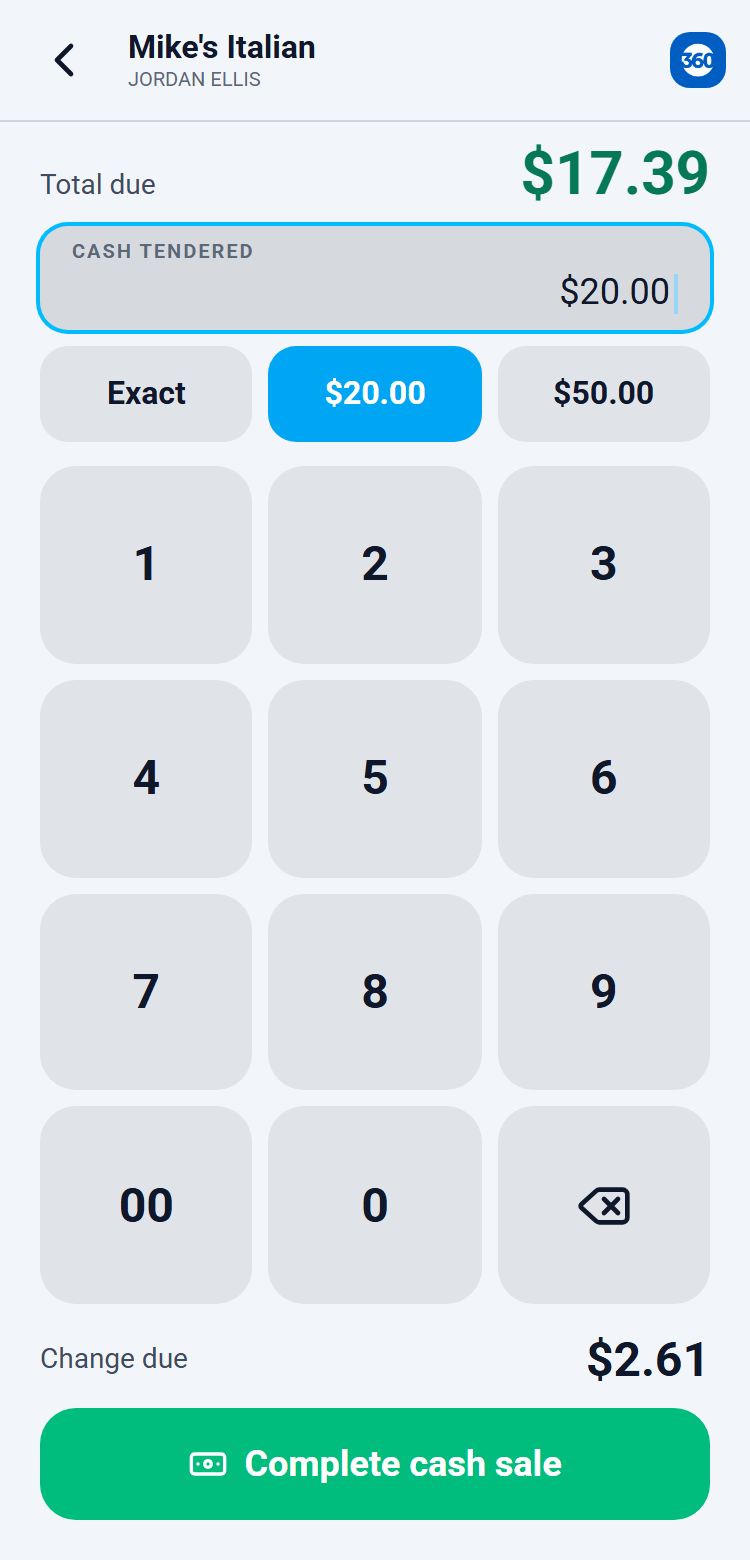
Cash turns the phone into a register: enter what the customer handed you, or tap a quick-cash button (exact, next $5 or $10, or a covering bill), and the app shows the exact Change due before you complete the sale.
With dual pricing on, Cash charges the lower cash price shown on the sale screen. A cash sale never asks for a signature and never prompts for a customer tip; use the Tip chip if the customer tips in cash. Cash sales appear in Transaction history and in your reports as cash, so your end-of-day count matches.
If you entered the wrong tendered amount, go back before completing; once completed, a cash sale cannot be voided from the app. Record the correction on the web under Transactions.
| On this screen | What it does |
|---|---|
| Amount tendered | What the customer handed you. Type it or tap a quick-cash button. |
| Quick-cash buttons | Exact, the next $5 or $10, or a covering bill, filled in with one tap. |
| Change due | Tendered minus the total, shown before you complete the sale. |
| Complete sale | Records the cash sale and opens the receipt options. |
Card and cash pricing (dual pricing & surcharge)
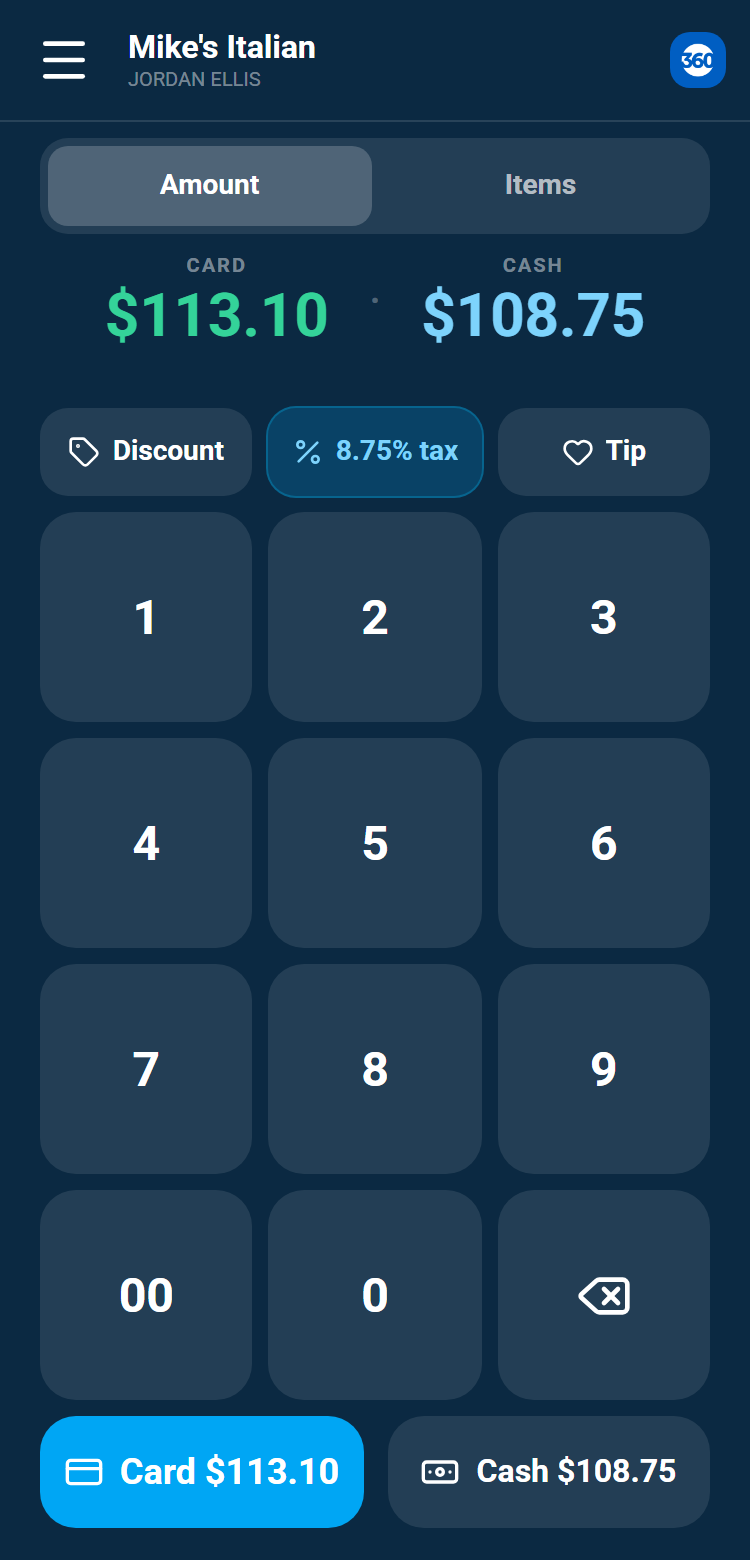
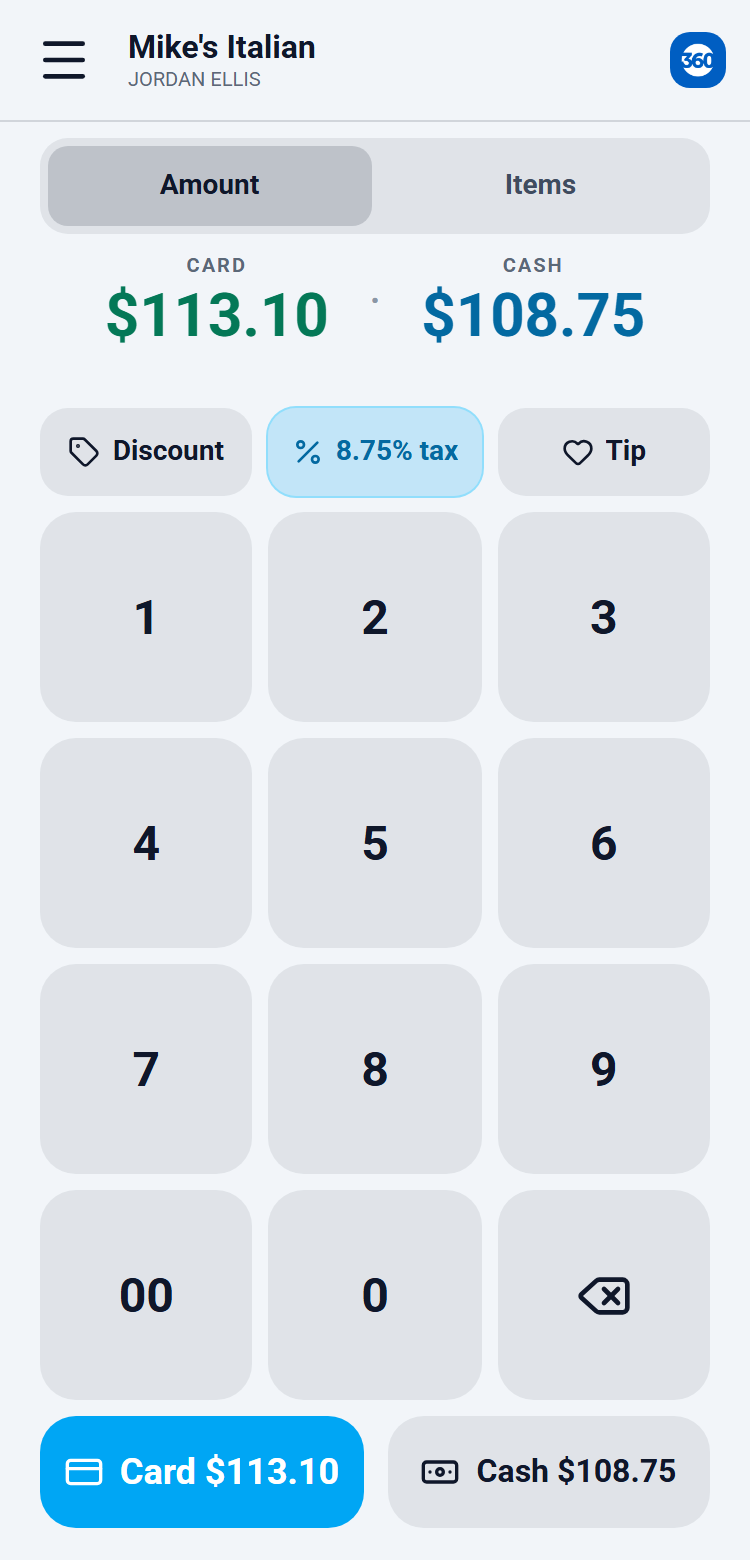
If your account is set up for dual pricing, the total shows both prices side by side, Card and Cash, and the Card and Cash buttons each show their amount. The customer picks how they want to pay and the app charges the matching total. The rates come from your Merchant360 settings under Dual pricing, the same ones your invoices and pay pages use.
If your account runs a surcharge program instead, the sale screen shows a Credit total and a Debit total before the card is presented, and the card decides which one is charged. The next section, Surcharge on the mobile terminal, walks through it. Surcharge and dual pricing are mutually exclusive, so you only ever see the one your account is configured for.
Done looks like this: the receipt shows the card price or the cash price the customer chose, or the surcharge as its own line, as card-brand rules require.
If the sale screen shows one price when you expected two, dual pricing is off under Accept Payments → Settings → Dual pricing, or a surcharge program is active and pausing it. If a debit card shows a surcharge, the card was not recognized as debit; key it again or use the reader so the card type is read from the chip.
| On this screen | What it does |
|---|---|
| Card price / Cash price | Both totals shown side by side when dual pricing is on. Each button charges its own amount. |
| Credit / Debit totals | With a surcharge program: what a credit card pays (amount, Surcharge, Total) and what a debit card pays (Debit total), shown on the sale screen and on the reader and Tap to Pay screens before the card is presented. The card decides which one is charged. |
| Surcharge line | On keyed entry with a surcharge program: the surcharge for a credit card, or no surcharge for debit, updated as you type. |
| Dual pricing (web) | Under Accept Payments → Settings: turn the program on, pick Dual pricing or Cash discount, set the card adds or cash discount percent, and choose whether debit cards pay the cash price. |
Surcharge on the mobile terminal
The mobile terminal runs your surcharge program on every card sale: keyed, tapped, inserted or swiped. There is nothing to switch on in the app. When your account has an active surcharge program, the terminal follows it, at the same percentage as your virtual terminal, invoices and payment links.
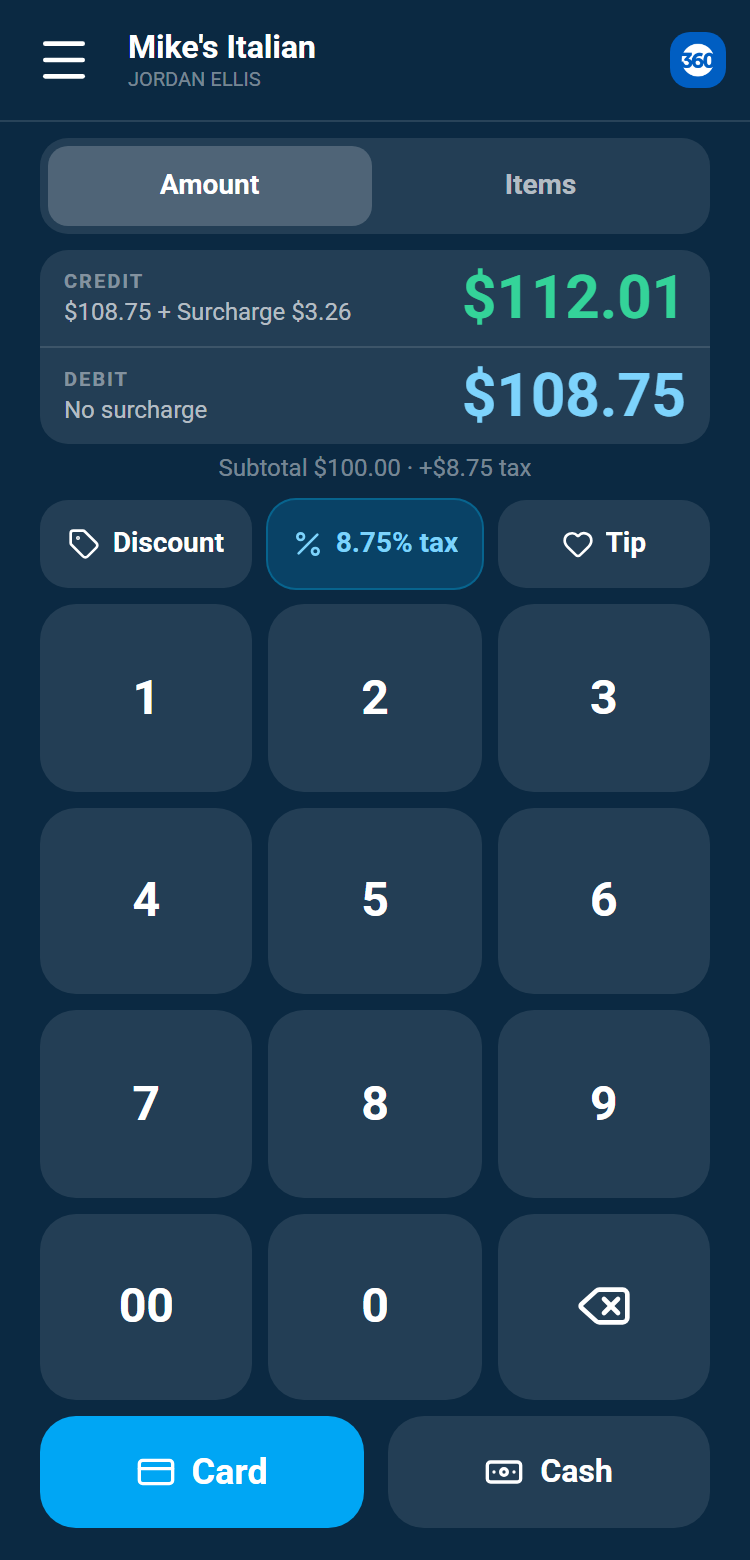
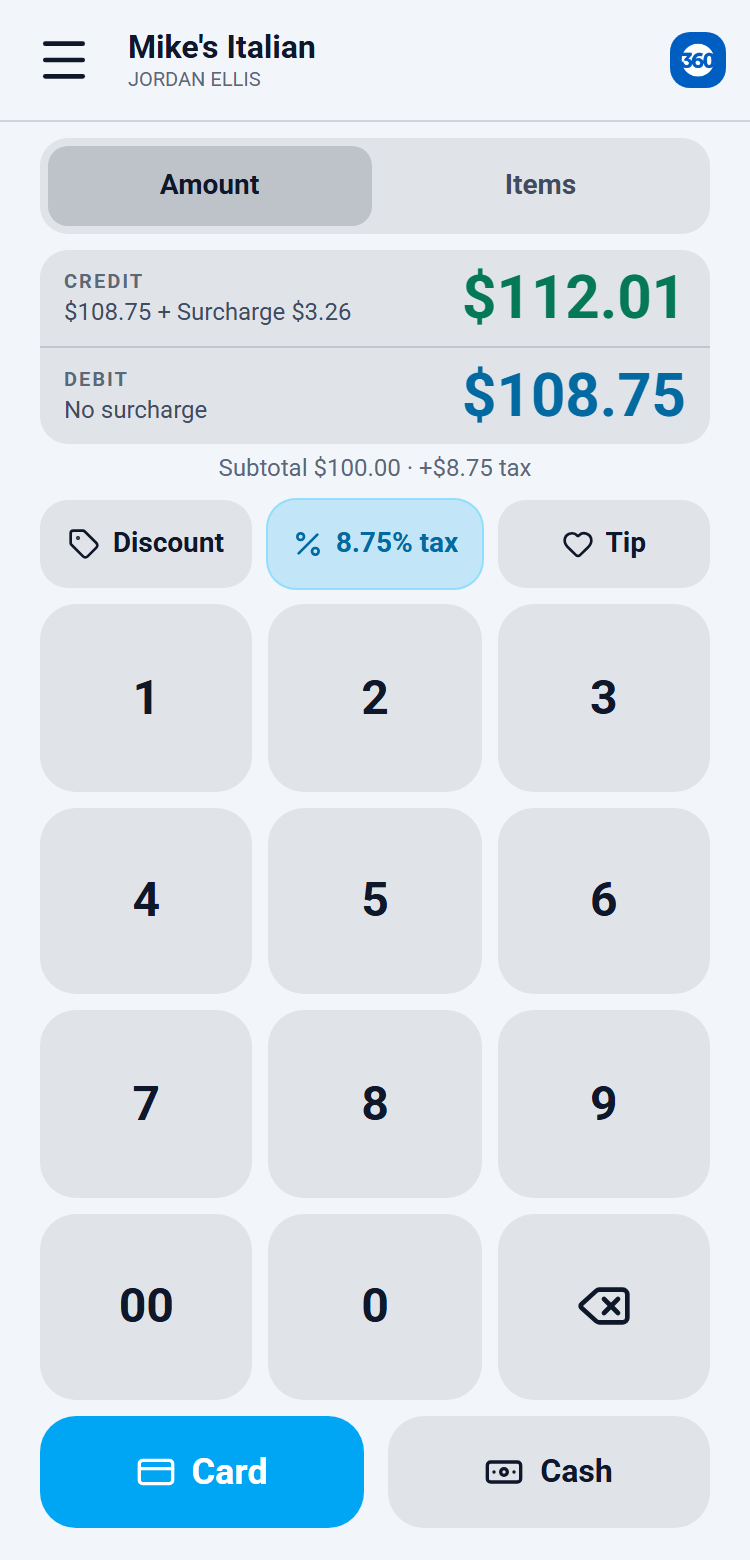
On a surcharge account the sale screen always shows the two totals, from the moment it opens at $0.00. Credit shows the amount, the Surcharge as its own figure, and the total. Debit shows the same amount with nothing added. For a $100.00 sale at 3% that reads Credit $100.00 + Surcharge $3.00 = $103.00, and Debit $100.00. Nothing else appears or moves as you type. Turn the phone to the customer so they can read it before they pay.
You never choose credit or debit, and you never ask the customer which kind of card it is. When the card is tapped, inserted, swiped or keyed, Merchant360 reads the card type from the card number and charges the credit total or the debit total. A card that cannot be confirmed as a credit card (debit, prepaid, or not recognized) is charged the debit total with no surcharge. If the card network refuses the surcharge on a particular card, the sale is sent again without it and the approved screen says it was approved without the surcharge.
The same two totals stay on screen while the customer presents the card to the card reader or to Tap to Pay. When you key the card instead, one line under the amount reads Credit and Debit until the first six digits are typed on the pad, then it settles on the one that applies: the amount plus the surcharge for a credit card, or Debit card, no surcharge.
Done looks like this: the approved screen shows the Surcharge as its own line when one applied, the texted or emailed receipt itemizes it, and Recent sales shows Surcharge with the amount under the sale. Cash sales are never surcharged. A surcharge program and dual pricing cannot run together, so you see either these two totals or the Card and Cash prices, never both.
- 1Enter the amount, or build the cart from Items.
- 2Show the customer the Credit total and the Debit total.
- 3Tap Reader, Tap to Pay or Card and take the card as usual.
- 4Read the approved screen: it shows the amount charged and, for a credit card, the Surcharge line.
- 5Send the receipt. The Surcharge is itemized on it.
| On this screen | What it does |
|---|---|
| Credit | What a credit card pays: the amount, the Surcharge, and the two added together. |
| Debit | What a debit or prepaid card pays: the amount, with no surcharge. |
| Surcharge line (approved screen, receipt, Recent sales) | The surcharge that was actually charged. It is absent when the card was debit or prepaid. |
The required signage still applies on a phone. Keep the surcharge notice at your door and at the point of sale, as the Surcharge & dual pricing chapter describes. The totals on the screen add to those signs; they do not replace them.
Capture a signature
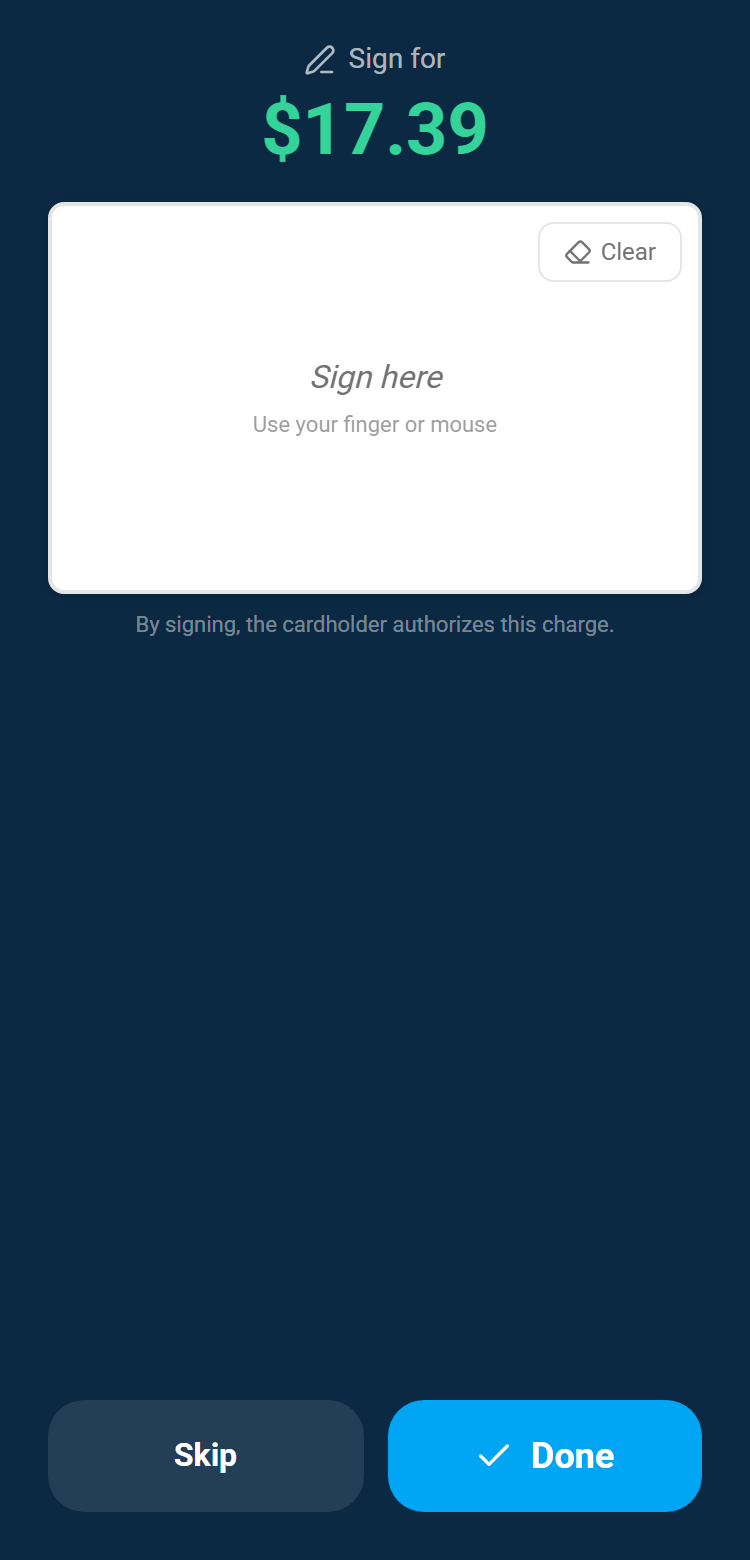
The charge is captured the moment you tap Charge. If your settings ask for a signature, a signature pad appears right after approval, before the approved-and-done screen. The customer signs with a finger. If signatures are Optional you can Skip; if Required, they must sign to finish. Cash sales never ask for a signature.
The signature is stored with the transaction for your records, and you can see it on the transaction on the web. Chip and contactless sales do not need a signature under card-brand rules, so many merchants leave this Off and turn it on only for keyed sales or large tickets.
If the pad does not appear, Signature is Off under Settings. If the customer signed and the screen did not move on, tap Done; the pad waits for Done so the customer can start over with Clear.
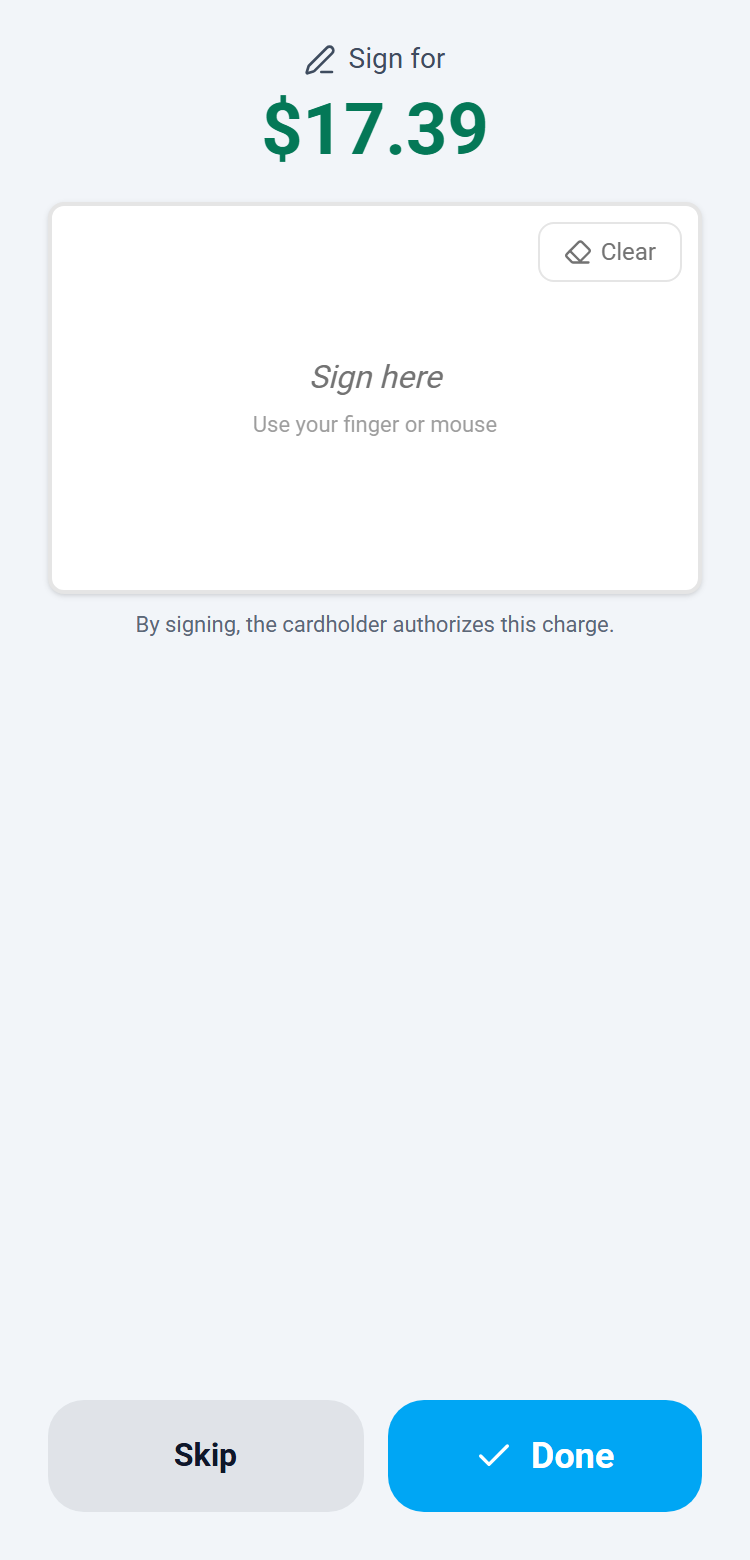
| On this screen | What it does |
|---|---|
| Signature pad | The customer signs with a finger for the amount shown. |
| Clear | Erases the signature to start again. |
| Done | Saves the signature with the transaction and opens the Approved screen. |
| Skip | Available when Settings → Signature is Optional. Finishes without a signature. |
| Signature (Settings) | Off, Optional (prompt with Skip), or Required (must sign to finish). |
Gift cards on the go
Tap Gift cards in the menu for the four everyday actions: Activate a new card, Add value, Redeem, and Refund. Check balance is one tap on any card. These are the same cards and balances as your eGift program on the web, so a card sold online can be redeemed on the phone and the other way round.
Instead of typing a code, tap Scan (in the installed app) to read the barcode on the back of a physical card or on the emailed gift PDF. Activating or adding value can be paid by cash or card; on a card load the app charges first and only loads the card after approval, refunding automatically if the load cannot complete.
Done looks like this: the card shows its new balance on screen, the load or redemption appears in Transaction history, and the customer can receive a receipt by text or email.
If Gift cards is missing from the menu, your eGift program is not set up yet; see the Gift cards chapter. If a scan does not read, type the card code instead. If a card shows as inactive, it was never activated or was deactivated on the web; activate it first.
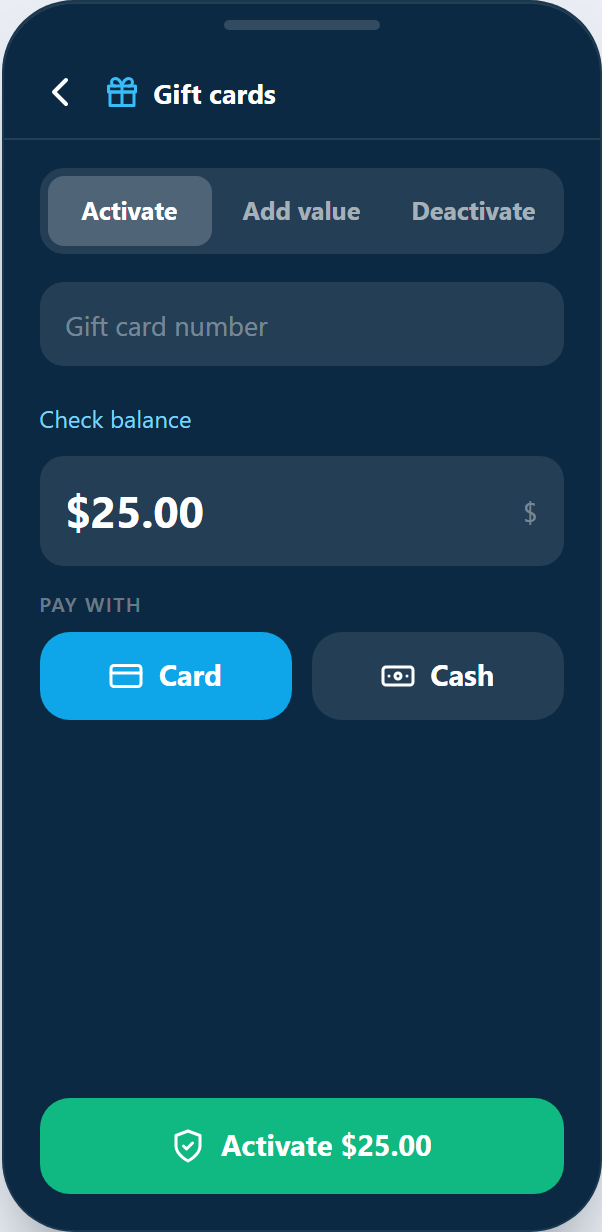
| On this screen | What it does |
|---|---|
| Activate | Turns on a new card and loads its first value, paid by cash or card. |
| Add value | Loads more onto an active card. |
| Redeem | Takes an amount off the card's balance for a purchase. |
| Refund | Returns value to a card. |
| Check balance | Shows the card's current balance. |
| Scan | Reads the card's barcode with the camera instead of typing the code. |
Void or refund a sale
Open Transaction history from the menu to see your recent sales with a running total. Each sale offers the right reversal: a card sale from today (before the batch settles) can be Voided so the customer is never charged; an older, settled sale can be Refunded back to the same card. Cash sales and already-reversed sales are not reversible from the app.
A void disappears from the customer's statement within a day or two because the charge was never captured in a batch. A refund is a new transaction that returns the money to the same card and takes a few business days to show on their statement. Both appear in Transaction history and on the web under Money → Transactions.
If Void is greyed out, the batch has already settled; use Refund. If Refund asks for a code, the amount is above your large-refund limit and a security code is texted to your phone. If a sale is missing from the list, it may have been run under another location or by another login; the web Transactions page shows everything for the account.
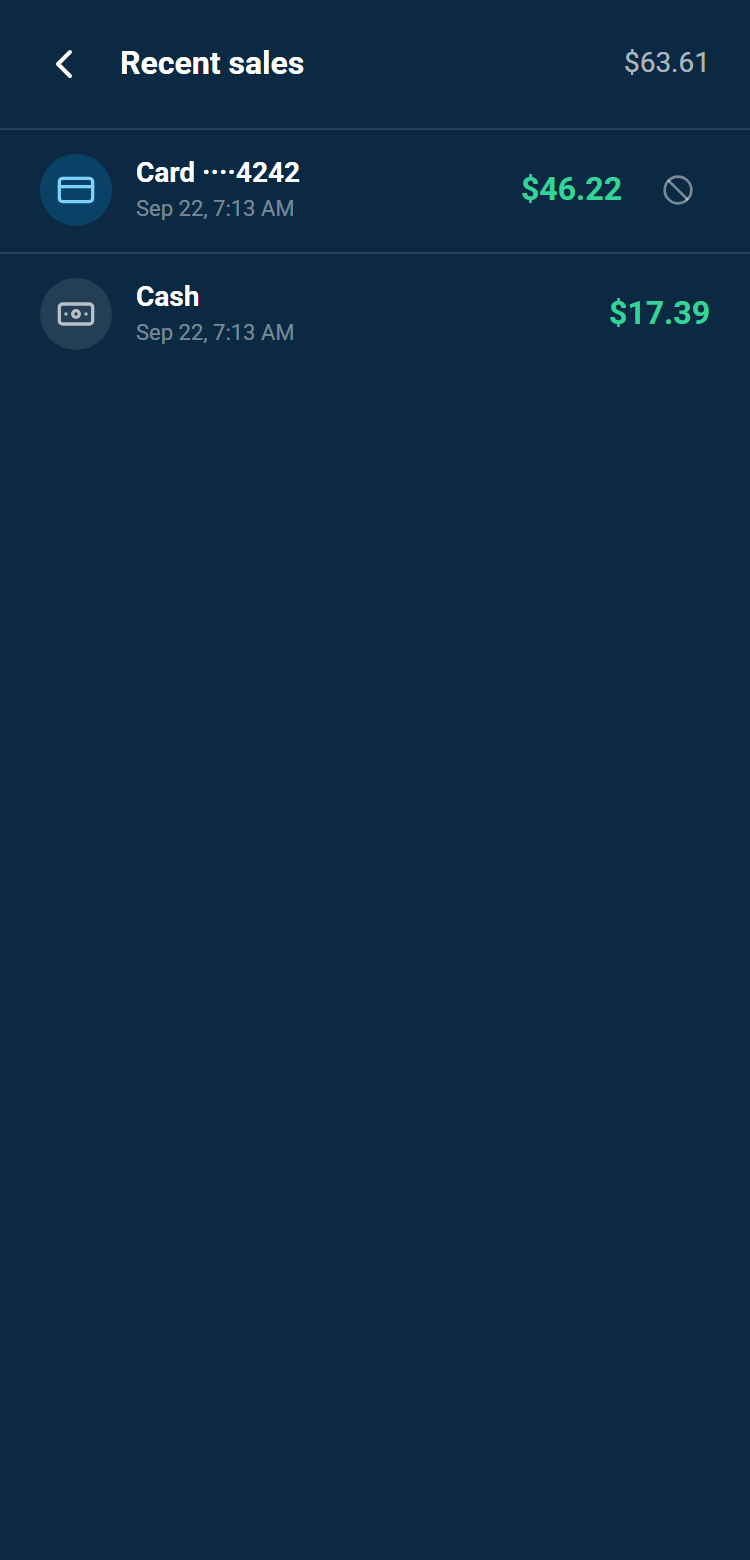
| On this screen | What it does |
|---|---|
| Transaction history | Recent sales for this account with amount, tender, card last four, tip, and status. |
| Void | On a card sale from today. Cancels it before settlement so the customer is never charged. |
| Refund | On a settled card sale. Returns the amount to the same card. |
| Receipt | Resends the receipt for that sale by text or email. |
| Security code prompt | Appears when a refund is above your large-refund limit. Enter the texted code to continue. |
Receipts
On the approved screen, send the receipt by Text or Email on the spot. The receipt is itemized, shows the card's last four, the tip, and any tax or discount, and where a surcharge applied it discloses it as card-brand rules require. Your business name, logo, and the receipt footer from Accept Payments → Settings → Receipts are on it.
Printing is not part of the app yet; text and email cover the receipt. You can resend a receipt later from Transaction history, and the web Transactions page has the same option.
If a text does not go through, the number may have opted out of texts from your business (reply START to rejoin) or is a landline; send by email instead. If the customer did not receive an email, check the address and resend from Transaction history.
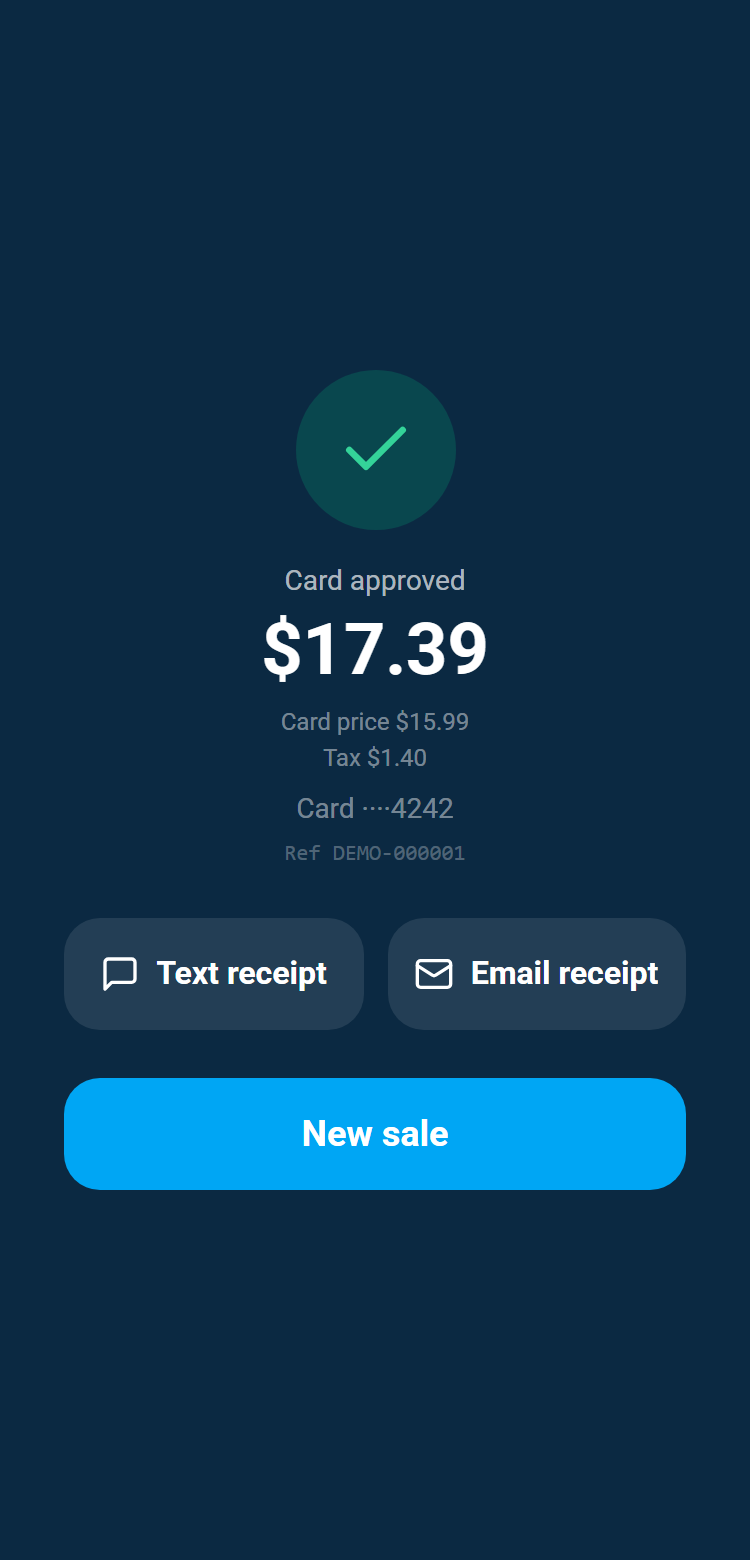
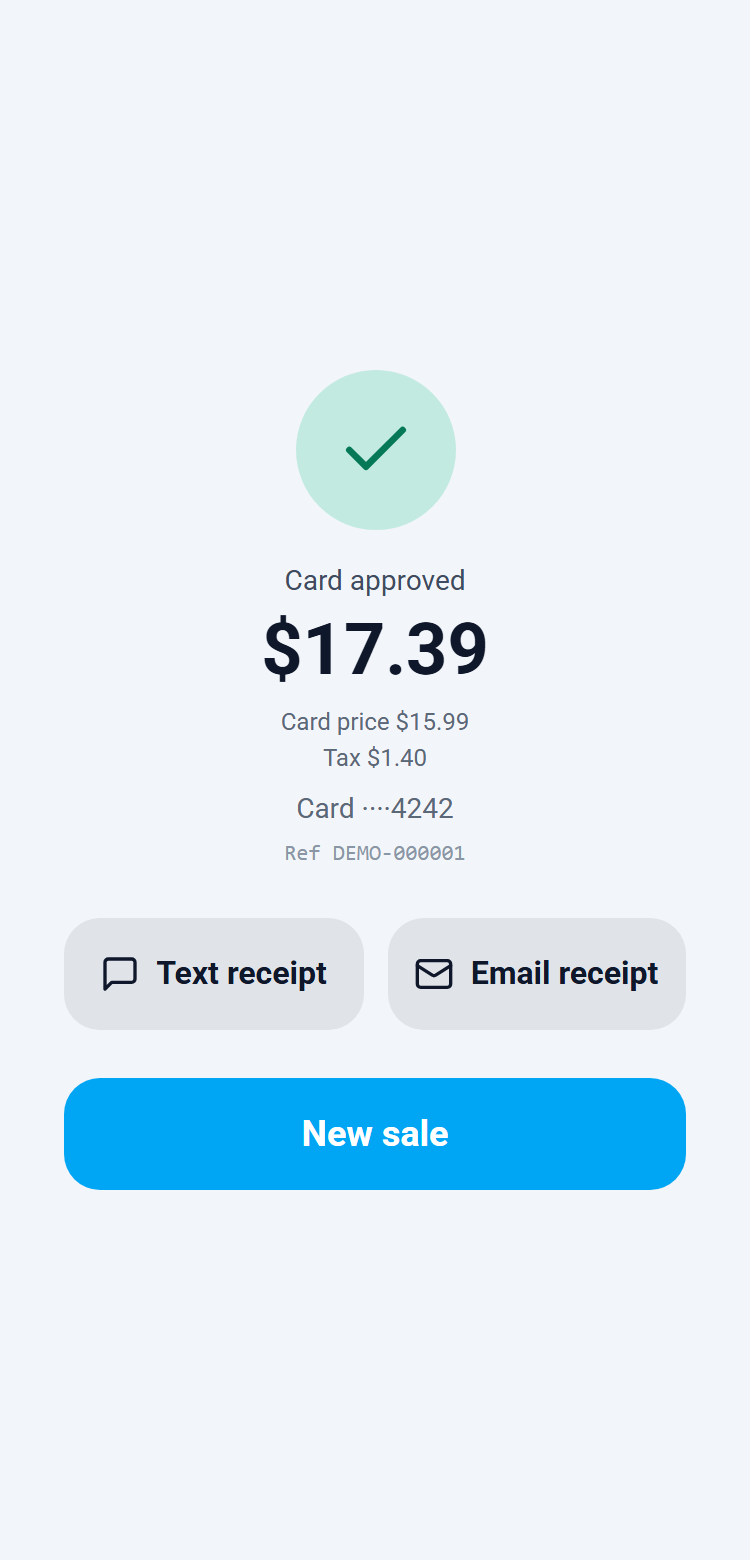
| On this screen | What it does |
|---|---|
| Text | Enter the customer's mobile number and send the receipt by SMS. |
| Enter the customer's email and send the receipt with your branding. | |
| No receipt | Finishes the sale without sending one. You can still resend it later. |
| New sale | Returns to an empty sale screen. |
Dark or light
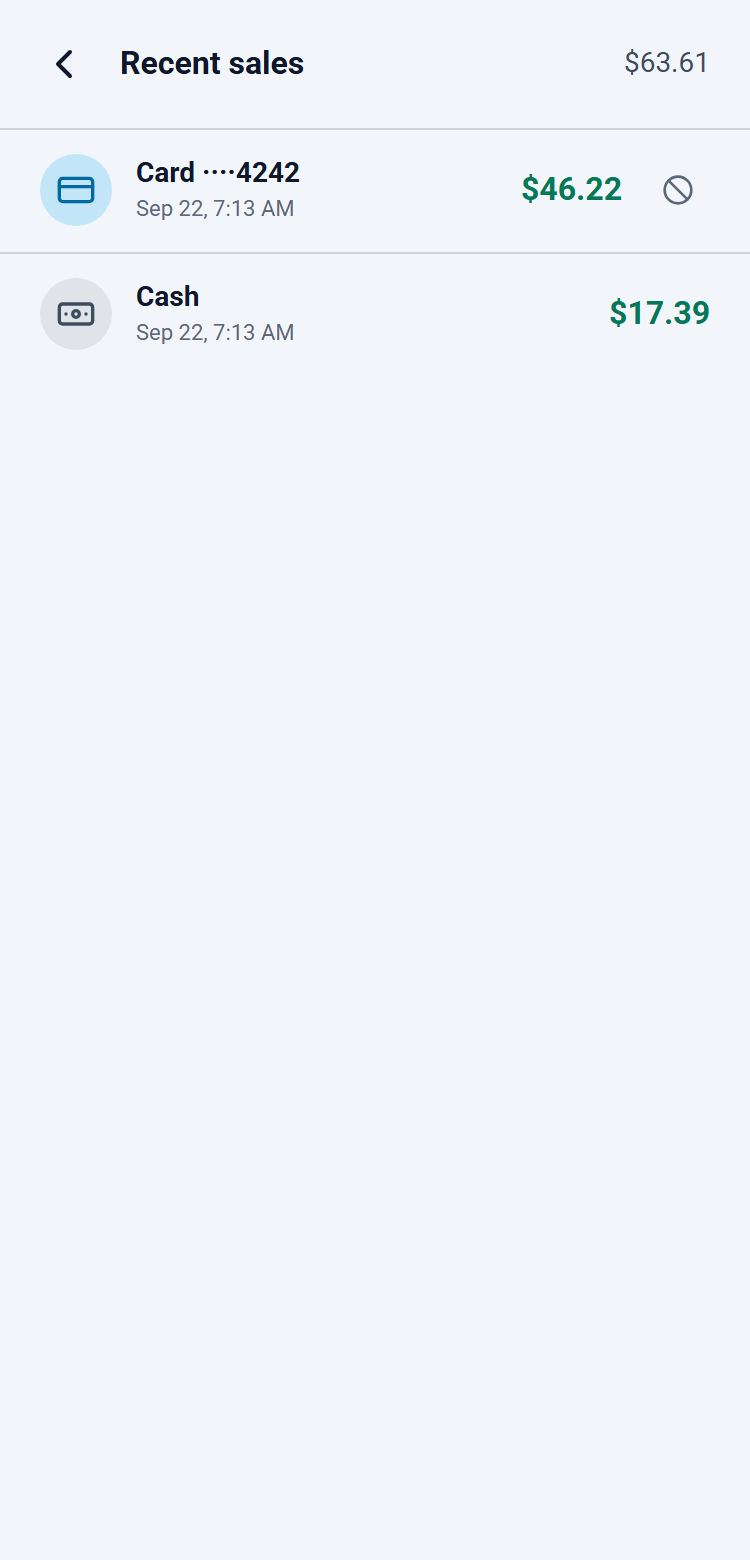
The terminal opens in dark mode. Settings → Appearance switches this phone to light mode, a high-contrast version of every screen for bright rooms, storefront windows and outdoor counters. The choice is per phone, so one register can run light and another dark. Every figure in this chapter is shown in both.
- 1Open the menu and tap Settings.
- 2Under Appearance, tap Light or Dark. The change is immediate and stays on this phone.
Settings
Settings controls how the terminal behaves on this account. Most of it is shared with your other Merchant360 tools, so a change here shows on every phone your team signs into.
Discount presets: create the quick discounts your team taps during a sale (name, then percent or dollar amount), and turn each on or off. These are managed right here in the app.
Sales tax: your Merchant360 tax rates are listed read-only (they are shared with your invoices and managed on the web under Tax rates), with a checkbox to apply your default rate automatically to every sale.
Signature: choose Off, Optional (prompt for a signature after approval with a Skip option), or Required so the cardholder must sign before the sale completes.
Tips: turn the customer tip prompt on or off for card sales, and set the percent buttons it shows.
If a setting will not save, check the connection and try again; settings are stored on your account, not on the phone, so they need a signal. If a teammate sees different presets, they are signed into another location.
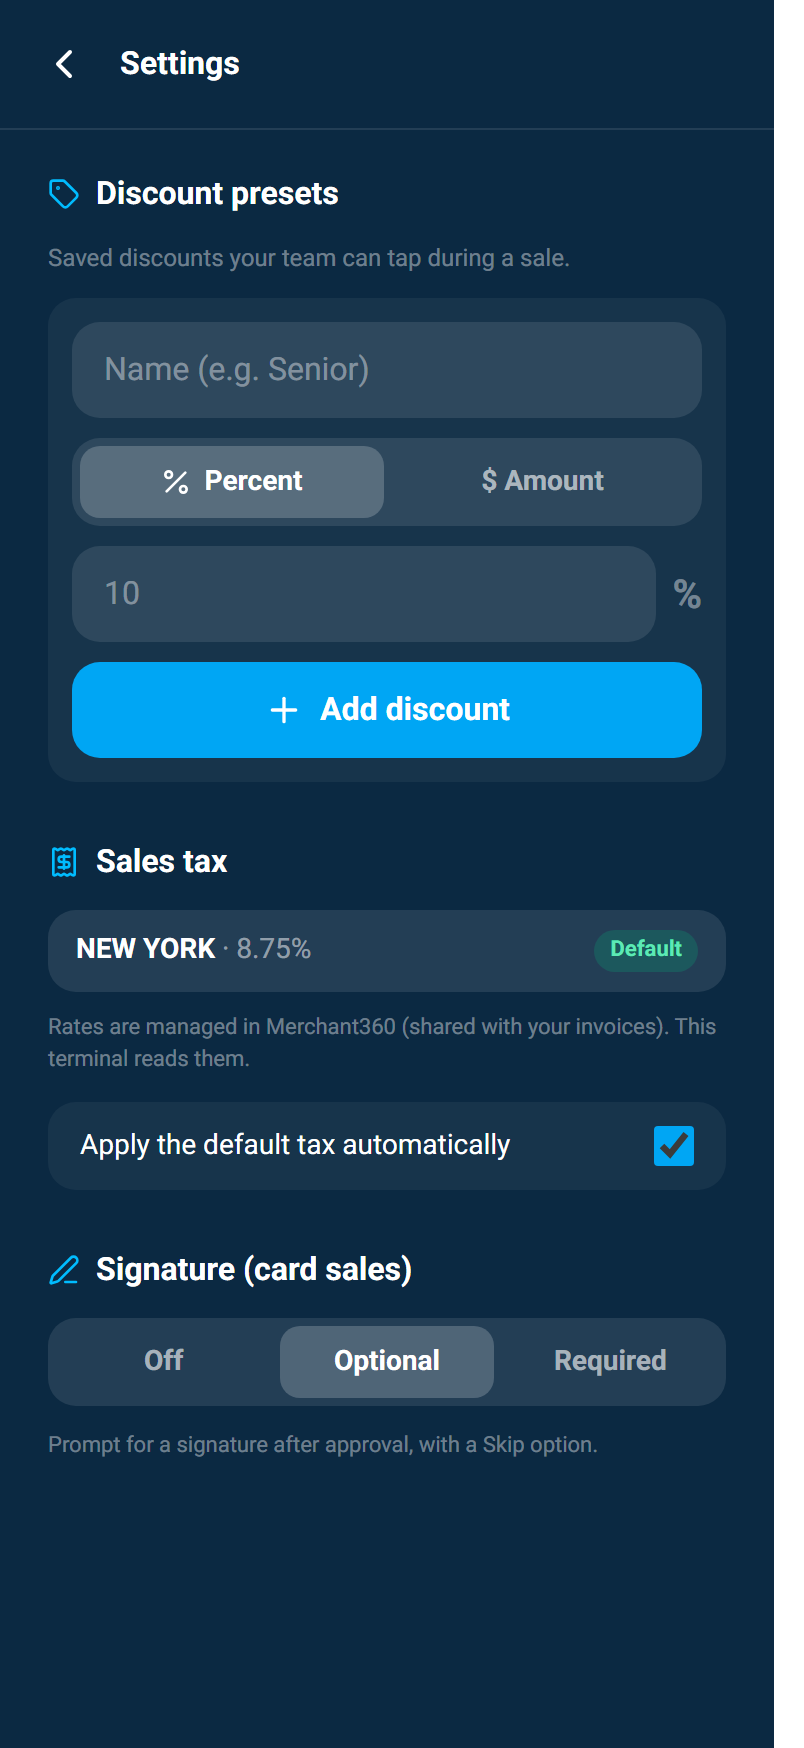
| On this screen | What it does |
|---|---|
| Discount presets | Add a preset with a name and a percent or dollar amount. Each has an on/off switch; off hides it from the Discount sheet. |
| Sales tax | Your tax rates, read-only. Apply default rate automatically puts your default rate on every sale. |
| Signature | Off, Optional, or Required for card sales. |
| Tips | Tip prompt on or off, and the preset percents (up to six). |
| Card reader | The reader paired on this account with its serial number. Manage reader opens the Card reader screen. |
| Sign-in | Biometric sign-in for this phone and the list of enrolled phones. |
Settings: card reader and sign-in
Card reader: the reader connected to this phone, or the reader last paired on your account, with its serial number, firmware, and configuration. Manage reader opens the Card reader screen where you can connect, update, disconnect, or forget it.
Sign-in: turn Face ID, Touch ID, or fingerprint sign-in on or off for this phone, and see every phone enrolled for it. Tap the X to remove a phone; it will need a code or password to sign in next time.
If a phone you no longer own is listed, remove it here and revoke it under Trusted Devices on the web Security page so it cannot skip a code either. If the reader shown is not the one in your hand, tap Manage reader and Find readers to pair the right one.
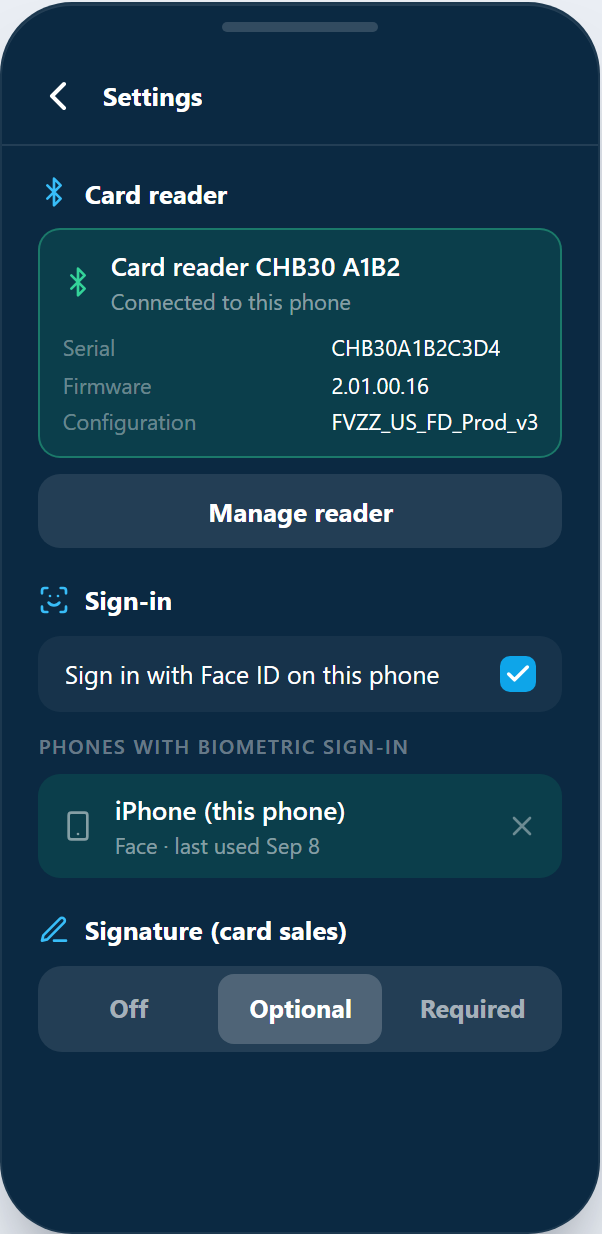
| On this screen | What it does |
|---|---|
| Card reader | Serial number, firmware, and configuration of the paired reader. |
| Manage reader | Opens the Card reader screen (Find readers, Connect, Update reader, Disconnect, Forget). |
| Biometric sign-in switch | Turns Face ID, Touch ID, or fingerprint sign-in on or off for this phone. |
| Enrolled phones | Every phone with biometric sign-in on. The X removes one. |