
Vendor & contractor payments
Pay the people you owe, keep their W-9s, and roll up 1099-NECs.
What are vendor payments?
Vendor payments is the money-out side of Merchant360: a place to track the vendors and contractors you pay, keep each one's W-9 on file, and have the year's totals roll straight into a 1099-NEC at tax time. It is the mirror image of invoicing, where you get paid.
Find it at Accept Payments → Vendor Payments. The top of the page shows three numbers at a glance: how many payees you have, how much you have paid them this year, and how many are at or over the $600 IRS threshold that triggers a 1099-NEC.
Use it for anyone you pay who is not an employee: freelancers, contractors, landlords, service vendors. There is nothing to set up first. Add a payee, record what you pay them, and the totals, the W-9, and the 1099-NEC take care of themselves.
Done looks like this: every contractor you pay is a row in the payee list with a TIN and a W-9, Paid in this year matches your checkbook, and in January the 1099-NEC forms panel lists exactly who needs a form.
If a payee shows unverified, no TIN, or needs W-9 on their row, that is the to-do list for a clean tax season. If the 1099-NEC due count looks wrong, check that each payment was recorded with Counts toward 1099 set correctly and that corporations you do not file for have the 1099 vendor flag off.
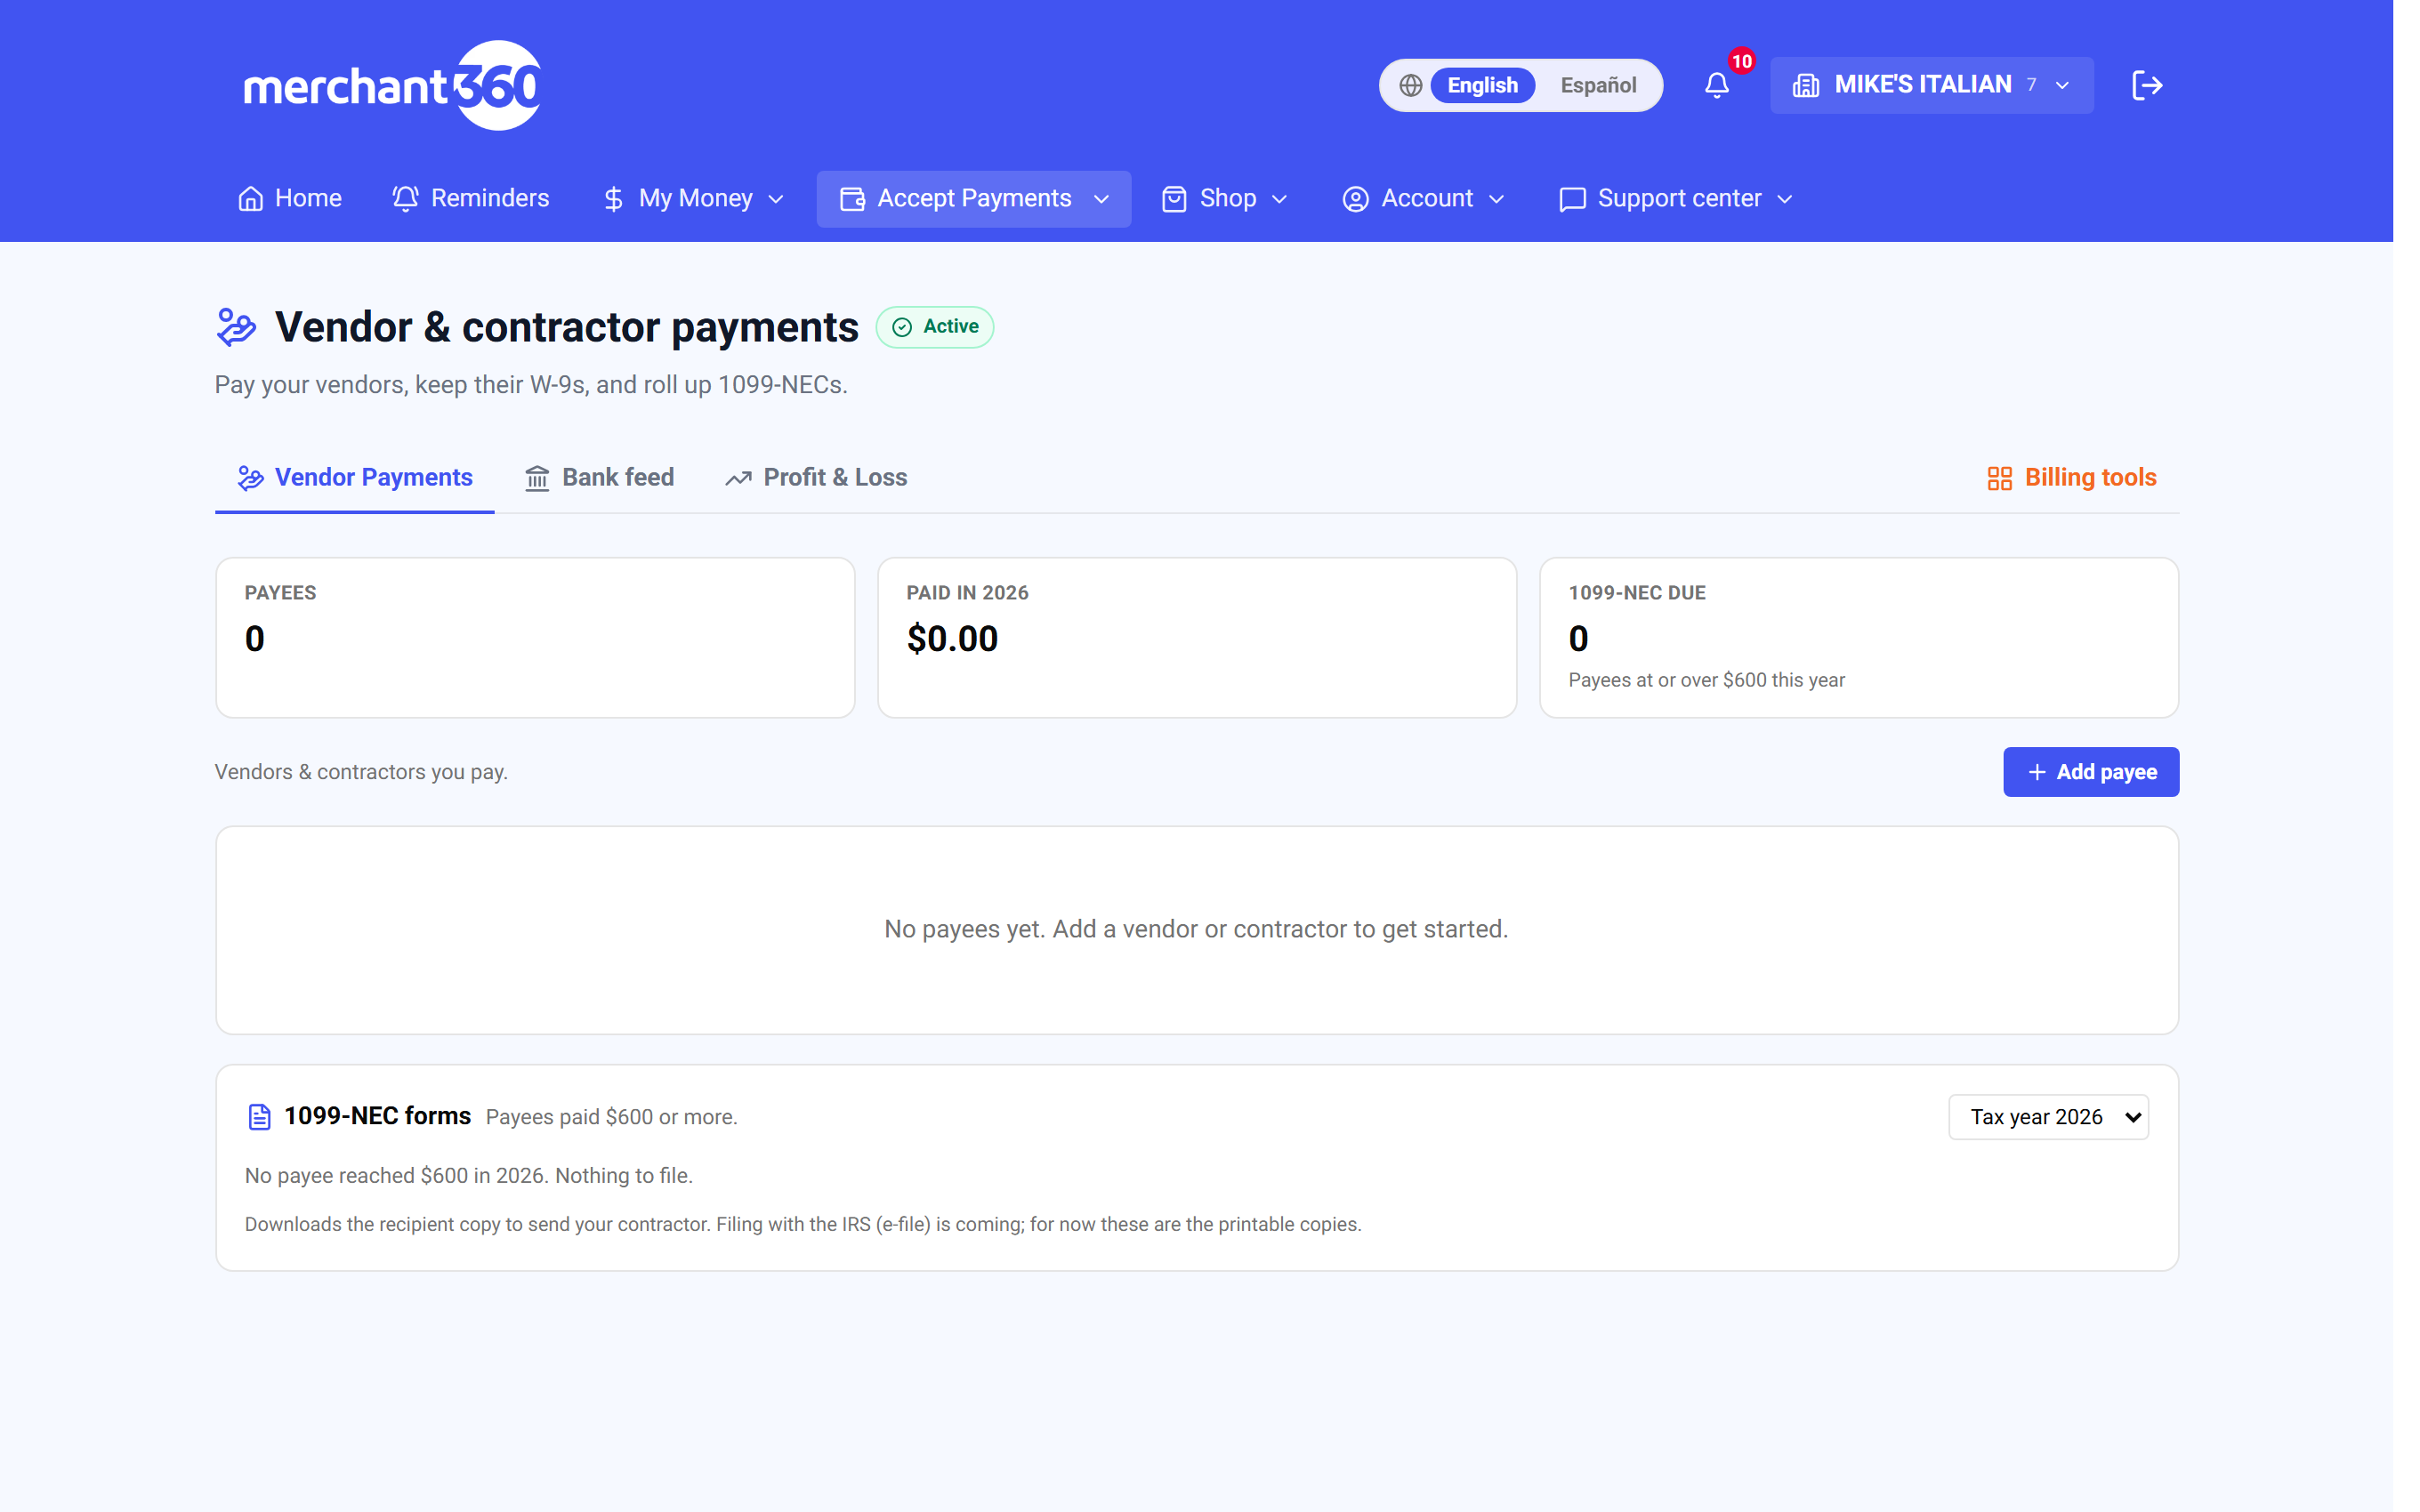
| On this screen | What it does |
|---|---|
| Payees / Paid in (year) / 1099-NEC due | The three tiles. 1099-NEC due counts payees at or over $600 this year. |
| Add payee | Opens the New payee form. |
| Payee / TIN / Paid in (year) / 1099 columns | Each payee with their tax ID status, this year's total, and whether a 1099 is due. |
| Row badges: unverified / no TIN / under $600 / needs W-9 | What is still missing for that payee before a 1099 can be filed. |
| Record | Records a payment you already made to that payee. |
| Pay by bank | Sends an ACH payout to the payee's bank, when enabled on your account. |
| W-9 / W-9 on file – download | Collects or downloads the payee's W-9. |
| Verify | Runs the IRS TIN Match on the payee's name and TIN. |
| Archive | Hides a payee you no longer use. Their payment history is kept. |
| 1099-NEC forms | The panel at the bottom with a tax year picker and a download per payee paid $600 or more. |
This is bookkeeping and tax hygiene, not a card feature. Recording a payment here does not move money on its own (see Pay a vendor by bank below for the ACH option); it keeps an honest record and gets your 1099s right.
Add a payee
A payee is anyone you pay who might need a 1099-NEC: a freelancer, a contractor, a landlord, a service vendor. Add them once and every payment you record rolls up under them.
Have their W-9 handy if you already collected one, because the legal name and TIN come straight from it. If you plan to pay them by bank, you also need their routing and account numbers.
Done looks like this: the payee is a row in the list with their type, a masked TIN, and a Paid in figure of zero until you record the first payment.
If the save fails, the name is missing or the TIN is not nine digits. If you do not have the TIN yet, save without it, click W-9 to send them a prefilled form, and add the TIN when it comes back. If a payee was added twice, archive the duplicate; its history is kept.
- 1Click Add payee. Choose Business or Individual; this decides how their name is treated on the W-9 and the 1099.
- 2Enter their name and, when you have it, their address, email, and phone. The address is what prints on their 1099-NEC, so it is worth getting right.
- 3Enter their TIN / EIN from their W-9. It is encrypted the moment you save it; only the last four digits are ever shown back to you.
- 4Leave 1099 vendor on for anyone reportable. Turn it off for a payee who never needs one, for example a corporation you are not required to file for.
- 5Optionally add their bank for ACH payout: routing, account, and Checking or Savings. Click Save payee.
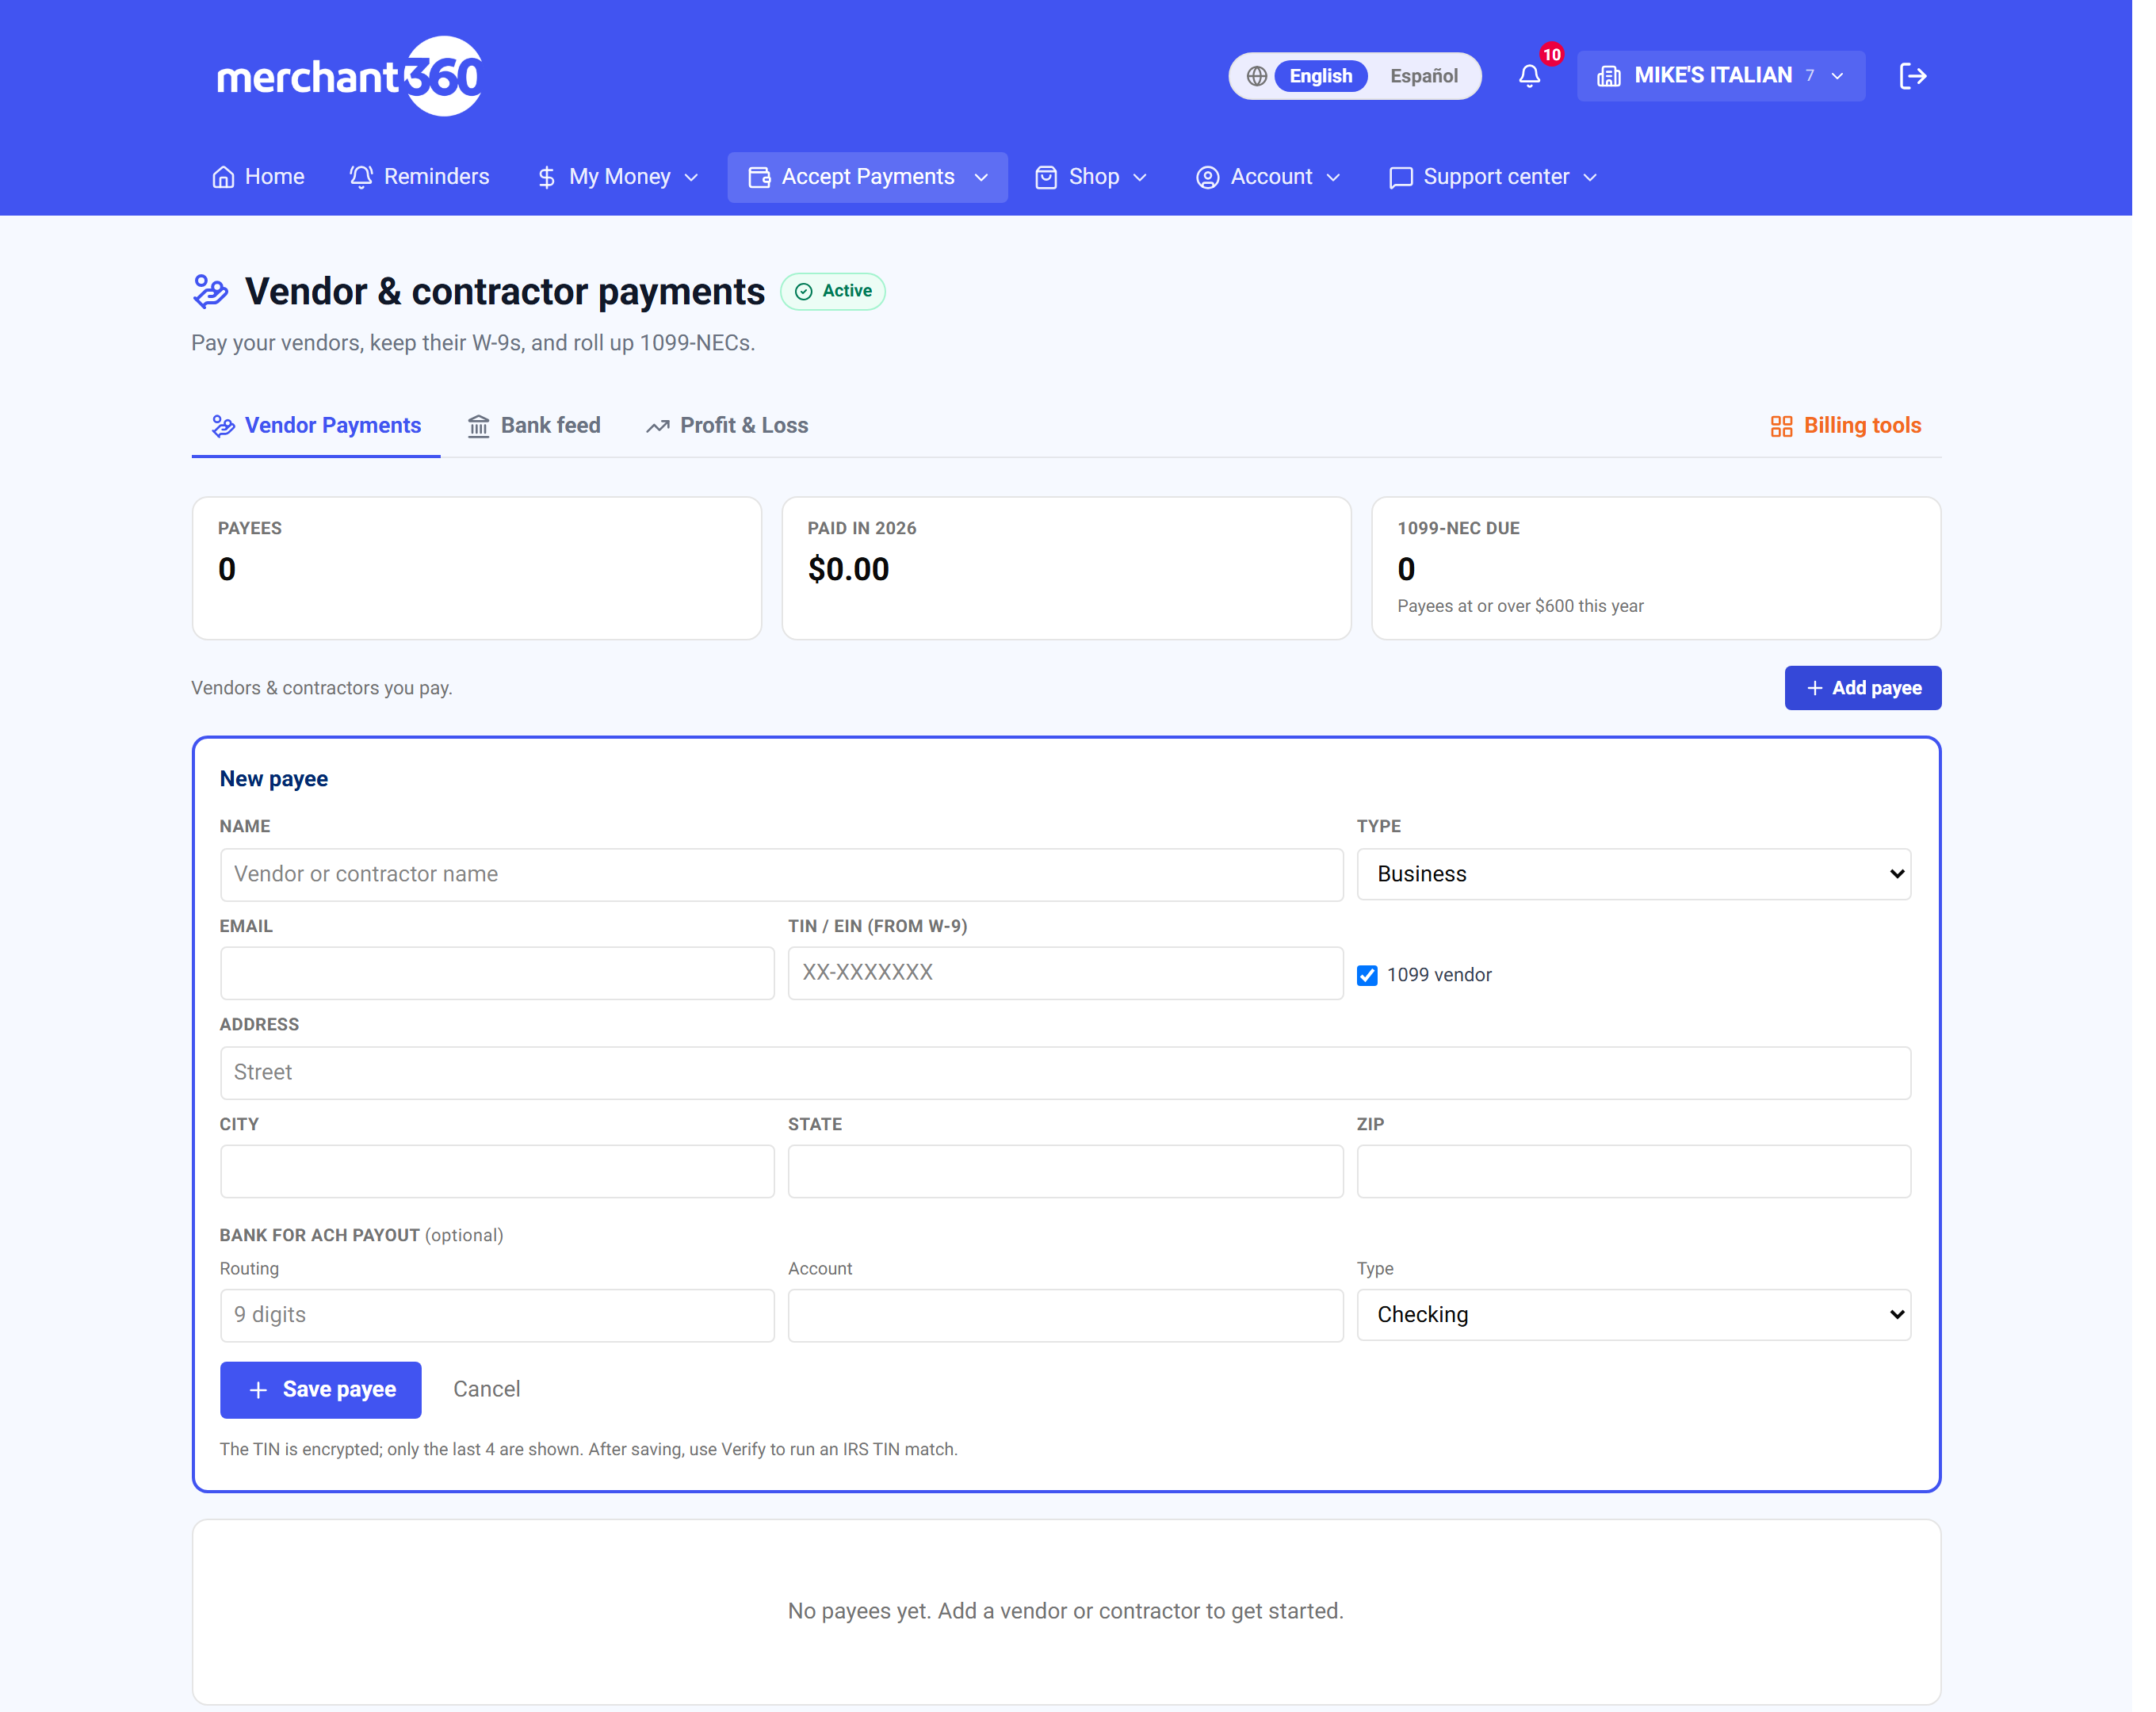
| On this screen | What it does |
|---|---|
| Name | The vendor or contractor name as it should appear on the 1099. |
| Type: Individual / Business | Decides how the name is treated on the W-9 and the 1099. |
| Where the prefilled W-9 and the 1099 recipient copy can be sent. | |
| TIN / EIN (from W-9) | Nine digits. Encrypted on save; only the last four are shown. The TIN type is EIN for a business or SSN for an individual. |
| 1099 vendor | On for anyone reportable. Off excludes them from the 1099-NEC rollup. |
| Bank for ACH payout (optional): Routing, Account, Checking / Savings | Needed only for Pay by bank. Stored encrypted. |
| Save payee / Cancel | Adds the payee or discards the form. |
Do not have their tax ID yet? Add the payee anyway and collect a W-9 next; you can fill in the TIN when it comes back.
Record a payment
Recording a payment tells Merchant360 you paid a vendor, whether you sent it by check, cash, bill-pay, or a transfer from your bank. It does two things: it books the amount as a Contractor expense so your Profit & Loss stays honest, and it adds to that payee's reportable total for the year.
Record every payment as you make it. Recorded payments flow into your P&L under Bookkeeping, so your expense picture and your 1099 totals always agree.
Done looks like this: the payee's Paid in figure goes up by the amount, and the same amount appears as a Contractor expense on your Profit & Loss for that date.
If the amount was reimbursed goods rather than services, untick Counts toward 1099 so it is booked as an expense but not reported. If you recorded the wrong amount, record a second entry for the difference with a memo explaining it. If the P&L does not show it, check the date on the payment falls inside the P&L range.
- 1On a payee's row, click Record. Enter the amount, the date, and an optional memo (what it was for).
- 2Leave Counts toward 1099 ticked if it counts toward their 1099-NEC. Save it.
- 3The amount immediately books as a Contractor expense in your bookkeeping and updates the Paid in figure on the payee's row.
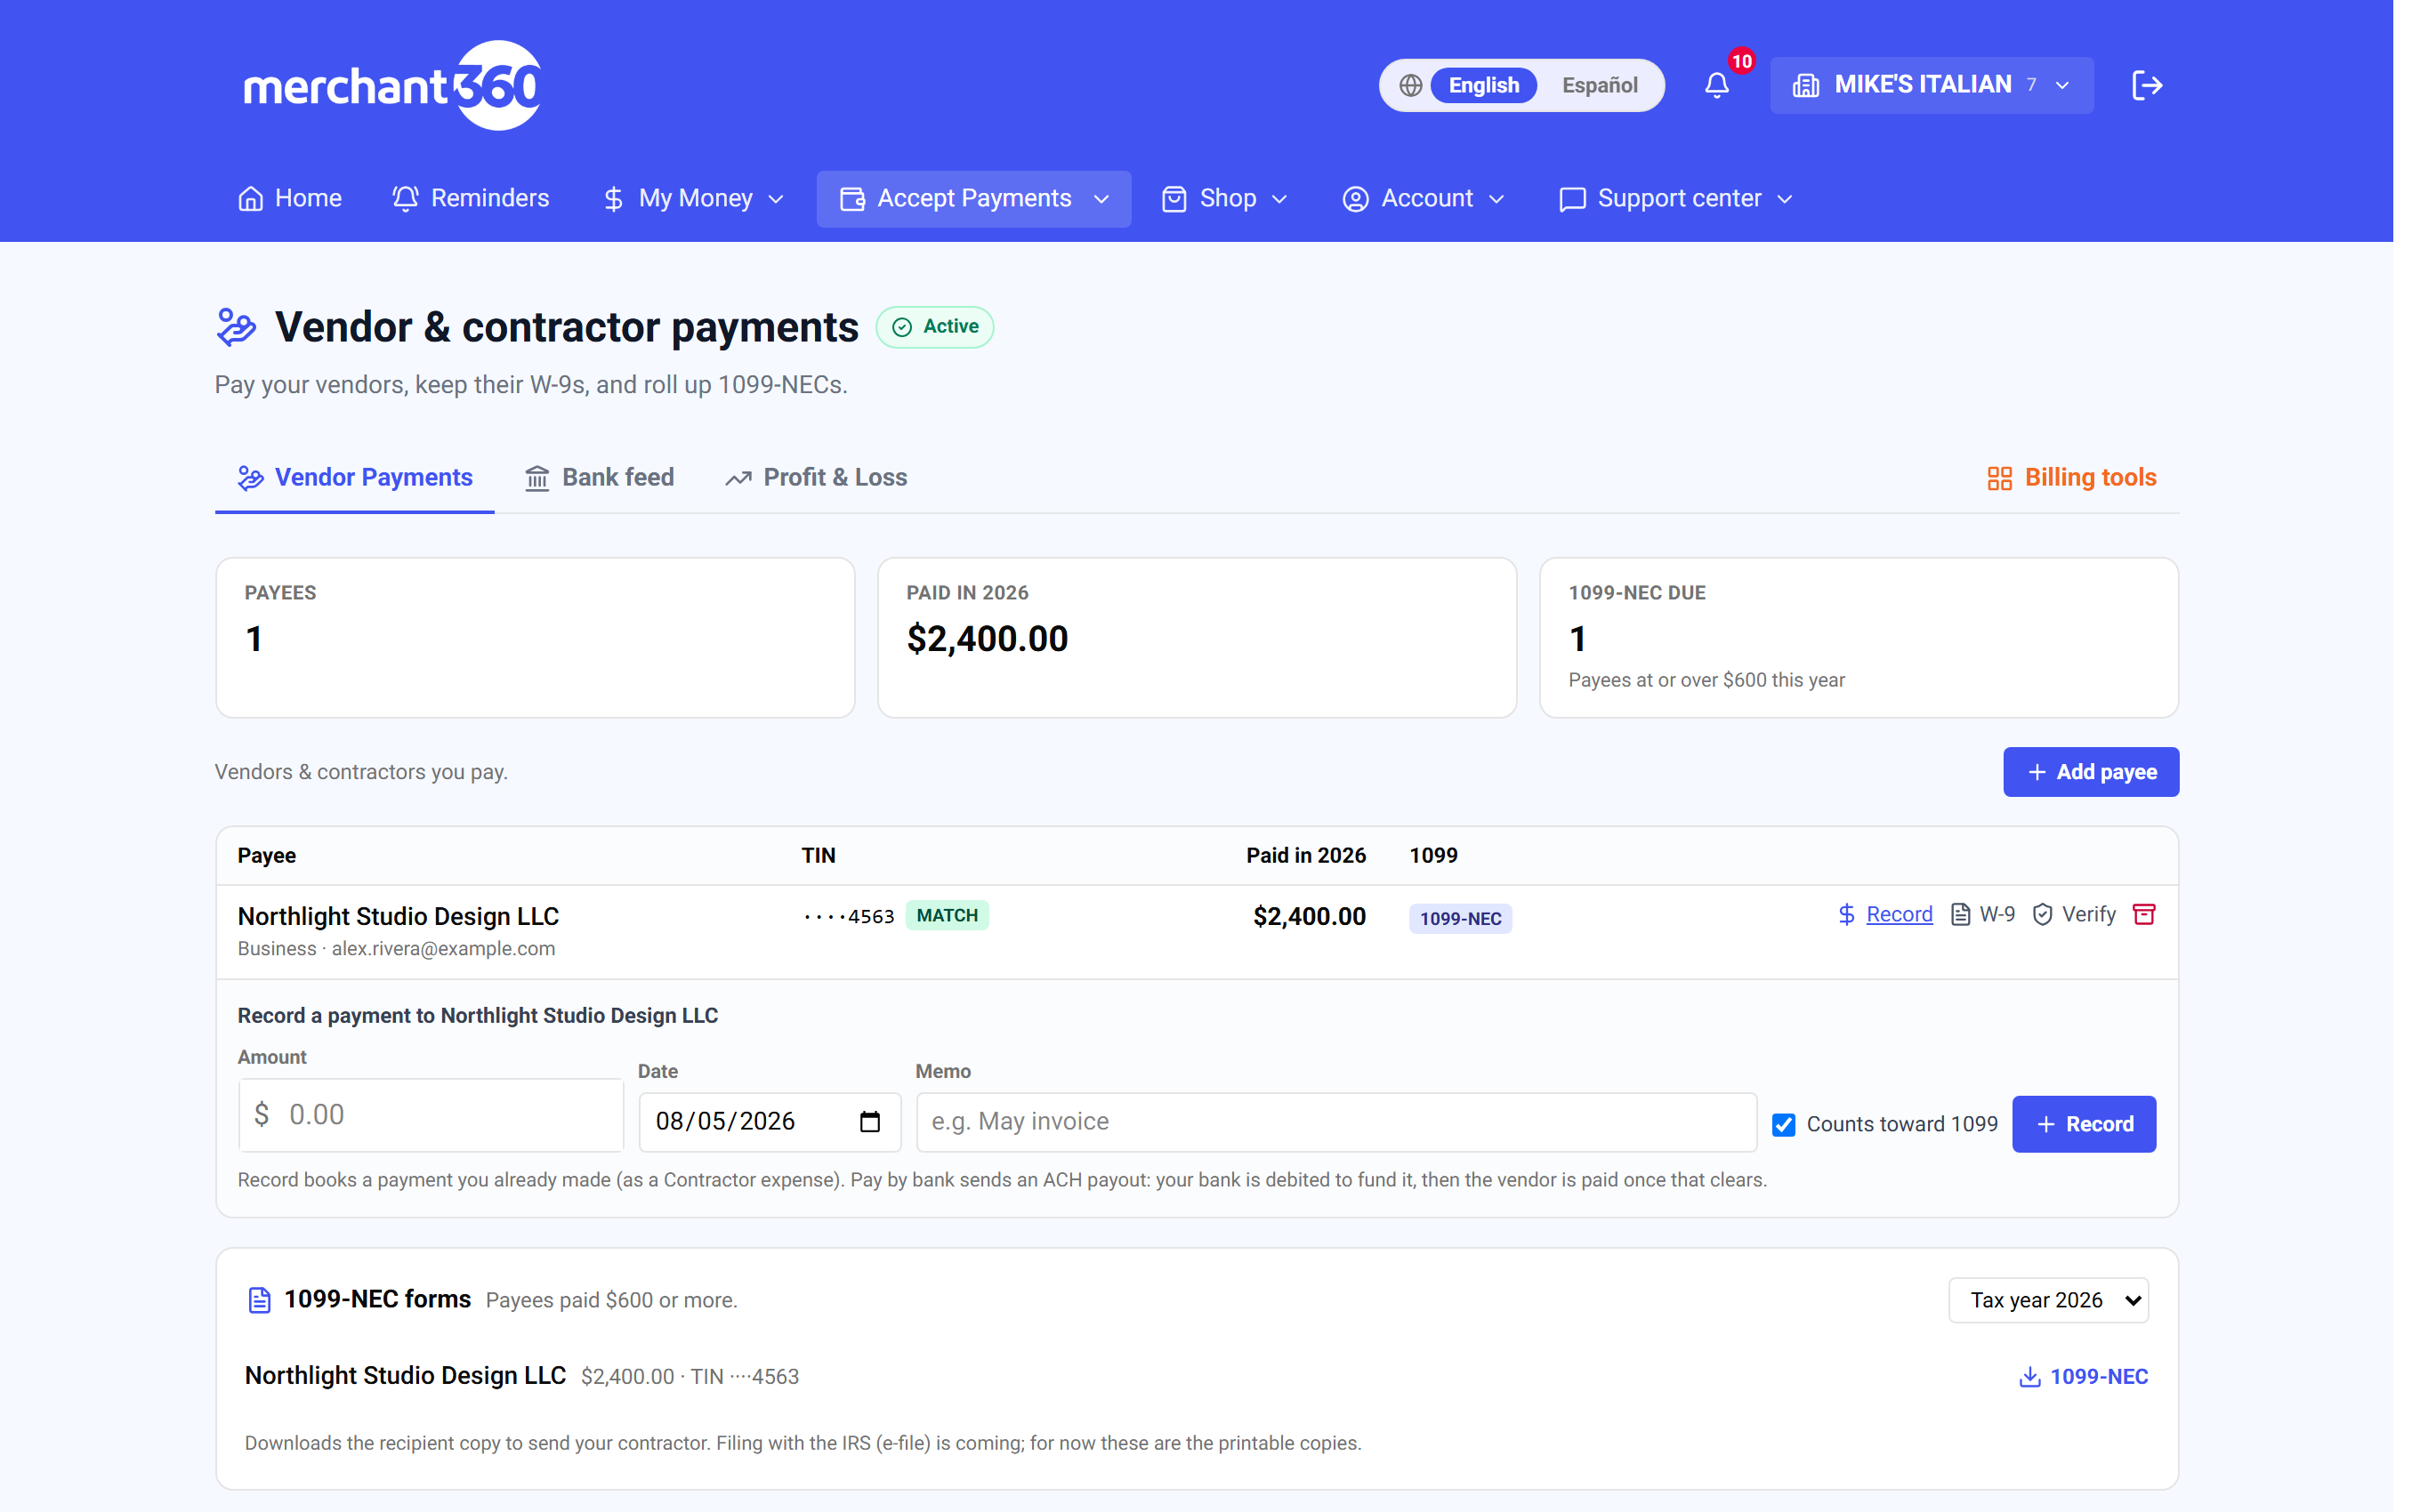
| On this screen | What it does |
|---|---|
| Record | Opens Record a payment to that payee. |
| Amount | What you paid. Required. |
| Date | When you paid it. Sets which P&L period and which tax year it counts in. |
| Memo | What it was for, such as May invoice. |
| Counts toward 1099 | Ticked adds the amount to the payee's reportable total. Untick for non-reportable amounts. |
| Record vs Pay by bank | Record books a payment you already made. Pay by bank sends an ACH payout instead. |
Recorded payments flow into your P&L under My Money → Bookkeeping, so your expense picture and your 1099 totals always agree.
Collect and store a W-9
You need a W-9 on file for anyone you will send a 1099-NEC. Merchant360 both generates one to send and stores the signed copy, encrypted, so you are not chasing paper in January.
Collect it before the first payment when you can. Done looks like this: the payee's row shows W-9 on file with a download link, and the TIN on the row came from the signed form.
If Record W-9 will not save, the TIN is not nine digits, the signer's name is missing, or the address is incomplete. If the vendor returns a form under a different legal name, enter the name exactly as signed, because that is what the IRS matches against. If you need the stored copy later, click W-9 on file to download it.
- 1On a payee's row, click W-9. Use Prefilled W-9 to send to download a form with their name and address already filled in, so they just confirm, sign, and return it.
- 2When the signed form comes back, use Record W-9 to file it: enter the legal name, business name, tax classification, TIN type and TIN, address, and the name it was signed under. Merchant360 generates the executed PDF and stores it encrypted against that payee.
- 3Once a W-9 is on file, the row shows W-9 on file – download, which you can click any time to get the stored copy.
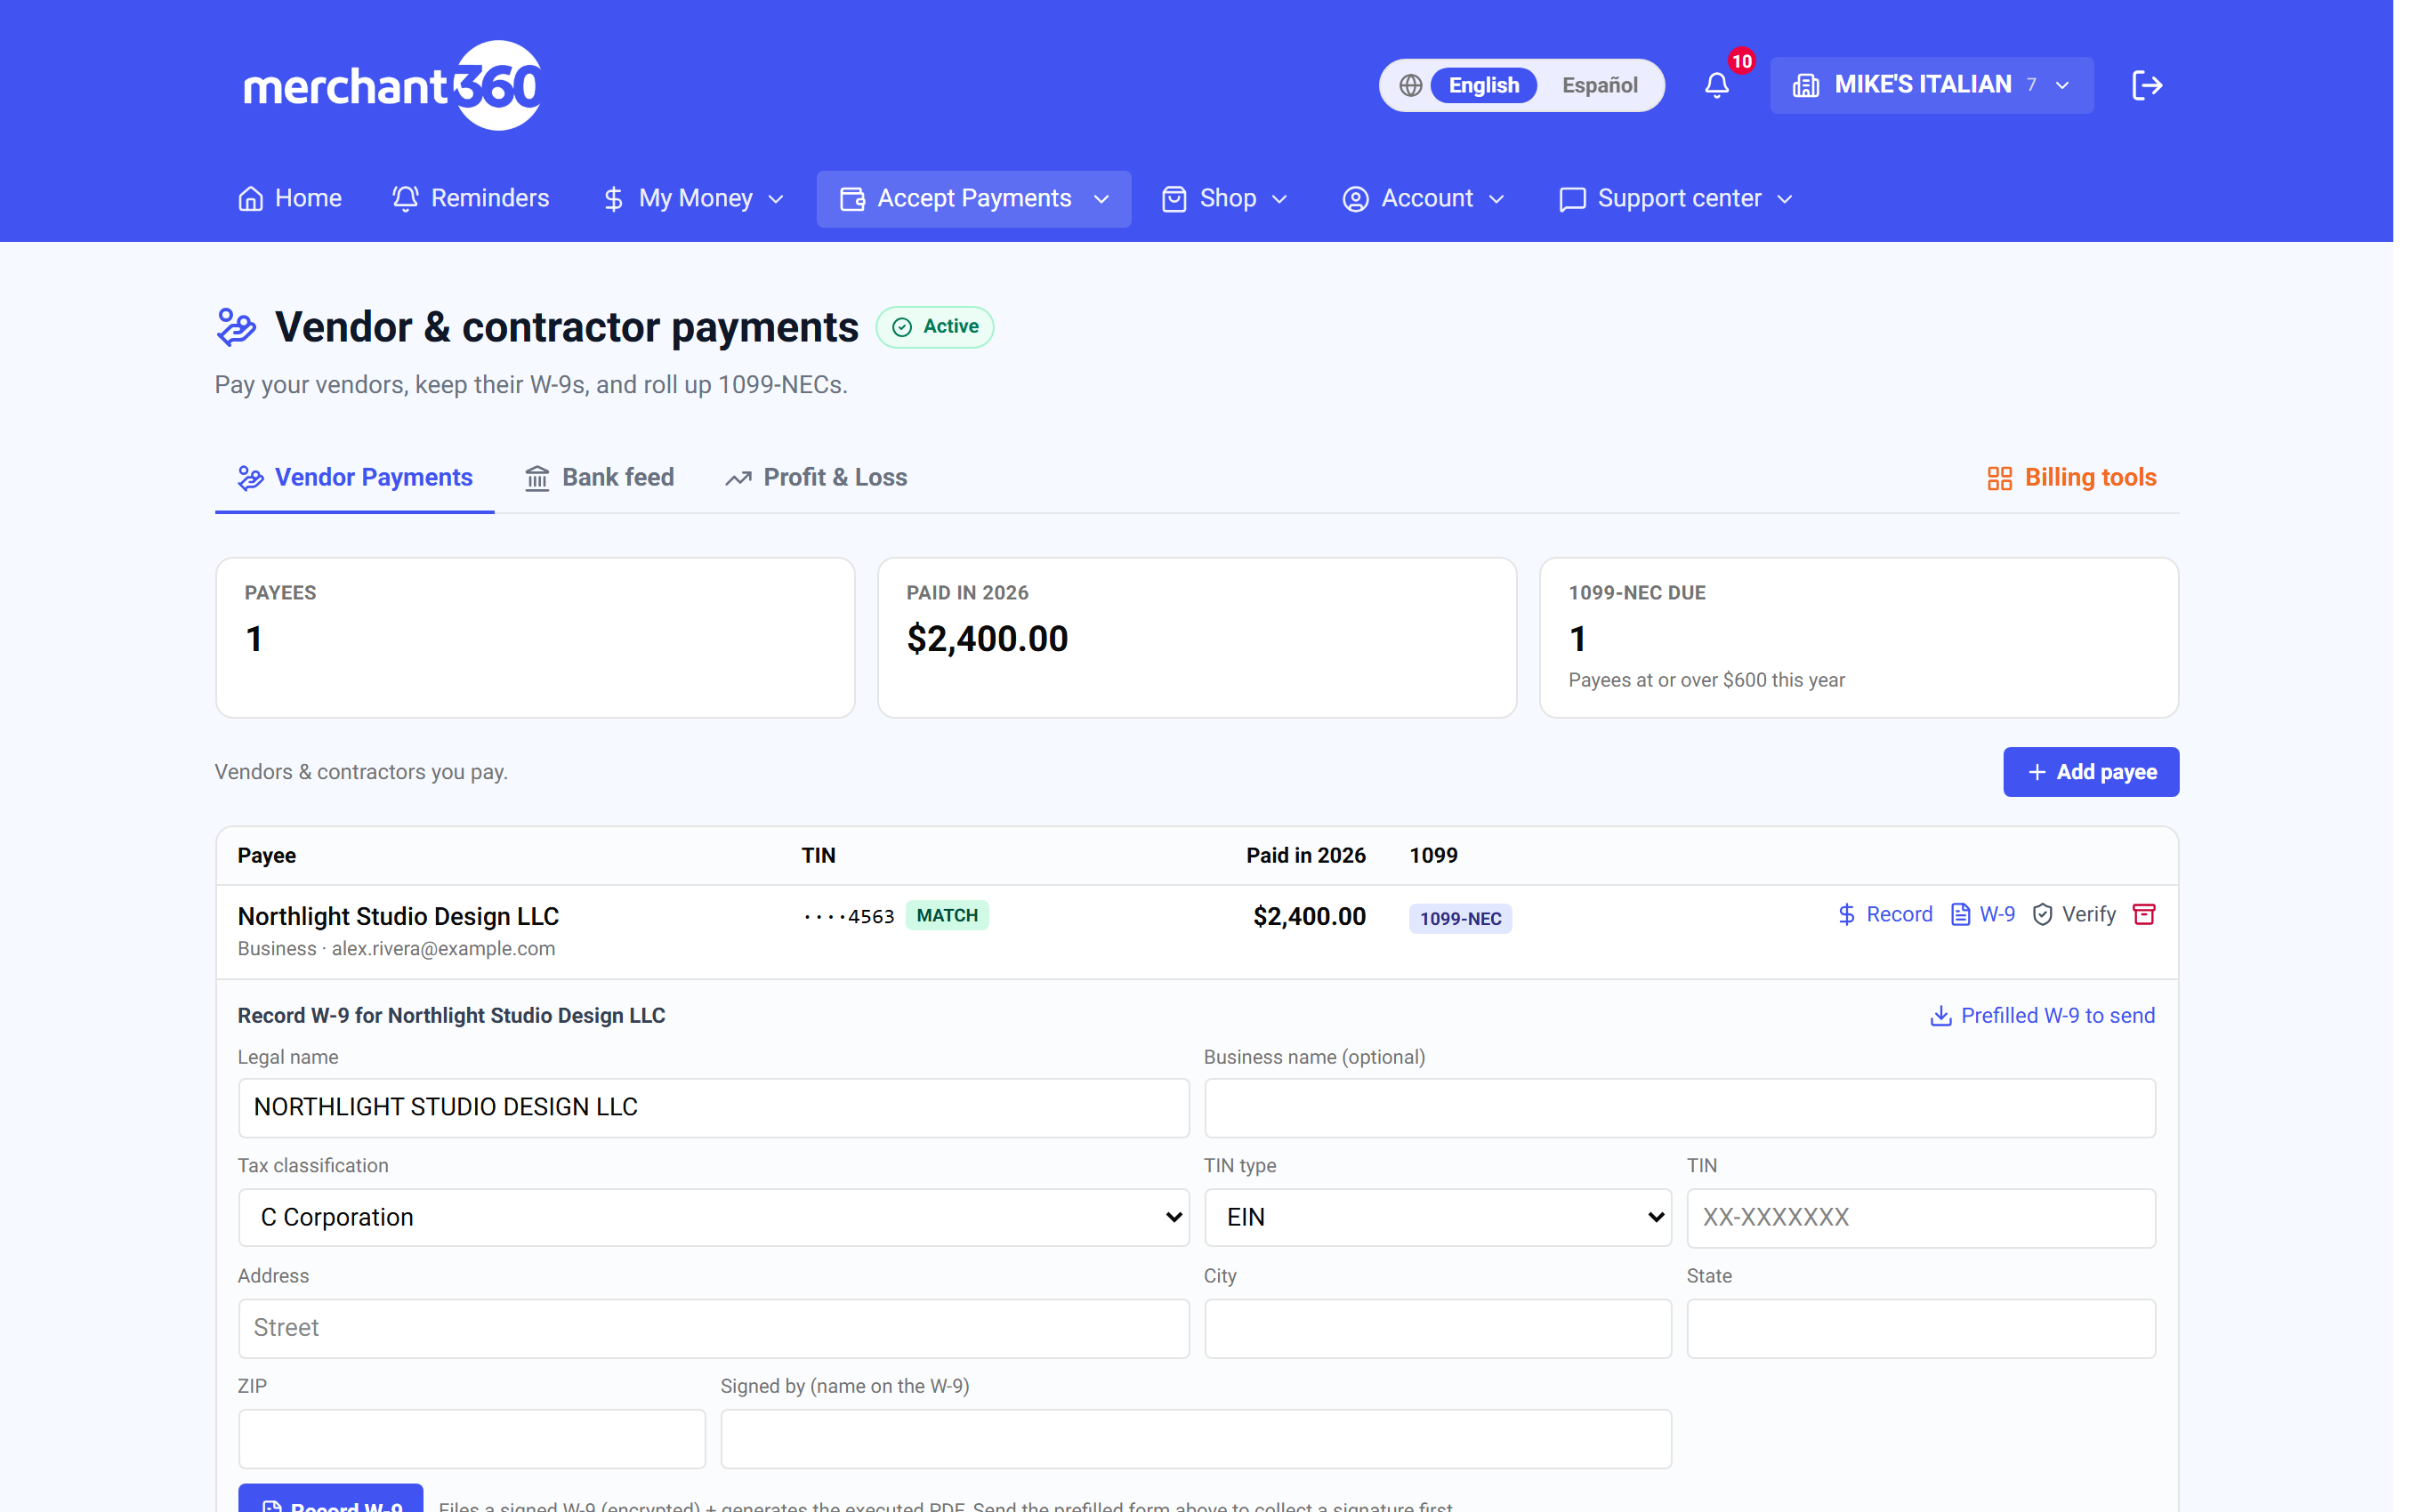
| On this screen | What it does |
|---|---|
| W-9 | Opens the W-9 panel for that payee. |
| Prefilled W-9 to send | Downloads a W-9 with the payee's name and address filled in, for them to sign. |
| Legal name / Business name (optional) | The name on the signed form. The legal name is what the IRS matches. |
| Tax classification | Individual / Sole proprietor, C Corporation, S Corporation, Partnership, LLC (C corp, S corp, or Partnership), or Other. |
| TIN type / TIN | EIN or SSN and the nine digits. Encrypted on save. |
| Address: Street, City, State, ZIP | Prints on the 1099-NEC. |
| Signed by (name on the W-9) | The signer's name as written on the form. |
| Record W-9 | Files the signed W-9 encrypted and generates the executed PDF. Confirms with W-9 recorded. |
| W-9 on file – download | Downloads the stored copy at any time. |
Collecting the W-9 up front, before you pay someone the first time, is the easiest way to guarantee a clean 1099 season.
Verify a payee's TIN (IRS TIN Match)
Before you file a 1099, it is worth confirming the payee's legal name and tax ID actually match IRS records. A wrong name-and-number pairing is the most common reason a 1099 bounces and triggers an IRS B-notice. TIN Match checks the pair against the IRS TIN Matching service for you.
Verify each payee once their TIN is on file, and again after any correction. Done looks like this: the row shows a green MATCH with the date it was checked instead of unverified.
If Verify is disabled with Add a TIN first, save a TIN on the payee. If the result is MISMATCH, compare the legal name and number against the signed W-9 character by character, correct the payee, and verify again. If the check itself cannot run, wait a few minutes and try again.
- 1On a payee's row, click Verify. Merchant360 sends the name and the tax ID you have on file to the IRS and shows the result right on the row.
- 2A green MATCH means the name and TIN line up with IRS records. A MISMATCH means they do not; double-check the spelling and the number against their W-9, fix it, and verify again.
- 3The result is stamped with the date it was checked, so you have a record that you did your due diligence.
| On this screen | What it does |
|---|---|
| Verify / Verify with IRS TIN Match | Sends the payee's legal name and TIN to the IRS and shows the result on the row. |
| Add a TIN first | Shown in place of Verify when the payee has no TIN saved. |
| MATCH | The name and TIN agree with IRS records. Stamped with the date checked. |
| MISMATCH | They do not agree. Fix the payee against the W-9 and verify again. |
| unverified | The row badge before any check has been run. |
Building on Merchant360? The same check is available as an API call for ISVs (POST /tin-match in the API reference). Ask your EPI rep to enable that scope.
1099-NEC rollup at tax time
When a payee crosses $600 in reportable payments for the year, they show up in the 1099-NEC forms panel at the bottom of the page, ready to file. Merchant360 adds up every reportable payment you recorded, so there is nothing to tally by hand.
Work through the panel in January. A payee whose row reads needs W-9 or needs TIN cannot be downloaded until that is fixed, which is why the badges are there all year. Done looks like this: every payee in the panel has a downloaded recipient copy, sent to them by January 31.
If someone you paid over $600 is missing from the panel, either their 1099 vendor flag is off or some payments were recorded without Counts toward 1099. If the total looks low, check for payments recorded with the wrong date, which puts them in the wrong tax year. If a contractor moved, update the address on the payee before you download.
- 1Pick the tax year from the dropdown to see who is reportable for that year and their totals.
- 2For each payee, click Download 1099-NEC to get the recipient copy, the one you send your contractor, with your business as the payer and their details filled in.
- 3Send each contractor their copy by the IRS deadline, typically January 31.
| On this screen | What it does |
|---|---|
| 1099-NEC forms / Tax year | The panel and its year picker. Lists payees paid $600 or more in that year. |
| needs (items) | What is still missing before the form can be generated, such as a W-9 or a TIN. |
| Download 1099-NEC | Downloads the recipient copy with your business as payer and the payee's details filled in. |
| No payee reached $600 | Shown when nothing needs to be filed for that year. |
Filing the copies with the IRS electronically (e-file) is coming. For now, the download gives you the printable recipient copies to send your contractors.
Pay a vendor by bank (ACH)
Recording a payment (above) logs money you already sent. Separately, Merchant360 can also send the payout for you as a bank (ACH) credit, pulling the funds from your account and depositing them to the vendor's, so you do not have to cut a check or leave the app.
This is a controlled feature: sending real ACH payouts is turned on per account once the compliance certification is in place. Until then, use Record a payment to keep your books and 1099s accurate for payouts you send by check, cash, or your own bank's bill-pay.
To use it, the payee needs a bank on file (routing, account, and account type) and your account needs payouts enabled. Done looks like this: the confirmation reads Payout to (name) started, your bank is debited to fund it, and the vendor is paid once that clears. The payout is booked as a Contractor expense and counts toward the 1099 like a recorded payment.
If Pay by bank is not offered, ask your sales rep to enable payouts. If it fails with Couldn't send the payout, check the payee's routing and account numbers. If a payout is returned by the vendor's bank, the amount comes back to your account and you can correct the bank details and send again.
| On this screen | What it does |
|---|---|
| Pay by bank | Opens Send an ACH payout to the vendor's bank. |
| Amount, Date, Memo, Counts toward 1099 | Same fields as a recorded payment. The memo travels with the payout. |
| Bank for ACH payout | The payee's routing and account, set on the payee. Required before Pay by bank works. |
| Payout started | The confirmation: funding from your bank first, then the vendor is paid once it clears. |
| Record vs Pay by bank | Record books a payment you already made as a Contractor expense. Pay by bank sends the ACH payout and books it the same way. |
Want ACH payouts enabled for your account? Ask your sales rep. The payee's bank details are captured (and encrypted) the same way as everywhere else in Merchant360.