
Payment Extension – install & connect
Get the browser extension installed and connected to your account in a few minutes.
Install the extension
The Merchant360 Payment Extension adds a small payment button to your Chrome or Edge browser. Use it when you take payments while working inside other software, such as a booking system, a CRM, or a web-based order screen, and you do not want to switch tabs to your virtual terminal.
Install it from the Chrome Web Store. Search for "Merchant360 Payment Extension", or use the Install button at merchant360.net/extension. One click adds it to Chrome or Edge. Nothing needs to be installed on the computer itself, and no card data is ever stored in the browser.
After it installs, the Merchant360 icon appears in the toolbar. Click the puzzle piece icon in the browser toolbar and pin Merchant360 so the button is always visible. Each person who takes payments installs the extension in their own browser profile and connects it with their own Merchant360 login.
You are done with this step when the Merchant360 icon shows in your toolbar and clicking it opens the extension's connect view.
If the icon does not appear after installing, open the puzzle piece menu in the toolbar and pin the extension from there. If the store page says the extension is not available, make sure you are using Chrome or Edge, since other browsers are not supported.
| On this screen | What it does |
|---|---|
| Install button (merchant360.net/extension) | Opens the Chrome Web Store listing for the extension. Clicking Add to Chrome installs it in the current browser profile. |
| Puzzle piece icon (browser toolbar) | Lists your installed extensions. Pinning Merchant360 keeps its icon visible in the toolbar so you can open it with one click. |
| Merchant360 icon | Opens the extension. Before it is connected it shows the connect view; after it is connected it shows the payment view. |
Connect automatically (recommended)
The extension has to be linked to your Merchant360 account before it can take a payment. The automatic path does this without copying any keys. Use it unless your account manager gave you an API key to paste in by hand.
You need a Merchant360 login with the Integrations tool access, which owners and managers have by default. The approval creates an API key on the account, so it also asks for a texted security code.
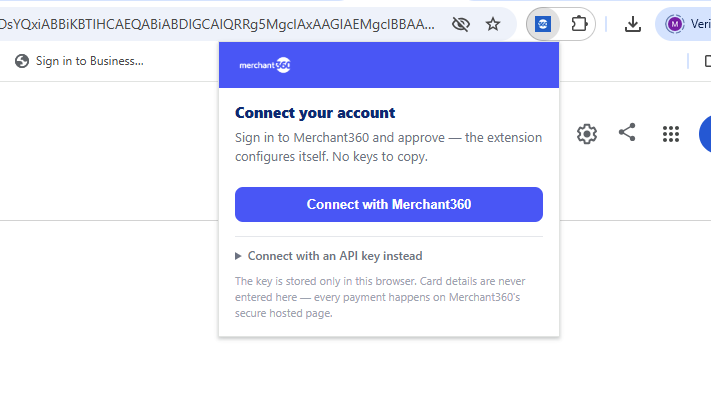
Open the extension and press Connect with Merchant360. A new Merchant360 tab opens at the connect page. Sign in with your normal merchant login if you are not already signed in. The page then asks you to authorize the connection, which is the next section.
You are done with this step when the Merchant360 tab shows the Connect the Payment Extension page with the list of what the extension will be able to do.
If the tab opens to the sign-in page and then goes back to the home page instead of the connect page, open the extension again and press Connect with Merchant360 a second time now that you are signed in.
| On this screen | What it does |
|---|---|
| Connect with Merchant360 | Opens a Merchant360 tab at the connect page. The extension watches that page and picks up the connection once you approve it. |
| Connect with an API key | Switches to the manual path, where you paste a key you received from your account manager. Covered later in this chapter. |
Authorize the connection
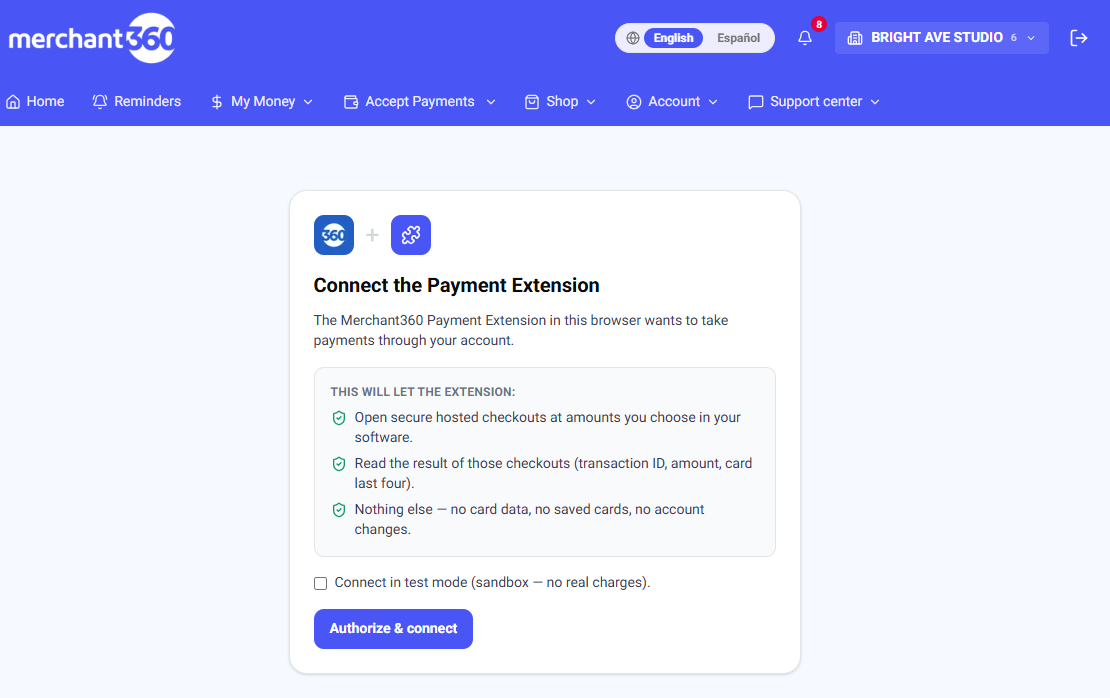
The Connect the Payment Extension page shows exactly what you are granting. The extension can open hosted checkouts at amounts you choose in your software, and it can read the result of those checkouts, meaning the transaction ID, amount, and card last four. It cannot read card data, cannot use saved cards, and cannot change anything on your account.
Tick Connect in test mode first if you want to rehearse with no real charges. A test connection uses a sandbox key, so every payment is simulated and shows on the Test Mode Transactions page instead of your live Transactions. Reconnect without the box ticked when you are ready to take real payments.
Click Authorize & connect. Because this creates an API key, Merchant360 texts a six-digit security code to the mobile number on your profile and asks for it before continuing. Enter the code, and the page shows Connected and hands the key to the extension. The tab closes itself, or tells you it can be closed.
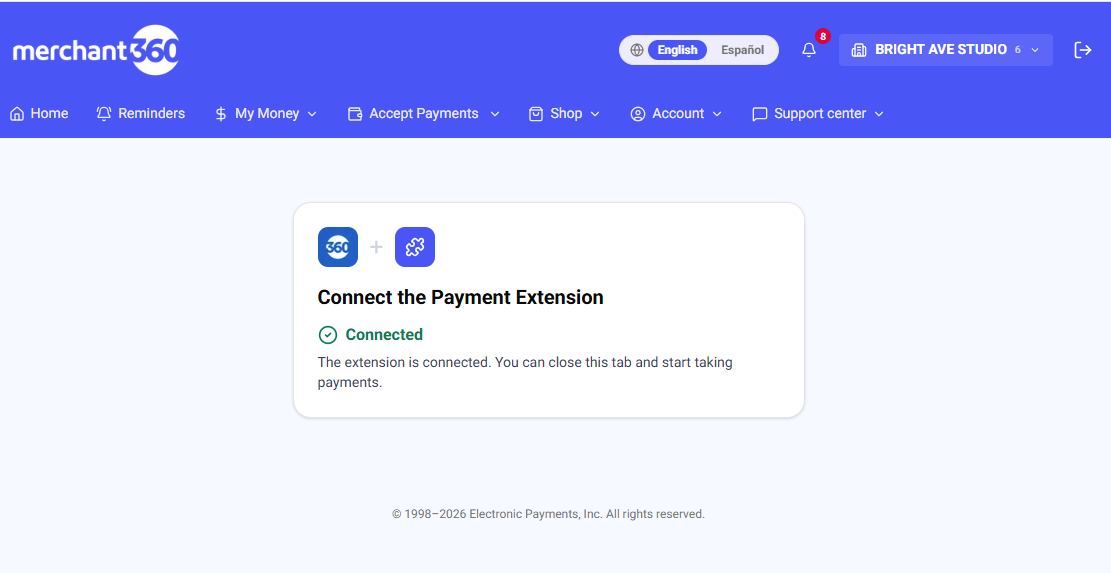
You are done when the page reads that the extension is connected and you can close the tab. The key is stored only inside the extension in this browser profile. It never appears on screen.
If the page stays on Handing the key to the extension for more than a few seconds, the extension is probably not installed in this browser profile. The page shows a hint after twenty seconds. Install the extension, then start the connection again from the extension. If the security code text does not arrive, use Resend code, and check that the mobile number on your profile is correct under Account.
| On this screen | What it does |
|---|---|
| This will let the extension (list) | Shows the three grants: open hosted checkouts at amounts you choose, read the result of those checkouts, and nothing else. This is the full scope of the key that will be created. |
| Connect in test mode (sandbox, no real charges) | Creates a test key instead of a live one. Payments taken through the extension are simulated and appear under Billing Tools, Settings, Test Mode Transactions. |
| Authorize & connect | Asks for a texted six-digit security code, then creates the key and publishes it to the extension. While it works the button reads Connecting. |
| Text me a verification code / Resend code | Sends the six-digit code to the mobile number on your profile. Resend code sends a fresh one if the first did not arrive. |
| Connected | Confirms the key was created. Handing the key to the extension means the page is waiting for the extension to claim it; once claimed it reads that you can close this tab. |
| Extension not installed hint | Appears after about twenty seconds if nothing claims the key. It tells you to install the extension in this browser profile and try again. |
Confirm you're connected
Once connected, the extension shows a green confirmation. From this point every payment you start from the extension opens a secure hosted checkout on Merchant360, and the result comes back into the extension when the customer or your staff finishes.
There are three ways to start a payment. Key an amount into the extension to open the secure checkout. Send an amount to your card terminal so the customer can tap or insert their card. Or highlight an amount on any web page, right-click, and choose Charge with Merchant360.
Every payment taken this way shows in Billing Tools, Transactions, with the same receipt, refund, and void controls as any other sale. Test connections show their payments on the Test Mode Transactions page instead.
You are done when the extension shows the green connected state and a test payment appears in Transactions, or in Test Mode Transactions if you connected in test mode.
If the extension still shows the connect view after you authorized, close and reopen the extension. If it asks you to connect again, the key was not claimed. Run the automatic connection again from the extension, and keep the Merchant360 tab open until it says the extension is connected.
| On this screen | What it does |
|---|---|
| Green connected confirmation | Shows the extension holds a valid key for your account. Click the icon to open the payment view. |
| Key a payment | Type an amount and open the secure hosted checkout, where the card is entered on Merchant360's page, never in the extension. |
| Send to card terminal | Pushes the amount to your connected card terminal so the customer can pay in person. The result comes back into the extension. |
| Charge with Merchant360 (right-click menu) | Takes a highlighted amount on any web page and opens the hosted checkout for that amount. |
Connect manually (API key)
The manual path is for merchants who prefer to control the key themselves, or who received a key directly from their account manager. The result is the same as the automatic path: the extension holds an API key scoped to opening hosted checkouts and reading their results.
The account owner creates the key under Developers & API in Merchant360. Create an API key, give it a name such as Payment Extension, choose Test or Live mode, and pick the Payments preset. Creating a key asks for a texted security code. The key is shown once, so copy it right away.
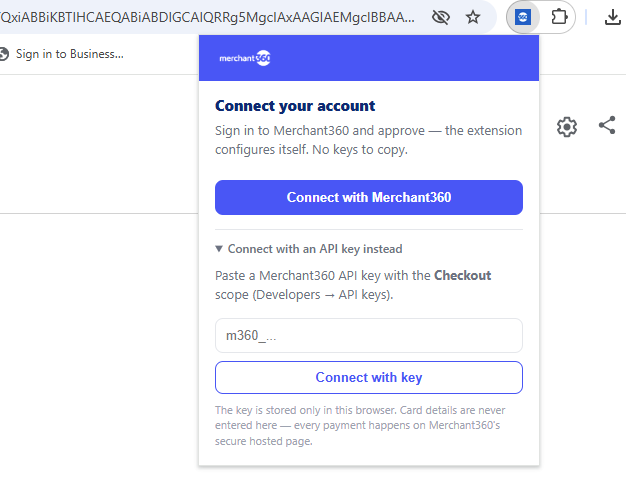
In the extension, open Connect with an API key instead, paste the key into the box, and connect. The key is stored only in this browser, and card details are never entered in the extension. Every payment still happens on Merchant360's secure hosted page.
You are done when the extension shows the green connected confirmation. The key appears under Your keys on the Developers & API page with its last-used time, so you can see it working.
If the extension rejects the key, check that you copied the whole value and that the key was not revoked on the Developers & API page. A test key only takes test payments, so if real charges are not appearing, create a live key and connect again. To disconnect a browser, revoke its key on the Developers & API page; the extension will ask to connect again the next time it is opened.
| On this screen | What it does |
|---|---|
| Connect with an API key | Opens the manual connect view in the extension with a single key field. |
| API key field | Takes the key you copied from Developers & API. The value is kept only in this browser profile. |
| Connect | Checks the key against your account and, if valid, switches the extension to the connected view. |
| Developers & API: Create an API key | Owner only. Name, Mode (Test or Live), and Scopes. The Payments preset is enough for the extension. Asks for a texted security code and shows the key once. |
| Developers & API: Revoke | Disables the key immediately. Any browser using it is disconnected and must connect again. |