
WordPress payments
Take donations, one-time payments, and subscriptions on any WordPress site – no store required.
- WordPress payments – what you can do
- What your customers see
- Two ways to collect
- How the embed works – three steps
- Step 1 – set up your Pay Widget
- Choose what your widget accepts
- Step 2 – add it to a WordPress page
- Donations
- One-time payments
- Subscriptions
- Letting customers pay an invoice
- Receipts, branding & keeping it secure
WordPress payments – what you can do
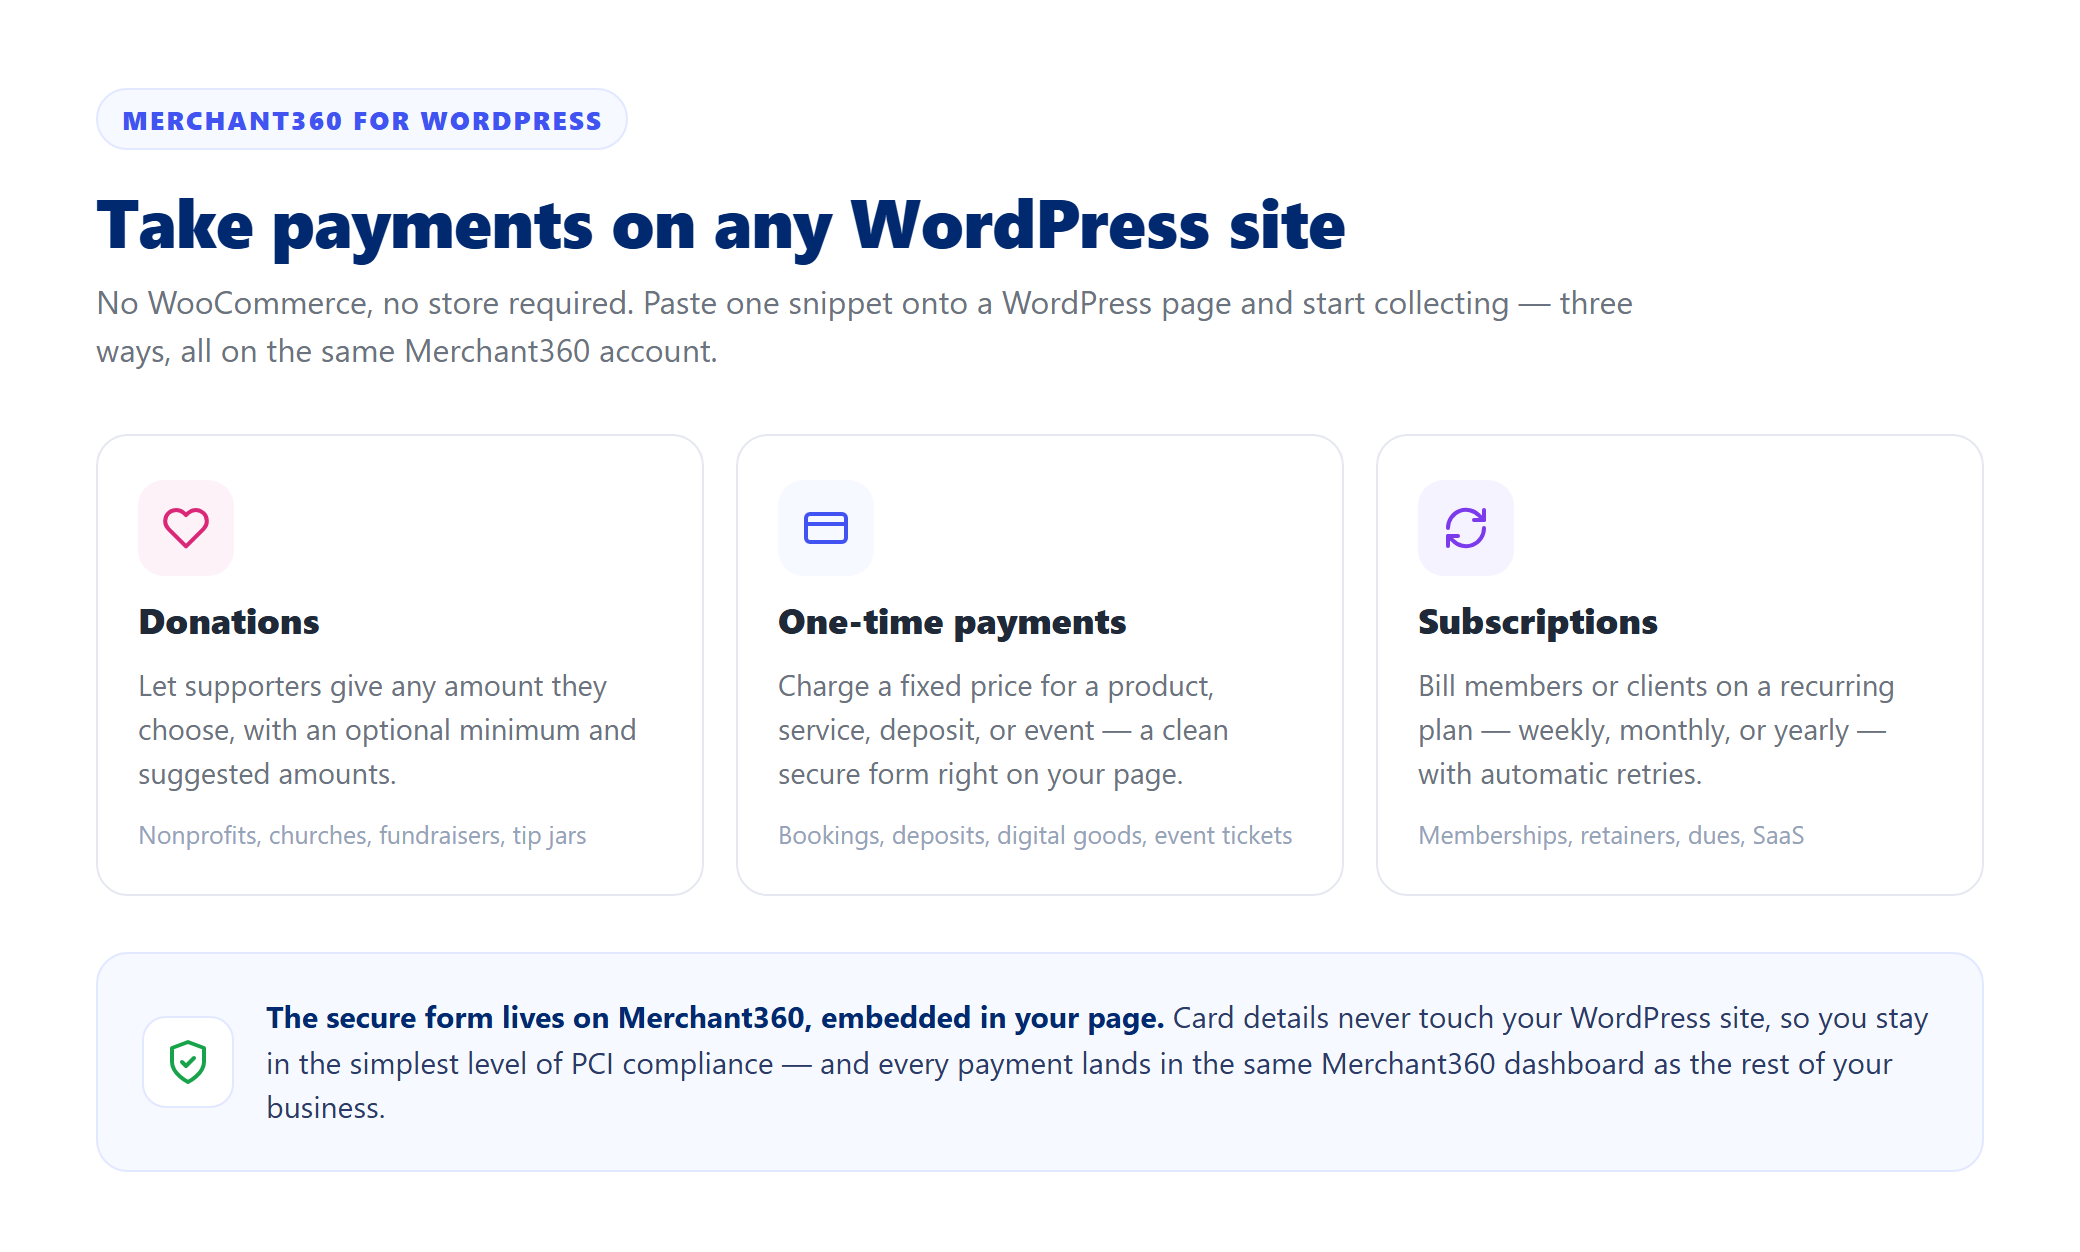
You do not need WooCommerce, or a store, to take card payments on a WordPress site. With Merchant360 you can collect three ways, donations, one-time payments, and subscriptions, right on your own pages, and every payment lands in the same Merchant360 dashboard as the rest of your business.
The payment form is hosted by Merchant360 and shown inside your page, so the card number is typed on Merchant360's secure surface, not on your WordPress site.
This works with any WordPress site, the block editor, the classic editor, or a page builder like Elementor or Divi, because all you are adding is a small snippet or a link.
Everything is configured on one Merchant360 page, Take Payments → Pay Widget, and it needs your card processing to be active. If the Pay Widget page says Set up payment processing first, finish Billing Tools setup before continuing.
| On this screen | What it does |
|---|---|
| Pay Widget page | Where you turn the widget on, pick payment types, set limits and branding, and copy the embed snippet or pay-page link. |
| Status: Live / Off / Not configured | Badge at the top of the Pay Widget page showing whether customers can pay right now. |
| Set up payment processing first | Notice shown until your processing account is active; the widget cannot charge before that. |
What your customers see
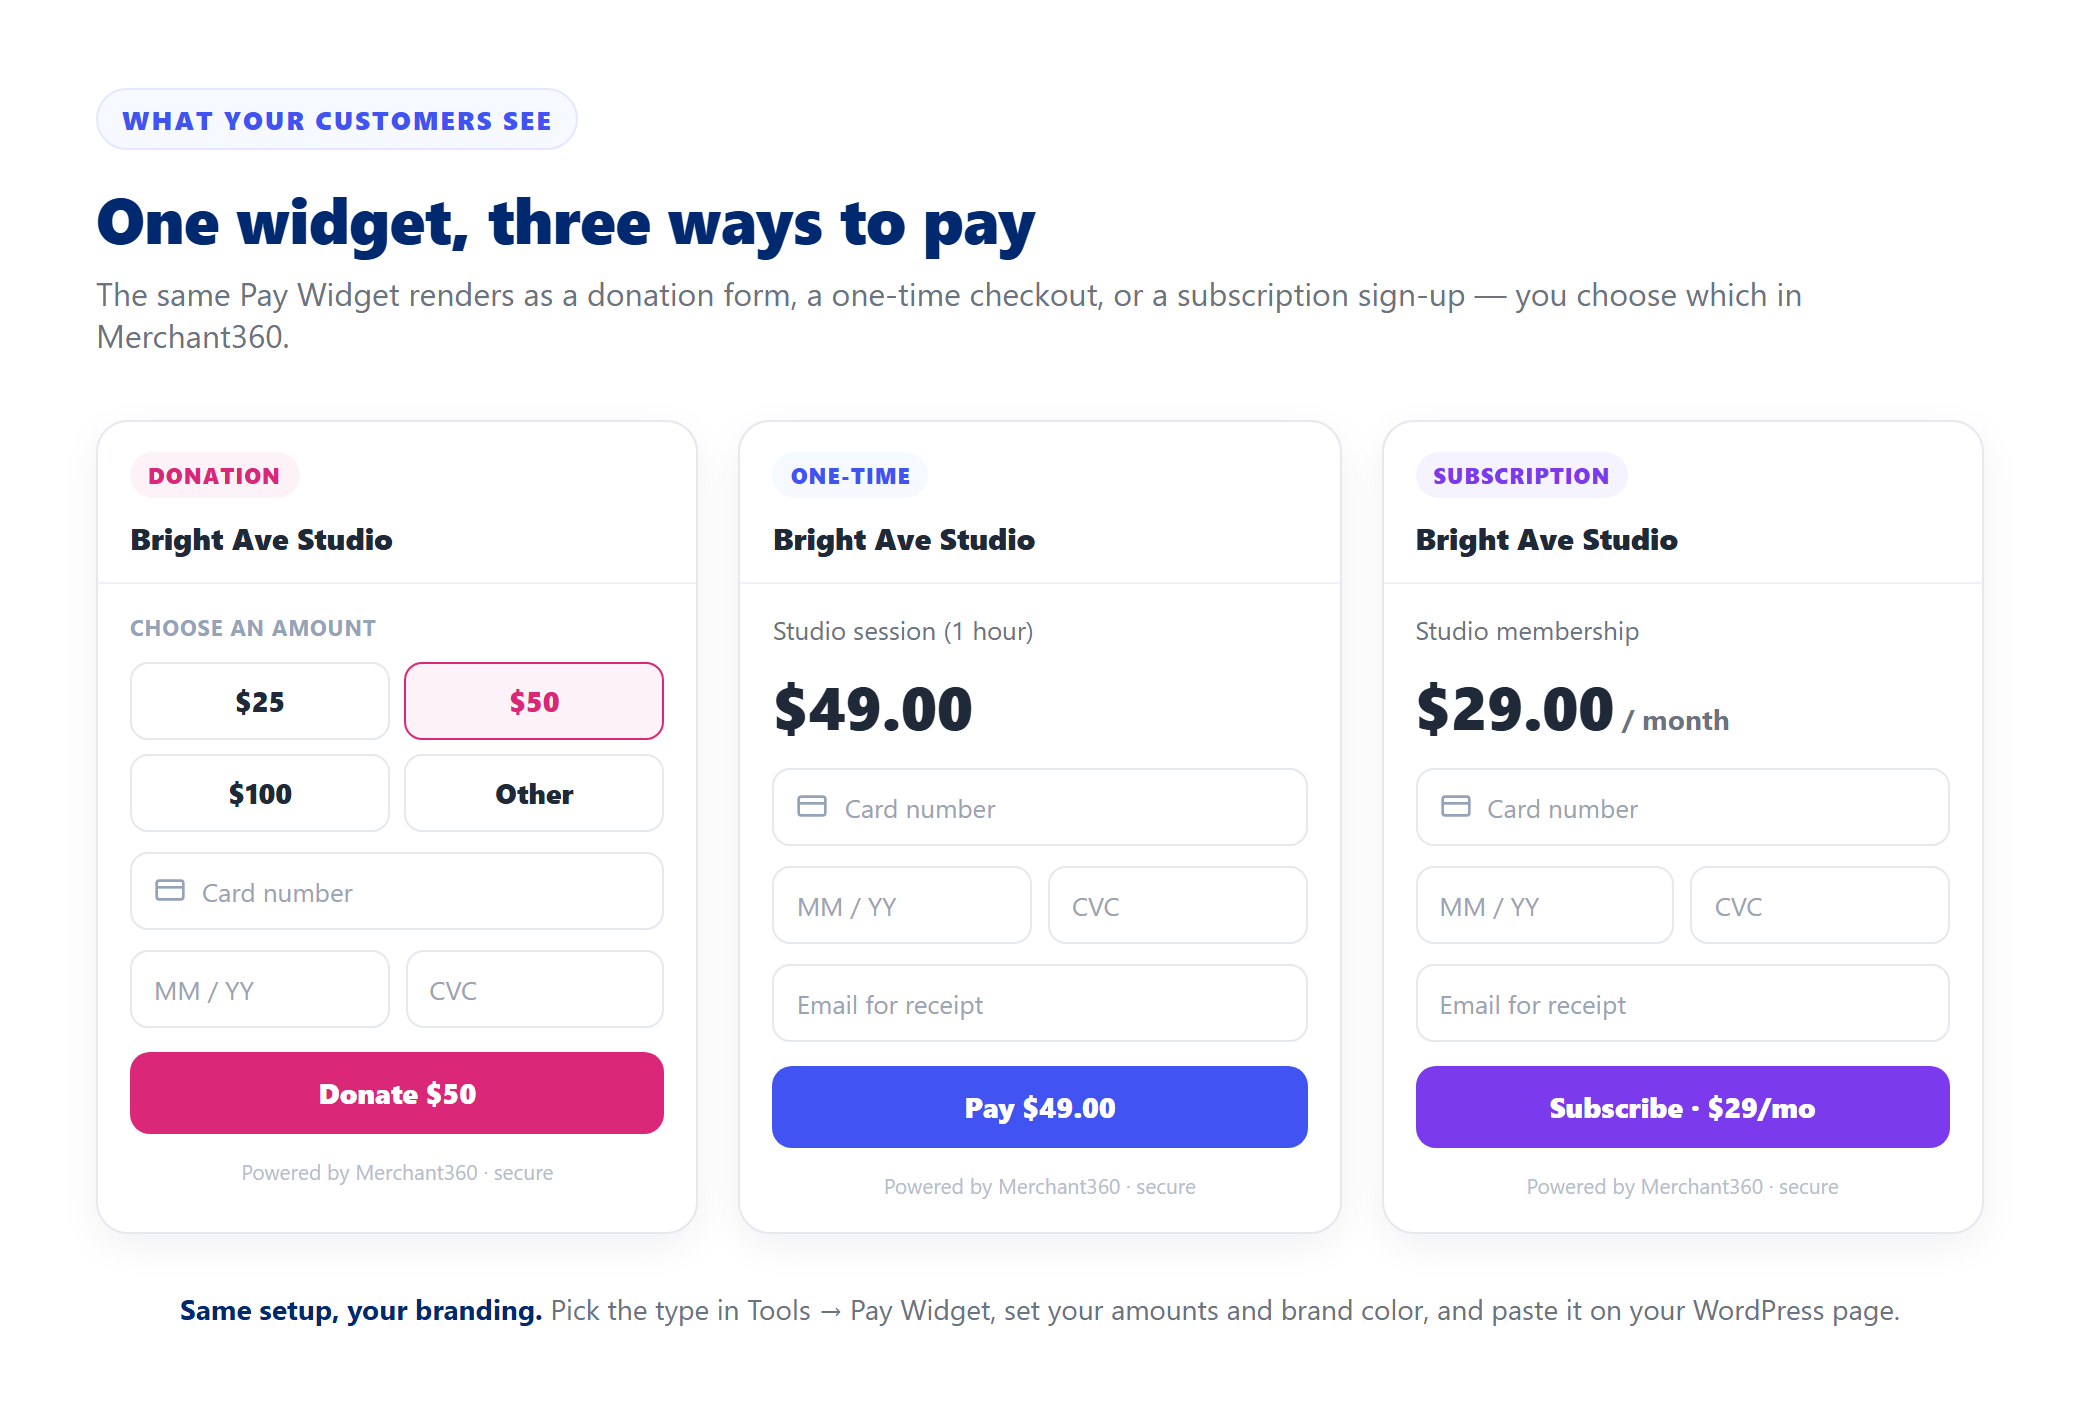
The Pay Widget is one tool that changes shape based on which payment types you turn on. There are six in all: a fixed amount, donations, save a card on file, pay an external invoice, pay a Merchant360 invoice, and subscriptions. The three most common are pictured above: a donation form (the giver picks an amount from preset chips or a custom value), a one-time form (a set price and a Pay button), and a subscription form (recurring sign-up).
Every one carries your business name and brand color, the card is entered on Merchant360's secure form, and the customer never leaves your page. You can put more than one on your site, say a donation widget on your Donate page and a membership sign-up on another.
The two invoice types are a little different, because the customer is paying a bill rather than a set price; those get their own section below (Letting customers pay an invoice).
To see exactly what a customer sees, click Preview on the Pay Widget page, or Preview next to a payment type. If the preview shows the wrong colors, update Brand color under Branding; the logo comes from your business profile.
| On this screen | What it does |
|---|---|
| Preview | Opens the hosted pay page as your customers see it. |
| Preview (per payment type) | Opens the page for one specific type, such as Donations. |
| Branding → Brand color | The accent color on the form and the Pay button. |
| Business name and logo | Come from your business profile and appear on every form and receipt. |
Two ways to collect
There are two no-code ways to take a payment, and both handle donations, one-time amounts, and subscriptions. Pick whichever fits the page.
1) A payment link. You create a link in Merchant360 and put it behind a button or a menu item. When someone clicks it, they pay on a secure Merchant360 page and come right back. This is the fastest option and needs nothing pasted into your site. The Pay Widget page also has a Pay Now button builder that gives you ready-to-paste button HTML or a plain link to your hosted page.
2) The Pay Widget (embedded). You paste a small snippet onto a page and the payment form appears right there, so the customer pays without leaving your site.
Both go through the same Master switch: when it is off, the hosted page and the embed both refuse charges with an unavailable message.
| On this screen | What it does |
|---|---|
| Embed snippet → Copy | Copies the code that renders the payment form inside your page. |
| Copy URL | Copies your hosted pay-page link for a button or menu item. |
| Pay Now button | Builder for a paste-ready button: Button text, Button color, Size, Corners, Full width, Opens (New page or Popup on your page), Success URL, and the Button HTML or Plain link to copy. |
| Payment Links → New Payment Link | Creates a one-off link with its own amount, description, and expiry. |
| Master switch | On or Off for the hosted page and embed together. |
Not sure which to use? Start with the Pay Widget embed for a donate or checkout page you want to feel built in, and use payment links for one-off buttons (a Pay your balance link, an event sign-up, a quick invoice).
How the embed works – three steps
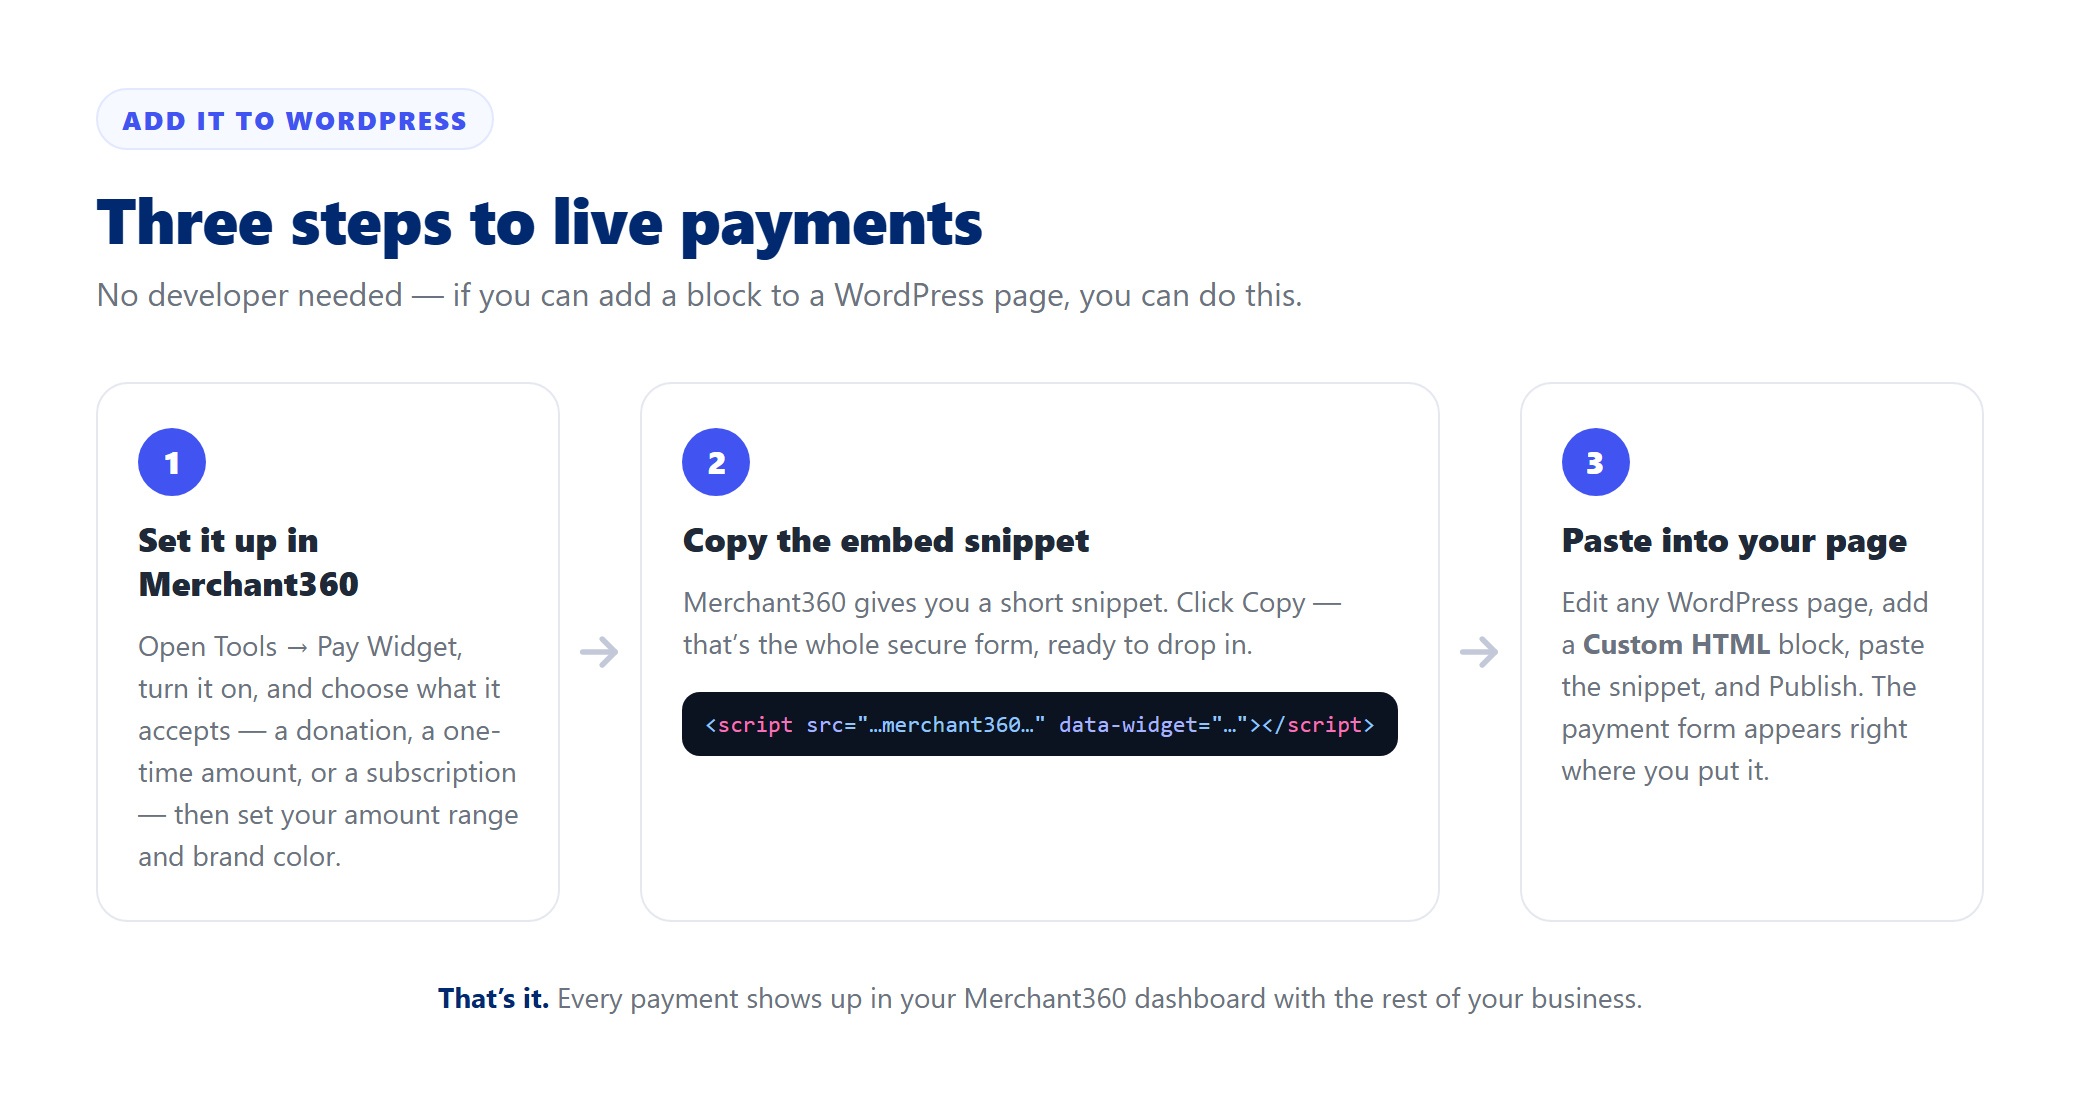
Adding the embedded form is three steps, and if you can add a block to a WordPress page you can do all of it yourself: set up the Pay Widget in Merchant360, copy the embed snippet, and paste it into a WordPress page. The snippet renders a Merchant360 payment iframe, so the form updates itself when you change settings in Merchant360; you never need to re-paste it.
The next two sections walk through each part. If the form does not appear after pasting, the snippet was pasted into a normal text block rather than a Custom HTML block.
| On this screen | What it does |
|---|---|
| Embed snippet | The code shown on the Pay Widget page, with a Payment type selector so the snippet opens on the type you choose. |
| Copy | Copies the snippet to your clipboard. |
Step 1 – set up your Pay Widget
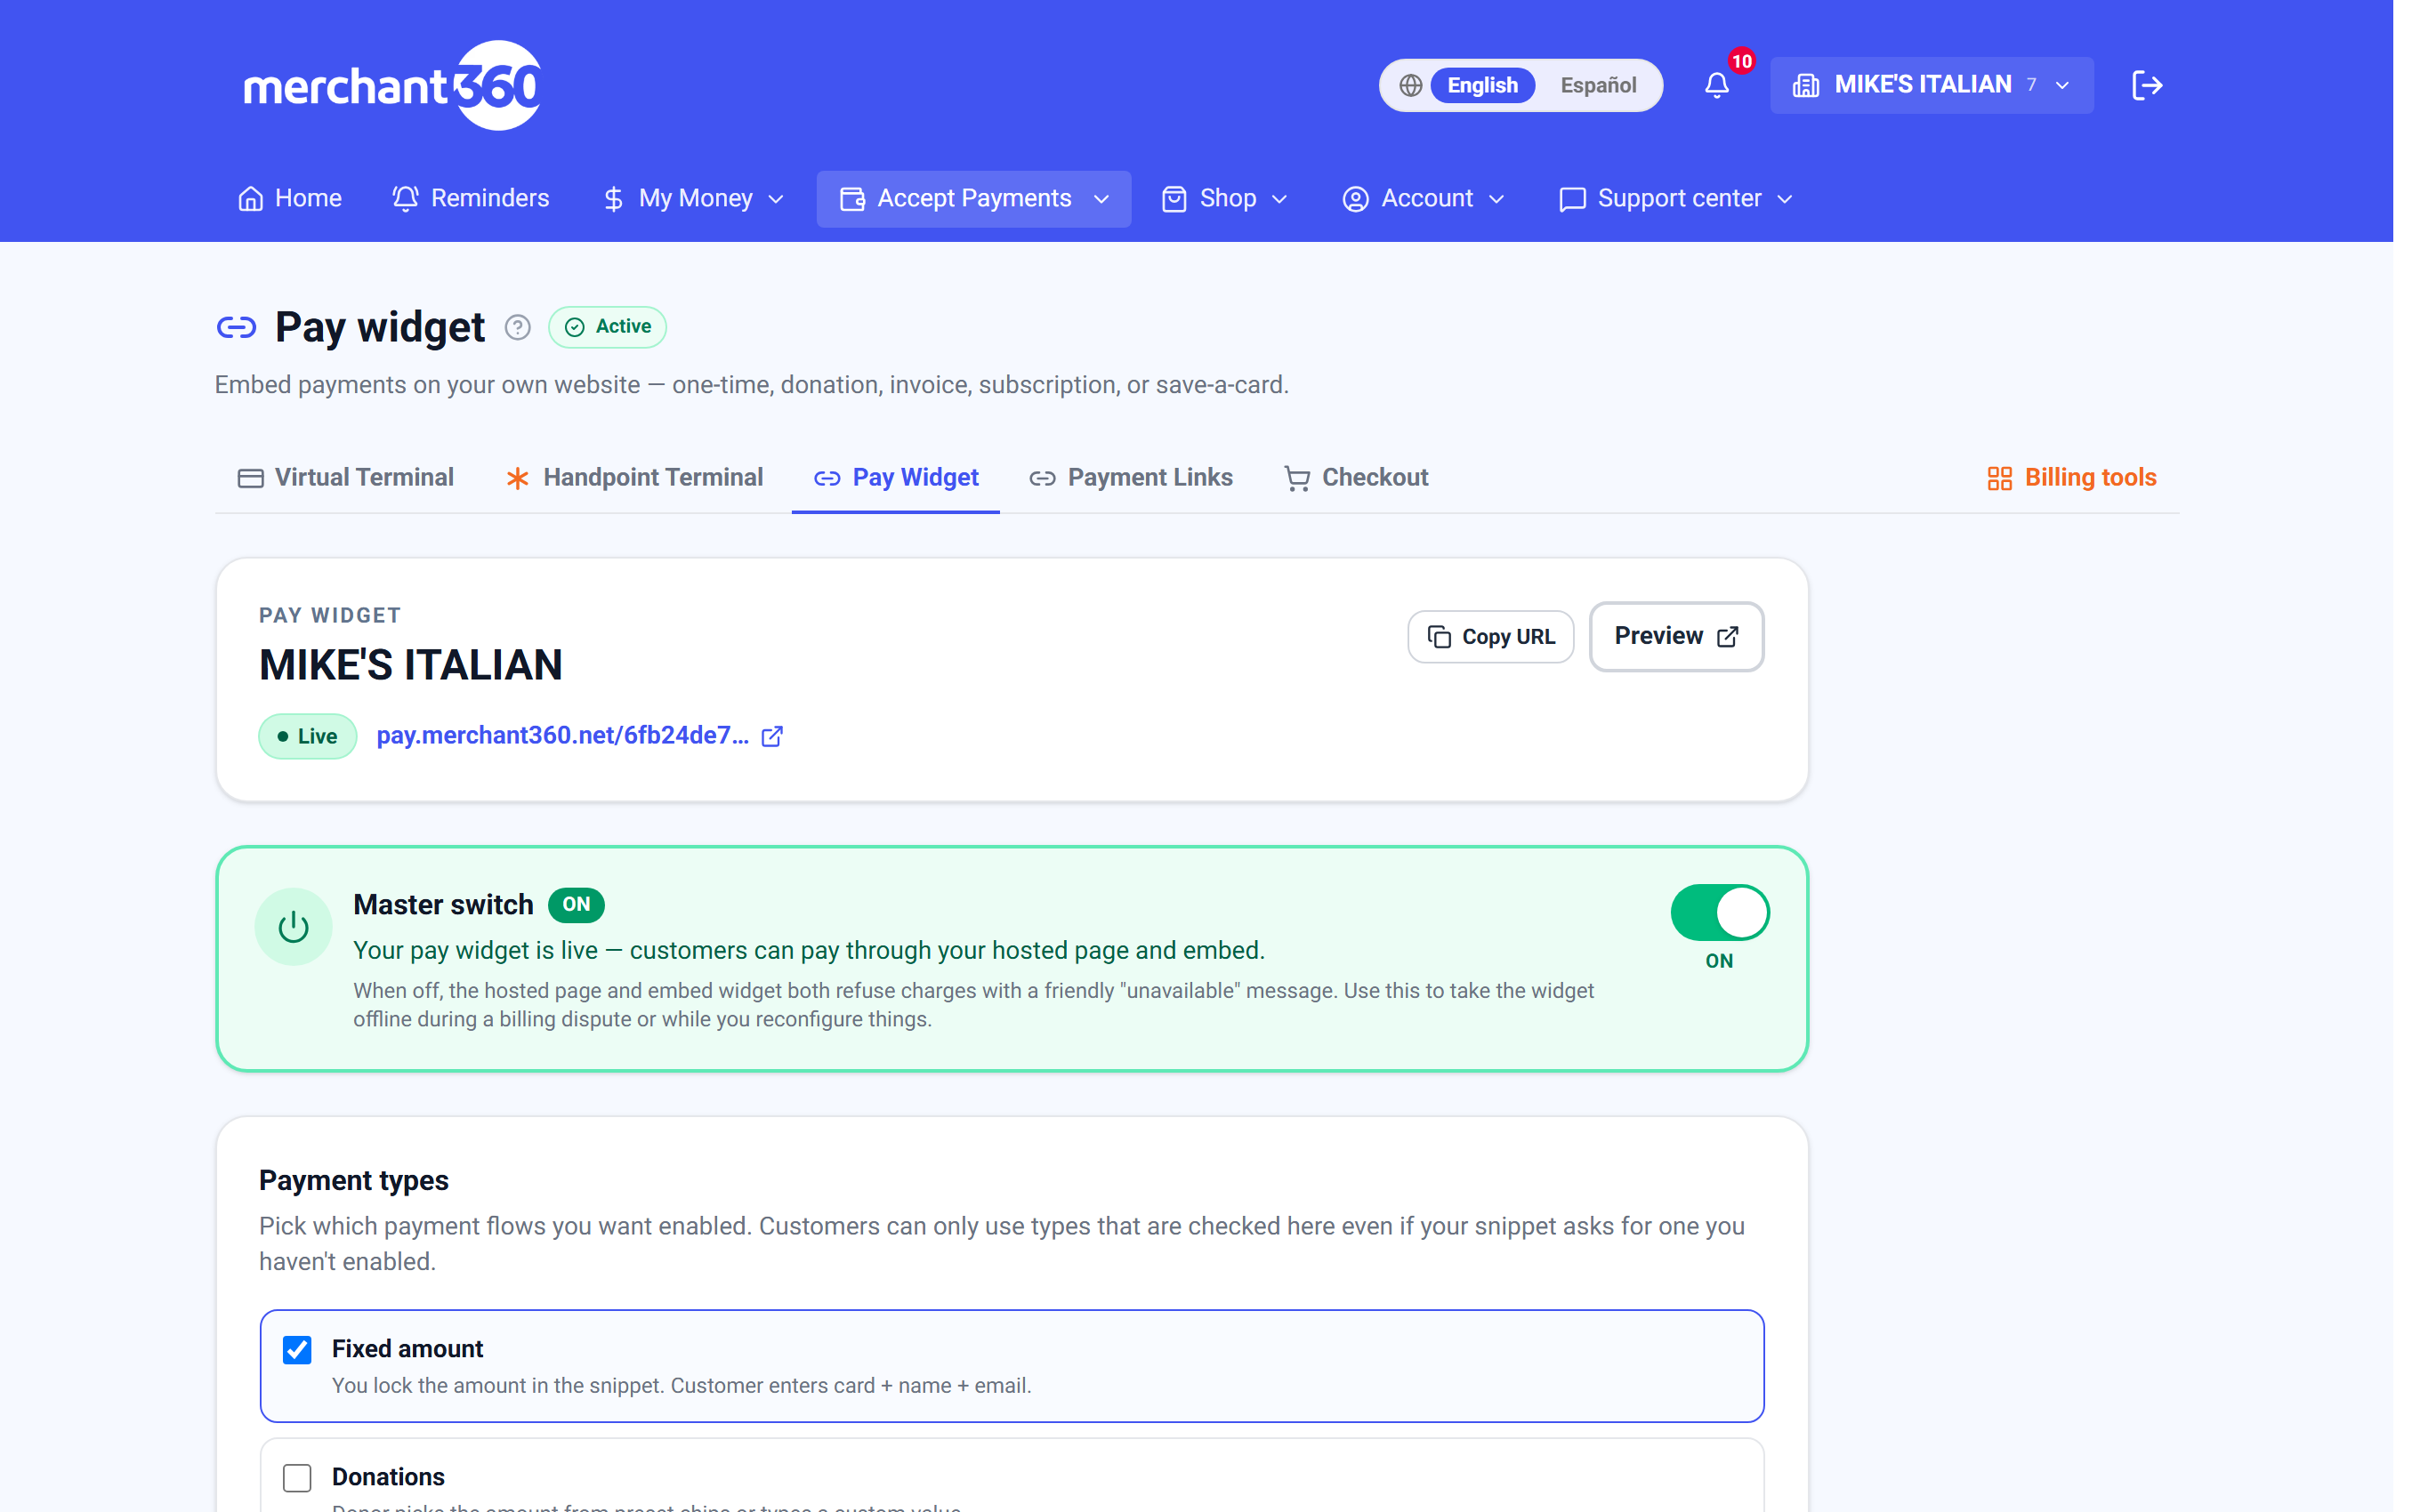
In Merchant360, go to Take Payments → Pay Widget and turn it on; this needs your card processing to be active. Then set it up the way you want it to behave on your site.
The page is a stack of cards: Master switch, Payment types, Amount range, Branding, Receipts, API key, Embed snippet, Pay Now button, Subscription plans, and Recent activity. Work down the page once; changes save when you click Save on each card.
You are done when the status badge reads Live and the Embed snippet card shows your snippet. If the badge reads Off, the Master switch is off. If it reads Not configured, the widget has not been activated yet; use Turn on the Pay Widget.
Leave the API key card alone unless a developer asked for a key; it is only for a checkout you build yourself.
- 1Payment types: choose what the form accepts: a fixed amount, donations, save a card on file, pay an invoice, or subscriptions. You can turn on more than one.
- 2Amount range: set a Minimum and Maximum. These are enforced on Merchant360's servers, so no one can edit the page to pay outside the range.
- 3Branding and receipts: set your Brand color, the Success redirect and Cancel redirect if you want customers sent to your own pages, and the From email and BCC email for receipts. Your logo comes from your business profile.
- 4Copy the embed: click Copy on the embed snippet. That snippet is the whole secure form; you will paste it into WordPress next.
| On this screen | What it does |
|---|---|
| Turn on the Pay Widget | Activates the widget on your processing account the first time. |
| Master switch (On / Off) | When off, the hosted page and embed both refuse charges with an unavailable message. Saves automatically. |
| Payment types | Checkboxes for Fixed amount, Donations, Save card on file, Pay external invoice, Pay Merchant360 invoice, and Subscriptions. Customers can only use the types checked here. |
| Amount range (Minimum / Maximum) | Server-side limits for every one-time payment and donation. |
| Branding (Logo URL, Brand color, Success redirect, Cancel redirect) | Your look on the form, and where customers land after paying or cancelling. |
| Receipts (From email, BCC email) | Receipts go to the customer from noreply@merchant360.net with your business name; BCC sends you a copy. |
| API key (Issue key / Re-issue / Revoke) | For developers only. Creates or rotates the key for a checkout you build yourself. |
| Embed snippet → Copy | Copies the code you paste into WordPress. |
| Copy URL / Preview | Copies your hosted pay-page link, or opens it. |
| Save | Saves the card you edited. |
Want to see it first? Use Preview, or copy your public pay-page URL to open the hosted version in a new tab; it is exactly what your customers will see.
Choose what your widget accepts
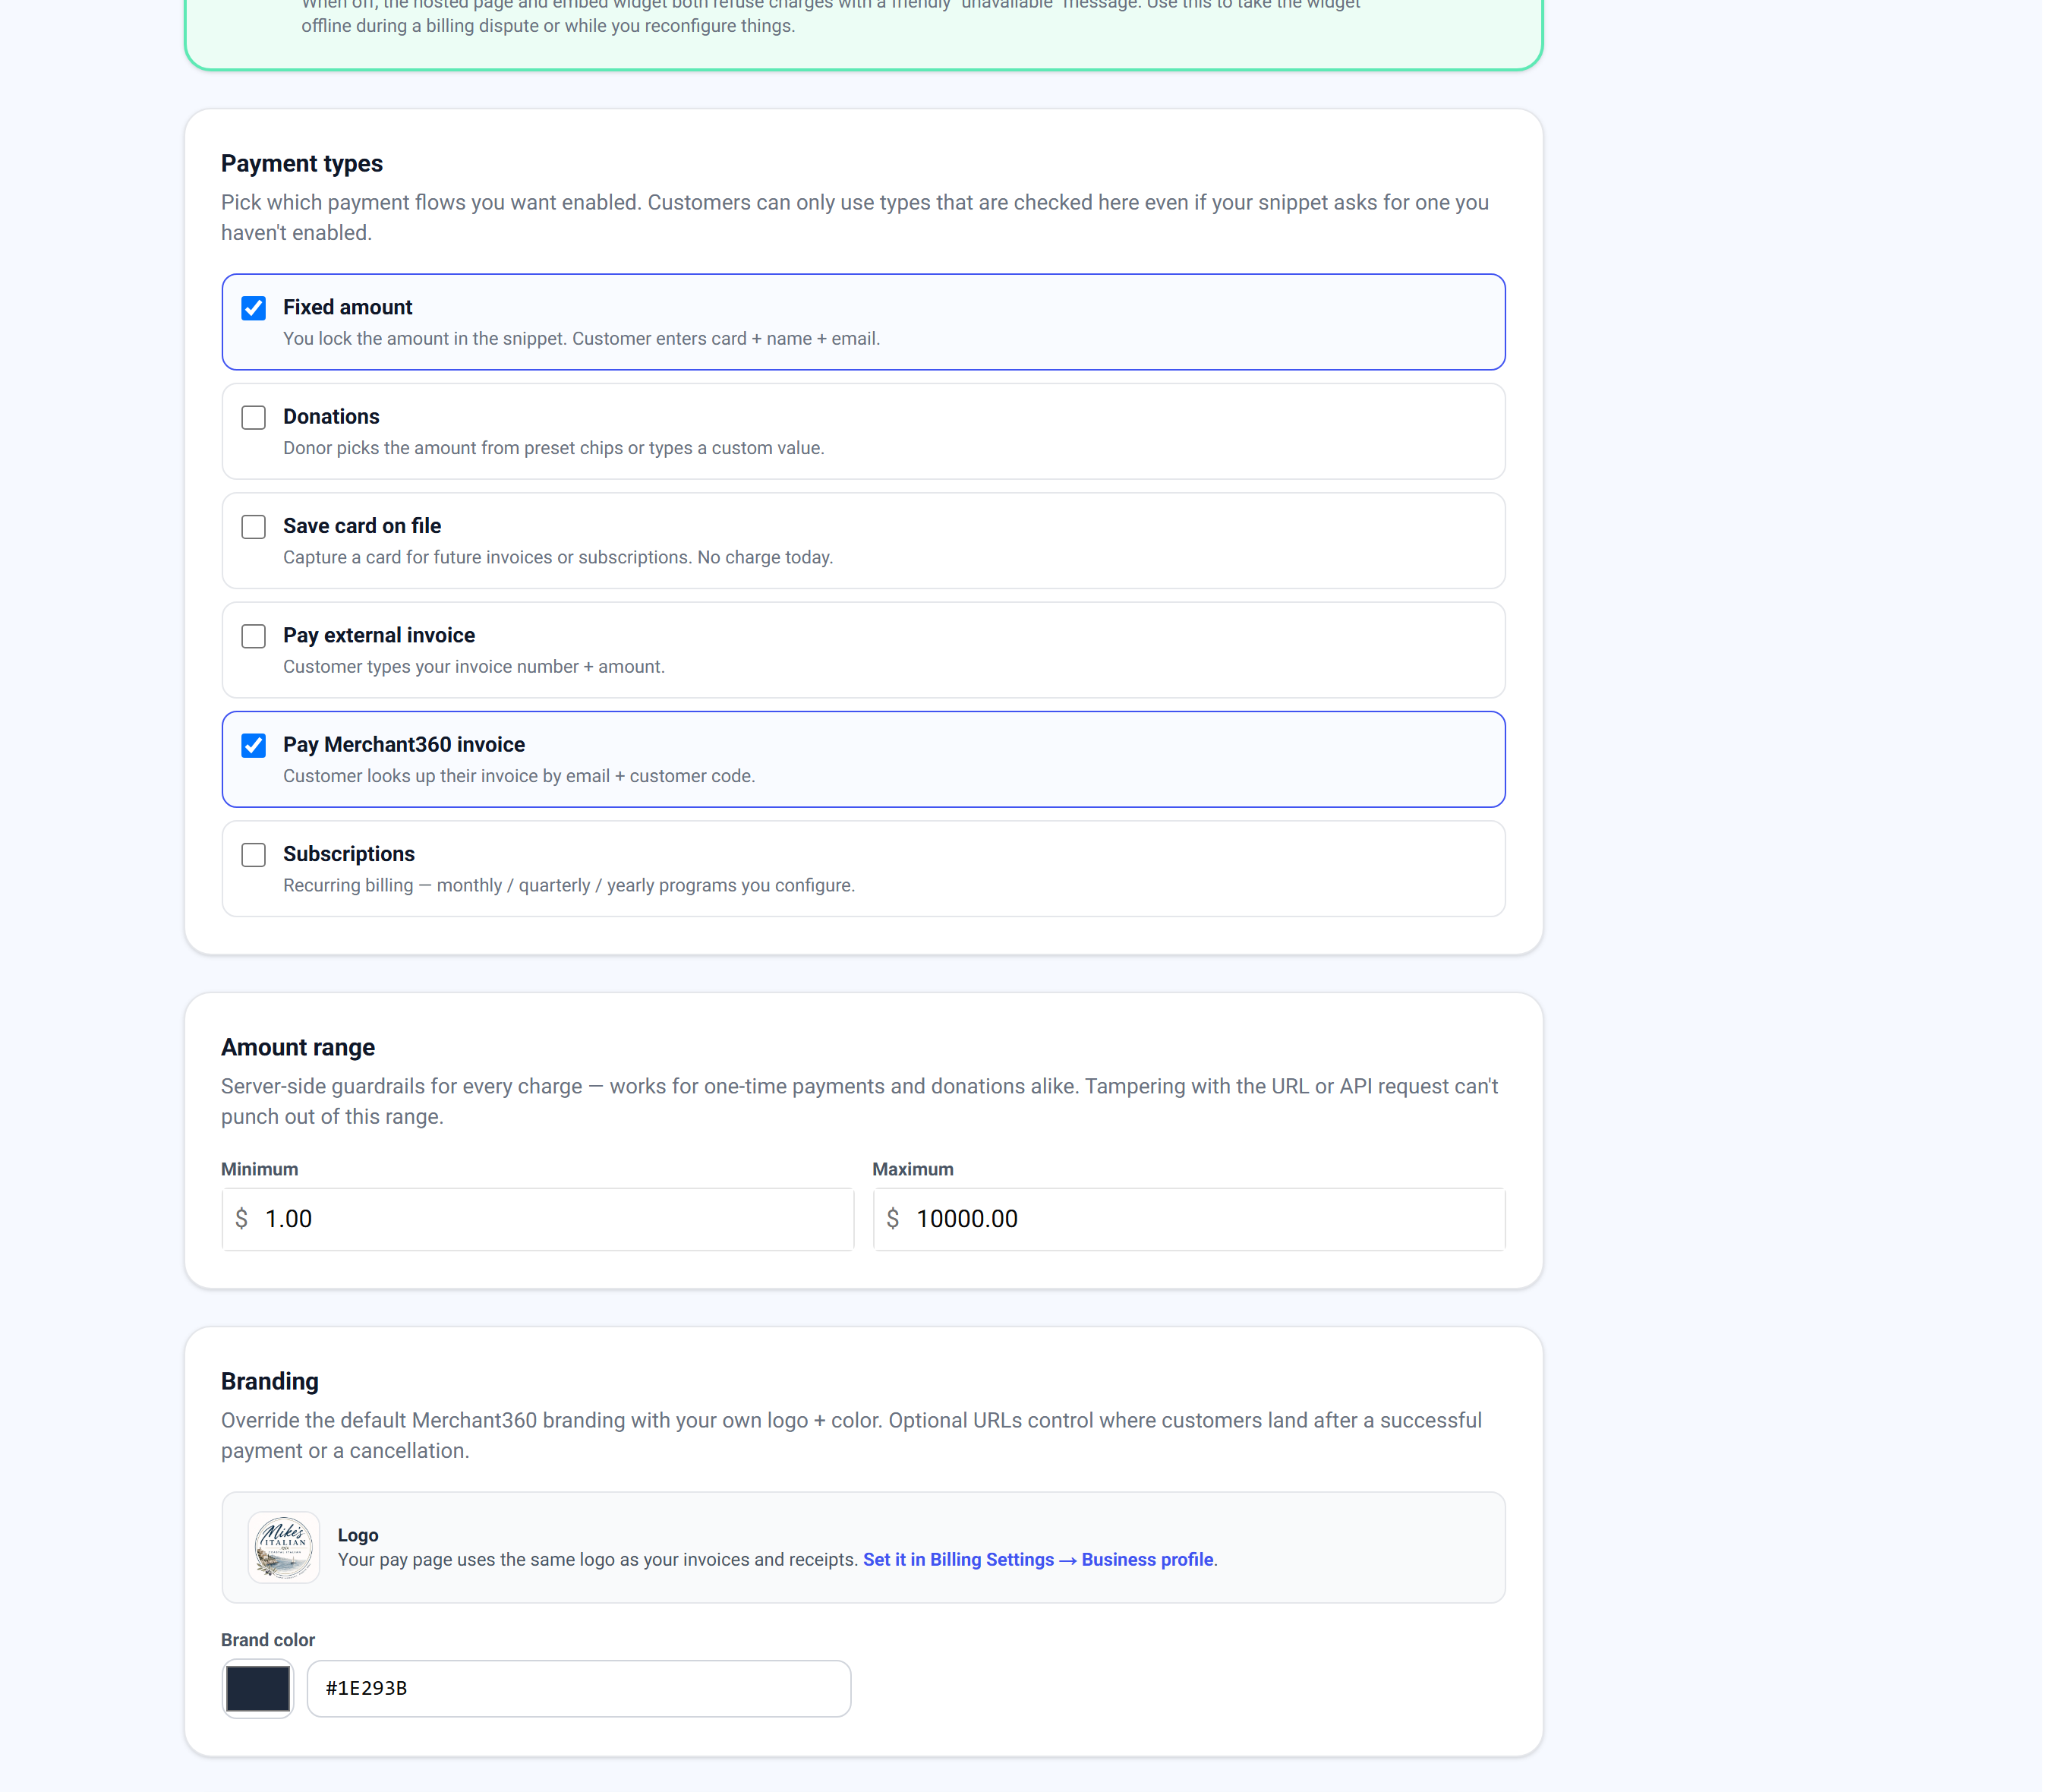
The Payment types list is where you pick what the form does. Turn on as many as you like; a visitor can only use the ones you have checked, even if a snippet asks for one you have not enabled.
Each type has a one-line description on the card. A type marked Coming soon cannot be checked yet. Subscriptions also needs at least one plan under Subscription plans before anyone can sign up.
If a customer reports the form says a payment type is disabled, open this card and check that type, then Save.
- 1Fixed amount: you lock the price in the snippet; the customer just enters their card.
- 2Donations: the donor picks the amount from preset chips or types their own.
- 3Save card on file: capture a card for later (a future invoice or subscription) with no charge today.
- 4Pay external invoice: the customer types your invoice number and the amount.
- 5Pay Merchant360 invoice: the customer looks up an invoice you sent from Merchant360 by email and customer code.
- 6Subscriptions: recurring billing on a plan you set up (monthly, quarterly, or yearly).
| On this screen | What it does |
|---|---|
| Fixed amount | Checkbox. The amount is set in the snippet or the Pay Now button; the customer enters card, name, and email. |
| Donations | Checkbox. The donor chooses the amount from preset chips or a custom value. |
| Save card on file | Checkbox. Captures a card into your saved cards with no charge today. |
| Pay external invoice | Checkbox. The customer types an invoice number and amount from another system. |
| Pay Merchant360 invoice | Checkbox. The customer looks up an invoice you sent from Merchant360. |
| Subscriptions | Checkbox. Customers sign up for a plan from Subscription plans. |
| Coming soon | Badge on a type that cannot be enabled yet. |
| Amount range | Minimum and Maximum enforced on the server for one-time payments and donations. |
Under the types, set an Amount range (a minimum and maximum). It is enforced on Merchant360's servers, so no one can edit the page or the link to pay outside your range.
Step 2 – add it to a WordPress page
Now put the snippet on your site. You are adding it to whichever page you want people to pay on: a Donate page, a checkout page, a membership sign-up, and so on.
You need the snippet on your clipboard from Step 1 and edit rights on the WordPress page. When it works, the Merchant360 form appears exactly where you placed the block, and a test payment shows up on the Pay Widget page under Recent activity.
If the page shows the raw code instead of a form, it was pasted into a paragraph block; delete it and paste into a Custom HTML block. If the form appears but says payments are unavailable, the Master switch is off in Merchant360.
- 1In WordPress, open the page you want (Pages → edit, or add a new one).
- 2Block editor: click the + to add a block, search for Custom HTML, and paste the snippet into it. Classic editor: switch to the Text tab and paste it there. Page builders (Elementor, Divi, Beaver Builder): drop in an HTML widget and paste it.
- 3Click Update or Publish, then open the live page. The Merchant360 payment form appears right where you placed the block.
- 4Do a real test: make a small live payment (or use test mode first). It should show up immediately under Recent activity on the Pay Widget page and in Transactions.
| On this screen | What it does |
|---|---|
| Custom HTML block | The WordPress block that renders pasted code as-is. |
| Update / Publish | Saves the page and makes the form live. |
| Recent activity | On the Pay Widget page: the last 50 events on your widget with When, Mode, Customer, Card, and Outcome, and a Refund button per charge. |
The form is responsive, so it fits your page on phones and desktops. You can place more than one on a site, for example a Donate widget on one page and a subscription sign-up on another, from the same Merchant360 account.
Donations
For a Donate page, set the payment type to Donations (on the Pay Widget, or when you create a payment link). The donor chooses how much to give; you can set an optional minimum and maximum to keep gifts in a sensible range.
It is a great fit for nonprofits, churches, schools, fundraisers, and tip jars. Donors get an emailed receipt, and every gift is tracked against the donor in your Merchant360 customer list.
For a button instead of an embedded form, the Pay Now button builder on the Pay Widget page can leave the amount blank; the customer then chooses how much to pay, using your Donations type. Choose the Donation option to show donation wording, or Open payment for a neutral Pay page.
If the donation form rejects an amount, it is outside your Amount range; adjust the Minimum or Maximum.
- 1Pay Widget → Payment types → turn on Donations, set an optional Minimum, then embed it on your Donate page (Step 2 above).
- 2Prefer a button? Create a payment link with the amount left open ($0.00 means the donor chooses) and link it from a Donate button or menu item, or build one with the Pay Now button card.
| On this screen | What it does |
|---|---|
| Donations (payment type) | Enables the donation form with preset chips and a custom amount. |
| Amount range → Minimum / Maximum | Bounds for what a donor can give. |
| Pay Now button → blank amount | Leaves the amount to the customer. Requires the Donations type to be on. |
| Donation / Open payment | Chooses donation wording or a neutral Pay page for the blank-amount button. |
One-time payments
For a set price, a product, a service, a deposit, an event ticket, set the payment type to a fixed amount. The customer sees the price and pays it on the spot, with no invoice needed.
Use the Pay Widget embed for a built-in checkout on the page, or a payment link for a simple Pay now button. A payment link locks after the first successful payment, so it cannot be paid twice.
On the Pay Widget page, the Pay Now button card builds the button for you: enter the amount and Button text, pick the color, size, and corners, choose whether it opens a new page or a popup on your page, and copy the Button HTML or the Plain link.
If the fixed-amount form shows no amount, the snippet was copied before the amount was set on the Pay Now button card; set it and copy again.
- 1Fixed-amount embed: Pay Widget → turn on Fixed amount → set the amount on the Pay Now button card → copy the snippet → paste on your page.
- 2One-off button: Take Payments → Payment Links → New Payment Link → set the amount and (optionally) a description and expiry → Copy URL → link it from a button on your WordPress page.
| On this screen | What it does |
|---|---|
| Fixed amount (payment type) | Enables set-price payments. |
| Pay Now button → Amount | The price the button charges. Leave blank to let the customer choose. |
| Button text / Button color / Size / Corners / Full width | How the button looks on your page. |
| Opens: New page / Popup on your page | Whether the pay page opens in a new tab or as a popup over your site. |
| Success URL (optional) | Where to send the customer after a successful payment. Blank shows the receipt with a Close button. |
| Button HTML / Plain link | Copy the ready-made button, or point any existing button at the link. |
| Payment Links → New Payment Link | A one-off link with amount, description, and expiry that locks after it is paid. |
Subscriptions
To bill on a recurring schedule, memberships, dues, retainers, a monthly box, use subscriptions. You first create a plan (the price and how often it bills), then let customers sign up from your WordPress site. Merchant360 charges the first payment immediately, puts the card on file for the rest, and retries a failed charge for you.
Plans for the widget live under Subscription plans on the Pay Widget page (and on its Subscriptions page). Each plan has a name, an optional description, the amount, a billing period (daily, weekly, every 2 weeks, monthly, quarterly, every 6 months, or yearly), an optional number of payments, an optional free trial in days, an optional one-time setup fee, and terms such as your cancellation policy. Archive a plan to hide it from new sign-ups; existing subscribers keep billing.
The Subscribers list shows everyone enrolled with their next charge and status: Active, Paused, Failed, or Cancelled. Pause and Resume stop and restart billing, Retry now re-runs a failed charge once the customer updates their card, and Cancel ends the subscription.
You are done when the Subscriptions type is on, at least one plan exists, and a test sign-up appears under Subscribers. If the widget shows no plans, the Subscriptions payment type is off (the card warns you) or every plan is archived. See the Recurring billing chapter for the full details on plans, free trials, metered usage, and dunning.
- 1Create the plan: Pay Widget → Subscription plans → + New plan. Set the Plan name, Amount, and Billing period, add a trial, setup fee, or terms if you want them, and click Create plan.
- 2Offer it on your site: turn on Subscriptions in Payment types and embed the widget on your sign-up page, or send a subscription payment link. The customer enters their card once and is billed automatically from then on.
| On this screen | What it does |
|---|---|
| Subscriptions (payment type) | Must be on before customers can sign up. The plans card warns you when it is off. |
| + New plan | Opens the New subscription plan form. |
| Plan name / Description / Amount / Billing period | What the customer sees and pays. Billing period options: Daily, Weekly, Every 2 weeks, Monthly, Quarterly, Every 6 months, Yearly. |
| Number of payments (optional) | Ends the subscription after that many charges. Blank means open-ended. |
| Free trial (days) / One-time setup fee | A trial delays the first recurring charge; a setup fee is charged at signup. |
| Terms (optional) | Cancellation policy and refund rules shown to the customer. |
| Create plan | Saves the plan and lists it on the widget. |
| Archive | Hides the plan from new sign-ups. Existing subscribers keep billing. |
| Subscribers (All / Active / Paused / Failed / Cancelled) | Filters the enrolled customers by status. Each row shows the next charge date. |
| Pause / Resume | Stops and restarts a customer's billing. |
| Retry now | Re-runs a failed charge after the customer updates their payment method. |
| Cancel | Ends the subscription after a confirmation. |
Subscriptions charge a card on file every cycle, so make sure the plan and price are right before you share the page. Customers can cancel from their receipt, and you can manage every subscription from the Subscribers list.
Letting customers pay an invoice
Two of the six payment types are for collecting on a bill rather than a set price. Both are worth turning on if you send invoices, and they behave differently: one looks the invoice up for the customer, the other lets them type in a reference from somewhere else.
These are loginless: your customer never creates an account or signs in. The lookup itself is the security; an invoice only comes back when both the invoice number and the exact email you sent it to match.
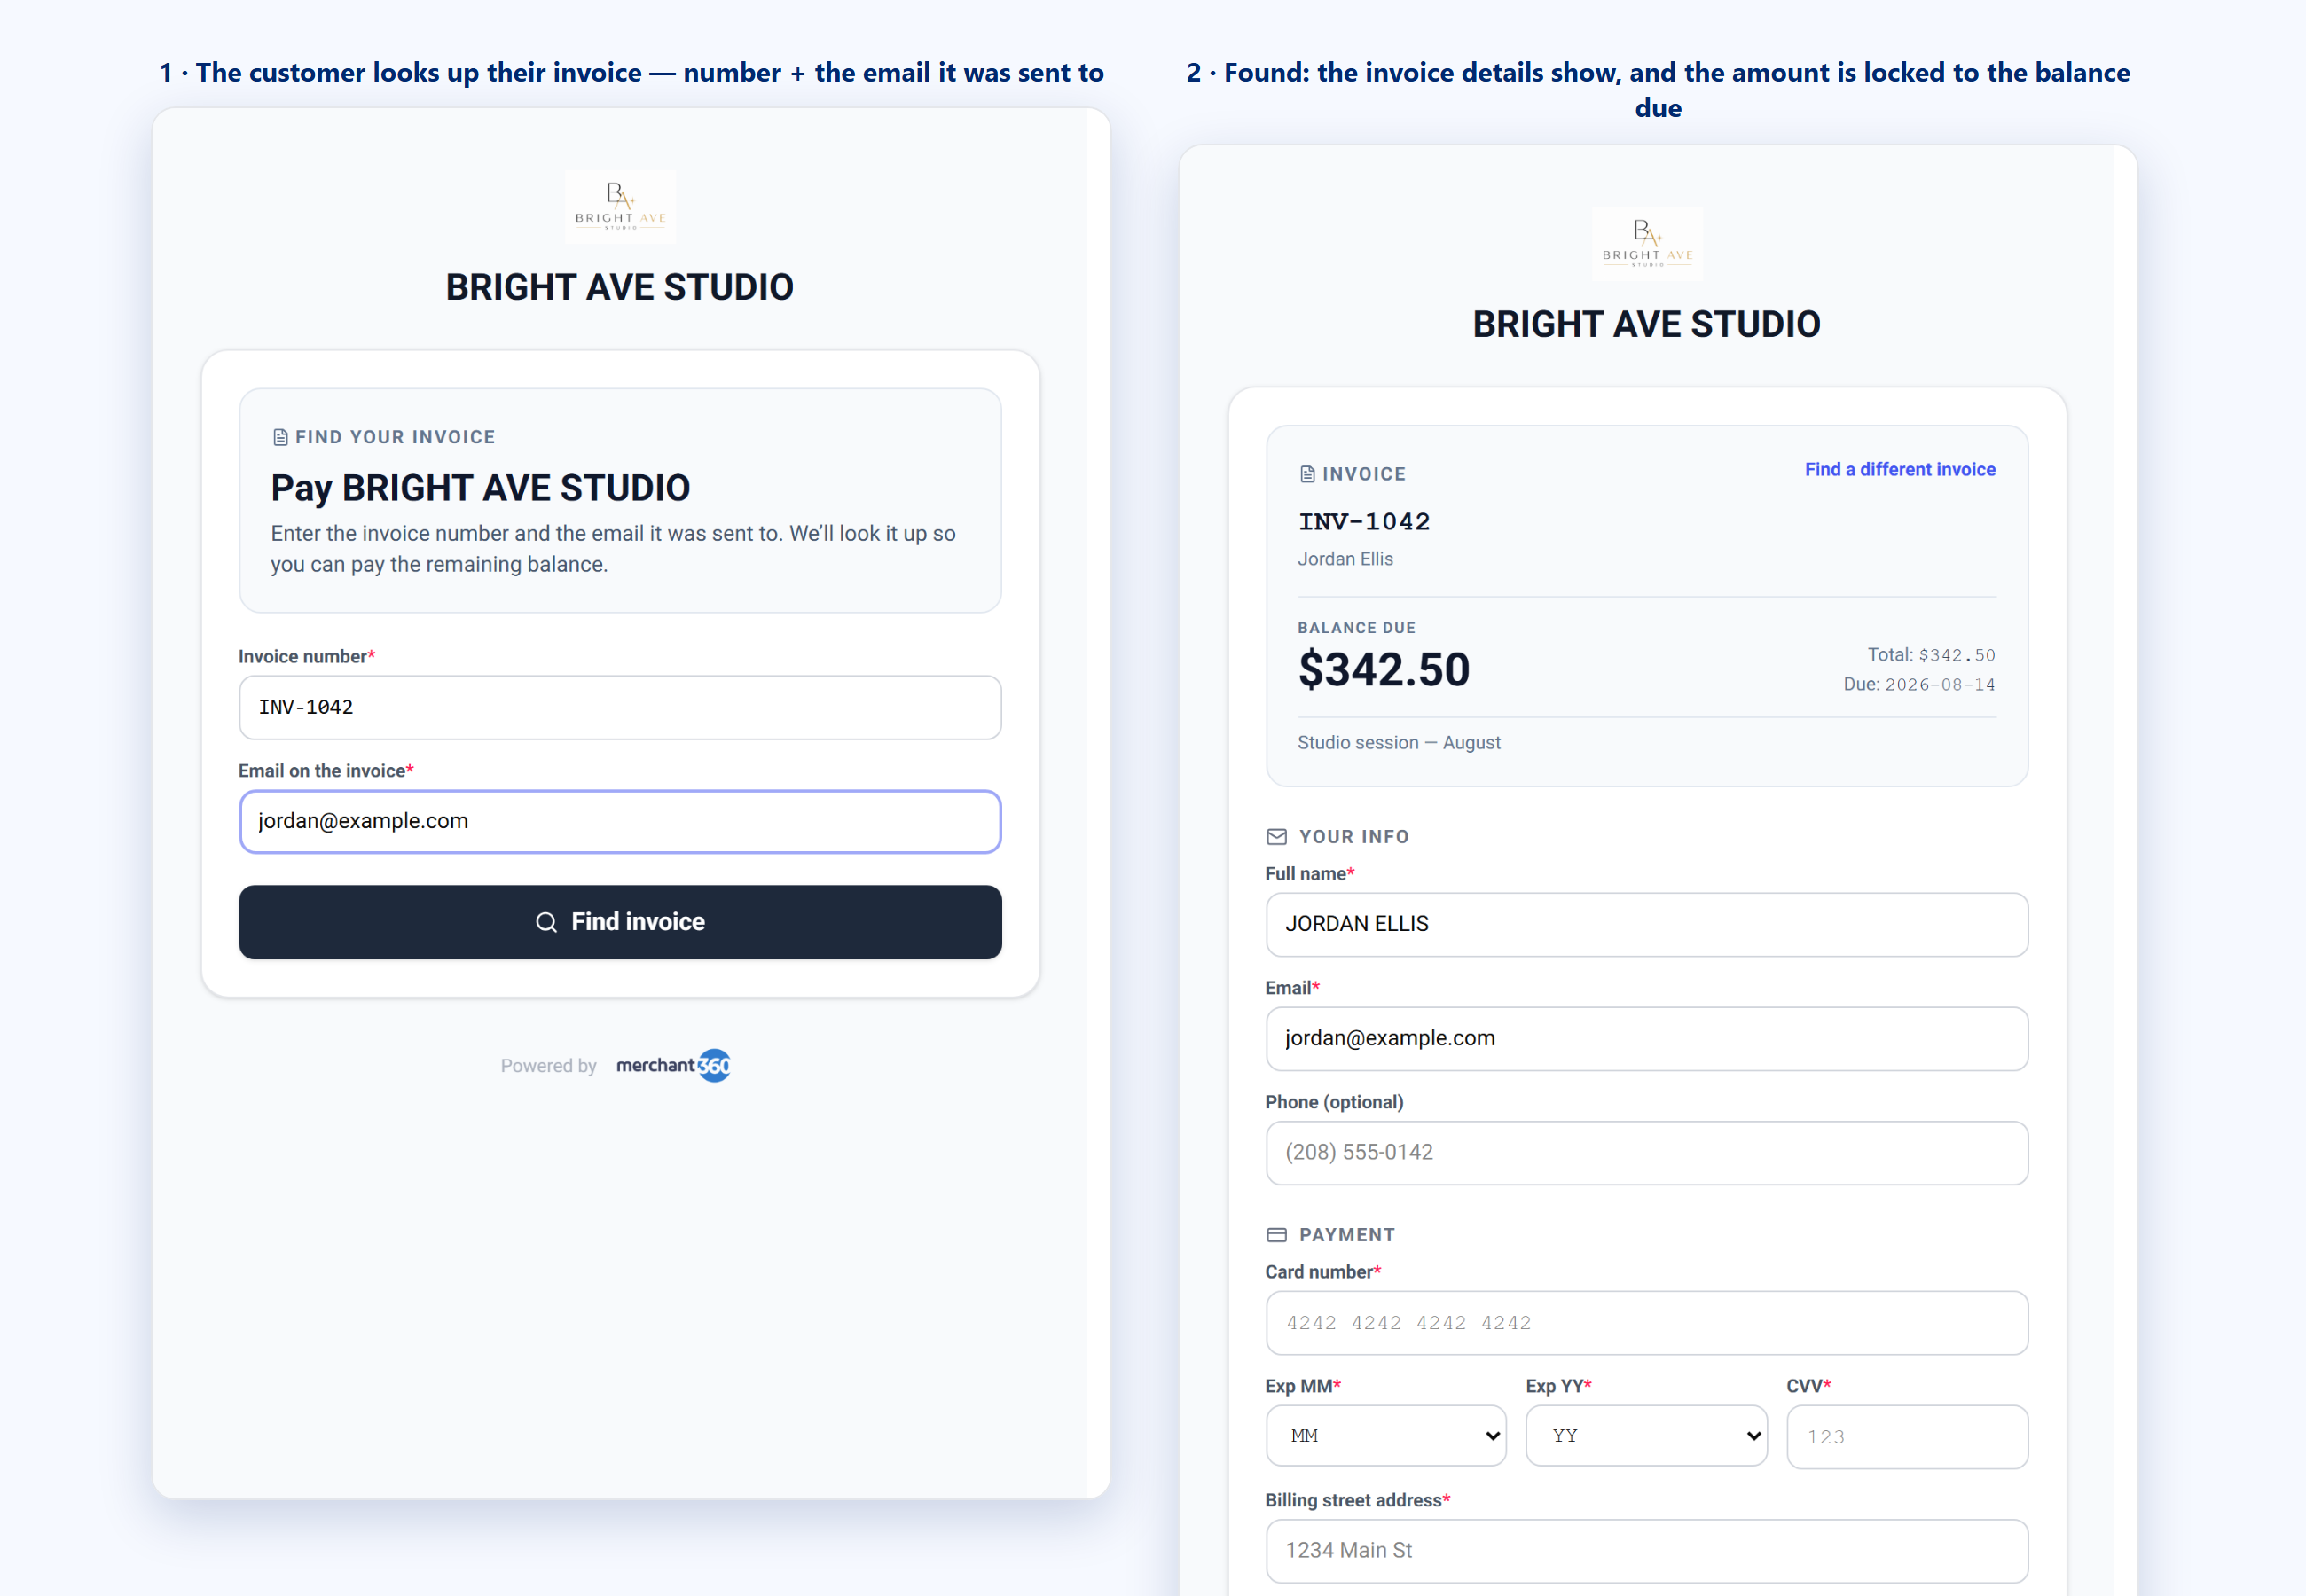
Pay a Merchant360 invoice is for invoices you sent from Merchant360 (Invoicing → Invoices). The customer does not need the emailed link: they can find the invoice themselves. When they open this widget they first see a short look-up step with two fields, the invoice number and the email address the invoice was sent to. They enter both and click Look up.
On a match, the widget shows the invoice, who it is for, the total, anything already paid, the balance due, and the due date, and locks the amount to the remaining balance so they cannot over- or under-pay. They enter their card and pay, the invoice is marked Paid (or Partial) automatically, and both of you get a receipt. If nothing matches, they see We couldn't find that invoice. Check the invoice number and the email it was sent to; no invoice details leak to a wrong guess.
Pay an external invoice is for invoices that live somewhere else (QuickBooks, Xero, a paper invoice). There is no look-up, because Merchant360 does not hold that bill. The customer simply types your invoice number and the amount they owe (and an optional note), then pays. The number is saved on the payment so you can reconcile it back to your own system.
If a customer says the lookup cannot find their invoice, check the email on the invoice in Invoices; a different address, even a typo, will not match. If an external-invoice payment needs to be matched to your books, the invoice number is on the transaction's description in Transactions.
- 1Turn it on: Pay Widget → Payment types → enable Pay Merchant360 invoice and/or Pay external invoice, then embed the widget (or share its link) on a Pay your bill page.
- 2Merchant360 invoice: the customer looks it up by invoice number plus email, sees the balance, and pays; the invoice updates itself.
- 3External invoice: the customer types the invoice number plus amount from your other system and pays; the reference rides along on the transaction.
| On this screen | What it does |
|---|---|
| Pay Merchant360 invoice (payment type) | Adds the look-up form for invoices you sent from Merchant360. |
| Pay external invoice (payment type) | Adds the number-plus-amount form for invoices from another system. |
| Look up (customer side) | Matches the invoice number and email; on a match, shows the invoice with the amount locked to the balance due. |
| Invoice number / Amount / Note (customer side) | Fields of the external-invoice form. The number is saved on the payment. |
| Paid / Partial | The invoice status set automatically after a Merchant360 invoice is paid through the widget. |
Send invoices from Merchant360? Turn on Pay Merchant360 invoice and put the widget on a Pay Your Bill page. A customer who lost the email can still pay in seconds with just their invoice number and email, with no support call.
Receipts, branding & keeping it secure
However a customer pays, donation, one-time, an invoice, or a subscription, they get a branded email receipt, and the payment appears in your Merchant360 dashboard alongside everything else, where you can refund it, see reporting, and follow it through to your bank.
Receipts are sent from noreply@merchant360.net with your business name on the From line. On the Pay Widget page, the Receipts card sets the From email customers reply to and a BCC email that gets a copy of every receipt. Branding sets your Brand color and, optionally, a Logo URL and the pages customers land on after a successful payment or a cancellation.
The card is always entered on Merchant360's hosted form, not on your WordPress site. If your account runs a credit-card surcharge, it is shown clearly to the customer before they pay.
Refund a widget payment from Recent activity on the Pay Widget page (full or partial, with an optional reason) or from Transactions. If a customer says they got no receipt, check the email they typed on the form in Recent activity and resend the receipt from Transactions.
| On this screen | What it does |
|---|---|
| Receipts → From email | The reply-to address on customer receipts. |
| Receipts → BCC email | An address that receives a copy of every receipt. |
| Branding → Logo URL / Brand color | Your logo and accent color on the form and receipts. |
| Success redirect / Cancel redirect | Where customers land after paying or cancelling. Optional. |
| Recent activity → Refund | Refunds a widget charge in full or in part, with an optional reason. The row then reads Refunded. |
| Transactions → Resend | Emails the receipt again to an address you enter. |
Everything you place on WordPress is powered by your one Merchant360 account, so there is nothing extra to reconcile: donations, one-time sales, and subscription billing all report together.