
WooCommerce
Sell online with WooCommerce – install, connect, take cards, and gift cards.
- WooCommerce – what the plugin does
- WooCommerce – works with every checkout, every way
- WooCommerce – step 1: install the plugin
- WooCommerce – expert install (optional, for developers)
- WooCommerce – step 2: connect to Merchant360
- WooCommerce – step 3: confirm and test
- WooCommerce – step 4: choose how customers pay
- WooCommerce – payment style: Modal (pop-up)
- WooCommerce – payment style: Hosted page (redirect)
- WooCommerce – Pay with Vault (returning customers)
- WooCommerce – gift cards (eGiftSolutions)
- WooCommerce – accept gift cards at checkout
- WooCommerce – sell gift cards as products
- WooCommerce – refund to store credit
- WooCommerce – surcharging: credit cards only, always itemized
- WooCommerce – refunds, voids, and saved cards
WooCommerce – what the plugin does
If your online store runs on WordPress with WooCommerce, the Merchant360 for WooCommerce plugin lets that store take credit and debit cards through your Merchant360 account, so your online sales land in the same place as the rest of your payments, with the same receipts, refunds, and reporting.
Your customer types their card into a small, secure Merchant360 window, not into your website.
If your account also has gift cards turned on, the same plugin can sell gift cards, let shoppers pay with a gift card, and turn a refund into store credit. You do not need a second key or a second setup for any of that; it rides on the same connection.
On the Merchant360 side, everything lives on the WooCommerce card under Account → Integrations: the connection status, the plugin download link, the setup guide, and the manual key. On the WordPress side, everything lives in the plugin's settings under WooCommerce → Settings → Payments → Merchant360.
You are done when the plugin shows Connected to Merchant360 as your business, Test connection succeeds, and a practice order appears under Test Mode Transactions. If a practice order charged a real card, the store connected live; disconnect in the plugin and reconnect with Connect in test mode ticked.
- 1You will do four things, in order: install the plugin, connect it to your Merchant360 account, test the connection, then choose how the card window appears at checkout. The next few sections walk through each one with pictures.
- 2You need: a WordPress site with WooCommerce active, and your Merchant360 login. That is it.
| On this screen | What it does |
|---|---|
| WooCommerce card (Integrations) | Shows Not connected, Connected with one click, or Connected with a key, with Get the plugin on WordPress.org, Setup guide, and Generate a key. |
| Plugin settings (WooCommerce → Settings → Payments → Merchant360) | Where you connect, test, set the Title and Description, choose Card entry, and turn on gift-card features. |
| Test Mode Transactions | Where practice orders from a test-mode connection appear, separate from live Transactions. |
Nothing here moves real money until you are ready. Connect in test mode (or with a test key) and place practice orders; they never charge a card, never fund, and never appear in your live Transactions. Card 4242 4242 4242 4242 approves; 4000 0000 0000 0002 rehearses a decline. Switch to live when everything looks right.
WooCommerce – works with every checkout, every way
WooCommerce has two kinds of checkout: the original Classic checkout (also called the shortcode checkout) and the newer Block checkout. Merchant360 works with both; you do not have to change your store or know which one you have.
You also get to choose how the secure card window appears to your shopper. There are three styles, and all three work on both checkouts: Inline (the card fields sit right inside your checkout), Modal (a secure card window pops up over your checkout), and Hosted page (the shopper goes to a secure Merchant360 page and comes right back). You pick the one you like under Card entry in the plugin settings.
If you add a surcharge to card payments, it works in every one of these combinations: the shopper sees the surcharge itemized before they pay, and the order total is reconciled automatically so your books match what was charged.
If a card box does not appear at checkout on one theme but does on another, switch Card entry to Modal or Redirect; those two do not depend on the theme's checkout layout.
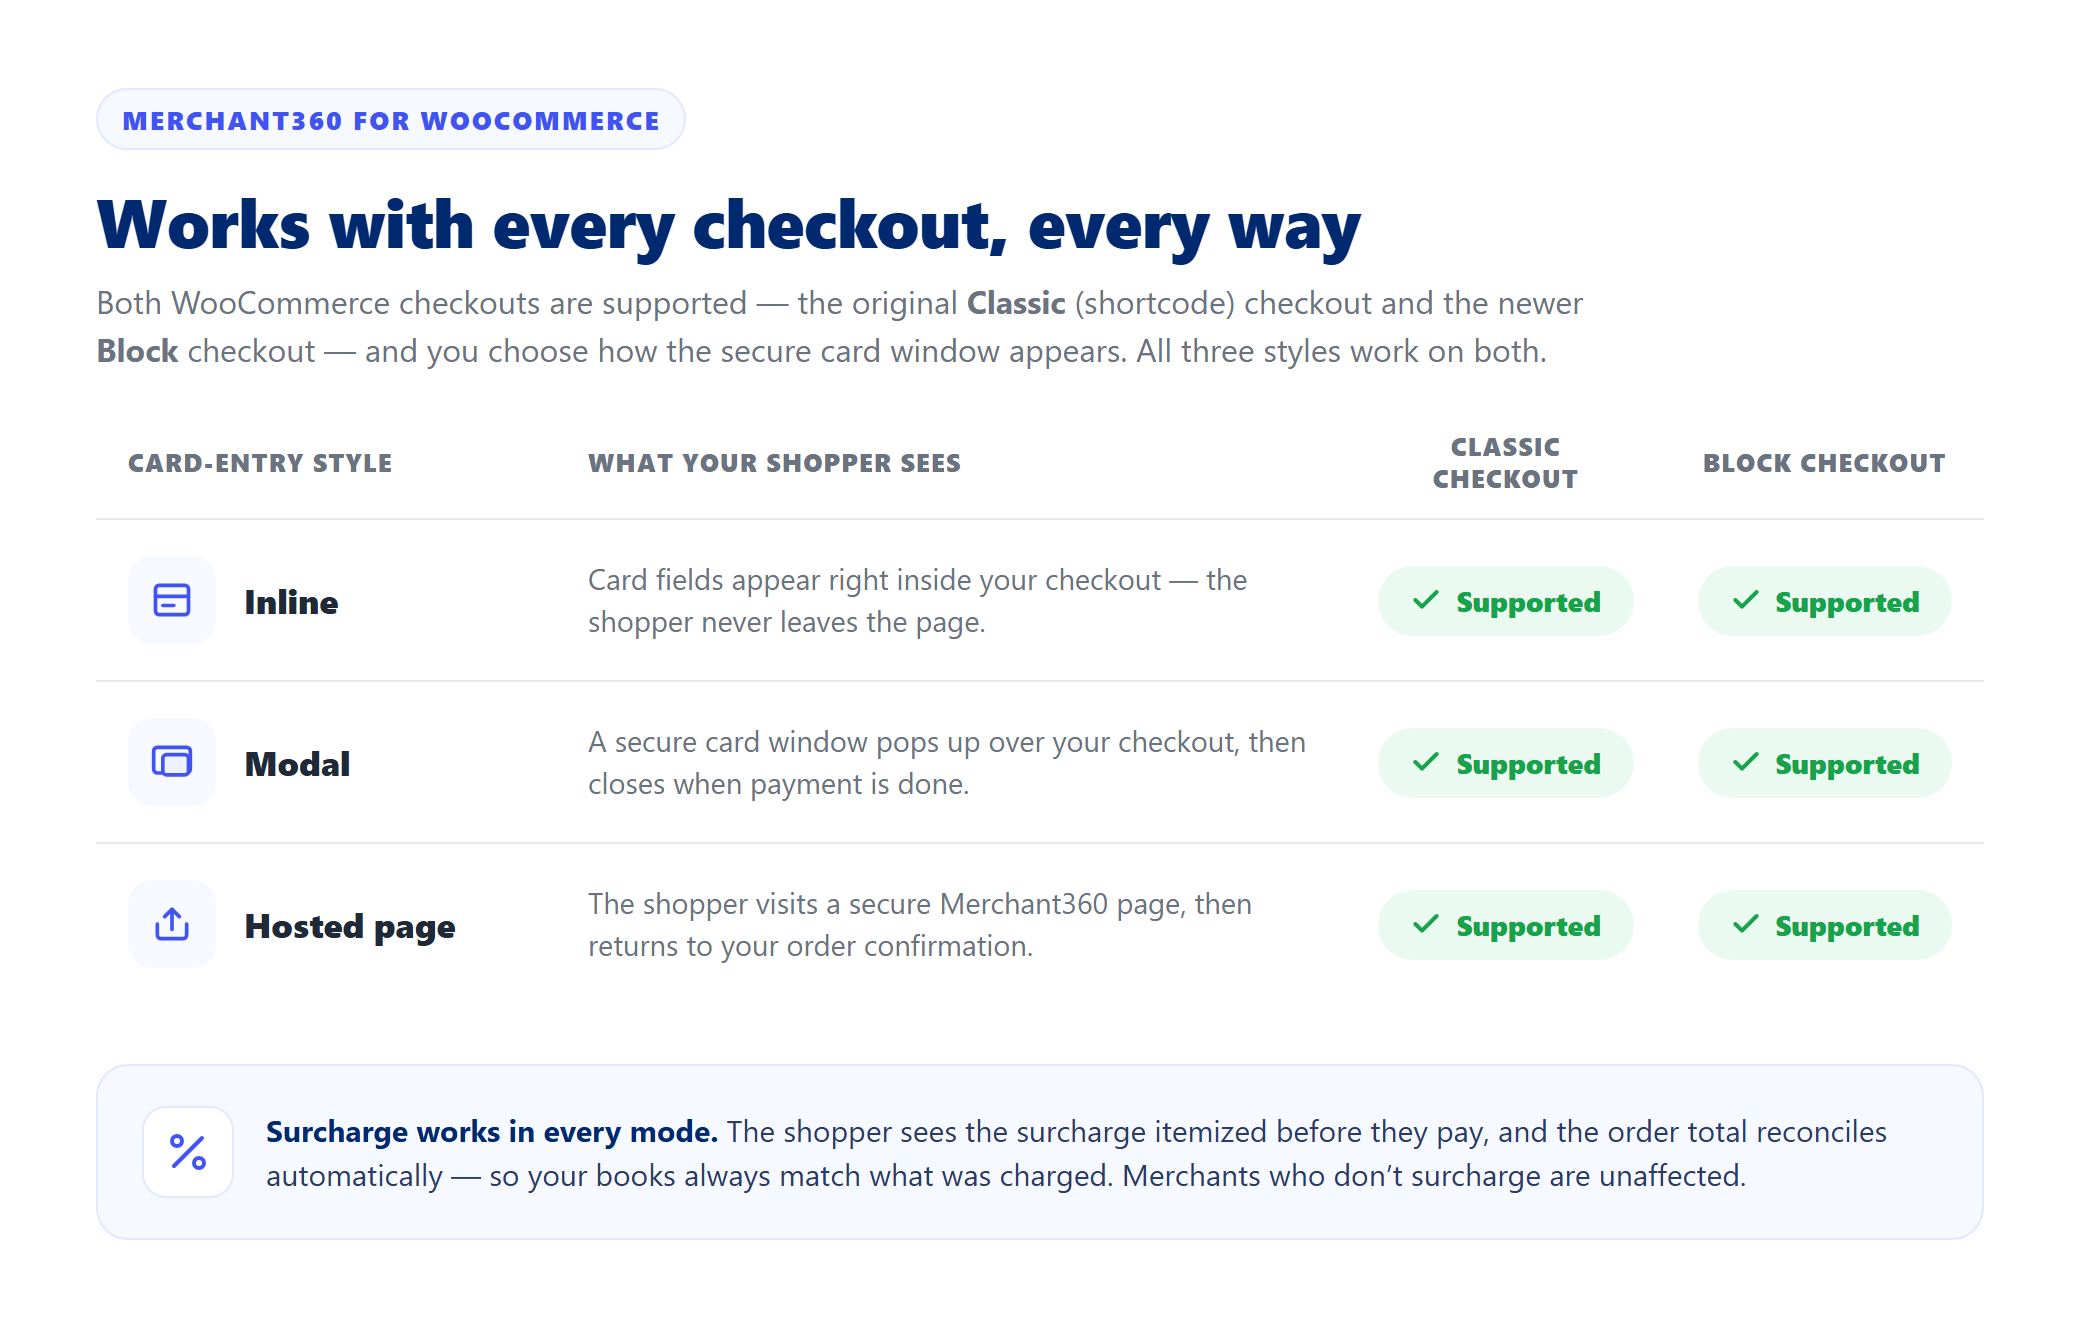
| On this screen | What it does |
|---|---|
| Card entry: Inline | The secure card fields are embedded in the checkout page. |
| Card entry: Modal | A secure window opens over the checkout when the shopper places the order. |
| Card entry: Redirect (Hosted page) | The shopper goes to a Merchant360 pay page and returns to your thank-you page. |
| Surcharge notice | Shown on the payment step when your account is enrolled in surcharging; the amount is itemized on the card window. |
WooCommerce – step 1: install the plugin
A WordPress plugin is just an add-on for your site. Merchant360 for WooCommerce is published in the official WordPress plugin directory (wordpress.org/plugins/merchant360-for-woocommerce), so you install it right from your dashboard with no file to download, and WordPress offers you its updates automatically, like any other plugin.
You need an administrator login to your WordPress site and WooCommerce already active. When you are done, Merchant360 appears in your Plugins list with a Settings link.
If the search does not find the plugin, your site may block the plugin directory; use Upload Plugin with the zip from the Get the plugin on WordPress.org link on the Integrations page instead. If Activate fails, check that WooCommerce itself is installed and active first.
- 1Log in to your WordPress admin (usually yoursite.com/wp-admin).
- 2In the left menu click Plugins, then Add New Plugin.
- 3In the search box at the top right, type Merchant360.
- 4On the Merchant360 for WooCommerce card, click Install Now, and when it finishes, click Activate. The plugin is now installed and turned on.
- 5You will now see Merchant360 in your Plugins list. Click its Settings link (or go to WooCommerce → Settings → Payments → Merchant360) to open its settings; that is where the next step happens.
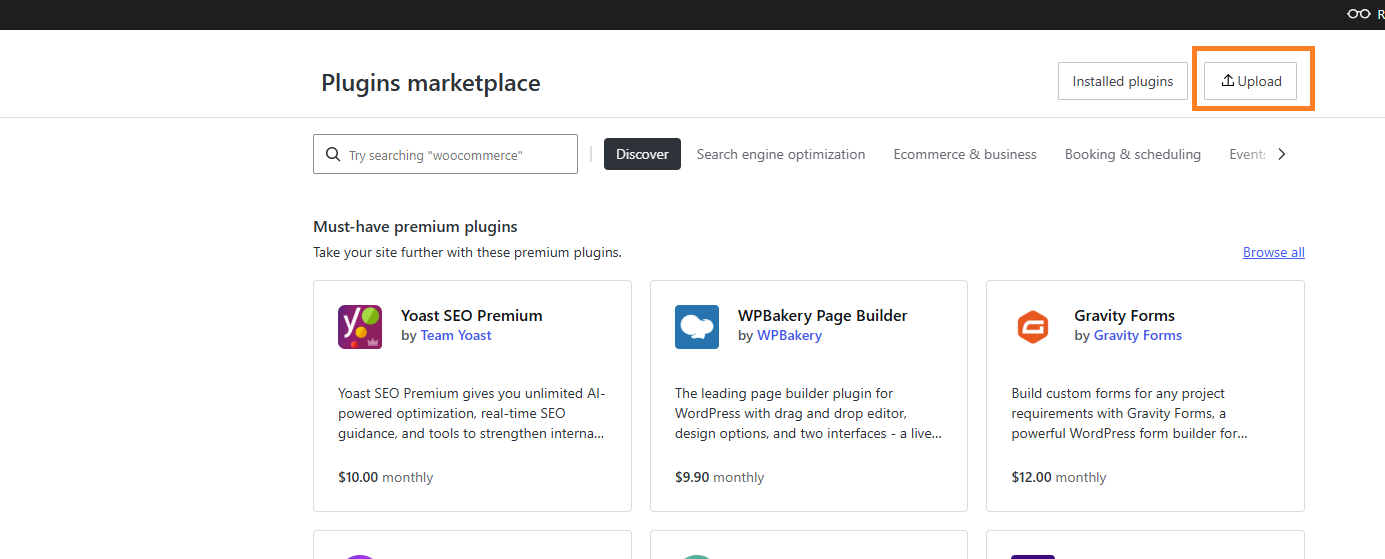
| On this screen | What it does |
|---|---|
| Plugins → Add New Plugin | The WordPress screen where you search the plugin directory. |
| Install Now / Activate | Installs the plugin, then turns it on. |
| Upload Plugin | Alternative path for the zip file when the directory is not reachable. |
| Settings (in the Plugins list) | Opens the plugin's settings page for the connection step. |
| Get the plugin on WordPress.org | Link on the Merchant360 Integrations card to the plugin's directory page. |
Prefer a manual install? The same plugin is available as a zip from us: Plugins → Add New Plugin → Upload Plugin, and upload merchant360-for-woocommerce.zip. Either way you end up with the identical plugin.
WooCommerce – expert install (optional, for developers)
Most people should use the steps above and can skip this section entirely. But if you or your developer has command-line (SSH or WP-CLI) access to the site, the plugin installs or updates in one line from the WordPress.org directory.
If the directory is unreachable from your host, the same plugin is also available from Merchant360's hosted copy: wp plugin install https://www.merchant360.net/integrations/woocommerce/merchant360-for-woocommerce.zip --force --activate
After the command finishes, the plugin appears in Plugins and the connection step is the same as for a dashboard install. If the command reports a permissions error, run it as the user that owns the WordPress files.
| On this screen | What it does |
|---|---|
| wp plugin install merchant360-for-woocommerce --force --activate | Installs (or updates) the current version from WordPress.org and activates it. |
| --force | Overwrites an existing copy so the command doubles as an updater. |
| --activate | Turns the plugin on as soon as it is installed. |
Run over SSH on the store (installs and activates the current version):
wp plugin install merchant360-for-woocommerce --force --activateWooCommerce – step 2: connect to Merchant360
Connecting links the plugin to your Merchant360 account so your store's payments go to you. There are two ways to do it. The easy way (one click) works for almost everyone. The manual way is a fallback if your store cannot be reached from the internet.
The easy way: on the plugin settings, click Connect with Merchant360. You are sent to Merchant360 to sign in and approve; that sign-in is what proves the store is yours. The approval screen names your store and lists what it will be allowed to do: create card payments and refunds, save customers' cards on file, and receive payment status updates. Merchant360 then sets up the key and the payment notifications for you and sends you back. You do not copy or paste anything.
The manual way (only if the easy way cannot reach your store): in Merchant360 go to Account → Integrations, and on the WooCommerce card click Generate a key. It is shown once; copy it, paste it into the plugin's API key box, and save. Treat that key like a password: it is secret, so do not email it or post it anywhere. Tick Test/sandbox key if you want a key that only makes practice payments.
You are done when the plugin says it is connected and the Integrations card reads Connected with one click or Connected with a key. If the approval page says the connection link is invalid or has expired, start the connection again from the plugin. If Connect seems to do nothing, your store may not be reachable from the public internet (a staging or password-protected site); use the manual key.
- 1Easy way: click Connect with Merchant360 on the plugin settings.
- 2Sign in to Merchant360 if you are asked, tick Connect in test mode if you want practice orders first, and click Authorize & connect. You are returned to your store and it says you are connected.
- 3Manual way (fallback): in Merchant360 open Account → Integrations → WooCommerce, click Generate a key, copy it, paste it into the plugin's API key field, and Save.
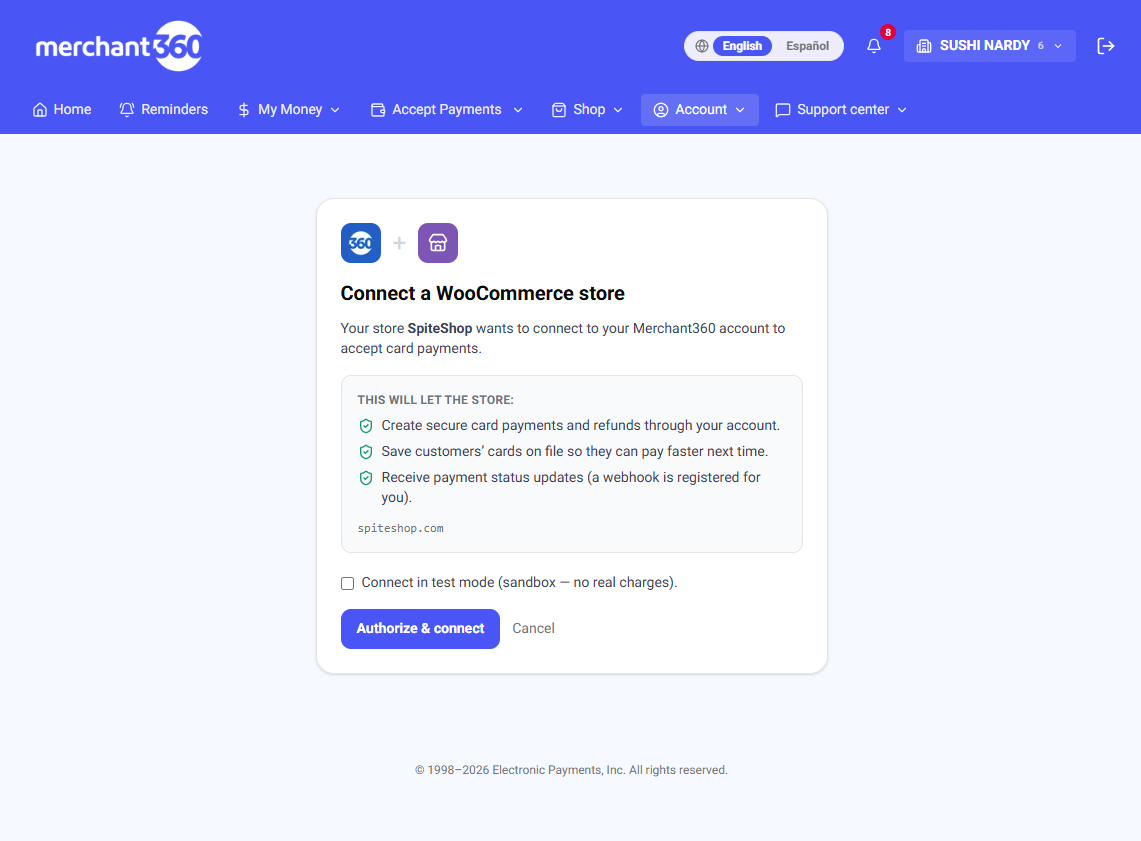
| On this screen | What it does |
|---|---|
| Connect with Merchant360 | Button in the plugin settings. Sends you to Merchant360 to approve the store. |
| Connect a WooCommerce store → Authorize & connect | The approval screen in Merchant360. It shows the store's address and the permissions it gets. Cancel backs out. |
| Connect in test mode (sandbox – no real charges) | Checkbox on the approval screen. The store gets a test connection until you reconnect live. |
| Generate a key | On the Integrations card: creates a manual API key, shown once. Copy it into the plugin's API key field. |
| Test/sandbox key | Option when generating: the key only creates test payments. |
| API key (plugin field) | Where the manual key is pasted. Save after pasting. |
| Connected with one click / Connected with a key | Status on the Integrations card showing how the store was connected. |
Most people are already signed in to Merchant360 in another browser tab; the connect still works whether you are signed in or not, it just asks you to sign in if needed.
WooCommerce – step 3: confirm and test
Once connected, the settings show a green Connected to Merchant360 as [your business] line. Click Test connection to confirm everything is talking correctly; you get a success message.
While you are here, set the two things your customer sees: the Title (the name of the payment option at checkout, like Credit / debit card) and the Description (a short reassuring line under it). Then make sure Enable Merchant360 payments is checked so it appears at checkout.
You are done when Test connection succeeds and the Merchant360 option shows on your checkout page. If it does not show, Enable Merchant360 payments is unchecked or the changes were not saved.
- 1Click Test connection. A success message means you are good to go.
- 2Set the Title and Description your customers will see at checkout (the defaults are fine).
- 3Check Enable Merchant360 payments to turn the card option on at checkout.
- 4Save changes.
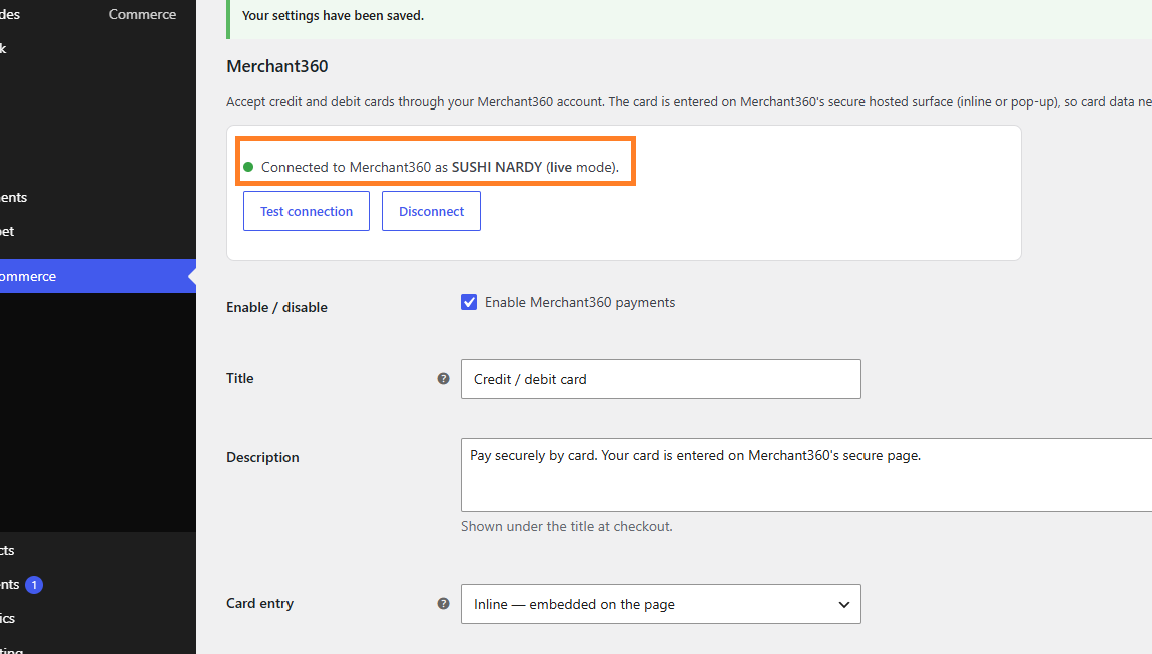
| On this screen | What it does |
|---|---|
| Connected to Merchant360 as [your business] | Green status line confirming which account the store is linked to. |
| Test connection | Sends a test request to Merchant360 and reports success or the exact reason it failed. |
| Title | The payment option's name at checkout. |
| Description | The short line shown under the payment option. |
| Enable Merchant360 payments | Turns the card option on or off at checkout. |
| Save changes | Saves the settings. |
If Test connection ever hangs or fails after a successful connect, it is almost always the store's SSL or a security plugin blocking the request, not your key. Re-run it; the message tells you the exact reason.
WooCommerce – step 4: choose how customers pay
The plugin gives you three ways to present the secure card window at checkout. Pick whichever fits your store under the Card entry setting. In all three, Merchant360 processes the payment and your customer gets the normal WooCommerce order confirmation and email; the only difference is where the card box appears.
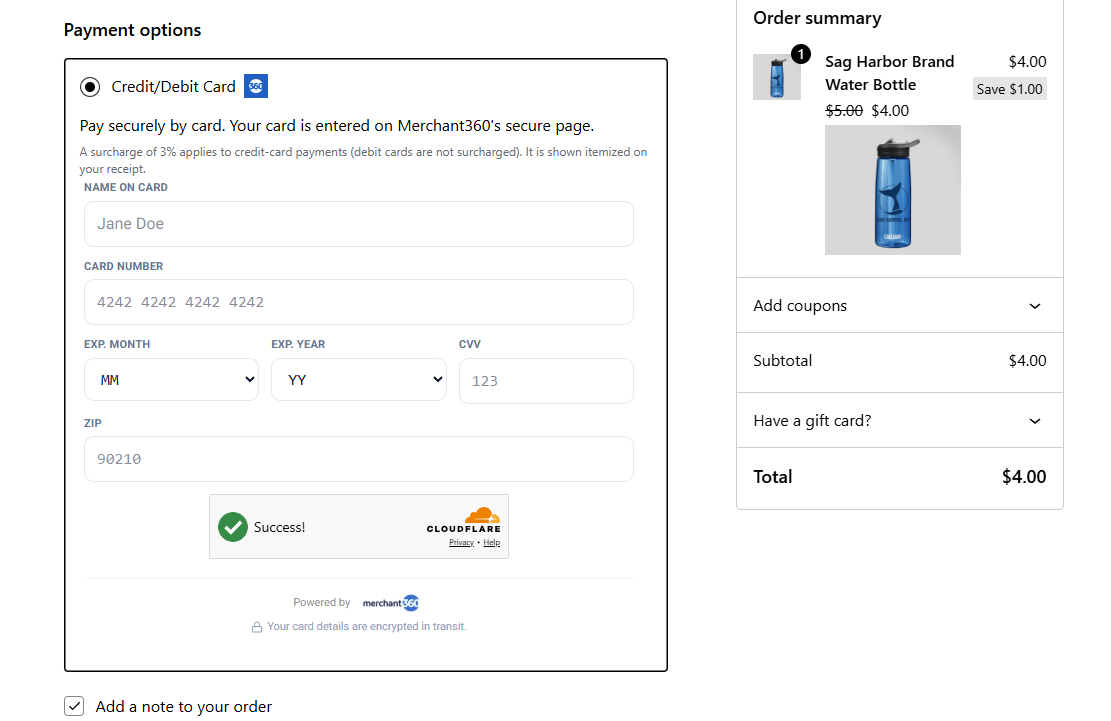
Inline (most popular): the secure card fields appear right inside your checkout page, so the shopper fills them in without ever leaving. It looks like a normal part of your checkout, but the card box is actually Merchant360's secure window embedded in the page.
You are done when a test order goes through in the style you chose. If the inline fields do not render on your theme, choose Modal instead; it does not depend on the checkout layout.
- 1Open the plugin settings and find Card entry.
- 2Choose Inline to embed the fields in the page (recommended for most stores).
- 3Save. Place a test order to see it in action before you go live.
| On this screen | What it does |
|---|---|
| Card entry | Dropdown with Inline, Modal, and Redirect. Changes take effect on the next checkout. |
| Inline | Embeds the secure card fields in the checkout page. |
| Save changes | Saves the chosen style. |
Not sure which to pick? Choose Inline. It is the smoothest for shoppers and the one most stores use. You can change it any time without reinstalling.
WooCommerce – payment style: Modal (pop-up)
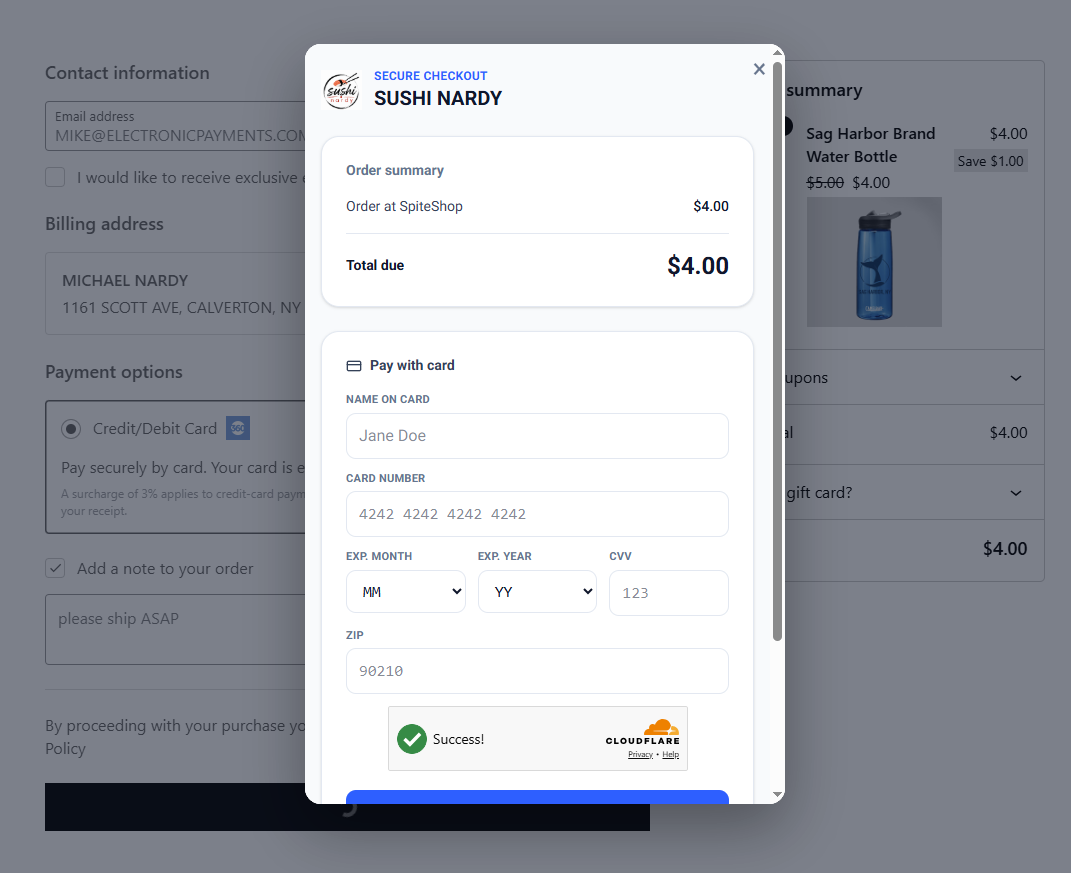
Modal shows the card window as a pop-up layered over your checkout page, similar to how PayPal or Apple Pay open a small window. The shopper pays in the pop-up and it closes back to your store when they are done. Choose this if you like keeping the checkout page clean and opening payment as a distinct step.
If the window closes without completing, the shopper cancelled; the order stays pending payment and they can click Place order again.
- 1In the plugin settings, set Card entry to Modal, and Save.
- 2At checkout the shopper clicks Place order; the secure card window opens over the page.
- 3After they pay, the window closes and the order completes on your store.
| On this screen | What it does |
|---|---|
| Card entry: Modal | Opens the secure Merchant360 window over your checkout when the shopper places the order. |
| Place order | The WooCommerce button that triggers the modal. |
The pop-up is a secure Merchant360 window laid over your own page. It is not a separate browser pop-up, so pop-up blockers do not interfere.
WooCommerce – payment style: Hosted page (redirect)
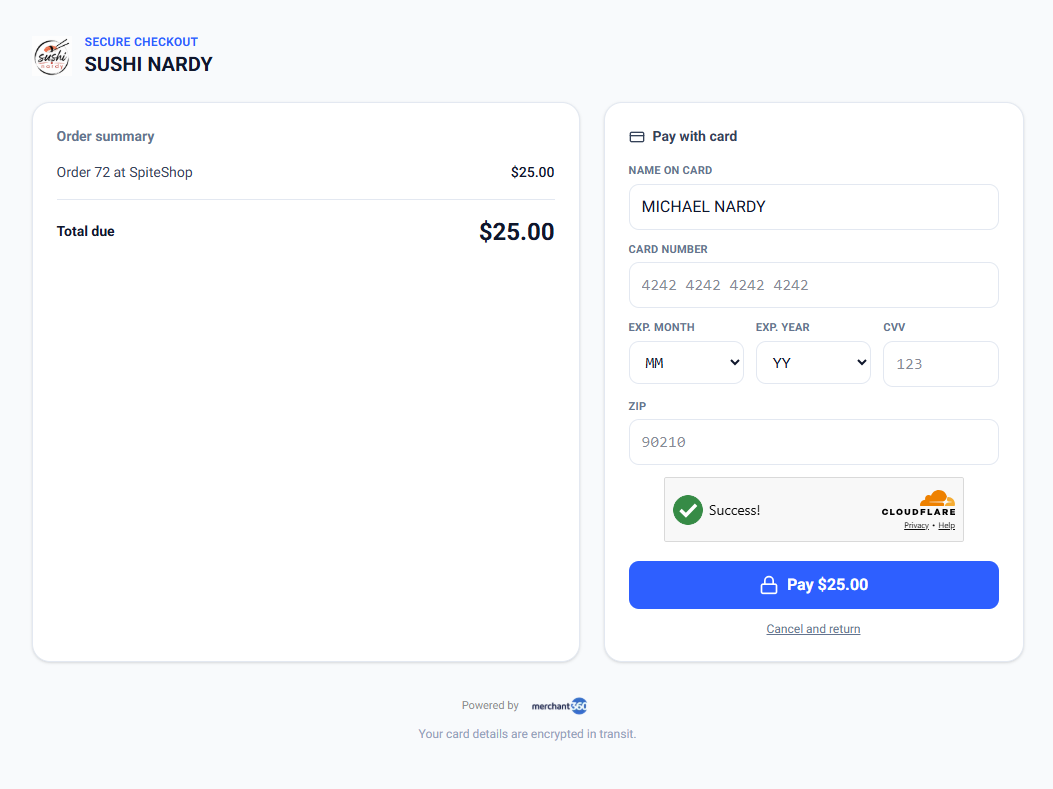
Hosted page sends the shopper to a full, separate Merchant360 payment page to enter their card, then brings them right back to your store's order-received page. It is the most traditional flow and is handy if you want the payment step completely off your own page.
If a shopper closes the pay page without paying, the order stays pending payment in WooCommerce and they can pay it from their order link.
- 1In the plugin settings, set Card entry to Redirect, and Save.
- 2At checkout the shopper is taken to the Merchant360 pay page.
- 3After paying they are returned to your store's normal thank-you page, order complete.
| On this screen | What it does |
|---|---|
| Card entry: Redirect | Sends the shopper to the hosted Merchant360 pay page and back. |
All three styles are equally secure and all send the same order confirmation to your customer. The choice is purely about where the card box appears.
WooCommerce – Pay with Vault (returning customers)
Pay with Vault is the Merchant360 network wallet, and it works right inside your WooCommerce checkout. A returning customer enters their email, confirms a one-time code, and pays with a card they saved before, at your store or any other business on Merchant360, without typing card details.
For you it is an ordinary card sale in every way: it runs on your own merchant account at your own rates, settles into your own deposits, and shows in Transactions like any other charge. There is nothing to enable in the plugin; the Vault option appears on the secure card window automatically on live connections.
If you do not see the Vault option on your checkout, the store is connected in test mode. Reconnect live and it appears.
| On this screen | What it does |
|---|---|
| Pay with Vault (on the card window) | Lets a returning customer pay with a saved wallet card after an email and one-time code. |
| Transactions | Vault payments appear here like any other card sale, and refund the same way. |
Vault quick-pay only shows on live connections; test mode keeps it off, since a wallet payment always moves real money.
WooCommerce – gift cards (eGiftSolutions)
The plugin's gift-card features run on eGiftSolutions, the gift-card program attached to your Merchant360 account. That means your online gift cards and your in-store gift cards are the same cards drawing on the same balances: a card sold on your website can be redeemed at the counter, and a card sold at the counter can be redeemed at your online checkout.
The Gift cards section only appears in the plugin settings when your Merchant360 account has gift cards turned on. If it is missing, ask us to turn gift cards on, then Disconnect and Connect the plugin once so the gift-card permissions are granted.
The next three sections cover what the plugin can do with them: accept gift cards at checkout, sell gift cards as products, and refund an order to store credit.
| On this screen | What it does |
|---|---|
| Gift cards section (plugin settings) | Holds the three switches: Accept gift cards, Sell gift cards, Refund to store credit. Shown only when your account has gift cards. |
| Gift Cards (Merchant360) | Where balances, activations, and redemptions from both the store and the counter are reported. |
WooCommerce – accept gift cards at checkout
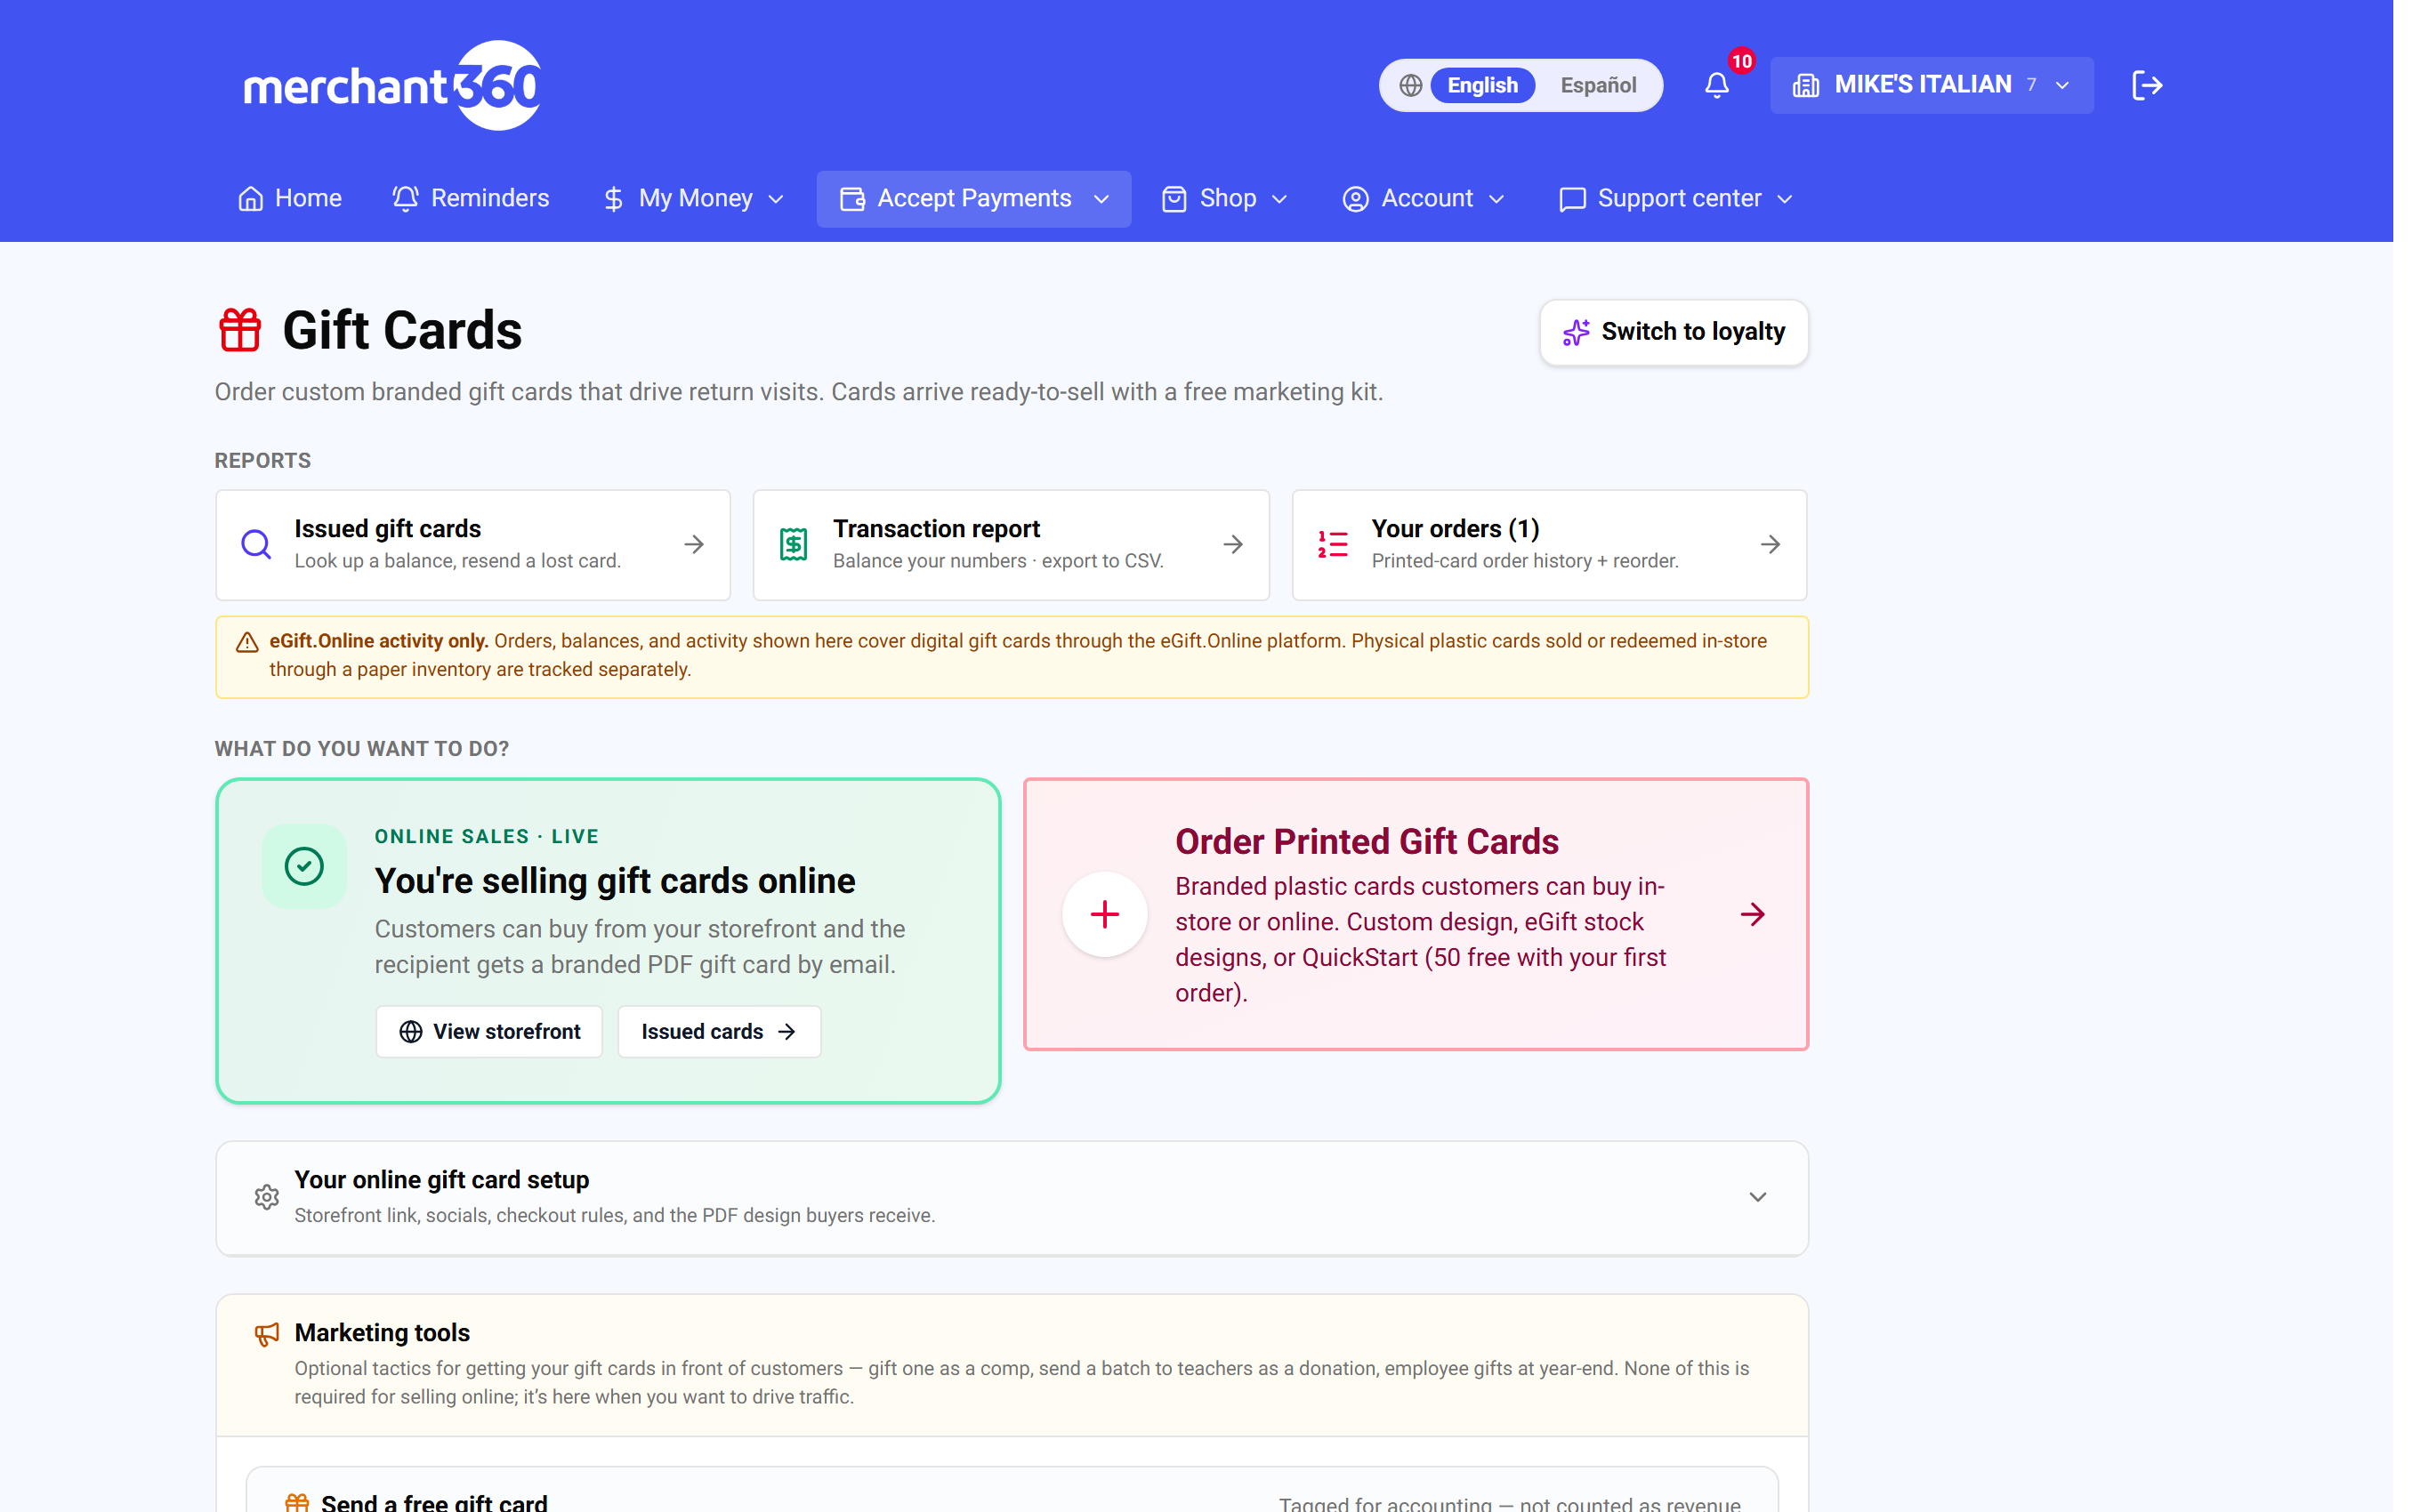
If your Merchant360 account has gift cards enabled, you can let shoppers pay with one. Turn on Accept gift cards in the plugin's Gift cards section. A Have a gift card? box then appears at checkout.
The Gift cards section only shows up in the plugin settings if your Merchant360 account is set up for gift cards. If you do not see it, your account does not have gift cards yet; ask us to turn them on and it appears (reconnect once after we do).
When a shopper enters their gift card, its balance is applied to the order and their credit or debit card is only charged for whatever is left. If the gift card covers the whole order, no card is charged at all. The gift card's balance is drawn down when the order is paid.
If a valid card is rejected at checkout, the store was connected before gift cards were enabled; click Disconnect, then Connect again once, and try again.
- 1In the plugin settings, open the Gift cards section and turn on Accept gift cards, then Save.
- 2A store connected before this feature launched should click Disconnect, then Connect again once, so the gift-card permissions are granted. Nothing else changes.
- 3At checkout the shopper enters a gift card in the Have a gift card? box; the balance comes off the total automatically.
| On this screen | What it does |
|---|---|
| Accept gift cards | Switch in the plugin's Gift cards section. Adds the Have a gift card? box to checkout. |
| Have a gift card? | Checkout box where the shopper enters the card. The balance is applied and only the remainder is charged to their card. |
| Disconnect / Connect (plugin) | Reconnecting once grants the gift-card permissions to a store connected before the feature existed. |
Everything is gated behind that one setting, so leaving it off changes nothing about your checkout. Gift-card acceptance works on both the classic and the newer block-based WooCommerce checkout.
WooCommerce – sell gift cards as products
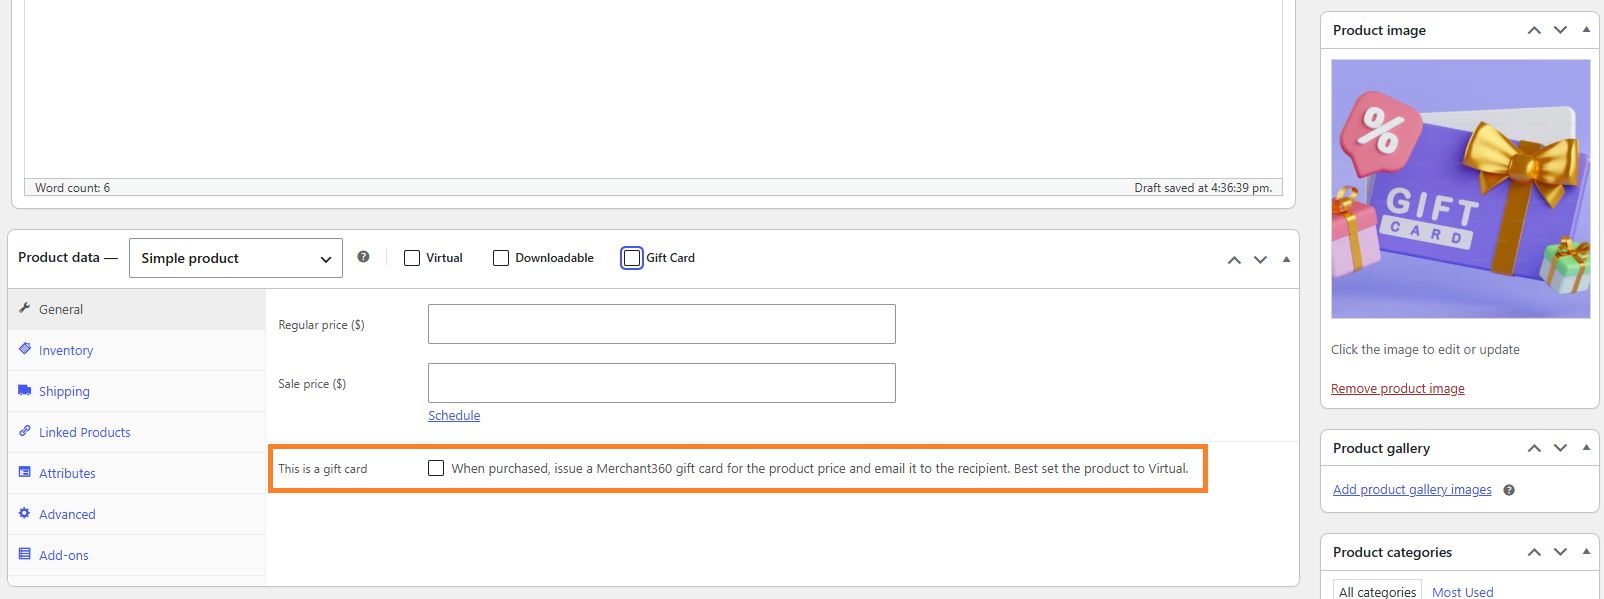
You can sell gift cards as ordinary products in your store. First turn on Sell gift cards in the plugin's Gift cards settings. Then edit any product, and in the Product data box check This is a gift card.
That checkbox is the whole trick: when it is checked, that product is a gift card. When a customer buys it, Merchant360 activates a real gift card for the product's price and emails it to the customer (or to a recipient they name at checkout), automatically, with no extra step from you. It is best to also mark the product Virtual, since nothing physical ships.
The buyer can name a recipient and add a short message right on the product page, so it arrives as a proper gift.
Selling draws from your gift-card inventory, so your rep needs to have loaded card numbers first. If a sale cannot get a card number, the order note says so; refund that order normally and contact your rep to load more cards.
- 1In the plugin's Gift cards settings, turn on Sell gift cards.
- 2Go to Products → edit (or add) a product, set its price, and mark it Virtual.
- 3In the Product data box, check This is a gift card, then Update.
- 4When someone buys it, the card is issued and emailed to the customer automatically; you do not do anything else.
| On this screen | What it does |
|---|---|
| Sell gift cards | Switch in the plugin's Gift cards section. Enables the gift-card checkbox on products. |
| This is a gift card | Checkbox in a product's Product data box. When checked, buying the product activates a real gift card for its price. |
| Virtual | WooCommerce product flag so no shipping is charged or expected. |
| Recipient and message (product page) | Lets the buyer address the card to someone else with a short note. |
| Order note | Records the issued card, or explains why a card number could not be obtained. |
Selling gift cards draws from your gift-card inventory, so make sure your rep has loaded card numbers before you start.
WooCommerce – refund to store credit
Instead of sending money back to a customer's card, you can hand out store credit. Turn on Refund to store credit and you get a Store credit box on each order screen. Enter an amount and the customer's email, and Merchant360 issues a brand-new gift card and emails it to them, keeping the value with your business.
Use it when a customer prefers credit, or when a card refund is no longer possible. The new card is a real gift card on your program, so it can be redeemed online or at the counter, and it appears in your Gift Cards reporting like any other activation.
If the box does not appear on the order, the switch is off or the Gift cards section is not available on your account yet.
- 1In the plugin's Gift cards settings, turn on Refund to store credit.
- 2On an order, use the Store credit box (amount plus the customer's email) to issue an emailed gift card.
| On this screen | What it does |
|---|---|
| Refund to store credit | Switch in the plugin's Gift cards section. Adds the Store credit box to order screens. |
| Store credit (amount, email) | Issues a new gift card for the amount and emails it to the address you enter. |
WooCommerce – surcharging: credit cards only, always itemized
If your Merchant360 account is enrolled in surcharging, the plugin applies it at checkout with no extra setup. Shoppers see a surcharge notice on the payment step, and the exact amount is itemized on the secure card window and added to the order total, which the plugin reconciles automatically, so your WooCommerce records match what was actually charged.
Debit cards are never surcharged. The credit-or-debit decision is not a guess: every card is checked against the card networks' own directory of card-number ranges at payment time. A debit or prepaid card pays the plain order total; only true credit cards carry the surcharge, at the rate your account is enrolled for.
Surcharging works in every combination the plugin offers: Inline, Modal, and Hosted page, on both the classic and the block checkout.
If no surcharge appears on a credit card, your account is not enrolled in surcharging; enrollment is done with your rep, not in the plugin. If a debit card shows a surcharge, contact support with the last four digits so the range can be checked.
| On this screen | What it does |
|---|---|
| Surcharge notice | Text on the payment step telling the shopper a surcharge applies to credit cards. |
| Surcharge line (card window) | Itemizes the exact surcharge amount before the shopper pays. Zero for debit and prepaid cards. |
| Order total reconciliation | The plugin adds the surcharge to the WooCommerce order total so the order matches the charge. |
WooCommerce – refunds, voids, and saved cards
Refunds and voids happen where you would expect: on the WooCommerce order screen. When you refund an order, that instruction goes to Merchant360 and is processed on your account. If the sale has not settled yet it is reversed (a void, no fee); if it has settled it is refunded. You see a note on the order confirming it.
Because a Woo order should stay in sync with your books, refund a Woo sale from WooCommerce, not from the Merchant360 transactions screen. In Merchant360 those Woo sales show a small Refund in WooCommerce note instead of a Void or Refund button, to steer you to the right place.
Saved cards: logged-in shoppers can save a card during checkout and reuse it next time (they manage them under My Account → Payment methods). And if your account runs a credit-card surcharge, it is shown clearly on the card window and added to the order total.
If a refund fails from the order screen, the order note shows the reason; the most common one is a refund larger than what remains on the sale. If a Woo sale shows Void or Refund buttons in Merchant360 rather than the note, it was taken before the store connected and can be refunded from either place.
- 1To refund: open the order in WooCommerce → Orders, click Refund, enter the amount, and confirm. It processes through Merchant360.
- 2To give store credit instead of a card refund, use the Store credit box on the order (see the previous section).
| On this screen | What it does |
|---|---|
| Refund (WooCommerce order) | Sends the refund to Merchant360. Unsettled sales are voided with no fee; settled sales are refunded. The order note confirms it. |
| Refund in WooCommerce (Merchant360 note) | Shown on Woo sales in Transactions instead of Void and Refund, so the order stays in sync. |
| Store credit | Issues a gift card instead of a card refund. |
| My Account → Payment methods | Where logged-in shoppers manage the cards they saved at checkout. |
Test everything first. Connect in test mode (or paste a test key) and place practice orders: checkout, a gift-card purchase, a gift-card redemption, and a refund. None of it moves real money, and test orders never appear in your live Transactions. Card 4242 4242 4242 4242 approves; 4000 0000 0000 0002 rehearses a decline. When it all looks right, switch to your live connection.